
Operating Guide
Page 8
...of that you have the following items supplied with your camcorder. AC Adaptor (1) (p. 9) Wireless Remote Commander (1) A button-type lithium battery is already installed. Picture Motion Browser Guide - Handycam Handbook (PDF) "Operating Guide" (This manual) ...sheet before using the Remote Commander. Insulation sheet Power cord (1) (p. 9) Handycam Station (1) (p. 9) Rechargeable battery pack NP-FH60 (1) (p. 9) Component video cable (1) (p. 16) A/V connecting cable (1) (p. 16) USB cable (1) (p. 30) CD-ROM "Handycam Application Software" (1) (p. 26) - Picture Motion Browser (Software) -...
...of that you have the following items supplied with your camcorder. AC Adaptor (1) (p. 9) Wireless Remote Commander (1) A button-type lithium battery is already installed. Picture Motion Browser Guide - Handycam Handbook (PDF) "Operating Guide" (This manual) ...sheet before using the Remote Commander. Insulation sheet Power cord (1) (p. 9) Handycam Station (1) (p. 9) Rechargeable battery pack NP-FH60 (1) (p. 9) Component video cable (1) (p. 16) A/V connecting cable (1) (p. 16) USB cable (1) (p. 30) CD-ROM "Handycam Application Software" (1) (p. 26) - Picture Motion Browser (Software) -...
Operating Guide
Page 19
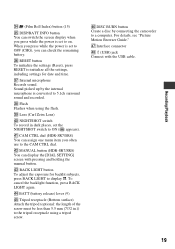
... Records sound. NIGHTSHOT switch To record in .)) to ON ( appears). ra CAM CTRL dial (HDR-SR7/SR8) You can display the [DIAL SETTING] screen with the USB cable. 19 rj Interface connector rk (USB) jack Connect with pressing and holding the manual button. To cancel the backlight function, press BACK ... LIGHT to display .. rh DISC BURN button Create a disc by the internal microphone is set to on. Sound picked up by connecting the camcorder to a computer. Recording/Playback ef (Film Roll Index) button (15) eg DISP/BATT INFO button You can switch the screen display when you...
... Records sound. NIGHTSHOT switch To record in .)) to ON ( appears). ra CAM CTRL dial (HDR-SR7/SR8) You can display the [DIAL SETTING] screen with the USB cable. 19 rj Interface connector rk (USB) jack Connect with pressing and holding the manual button. To cancel the backlight function, press BACK ... LIGHT to display .. rh DISC BURN button Create a disc by the internal microphone is set to on. Sound picked up by connecting the camcorder to a computer. Recording/Playback ef (Film Roll Index) button (15) eg DISP/BATT INFO button You can switch the screen display when you...
Operating Guide
Page 27
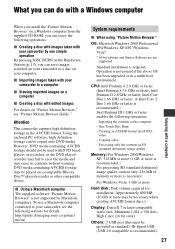
... However, DVD media containing AVCHD footage should not be played on a computer x Creating a disc with your camcorder, see "Picture Motion Browser Guide." http://guide.d-imaging.sony.co.jp/mac/ ms/us/ System requirements x When using "Picture Motion Browser" OS: Microsoft Windows 2000 ... recorders, as standard), Hi-Speed USB (USB 2.0 compatible is not supported by one simple operation By pressing DISC BURN on the Handycam Station (p. 19), you can save images recorded on your camcorder to a disc on your computer. Attention This camcorder captures high definition footage in a multi...
... However, DVD media containing AVCHD footage should not be played on a computer x Creating a disc with your camcorder, see "Picture Motion Browser Guide." http://guide.d-imaging.sony.co.jp/mac/ ms/us/ System requirements x When using "Picture Motion Browser" OS: Microsoft Windows 2000 ... recorders, as standard), Hi-Speed USB (USB 2.0 compatible is not supported by one simple operation By pressing DISC BURN on the Handycam Station (p. 19), you can save images recorded on your camcorder to a disc on your computer. Attention This camcorder captures high definition footage in a multi...

Operating Guide
Page 29
...* Software required to install the required software. - The installation is complete. 12Remove the CD-ROM from the disc drive of your camcorder. 9 Click [Next] on the connection confirmation screen of the computer. 10Follow the on-screen instructions to install the software. Enjoying with ...a computer 2 Set the camcorder onto the Handycam Station, then slide the POWER switch to turn on. 3 Connect the (USB) jack of the Handycam Station to the (USB) jack of the computer using the supplied USB cable. 4 Touch [ COMPUTER] on the LCD screen of...
...* Software required to install the required software. - The installation is complete. 12Remove the CD-ROM from the disc drive of your camcorder. 9 Click [Next] on the connection confirmation screen of the computer. 10Follow the on-screen instructions to install the software. Enjoying with ...a computer 2 Set the camcorder onto the Handycam Station, then slide the POWER switch to turn on. 3 Connect the (USB) jack of the Handycam Station to the (USB) jack of the computer using the supplied USB cable. 4 Touch [ COMPUTER] on the LCD screen of...
Operating Guide
Page 30
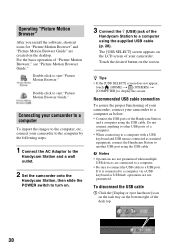
... functioning of your camcorder, connect your camcorder. Double-click to another USB port using the USB cable. Operating "Picture Motion Browser" After you install the software, shortcut icons for "Picture Motion Browser" and "Picture Motion Browser Guide" are created on . 3 Connect the (USB) jack of the Handycam Station to a computer via a USB keyboard or USB hub, operations are...
... functioning of your camcorder, connect your camcorder. Double-click to another USB port using the USB cable. Operating "Picture Motion Browser" After you install the software, shortcut icons for "Picture Motion Browser" and "Picture Motion Browser Guide" are created on . 3 Connect the (USB) jack of the Handycam Station to a computer via a USB keyboard or USB hub, operations are...
Operating Guide
Page 31
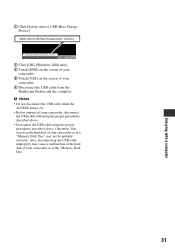
...of your camcorder. 6 Disconnect the USB cable from the Handycam Station and the computer. Enjoying with a computer 2 Click [Safely remove USB Mass Storage Device]. 3 Click [OK] (Windows 2000 only). 4 Touch [END] on the screen of your camcorder. 5 Touch [YES] on the hard disk of your camcorder or ...b Notes • Do not disconnect the USB cable while the ACCESS lamp is lit. • Before turning off your camcorder or of your camcorder, disconnect the USB cable following the proper procedures described above. • Disconnect the USB cable using the proper procedures described above. ...
...of your camcorder. 6 Disconnect the USB cable from the Handycam Station and the computer. Enjoying with a computer 2 Click [Safely remove USB Mass Storage Device]. 3 Click [OK] (Windows 2000 only). 4 Touch [END] on the screen of your camcorder. 5 Touch [YES] on the hard disk of your camcorder or ...b Notes • Do not disconnect the USB cable while the ACCESS lamp is lit. • Before turning off your camcorder or of your camcorder, disconnect the USB cable following the proper procedures described above. • Disconnect the USB cable using the proper procedures described above. ...

Operating Guide
Page 33
... starts from the computer and the Handycam Station, and restart the computer, then connect the computer and your camcorder. • Disconnect the USB cable from "E." 101-0001 (Warning indicator pertaining to install it. • Install it in the viewfinder (HDR-SR7/SR8) or on the media check tool...number of movie scenes or still images exceeds the recordable capacity of your Sony dealer or local authorized Sony service facility. You cannot make new recording during this period. • The hard disk of the camcorder is not an "InfoLITHIUM" battery pack (H series). Self-diagnosis display...
... starts from the computer and the Handycam Station, and restart the computer, then connect the computer and your camcorder. • Disconnect the USB cable from "E." 101-0001 (Warning indicator pertaining to install it. • Install it in the viewfinder (HDR-SR7/SR8) or on the media check tool...number of movie scenes or still images exceeds the recordable capacity of your Sony dealer or local authorized Sony service facility. You cannot make new recording during this period. • The hard disk of the camcorder is not an "InfoLITHIUM" battery pack (H series). Self-diagnosis display...
Operating Guide
Page 38
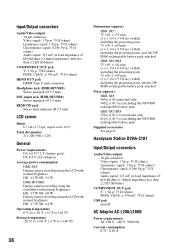
...) main unit only 540 g (1 lb 3 oz) including the NP-FH60 rechargeable battery pack HDR-SR7/SR8: 530 g (1 lb 2 oz) main unit only 610 g (1 lb 5 oz) including the NP-FH60 rechargeable battery pack Supplied accessories See page 8. Handycam Station DCRA-C181 Input/Output connectors Audio/Video output 10-pin connector Video signal: 1 Vp... impedance with less than 2.2 kΩ (kilohms) COMPONENT OUT jack Y: 1 Vp-p, 75 Ω (ohms) PB/PR, CB/CR: ± 350 mV, 75 Ω (ohms) USB jack mini-B AC Adaptor AC-L200/L200B Power requirements AC 100 V - 240 V, 50/60 Hz Current consumption 0.35 - 0.18 A
...) main unit only 540 g (1 lb 3 oz) including the NP-FH60 rechargeable battery pack HDR-SR7/SR8: 530 g (1 lb 2 oz) main unit only 610 g (1 lb 5 oz) including the NP-FH60 rechargeable battery pack Supplied accessories See page 8. Handycam Station DCRA-C181 Input/Output connectors Audio/Video output 10-pin connector Video signal: 1 Vp... impedance with less than 2.2 kΩ (kilohms) COMPONENT OUT jack Y: 1 Vp-p, 75 Ω (ohms) PB/PR, CB/CR: ± 350 mV, 75 Ω (ohms) USB jack mini-B AC Adaptor AC-L200/L200B Power requirements AC 100 V - 240 V, 50/60 Hz Current consumption 0.35 - 0.18 A


