Operating Guide
Page 5
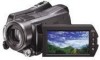
... of California, USA only Perchlorate Material - Reorient or relocate the receiving antenna. - Handycam Handbook (PDF) • "Operating Guide" (This manual) (1) US A B C D Using the camcorder • The camcorder is connected. - Eject the "Memory Stick PRO Duo" - Remove the battery pack or AC...mode lamps or the ACCESS lamps (p. 13, 17) are lit or flashing. Apply mechanical shock or vibration to the camcorder • When connecting your camcorder. See "Precautions" (p. 32). • Do not do any changes or modifications not expressly approved in accordance with...
... of California, USA only Perchlorate Material - Reorient or relocate the receiving antenna. - Handycam Handbook (PDF) • "Operating Guide" (This manual) (1) US A B C D Using the camcorder • The camcorder is connected. - Eject the "Memory Stick PRO Duo" - Remove the battery pack or AC...mode lamps or the ACCESS lamps (p. 13, 17) are lit or flashing. Apply mechanical shock or vibration to the camcorder • When connecting your camcorder. See "Precautions" (p. 32). • Do not do any changes or modifications not expressly approved in accordance with...
Operating Guide
Page 6
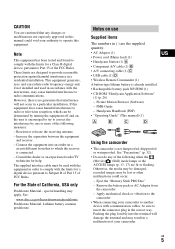
... in such situations. Insulation sheet Types of "Memory Stick" you may damage the hard disk drive of your camcorder. However, there may also be saved or recorded. • Connect cables to the connectors of the Handycam Station when using your images on some tiny black points and/or bright points (white, red, blue...
... in such situations. Insulation sheet Types of "Memory Stick" you may damage the hard disk drive of your camcorder. However, there may also be saved or recorded. • Connect cables to the connectors of the Handycam Station when using your images on some tiny black points and/or bright points (white, red, blue...
Operating Guide
Page 7
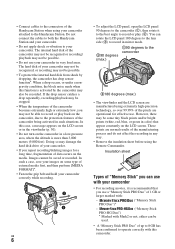
When the camcorder is connected to a computer • Do not try to a malfunction of the camcorder, recording media, etc. • TV color systems differ depending on the country/region. ... It is recommended that you cannot play back images recorded with the following devices; - Also, when you dispose of the camcorder, it is compatible with High Profile - Change the screen language before using a computer. Note on a TV, you may... problems. • Compensation for the contents of recordings cannot be contrary to "Handycam Handbook" (PDF) and "PMB Guide." US 7
When the camcorder is connected to a computer • Do not try to a malfunction of the camcorder, recording media, etc. • TV color systems differ depending on the country/region. ... It is recommended that you cannot play back images recorded with the following devices; - Also, when you dispose of the camcorder, it is compatible with High Profile - Change the screen language before using a computer. Note on a TV, you may... problems. • Compensation for the contents of recordings cannot be contrary to "Handycam Handbook" (PDF) and "PMB Guide." US 7
Operating Guide
Page 9
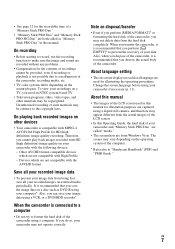
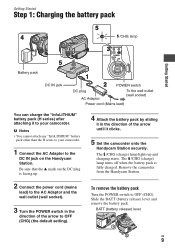
...outlet (wall socket) Power cord (Mains lead) You can charge the "InfoLITHIUM" battery pack (H series) after attaching it clicks. 5 Set the camcorder onto the Handycam Station securely. The /CHG (charge) lamp lights up . 4 Attach the battery pack by sliding it in the direction of the arrow until ...) (the default setting). The /CHG (charge) lamp turns off when the battery pack is facing up and charging starts. Remove the camcorder from the Handycam Station. 2 Connect the power cord (mains lead) to the AC Adaptor and the wall outlet (wall socket). 3 Turn the POWER switch in the direction...
...outlet (wall socket) Power cord (Mains lead) You can charge the "InfoLITHIUM" battery pack (H series) after attaching it clicks. 5 Set the camcorder onto the Handycam Station securely. The /CHG (charge) lamp lights up . 4 Attach the battery pack by sliding it in the direction of the arrow until ...) (the default setting). The /CHG (charge) lamp turns off when the battery pack is facing up and charging starts. Remove the camcorder from the Handycam Station. 2 Connect the power cord (mains lead) to the AC Adaptor and the wall outlet (wall socket). 3 Turn the POWER switch in the direction...
Operating Guide
Page 10
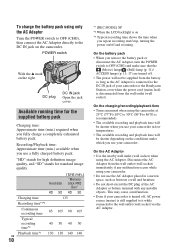
...will not be supplied from the battery as long as between a wall and furniture. • Do not short-circuit the DC plug of your camcorder or the Handycam Station, even when the power cord (mains lead) is disconnected from the wall outlet (wall socket) immediately if any metallic objects. "HD" stands...77°F) (10°C to 30°C (50°F to 86°F) is still supplied to it while connected to the DC IN jack on the conditions under which you use your camcorder. Available running time for standard image quality. On the AC Adaptor • Use the nearby wall outlet (wall ...
...will not be supplied from the battery as long as between a wall and furniture. • Do not short-circuit the DC plug of your camcorder or the Handycam Station, even when the power cord (mains lead) is disconnected from the wall outlet (wall socket) immediately if any metallic objects. "HD" stands...77°F) (10°C to 30°C (50°F to 86°F) is still supplied to it while connected to the DC IN jack on the conditions under which you use your camcorder. Available running time for standard image quality. On the AC Adaptor • Use the nearby wall outlet (wall ...
Operating Guide
Page 16
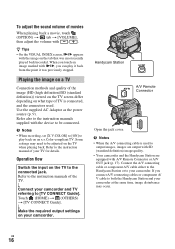
... most recently played back/recorded. Operation flow Switch the input on an x.v.Color-compliant TV. b Notes • When the A/V connecting cable is connected, and the connectors used to both the Handycam Station and your camcorder. US 16 Use the supplied AC Adaptor as the power source (p. 9). Refer to the instruction manual of movies When...
... most recently played back/recorded. Operation flow Switch the input on an x.v.Color-compliant TV. b Notes • When the A/V connecting cable is connected, and the connectors used to both the Handycam Station and your camcorder. US 16 Use the supplied AC Adaptor as the power source (p. 9). Refer to the instruction manual of movies When...
Operating Guide
Page 18
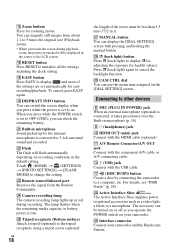
...settings are set to OFF (CHG), you can switch the screen display when you press while the power is set to on your camcorder and the Handycam Station. ql DISP/BATT INFO button You can check the remaining battery. When you touched will flash automatically depending on the [DIAL ... Interface Shoe supplies power to 5 times the original size (Playback zoom). • When you operate the POWER switch on . wg Interface connector Connect your camcorder. wl CAM CTRL dial You can magnify still images from the Remote Commander. ws Flash The flash will be displayed in .)). qj (DISC BURN...
...settings are set to OFF (CHG), you can switch the screen display when you press while the power is set to on your camcorder and the Handycam Station. ql DISP/BATT INFO button You can check the remaining battery. When you touched will flash automatically depending on the [DIAL ... Interface Shoe supplies power to 5 times the original size (Playback zoom). • When you operate the POWER switch on . wg Interface connector Connect your camcorder. wl CAM CTRL dial You can magnify still images from the Remote Commander. ws Flash The flash will be displayed in .)). qj (DISC BURN...
Operating Guide
Page 20
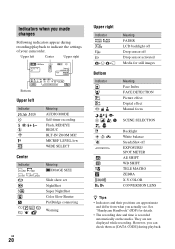
...WIDE SELECT Meaning IMAGE SIZE Slide show set NightShot Super NightShot Color Slow Shutter PictBridge connecting Warning US 20 Upper right Indicator Bottom Indicator 9 . However, you can check ...them as [DATA CODE] during recording/playback to indicate the settings of your camcorder. Indicators when you made changes Following indicators appear during playback. n Meaning FADER LCD ...LENS z Tips • Indicators and their positions are not displayed while recording. See "Handycam Handbook" (PDF) for still images Meaning Face Index FACE DETECTION Picture effect Digital effect...
...WIDE SELECT Meaning IMAGE SIZE Slide show set NightShot Super NightShot Color Slow Shutter PictBridge connecting Warning US 20 Upper right Indicator Bottom Indicator 9 . However, you can check ...them as [DATA CODE] during recording/playback to indicate the settings of your camcorder. Indicators when you made changes Following indicators appear during playback. n Meaning FADER LCD ...LENS z Tips • Indicators and their positions are not displayed while recording. See "Handycam Handbook" (PDF) for still images Meaning Face Index FACE DETECTION Picture effect Digital effect...
Operating Guide
Page 22
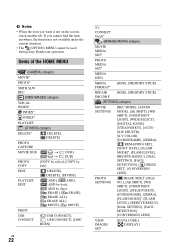
If you want is not available under the current situation. • The (OPTION) MENU cannot be used during Easy Handycam operation. Items of the HOME MENU (CAMERA) category MOVIE* PHOTO* SMTH SLW REC (VIEW IMAGES) category VISUAL INDEX* INDEX* INDEX... [ ADD by date], [ ADD by date], [ ERASE], [ ERASE], [ ERASE ALL], [ ERASE ALL], [ MOVE], [ MOVE] PRINT USB CONNECT [ USB CONNECT], [ USB CONNECT], [DISC BURN] US 22 TV CONNECT Guide* (MANAGE MEDIA) category MOVIE MEDIA SET* PHOTO MEDIA SET* MEDIA INFO MEDIA [HDD], [MEMORY STICK] FORMAT* REPAIR [HDD], [MEMORY STICK] IMG...
If you want is not available under the current situation. • The (OPTION) MENU cannot be used during Easy Handycam operation. Items of the HOME MENU (CAMERA) category MOVIE* PHOTO* SMTH SLW REC (VIEW IMAGES) category VISUAL INDEX* INDEX* INDEX... [ ADD by date], [ ADD by date], [ ERASE], [ ERASE], [ ERASE ALL], [ ERASE ALL], [ MOVE], [ MOVE] PRINT USB CONNECT [ USB CONNECT], [ USB CONNECT], [DISC BURN] US 22 TV CONNECT Guide* (MANAGE MEDIA) category MOVIE MEDIA SET* PHOTO MEDIA SET* MEDIA INFO MEDIA [HDD], [MEMORY STICK] FORMAT* REPAIR [HDD], [MEMORY STICK] IMG...
Operating Guide
Page 24
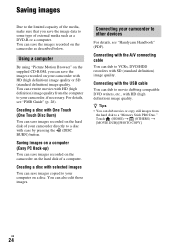
...high definition) image quality. You can dub movies or copy still images from the computer to your camcorder directly to other devices For details, see "PMB Guide" (p. 28). Connecting your camcorder with ease by pressing the (DISC BURN) button. Saving images Due to the limited capacity of...recorders with HD (high definition) image quality from the hard disk to a "Memory Stick PRO Duo." For details, see "Handycam Handbook" (PDF). Connecting with the A/V connecting cable You can save the images recorded on the hard disk of external media such as described below. z Tips • ...
...high definition) image quality. You can dub movies or copy still images from the computer to your camcorder directly to other devices For details, see "PMB Guide" (p. 28). Connecting your camcorder with ease by pressing the (DISC BURN) button. Saving images Due to the limited capacity of...recorders with HD (high definition) image quality from the hard disk to a "Memory Stick PRO Duo." For details, see "Handycam Handbook" (PDF). Connecting with the A/V connecting cable You can save the images recorded on the hard disk of external media such as described below. z Tips • ...
Operating Guide
Page 26
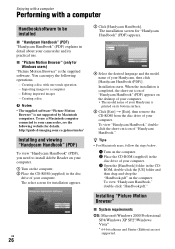
...Macintosh users, follow the steps below. 1 Turn on its practical use a Macintosh computer connected to be installed x "Handycam Handbook" (PDF) "Handycam Handbook" (PDF) explains in detail about your camcorder and its bottom surface. 5 Click [Exit] t [Exit], then remove the CD-ROM... your Handycam, then click [Handycam Handbook (PDF)]. US 26 3 Click [Handycam Handbook]. The select screen for details. To view "Handycam Handbook," double-click "Handbook.pdf." http://guide.d-imaging.sony.co.jp/mac/ms/us/ Installing and viewing "Handycam Handbook" (PDF) To view "Handycam Handbook"...
...Macintosh users, follow the steps below. 1 Turn on its practical use a Macintosh computer connected to be installed x "Handycam Handbook" (PDF) "Handycam Handbook" (PDF) explains in detail about your camcorder and its bottom surface. 5 Click [Exit] t [Exit], then remove the CD-ROM... your Handycam, then click [Handycam Handbook (PDF)]. US 26 3 Click [Handycam Handbook]. The select screen for details. To view "Handycam Handbook," double-click "Handbook.pdf." http://guide.d-imaging.sony.co.jp/mac/ms/us/ Installing and viewing "Handycam Handbook" (PDF) To view "Handycam Handbook"...
Operating Guide
Page 27
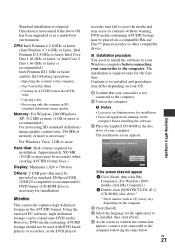
... enclosed PC software, high definition footage can be installed, then click [Next]. 6 As the screen to confirm the connection appears, connect your camcorder is necessary. x Installation procedure You need to install the software to your computer. Contents to be installed and procedures ...may be provided as an Administrator for installation. • Close all applications running on the computer before connecting your camcorder to the computer. Copying a disc - The installation is recommended.) Intel Pentium III 1 GHz or faster enables the following...
... enclosed PC software, high definition footage can be installed, then click [Next]. 6 As the screen to confirm the connection appears, connect your camcorder is necessary. x Installation procedure You need to install the software to your computer. Contents to be installed and procedures ...may be provided as an Administrator for installation. • Close all applications running on the computer before connecting your camcorder to the computer. Copying a disc - The installation is recommended.) Intel Pentium III 1 GHz or faster enables the following...
Operating Guide
Page 28
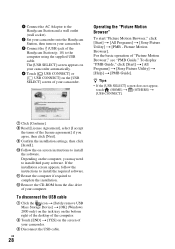
... to the computer using the supplied USB cable. For the basic operation of your camcorder. 1 Connect the AC Adaptor to the Handycam Station and a wall outlet (wall socket). 2 Set your camcorder onto the Handycam Station, then turn on your camcorder. 3 Disconnect the USB cable. Operating the "Picture Motion Browser" To start ... the disc drive of "Picture Motion Browser," see "PMB Guide." To display "PMB Guide," click [Start] t [All Programs] t [Sony Picture Utility] t [Help] t [PMB Guide]. If the installation screen appears, follow the instructions to complete the installation.
... to the computer using the supplied USB cable. For the basic operation of your camcorder. 1 Connect the AC Adaptor to the Handycam Station and a wall outlet (wall socket). 2 Set your camcorder onto the Handycam Station, then turn on your camcorder. 3 Disconnect the USB cable. Operating the "Picture Motion Browser" To start ... the disc drive of "Picture Motion Browser," see "PMB Guide." To display "PMB Guide," click [Start] t [All Programs] t [Sony Picture Utility] t [Help] t [PMB Guide]. If the installation screen appears, follow the instructions to complete the installation.
Operating Guide
Page 29
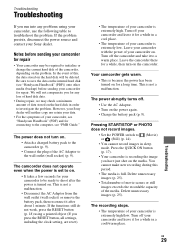
... have just shot on the media. However, your Sony dealer will neither copy nor retain your data. • For the symptoms of your camcorder for a long time. Leave your camcorder with the power of your camcorder for connecting to the computer, see "Handycam Handbook" (PDF) and for repair. Your camcorder gets warm. • This is set to...
... have just shot on the media. However, your Sony dealer will neither copy nor retain your data. • For the symptoms of your camcorder for a long time. Leave your camcorder with the power of your camcorder for connecting to the computer, see "Handycam Handbook" (PDF) and for repair. Your camcorder gets warm. • This is set to...
Operating Guide
Page 30
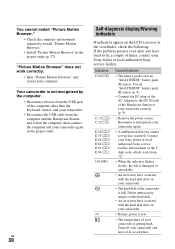
...battery pack is not recognized by the computer. • Disconnect devices from the computer and the Handycam Station, and restart the computer, then connect the computer and your Sony dealer or local authorized Sony service facility. Inform them of the 5digit code, which starts from "E." • When the...may have tried to fix a couple of the computer other than the keyboard, mouse, and your camcorder. • Disconnect the USB cable from the USB jack of times, contact your camcorder again in the proper order (p. 27). You cannot install "Picture Motion Browser." • Check ...
...battery pack is not recognized by the computer. • Disconnect devices from the computer and the Handycam Station, and restart the computer, then connect the computer and your Sony dealer or local authorized Sony service facility. Inform them of the 5digit code, which starts from "E." • When the...may have tried to fix a couple of the computer other than the keyboard, mouse, and your camcorder. • Disconnect the USB cable from the USB jack of times, contact your camcorder again in the proper order (p. 27). You cannot install "Picture Motion Browser." • Check ...
Operating Guide
Page 33
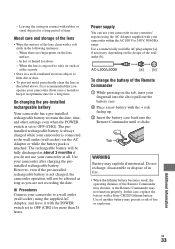
...Commander 1 While pressing on the tab, inset your camcorder in any countries/ regions using the supplied AC Adaptor, and leave it in contact with a Sony CR2025 lithium battery. However, even if the pre-installed rechargeable battery is connected to salty air such as you do not use... your fingernail into the slit to OFF (CHG). The preinstalled rechargeable battery is always charged while your camcorder after charging the ...
...Commander 1 While pressing on the tab, inset your camcorder in any countries/ regions using the supplied AC Adaptor, and leave it in contact with a Sony CR2025 lithium battery. However, even if the pre-installed rechargeable battery is connected to salty air such as you do not use... your fingernail into the slit to OFF (CHG). The preinstalled rechargeable battery is always charged while your camcorder after charging the ...


