Operating Guide
Page 5
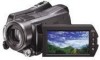
...battery is already installed. • Rechargeable battery pack NP-FH60 (1) • CD-ROM "Handycam Application Software" (1) (p. 26) - However, there is connected. - For the State of your camcorder. Increase the separation between the equipment and receiver. - Consult the dealer or an experienced radio... and, if not installed and used with the equipment in this equipment. Handycam Handbook (PDF) • "Operating Guide" (This manual) (1) US A B C D Using the camcorder • The camcorder is encouraged to try to operate this manual could occur. - Otherwise,...
...battery is already installed. • Rechargeable battery pack NP-FH60 (1) • CD-ROM "Handycam Application Software" (1) (p. 26) - However, there is connected. - For the State of your camcorder. Increase the separation between the equipment and receiver. - Consult the dealer or an experienced radio... and, if not installed and used with the equipment in this equipment. Handycam Handbook (PDF) • "Operating Guide" (This manual) (1) US A B C D Using the camcorder • The camcorder is encouraged to try to operate this manual could occur. - Otherwise,...
Operating Guide
Page 6
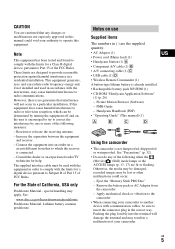
... the hard disk drive of your camcorder. • If you may be saved or recorded. When a drop occurs, or under a nongravity condition, the block noise made when this camcorder. Do not connect the cables to both the Handycam Station and your camcorder. • Do not apply shock... or vibration to the Handycam Station. The internal hard disk of external media first, and then perform [MEDIA ...
... the hard disk drive of your camcorder. • If you may be saved or recorded. When a drop occurs, or under a nongravity condition, the block noise made when this camcorder. Do not connect the cables to both the Handycam Station and your camcorder. • Do not apply shock... or vibration to the Handycam Station. The internal hard disk of external media first, and then perform [MEDIA ...
Operating Guide
Page 7
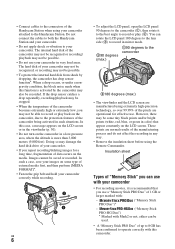
... screenshots are from the actual images of the LCD screen. • In this Operating Guide, the hard disk of the camcorder. When the camcorder is connected to a computer • Do not try to "Handycam Handbook" (PDF) and "PMB Guide." When you transfer the camcorder, it is recommended that you perform [ EMPTY]* to a malfunction of the...
... screenshots are from the actual images of the LCD screen. • In this Operating Guide, the hard disk of the camcorder. When the camcorder is connected to a computer • Do not try to "Handycam Handbook" (PDF) and "PMB Guide." When you transfer the camcorder, it is recommended that you perform [ EMPTY]* to a malfunction of the...
Operating Guide
Page 9
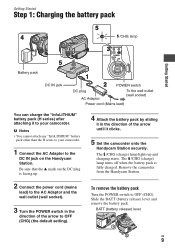
Be sure that the v mark on the Handycam Station. Remove the camcorder from the Handycam Station. 2 Connect the power cord (mains lead) to the AC Adaptor and the wall... up . 4 Attach the battery pack by sliding it in the direction of the arrow until it to your camcorder. 1 Connect the AC Adaptor to the DC IN jack on the DC plug is fully charged. The /CHG (charge) ... the "InfoLITHIUM" battery pack (H series) after attaching it clicks. 5 Set the camcorder onto the Handycam Station securely. b Notes • You cannot attach any "InfoLITHIUM" battery pack other than the H series to your...
Be sure that the v mark on the Handycam Station. Remove the camcorder from the Handycam Station. 2 Connect the power cord (mains lead) to the AC Adaptor and the wall... up . 4 Attach the battery pack by sliding it in the direction of the arrow until it to your camcorder. 1 Connect the AC Adaptor to the DC IN jack on the DC plug is fully charged. The /CHG (charge) ... the "InfoLITHIUM" battery pack (H series) after attaching it clicks. 5 Set the camcorder onto the Handycam Station securely. b Notes • You cannot attach any "InfoLITHIUM" battery pack other than the H series to your...
Operating Guide
Page 10
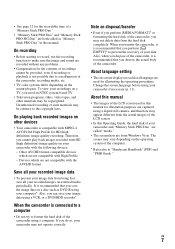
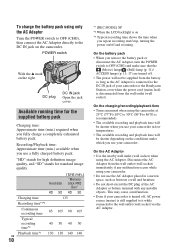
... will not be supplied from the battery as long as between a wall and furniture. • Do not short-circuit the DC plug of your camcorder or the Handycam Station, even when the power cord (mains lead) is on *3 Typical recording time shows the time when you use a fully charged battery pack. On... image quality, and "SD" stands for the supplied battery pack Charging time: Approximate time (min.) required when you use your camcorder in a narrow space, such as the AC Adaptor is connected to the DC IN jack on the right DC plug DC IN jack Open the jack cover. POWER switch With the...
... will not be supplied from the battery as long as between a wall and furniture. • Do not short-circuit the DC plug of your camcorder or the Handycam Station, even when the power cord (mains lead) is on *3 Typical recording time shows the time when you use a fully charged battery pack. On... image quality, and "SD" stands for the supplied battery pack Charging time: Approximate time (min.) required when you use your camcorder in a narrow space, such as the AC Adaptor is connected to the DC IN jack on the right DC plug DC IN jack Open the jack cover. POWER switch With the...
Operating Guide
Page 16
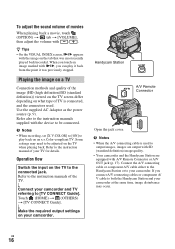
...Adaptor as the power source (p. 9). Refer also to the instruction manuals supplied with i/B, you connect A/V connecting cables or component A/ V cable to both the Handycam Station and your camcorder at the same time, image disturbance may need to be adjusted on an x.v.Color-compliant ... (standard definition) image quality. • Your camcorder and the Handycam Station are equipped with / . Handycam Station A/V Remote Connector Open the jack cover. b Notes • When the A/V connecting cable is connected, and the connectors used to the connected jack. If you can play back on the ...
...Adaptor as the power source (p. 9). Refer also to the instruction manuals supplied with i/B, you connect A/V connecting cables or component A/ V cable to both the Handycam Station and your camcorder at the same time, image disturbance may need to be adjusted on an x.v.Color-compliant ... (standard definition) image quality. • Your camcorder and the Handycam Station are equipped with / . Handycam Station A/V Remote Connector Open the jack cover. b Notes • When the A/V connecting cable is connected, and the connectors used to the connected jack. If you can play back on the ...
Operating Guide
Page 18
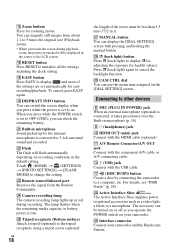
... Active Interface Shoe The Active Interface Shoe supplies power to OFF (CHG), you can use the menu item assigned on your camcorder and the Handycam Station. The accessory can magnify still images from the Remote Commander. When you press while the POWER switch is set to ...a disc by the internal microphone is set automatically for easy recording/playback. wf Camera recording lamp The camera recording lamp lights up by connecting the camcorder to 5.1ch surround sound and recorded. To cancel, press EASY again. wa Built-in microphone Sound picked up in the default setting...
... Active Interface Shoe The Active Interface Shoe supplies power to OFF (CHG), you can use the menu item assigned on your camcorder and the Handycam Station. The accessory can magnify still images from the Remote Commander. When you press while the POWER switch is set to ...a disc by the internal microphone is set automatically for easy recording/playback. wf Camera recording lamp The camera recording lamp lights up by connecting the camcorder to 5.1ch surround sound and recorded. To cancel, press EASY again. wa Built-in microphone Sound picked up in the default setting...
Operating Guide
Page 20
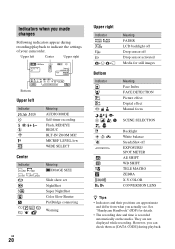
...are approximate and differ from what you can check them as [DATA CODE] during recording/playback to indicate the settings of your camcorder. See "Handycam Handbook" (PDF) for still images Meaning Face Index FACE DETECTION Picture effect Digital effect Manual focus SCENE SELECTION Backlight White balance... REDUC BLT-IN ZOOM MIC MICREF LEVEL low WIDE SELECT Meaning IMAGE SIZE Slide show set NightShot Super NightShot Color Slow Shutter PictBridge connecting Warning US 20 Upper right Indicator Bottom Indicator 9 . n Meaning FADER LCD backlight off Drop sensor off EXPOSURE/ SPOT METER AE...
...are approximate and differ from what you can check them as [DATA CODE] during recording/playback to indicate the settings of your camcorder. See "Handycam Handbook" (PDF) for still images Meaning Face Index FACE DETECTION Picture effect Digital effect Manual focus SCENE SELECTION Backlight White balance... REDUC BLT-IN ZOOM MIC MICREF LEVEL low WIDE SELECT Meaning IMAGE SIZE Slide show set NightShot Super NightShot Color Slow Shutter PictBridge connecting Warning US 20 Upper right Indicator Bottom Indicator 9 . n Meaning FADER LCD backlight off Drop sensor off EXPOSURE/ SPOT METER AE...
Operating Guide
Page 22
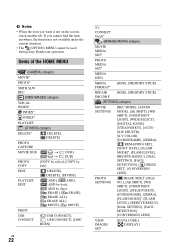
...], [DIVIDE] PLAYLIST [ ADD], [ ADD], EDIT [ ADD by date], [ ADD by date], [ ERASE], [ ERASE], [ ERASE ALL], [ ERASE ALL], [ MOVE], [ MOVE] PRINT USB CONNECT [ USB CONNECT], [ USB CONNECT], [DISC BURN] US 22 TV CONNECT Guide* (MANAGE MEDIA) category MOVIE MEDIA SET* PHOTO MEDIA SET* MEDIA INFO MEDIA [HDD], [MEMORY STICK] FORMAT* REPAIR [HDD], [MEMORY STICK] IMG...] VIEW IMAGES SET [DATA CODE], [ DISPLAY] If you want is not available under the current situation. • The (OPTION) MENU cannot be used during Easy Handycam operation.
...], [DIVIDE] PLAYLIST [ ADD], [ ADD], EDIT [ ADD by date], [ ADD by date], [ ERASE], [ ERASE], [ ERASE ALL], [ ERASE ALL], [ MOVE], [ MOVE] PRINT USB CONNECT [ USB CONNECT], [ USB CONNECT], [DISC BURN] US 22 TV CONNECT Guide* (MANAGE MEDIA) category MOVIE MEDIA SET* PHOTO MEDIA SET* MEDIA INFO MEDIA [HDD], [MEMORY STICK] FORMAT* REPAIR [HDD], [MEMORY STICK] IMG...] VIEW IMAGES SET [DATA CODE], [ DISPLAY] If you want is not available under the current situation. • The (OPTION) MENU cannot be used during Easy Handycam operation.
Operating Guide
Page 24
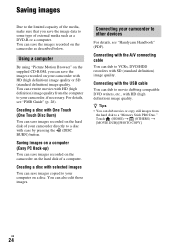
... the hard disk of a computer. You can save images recorded on the hard disk of your camcorder directly to a disc with ease by pressing the (DISC BURN) button. Connecting your camcorder, if necessary. US 24 For details, see "Handycam Handbook" (PDF). Touch (HOME) t (OTHERS) t [MOVIE DUB]/[PHOTO COPY]. Creating a disc with selected images You...
... the hard disk of a computer. You can save images recorded on the hard disk of your camcorder directly to a disc with ease by pressing the (DISC BURN) button. Connecting your camcorder, if necessary. US 24 For details, see "Handycam Handbook" (PDF). Touch (HOME) t (OTHERS) t [MOVIE DUB]/[PHOTO COPY]. Creating a disc with selected images You...
Operating Guide
Page 26
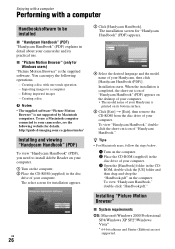
.... 4 Select the desired language and the model name of your Handycam, then click [Handycam Handbook (PDF)]. http://guide.d-imaging.sony.co.jp/mac/ms/us/ Installing and viewing "Handycam Handbook" (PDF) To view "Handycam Handbook" (PDF), you need to install Adobe Reader on your ...appears. Creating a disc with a computer Handbook/software to be installed x "Handycam Handbook" (PDF) "Handycam Handbook" (PDF) explains in the disc drive of your camcorder and its practical use a Macintosh computer connected to your computer. Creating a disc b Notes • The supplied software ...
.... 4 Select the desired language and the model name of your Handycam, then click [Handycam Handbook (PDF)]. http://guide.d-imaging.sony.co.jp/mac/ms/us/ Installing and viewing "Handycam Handbook" (PDF) To view "Handycam Handbook" (PDF), you need to install Adobe Reader on your ...appears. Creating a disc with a computer Handbook/software to be installed x "Handycam Handbook" (PDF) "Handycam Handbook" (PDF) explains in the disc drive of your camcorder and its practical use a Macintosh computer connected to your computer. Creating a disc b Notes • The supplied software ...
Operating Guide
Page 27
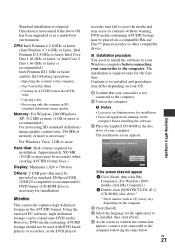
...(E:)) may be copied onto DVD media. Creating an AVCHD format disc/DVDvideo - x Installation procedure You need to install the software to your camcorder to the computer following operations: - If the screen does not appear 1 Click [Start], then click [My Computer]. (For Windows 2000,...(1 GB or more is recommended.) For processing SD (standard definition) image quality content only, 256 MB of your camcorder to confirm the connection appears, connect your Windows computer before installing the software. 3 Place the supplied CD-ROM in the AVCHD format. Using the enclosed...
...(E:)) may be copied onto DVD media. Creating an AVCHD format disc/DVDvideo - x Installation procedure You need to install the software to your camcorder to the computer following operations: - If the screen does not appear 1 Click [Start], then click [My Computer]. (For Windows 2000,...(1 GB or more is recommended.) For processing SD (standard definition) image quality content only, 256 MB of your camcorder to confirm the connection appears, connect your Windows computer before installing the software. 3 Place the supplied CD-ROM in the AVCHD format. Using the enclosed...
Operating Guide
Page 28
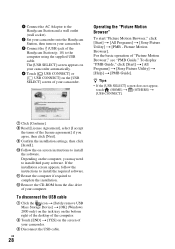
...agree, then click [Next]. 9 Confirm the installation settings, then click [Install]. 0 Follow the on your camcorder. 3 Connect the (USB) jack of the license agreement] if you may need to install third party software. qa ...camcorder automatically. 4 Touch [ USB CONNECT] or [ USB CONNECT] on the screen of your camcorder. Operating the "Picture Motion Browser" To start "Picture Motion Browser," click [Start] t [All Programs] t [Sony Picture Utility] t [PMB - 1 Connect the AC Adaptor to the Handycam Station and a wall outlet (wall socket). 2 Set your camcorder onto the Handycam...
...agree, then click [Next]. 9 Confirm the installation settings, then click [Install]. 0 Follow the on your camcorder. 3 Connect the (USB) jack of the license agreement] if you may need to install third party software. qa ...camcorder automatically. 4 Touch [ USB CONNECT] or [ USB CONNECT] on the screen of your camcorder. Operating the "Picture Motion Browser" To start "Picture Motion Browser," click [Start] t [All Programs] t [Sony Picture Utility] t [PMB - 1 Connect the AC Adaptor to the Handycam Station and a wall outlet (wall socket). 2 Set your camcorder onto the Handycam...
Operating Guide
Page 29
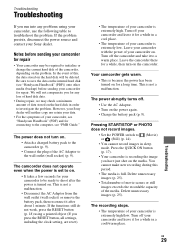
...any problems using a pointed object (If you have just shot on . • Attach a charged battery pack to the camcorder (p. 9). • Connect the plug of the media. However, your Sony dealer will be deleted. The power does not turn on the hard disk in a cool/warm place. The power abruptly ...then turn on the media. Turn off . • Use the AC Adaptor. • Turn on for a long time. Notes before sending your camcorder for connecting to the computer, see "Handycam Handbook" (PDF) and for repair. If the functions still do not work, press the RESET button (p. 18) using your...
...any problems using a pointed object (If you have just shot on . • Attach a charged battery pack to the camcorder (p. 9). • Connect the plug of the media. However, your Sony dealer will be deleted. The power does not turn on the hard disk in a cool/warm place. The power abruptly ...then turn on the media. Turn off . • Use the AC Adaptor. • Turn on for a long time. Notes before sending your camcorder for connecting to the computer, see "Handycam Handbook" (PDF) and for repair. If the functions still do not work, press the RESET button (p. 18) using your...
Operating Guide
Page 30
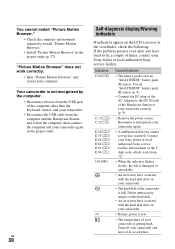
... the computer other than the keyboard, mouse, and your camcorder. • Disconnect the USB cable from the computer and the Handycam Station, and restart the computer, then connect the computer and your Sony dealer or local authorized Sony service facility. Inform them of the 5digit code, which ...starts from the USB jack of your camcorder securely (p. 9). • Remove the power...
... the computer other than the keyboard, mouse, and your camcorder. • Disconnect the USB cable from the computer and the Handycam Station, and restart the computer, then connect the computer and your Sony dealer or local authorized Sony service facility. Inform them of the 5digit code, which ...starts from the USB jack of your camcorder securely (p. 9). • Remove the power...
Operating Guide
Page 33
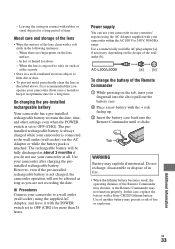
... set to OFF (CHG) for more than 24 hours. Power supply You can use your camcorder within the AC 100 V to pull out the battery case. 2 Place a new battery with a Sony CR2025 lithium battery. Tab WARNING Battery may present a risk of fire or explosion. It is... clean the lens as at all. Leaving the casing in the following instances: - Use of another battery may explode if mistreated. x Procedures Connect your camcorder after charging the preinstalled rechargeable battery. In hot or humid locations - In this case, replace the battery with the + side facing up. ...
... set to OFF (CHG) for more than 24 hours. Power supply You can use your camcorder within the AC 100 V to pull out the battery case. 2 Place a new battery with a Sony CR2025 lithium battery. Tab WARNING Battery may present a risk of fire or explosion. It is... clean the lens as at all. Leaving the casing in the following instances: - Use of another battery may explode if mistreated. x Procedures Connect your camcorder after charging the preinstalled rechargeable battery. In hot or humid locations - In this case, replace the battery with the + side facing up. ...


