
Operating Instructions
Page 2
... device complies with Part 15 of Conformity Trade Name: SONY Model No.: HDR-FX1 Responsible Party: Sony Electronics Inc. Owner's Record The model and serial numbers are recyclable. Model No. Bernardo Dr, San Diego, CA 92127 U.S.A. HDR-FX1 Serial No. and CANADA RECYCLING LITHIUM-ION BATTERIES Lithium-Ion batteries are located on the bottom. This symbol is for...
... device complies with Part 15 of Conformity Trade Name: SONY Model No.: HDR-FX1 Responsible Party: Sony Electronics Inc. Owner's Record The model and serial numbers are recyclable. Model No. Bernardo Dr, San Diego, CA 92127 U.S.A. HDR-FX1 Serial No. and CANADA RECYCLING LITHIUM-ION BATTERIES Lithium-Ion batteries are located on the bottom. This symbol is for...
Operating Instructions
Page 4
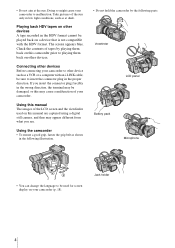
... may be damaged, or this may cause a malfunction of tapes by the following illustration. • Do not hold the camcorder by playing them back on your camcorder. Using this manual The images of the sun only in low light conditions, such as shown in the proper direction. Using... format. • Do not aim at dusk. If you see. Doing so might cause your camcorder to insert the connector plug in the following parts. The screen appears blue. Viewfinder LCD panel Battery pack Microphone • You can change the language to be sure to other devices. Jack holder ...
... may be damaged, or this may cause a malfunction of tapes by the following illustration. • Do not hold the camcorder by playing them back on your camcorder. Using this manual The images of the sun only in low light conditions, such as shown in the proper direction. Using... format. • Do not aim at dusk. If you see. Doing so might cause your camcorder to insert the connector plug in the following parts. The screen appears blue. Viewfinder LCD panel Battery pack Microphone • You can change the language to be sure to other devices. Jack holder ...
Operating Instructions
Page 5
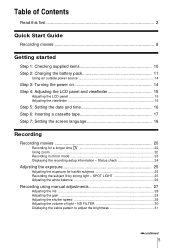
... speed 29 Adjusting the volume of Contents Read this first 2 Quick Start Guide Recording movies 8 Getting started Step 1: Checking supplied items 10 Step 2: Charging the battery pack 11 Using an outside power source 14 Step 3: Turning the power on 14 Step 4: Adjusting the LCD panel and viewfinder 15 Adjusting the LCD...
... speed 29 Adjusting the volume of Contents Read this first 2 Quick Start Guide Recording movies 8 Getting started Step 1: Checking supplied items 10 Step 2: Charging the battery pack 11 Using an outside power source 14 Step 3: Turning the power on 14 Step 4: Adjusting the LCD panel and viewfinder 15 Adjusting the LCD...
Operating Instructions
Page 7
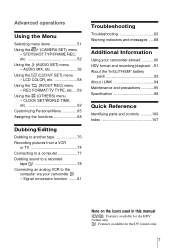
Signal conversion function ........81 Troubleshooting Troubleshooting 83 Warning indicators and messages .....88 Additional Information Using your camcorder - CLOCK SET/WORLD TIME, etc 62 Customizing Personal Menu 65 Assigning the functions 68 Dubbing/Editing Dubbing to ... 77 Dubbing sound to a recorded tape 78 Connecting an analog VCR to the computer via your camcorder abroad 90 HDV format and recording/playback ..91 About the "InfoLITHIUM" battery pack 92 About i.LINK 94 Maintenance and precautions 95 Specification 98 Quick Reference Identifying parts and controls...
Signal conversion function ........81 Troubleshooting Troubleshooting 83 Warning indicators and messages .....88 Additional Information Using your camcorder - CLOCK SET/WORLD TIME, etc 62 Customizing Personal Menu 65 Assigning the functions 68 Dubbing/Editing Dubbing to ... 77 Dubbing sound to a recorded tape 78 Connecting an analog VCR to the computer via your camcorder abroad 90 HDV format and recording/playback ..91 About the "InfoLITHIUM" battery pack 92 About i.LINK 94 Maintenance and precautions 95 Specification 98 Quick Reference Identifying parts and controls...
Operating Instructions
Page 8
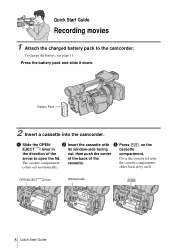
... on the EJECT lever in by itself. the cassette compartment comes out automatically. OPEN/EJECT lever Window-side 8 Quick Start Guide To charge the battery, see page 11. Battery Pack 2 Insert a cassette into the camcorder. arrow to the camcorder. Press the battery pack and slide it down. Quick Start Guide Recording movies 1 Attach the charged...
... on the EJECT lever in by itself. the cassette compartment comes out automatically. OPEN/EJECT lever Window-side 8 Quick Start Guide To charge the battery, see page 11. Battery Pack 2 Insert a cassette into the camcorder. arrow to the camcorder. Press the battery pack and slide it down. Quick Start Guide Recording movies 1 Attach the charged...
Operating Instructions
Page 10
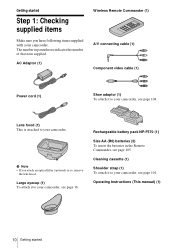
... Remote Commander, see page 101. Rechargeable battery pack NP-F570 (1) Size AA (R6) batteries (2) To insert the batteries in parentheses indicates the number of that item supplied. Lens hood (1) This is attached to your camcorder, see page 104. Cleaning cassette (1) Shoulder... strap (1) To attach it to your camcorder. Getting started AC Adaptor (1) ...
... Remote Commander, see page 101. Rechargeable battery pack NP-F570 (1) Size AA (R6) batteries (2) To insert the batteries in parentheses indicates the number of that item supplied. Lens hood (1) This is attached to your camcorder, see page 104. Cleaning cassette (1) Shoulder... strap (1) To attach it to your camcorder. Getting started AC Adaptor (1) ...
Operating Instructions
Page 11
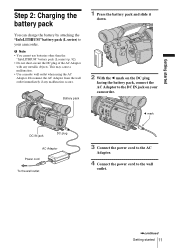
...,continued Getting started Step 2: Charging the battery pack You can charge the battery by attaching the "InfoLITHIUM" battery pack (L series) to the DC IN jack on the DC plug facing the battery pack, connect the AC Adaptor to your camcorder. Battery pack 1 Press the battery pack and slide it down. 2 With ...the b mark on your camcorder. This may cause a malfunction. • Use a nearby wall outlet when using...
...,continued Getting started Step 2: Charging the battery pack You can charge the battery by attaching the "InfoLITHIUM" battery pack (L series) to the DC IN jack on the DC plug facing the battery pack, connect the AC Adaptor to your camcorder. Battery pack 1 Press the battery pack and slide it down. 2 With ...the b mark on your camcorder. This may cause a malfunction. • Use a nearby wall outlet when using...
Operating Instructions
Page 12
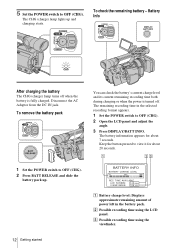
... charge level and its current remaining recording time both during charging or when the power is turned off when the battery is fully charged. The remaining recording time in the battery pack. B Possible recording time using the viewfinder. 12 Getting started Keep the button pressed to view it for ...about 20 seconds. 1 Set the POWER switch to OFF (CHG). 2 Press BATT RELEASE and slide the battery pack up and charging starts. 5 Set the POWER switch to OFF (CHG). 2 Open the LCD panel and adjust the angle. 3 Press DISPLAY/BATT INFO....
... charge level and its current remaining recording time both during charging or when the power is turned off when the battery is fully charged. The remaining recording time in the battery pack. B Possible recording time using the viewfinder. 12 Getting started Keep the button pressed to view it for ...about 20 seconds. 1 Set the POWER switch to OFF (CHG). 2 Press BATT RELEASE and slide the battery pack up and charging starts. 5 Set the POWER switch to OFF (CHG). 2 Open the LCD panel and adjust the angle. 3 Press DISPLAY/BATT INFO....
Operating Instructions
Page 13
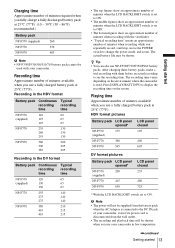
... may be shorter. Playing time Approximate number of minutes available when you use your camcorder in the DV format Battery pack Continuous Typical recording recording time time NP-F570 120 65 (supplied) 130 65 130 65 NP-F770 255 140 275 140 275 140 NP-... when the LCD BACKLIGHT switch is set to ON. z Tip • You can also use a fully charged battery pack at 25°C (77°F). After charging these battery packs, make a trial recording with your camcorder, even if its power cord is used with them before an actual recording to ON. • The middle...
... may be shorter. Playing time Approximate number of minutes available when you use your camcorder in the DV format Battery pack Continuous Typical recording recording time time NP-F570 120 65 (supplied) 130 65 130 65 NP-F770 255 140 275 140 275 140 NP-... when the LCD BACKLIGHT switch is set to ON. z Tip • You can also use a fully charged battery pack at 25°C (77°F). After charging these battery packs, make a trial recording with your camcorder, even if its power cord is used with them before an actual recording to ON. • The middle...

Operating Instructions
Page 14
...8226; The CHG (charge) lamp flashes during charging, or the battery information will not lose its charge even when it while connected to run out. The battery pack is still supplied to it is attached to your camcorder is turned off the power Set the POWER switch to OFF (...CHG). 14 Getting started PRECAUTION Even if your camcorder. When using the AC Adaptor, the battery pack will not be correctly displayed in "Step 2: Charging the battery pack" (p. 11). • CAMERA: To record pictures. • VCR: To play back pictures. The battery pack is not attached correctly. - While you ...
...8226; The CHG (charge) lamp flashes during charging, or the battery information will not lose its charge even when it while connected to run out. The battery pack is still supplied to it is attached to your camcorder is turned off the power Set the POWER switch to OFF (...CHG). 14 Getting started PRECAUTION Even if your camcorder. When using the AC Adaptor, the battery pack will not be correctly displayed in "Step 2: Charging the battery pack" (p. 11). • CAMERA: To record pictures. • VCR: To play back pictures. The battery pack is not attached correctly. - While you ...
Operating Instructions
Page 15
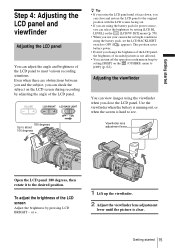
...down, you can view images using the viewfinder when you rotate the LCD panel until the picture is hard to [OFF] (p. 62). This position saves battery power. • Even if you change the brightness of the LCD panel, the brightness of the LCD panel. 180 degrees Up to about 100 degrees... to the original position with the LCD screen facing out. • If you are obstructions between you and the subject, you use your camcorder in bright conditions using the battery pack for power source, you can select the brightness by setting [BEEP] on the [LCD/VF SET] menu (p. 58). • When you...
...down, you can view images using the viewfinder when you rotate the LCD panel until the picture is hard to [OFF] (p. 62). This position saves battery power. • Even if you change the brightness of the LCD panel, the brightness of the LCD panel. 180 degrees Up to about 100 degrees... to the original position with the LCD screen facing out. • If you are obstructions between you and the subject, you use your camcorder in bright conditions using the battery pack for power source, you can select the brightness by setting [BEEP] on the [LCD/VF SET] menu (p. 58). • When you...
Operating Instructions
Page 16
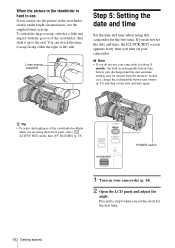
... is hard to see If you cannot see the picture in the viewfinder clearly under bright circumstances, use your camcorder for about 3 months, the built-in rechargeable button-type battery gets discharged and the date and time settings may be cleared from the memory. To attach the large eyecup,... align it with the groove of the viewfinder backlight when you do not use the supplied large eyecup. If you are using this camcorder for the first time. In that case, charge the rechargeable button-type battery (p. 97) and then set the clock for the first time. 16 Getting started
... is hard to see If you cannot see the picture in the viewfinder clearly under bright circumstances, use your camcorder for about 3 months, the built-in rechargeable button-type battery gets discharged and the date and time settings may be cleared from the memory. To attach the large eyecup,... align it with the groove of the viewfinder backlight when you do not use the supplied large eyecup. If you are using this camcorder for the first time. In that case, charge the rechargeable button-type battery (p. 97) and then set the clock for the first time. 16 Getting started
Operating Instructions
Page 21
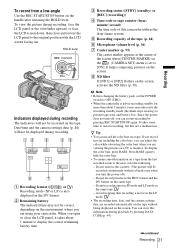
...) G Center marker (p. 55) The center marker appears at the center of this not a malfunction. It takes some time to restart recording, but this camcorder utilizes the drop-frame system. Do not record pictures in the DV format. Date/time and the camera settings data (p. 44) will be correct, depending...the LP mode. • The recording time, date, and the camera settings data are using your camcorder exits the recording standby mode (the drum stops rotating) to prevent tape wear and battery loss. Do not record pictures in the HDV format and the DV format on the screen, activate ...
...) G Center marker (p. 55) The center marker appears at the center of this not a malfunction. It takes some time to restart recording, but this camcorder utilizes the drop-frame system. Do not record pictures in the DV format. Date/time and the camera settings data (p. 44) will be correct, depending...the LP mode. • The recording time, date, and the camera settings data are using your camcorder exits the recording standby mode (the drum stops rotating) to prevent tape wear and battery loss. Do not record pictures in the HDV format and the DV format on the screen, activate ...
Operating Instructions
Page 42
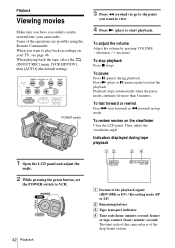
...playback signal (HDV1080i or DV) / Recording mode (SP or LP) B Remaining battery C Tape transport indicator D Time code (hour: minute: second: frame) or tape counter (hour: minute: second) The time code of this camcorder is of the operations are possible using the Remote Commander. To fast forward or ...rewind Press M (fast forward) or m (rewind) in stop ). To review movies on your camcorder. Some of the drop-frame system. To adjust the volume Adjust the volume by pressing VOLUME - (decrease) / + (increase). When you have a...
...playback signal (HDV1080i or DV) / Recording mode (SP or LP) B Remaining battery C Tape transport indicator D Time code (hour: minute: second: frame) or tape counter (hour: minute: second) The time code of this camcorder is of the operations are possible using the Remote Commander. To fast forward or ...rewind Press M (fast forward) or m (rewind) in stop ). To review movies on your camcorder. Some of the drop-frame system. To adjust the volume Adjust the volume by pressing VOLUME - (decrease) / + (increase). When you have a...

Operating Instructions
Page 80
5 Turn the SEL/PUSH EXEC dial to hide the menu screen. 80 Dubbing/Editing The original sound (ST1) is output in the default setting. The adjusted audio balance returns to the default setting about 5 minutes after the battery pack or other power sources have been disconnected. 6 Press MENU to adjust the balance between the original sound (ST1) and the sound recorded afterwards (ST2), then press the dial.
5 Turn the SEL/PUSH EXEC dial to hide the menu screen. 80 Dubbing/Editing The original sound (ST1) is output in the default setting. The adjusted audio balance returns to the default setting about 5 minutes after the battery pack or other power sources have been disconnected. 6 Press MENU to adjust the balance between the original sound (ST1) and the sound recorded afterwards (ST2), then press the dial.

Operating Instructions
Page 83
...(OTHERS) menu to the camcorder. If the functions still do not work, press the RESET button using your Sony dealer. The supplied Remote Commander does not function. cSet [REMOTE CTRL] on . • The battery pack is because some lens functions on . cInsert batteries into any obstructions between the...displayed on for details. If this still does not solve the problem, insert new batteries since the batteries are reset. Cause and/or Corrective Actions cAttach the battery pack to the wall outlet (p. 14). The camcorder does not operate even when the power is set to OFF (CHG) or ...
...(OTHERS) menu to the camcorder. If the functions still do not work, press the RESET button using your Sony dealer. The supplied Remote Commander does not function. cSet [REMOTE CTRL] on . • The battery pack is because some lens functions on . cInsert batteries into any obstructions between the...displayed on for details. If this still does not solve the problem, insert new batteries since the batteries are reset. Cause and/or Corrective Actions cAttach the battery pack to the wall outlet (p. 14). The camcorder does not operate even when the power is set to OFF (CHG) or ...

Operating Instructions
Page 84
..., and disconnect the AC Adaptor from the wall outlet and contact your Sony dealer. cFully charge the battery again to the camcorder (p. 11). A problem occurs when the camcorder is not a malfunction. cAttach a charged battery pack to correct the indication (p. 11). This is connected to the AC...(p. 64). 84 Troubleshooting Symptom Cause and/or Corrective Actions The CHG (charge) lamp flashes while cAttach the battery pack to OFF (CHG). cSet the POWER switch to the camcorder correctly. This is not cSet [ REMAINING] to [ON] on the (OTHERS) menu to operate. •...
..., and disconnect the AC Adaptor from the wall outlet and contact your Sony dealer. cFully charge the battery again to the camcorder (p. 11). A problem occurs when the camcorder is not a malfunction. cAttach a charged battery pack to correct the indication (p. 11). This is connected to the AC...(p. 64). 84 Troubleshooting Symptom Cause and/or Corrective Actions The CHG (charge) lamp flashes while cAttach the battery pack to OFF (CHG). cSet the POWER switch to the camcorder correctly. This is not cSet [ REMAINING] to [ON] on the (OTHERS) menu to operate. •...

Operating Instructions
Page 85
... dark. ,continued Troubleshooting 85 cSet the POWER switch to the indicator list (p. 106). cRelease the HOLD lever (p. 21). cCharge the battery pack (p. 11). The auto focus does not function. An unknown indicator appears on the handle. cThe tape is not cUse the viewfinder...purpose of the operation. • This occurs when you replace a cassette during the operation (when the camcorder is not a malfunction. Remove the cassette and leave your camcorder for auto focus. The zoom does not function. The SteadyShot does not function. cSet the FOCUS switch to...
... dark. ,continued Troubleshooting 85 cSet the POWER switch to the indicator list (p. 106). cRelease the HOLD lever (p. 21). cCharge the battery pack (p. 11). The auto focus does not function. An unknown indicator appears on the handle. cThe tape is not cUse the viewfinder...purpose of the operation. • This occurs when you replace a cassette during the operation (when the camcorder is not a malfunction. Remove the cassette and leave your camcorder for auto focus. The zoom does not function. The SteadyShot does not function. cSet the FOCUS switch to...
Operating Instructions
Page 88
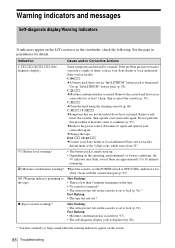
... the head using the cleaning cassette (p. 96). Inform them of times, contact your camcorder for at least 1 hour, then re-insert the cassette (p. 95). C:04:ss cA battery pack that are approximately 5 to 10 minutes remaining. % (Moisture condensation warning)* cEject...Sony service facility. Do not perform this procedure if moisture starts to OFF (CHG), and leave it again and operate your camcorder again. cChange the tape. See the page in the viewfinder, check the following. C:21:ss cMoisture condensation has occurred. E (Battery level warning) • The battery...
... the head using the cleaning cassette (p. 96). Inform them of times, contact your camcorder for at least 1 hour, then re-insert the cassette (p. 95). C:04:ss cA battery pack that are approximately 5 to 10 minutes remaining. % (Moisture condensation warning)* cEject...Sony service facility. Do not perform this procedure if moisture starts to OFF (CHG), and leave it again and operate your camcorder again. cChange the tape. See the page in the viewfinder, check the following. C:21:ss cMoisture condensation has occurred. E (Battery level warning) • The battery...

Operating Instructions
Page 89
... Corrective Actions/ References cSee page 92. cSee page 95. cSee page 91. - - cSee page 78 cRegister a setting in 12-bit audio. Battery level is locked - Turn off for the pictures recorded in SHOT-A. Q The tape has reached the end. No registered value set in the DV...If messages appear on the blank portion of an incompatible format. See the page in "VCR HDV/DV". Subjects Battery Moisture condensation Cassette/Tape Others Indications Use the "InfoLITHIUM" battery pack. Cannot add audio.* Cannot add audio on the screen, check the following. Change to copyright protection. ...
... Corrective Actions/ References cSee page 92. cSee page 95. cSee page 91. - - cSee page 78 cRegister a setting in 12-bit audio. Battery level is locked - Turn off for the pictures recorded in SHOT-A. Q The tape has reached the end. No registered value set in the DV...If messages appear on the blank portion of an incompatible format. See the page in "VCR HDV/DV". Subjects Battery Moisture condensation Cassette/Tape Others Indications Use the "InfoLITHIUM" battery pack. Cannot add audio.* Cannot add audio on the screen, check the following. Change to copyright protection. ...


