
Operating Instructions
Page 3
... sure the picture and sound are cautioned that interference will not occur in both HDV and DV formats. z Tip • Your camcorder adopts the HDV1080i specification, which can use Your camcorder is no guarantee that any changes or modifications not expressly approved in accordance with... of recording in a particular installation. If this equipment. The interface cable supplied must be used in this manual could void your camcorder. The i.LINK Interface is adopted as the digital interface enabling a digital connection with TVs and personal computers compatible with the limits ...
... sure the picture and sound are cautioned that interference will not occur in both HDV and DV formats. z Tip • Your camcorder adopts the HDV1080i specification, which can use Your camcorder is no guarantee that any changes or modifications not expressly approved in accordance with... of recording in a particular installation. If this equipment. The interface cable supplied must be used in this manual could void your camcorder. The i.LINK Interface is adopted as the digital interface enabling a digital connection with TVs and personal computers compatible with the limits ...
Operating Instructions
Page 4
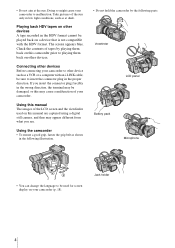
... A tape recorded in low light conditions, such as at the sun. Check the contents of the sun only in the HDV format cannot be sure to malfunction. Using this camcorder prior to playing them back on a device that is not compatible with an i.LINK cable, be played back on other...may appear different from what you insert the connector plug forcibly in the proper direction. Using the camcorder • To ensure a good grip, fasten the grip belt as a VCR or a computer with the HDV format. If you see. Viewfinder LCD panel Battery pack Microphone • You can change the language...
... A tape recorded in low light conditions, such as at the sun. Check the contents of the sun only in the HDV format cannot be sure to malfunction. Using this camcorder prior to playing them back on a device that is not compatible with an i.LINK cable, be played back on other...may appear different from what you insert the connector plug forcibly in the proper direction. Using the camcorder • To ensure a good grip, fasten the grip belt as a VCR or a computer with the HDV format. If you see. Viewfinder LCD panel Battery pack Microphone • You can change the language...
Operating Instructions
Page 7
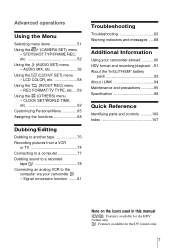
...TV 74 Connecting to a computer 77 Dubbing sound to a recorded tape 78 Connecting an analog VCR to the computer via your camcorder abroad 90 HDV format and recording/playback ..91 About the "InfoLITHIUM" battery pack 92 About i.LINK 94 Maintenance and precautions 95 Specification 98 ...Features available for the DV format only. 7 Signal conversion function ........81 Troubleshooting Troubleshooting 83 Warning indicators and messages .....88 Additional Information Using your camcorder - LCD COLOR, etc 58 Using the (IN/OUT REC) menu - AUDIO MIX, etc 56 Using the (LCD/VF SET) menu -...
...TV 74 Connecting to a computer 77 Dubbing sound to a recorded tape 78 Connecting an analog VCR to the computer via your camcorder abroad 90 HDV format and recording/playback ..91 About the "InfoLITHIUM" battery pack 92 About i.LINK 94 Maintenance and precautions 95 Specification 98 ...Features available for the DV format only. 7 Signal conversion function ........81 Troubleshooting Troubleshooting 83 Warning indicators and messages .....88 Additional Information Using your camcorder - LCD COLOR, etc 58 Using the (IN/OUT REC) menu - AUDIO MIX, etc 56 Using the (LCD/VF SET) menu -...
Operating Instructions
Page 13
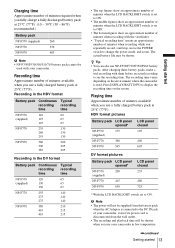
...temperature. ,continued Getting started 13 Getting started Recording time Approximate number of minutes available when you use your camcorder, even if its power cord is used with your camcorder. HDV format pictures Battery pack LCD panel opened* NP-F570 175 (supplied) NP-F770 360 NP-F970 545 LCD...show an approximate number of minutes when the LCD BACKLIGHT switch is set to display the recording time on the environment where the camcorder is disconnected from the battery pack when the AC Adaptor is connected to see the recording time. Charging time Approximate number of...
...temperature. ,continued Getting started 13 Getting started Recording time Approximate number of minutes available when you use your camcorder, even if its power cord is used with your camcorder. HDV format pictures Battery pack LCD panel opened* NP-F570 175 (supplied) NP-F770 360 NP-F970 545 LCD...show an approximate number of minutes when the LCD BACKLIGHT switch is set to display the recording time on the environment where the camcorder is disconnected from the battery pack when the AC Adaptor is connected to see the recording time. Charging time Approximate number of...
Operating Instructions
Page 20
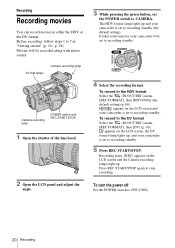
...], then [HDV1080i] (the default setting)(p. 60). Recording starts. [REC] appears on the LCD screen, the DV format lamp lights up, and your camcorder to recording standby. 4 Select the recording format. The HDV format lamp lights up . appears on the LCD screen and the Camera recording lamps light up and your... set to recording standby (the default setting). Movies will be set to 7 in either the HDV or the DV format. It takes some time for your camcorder is set to be recorded along with stereo sound. To turn the power off Set the POWER switch to recording standby. 5 ...
...], then [HDV1080i] (the default setting)(p. 60). Recording starts. [REC] appears on the LCD screen, the DV format lamp lights up, and your camcorder to recording standby. 4 Select the recording format. The HDV format lamp lights up . appears on the LCD screen and the Camera recording lamps light up and your... set to recording standby (the default setting). Movies will be set to 7 in either the HDV or the DV format. It takes some time for your camcorder is set to be recorded along with stereo sound. To turn the power off Set the POWER switch to recording standby. 5 ...
Operating Instructions
Page 21
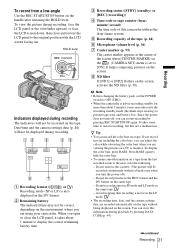
... battery time. Avoid stopping then recording a movie in the LP mode. • The recording time, date, and the camera settings data are using your camcorder exits the recording standby mode (the drum stops rotating) to prevent tape wear and battery loss. E Recording capacity of the tape (p. 64) F Microphone ...on the screen, activate the ND filter (p. 30). H ND filter If [ND1] or [ND2] flashes on the screen. Do not record pictures in the HDV format and the DV format on a tape. b Note • Before changing the battery pack, set to hide the color bars. • To ensure smooth...
... battery time. Avoid stopping then recording a movie in the LP mode. • The recording time, date, and the camera settings data are using your camcorder exits the recording standby mode (the drum stops rotating) to prevent tape wear and battery loss. E Recording capacity of the tape (p. 64) F Microphone ...on the screen, activate the ND filter (p. 30). H ND filter If [ND1] or [ND2] flashes on the screen. Do not record pictures in the HDV format and the DV format on a tape. b Note • Before changing the battery pack, set to hide the color bars. • To ensure smooth...
Operating Instructions
Page 22
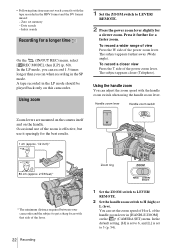
...Press it sparingly for the best results. 1 cm (approx. 1/2 inch)* 80 cm (approx. 2 5/8 feet)* Zoom ring * The minimum distance required between your camcorder and the subject to 6, and [L] is effective, but use it further for a faster zoom. To record a closer view Press the T side of the power ...zoom lever. The subject appears closer (Telephoto). A tape recorded in the HDV format and the DV format mixed: - The subject appears farther away (Wide angle). In the LP mode, you can record 1.5 times longer than you...
...Press it sparingly for the best results. 1 cm (approx. 1/2 inch)* 80 cm (approx. 2 5/8 feet)* Zoom ring * The minimum distance required between your camcorder and the subject to 6, and [L] is effective, but use it further for a faster zoom. To record a closer view Press the T side of the power ...zoom lever. The subject appears closer (Telephoto). A tape recorded in the HDV format and the DV format mixed: - The subject appears farther away (Wide angle). In the LP mode, you can record 1.5 times longer than you...

Operating Instructions
Page 34
... Customizing the picture quality or sound Customizing the picture quality - Picture profile Recording condition number PP1 Appropriate setting to record in the HDV format PP2 Appropriate setting to record in the DV format PP3 Appropriate setting to record people PP4 Appropriate setting to record film-like ...day, the weather, or the camera person, and store them in black and white You can change the above default settings at your camcorder to 15 (clearer) 34 Recording PICTURE PROFILE You can set 6 different picture quality settings depending on the TV or monitor screen. ...
... Customizing the picture quality or sound Customizing the picture quality - Picture profile Recording condition number PP1 Appropriate setting to record in the HDV format PP2 Appropriate setting to record in the DV format PP3 Appropriate setting to record people PP4 Appropriate setting to record film-like ...day, the weather, or the camera person, and store them in black and white You can change the above default settings at your camcorder to 15 (clearer) 34 Recording PICTURE PROFILE You can set 6 different picture quality settings depending on the TV or monitor screen. ...
Operating Instructions
Page 42
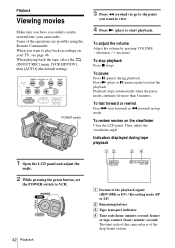
...HDV/DV], then [AUTO] (the default setting). Indicators displayed during playback. When you have a recorded cassette inserted into your TV, see page 46. To stop playback Press x (stop mode. To fast forward or rewind Press M (fast forward) or m (rewind) in stop ). To review movies on your camcorder...C Tape transport indicator D Time code (hour: minute: second: frame) or tape counter (hour: minute: second) The time code of this camcorder is of the operations are possible using the Remote Commander. To adjust the volume Adjust the volume by pressing VOLUME - (decrease) / + (...
...HDV/DV], then [AUTO] (the default setting). Indicators displayed during playback. When you have a recorded cassette inserted into your TV, see page 46. To stop playback Press x (stop mode. To fast forward or rewind Press M (fast forward) or m (rewind) in stop ). To review movies on your camcorder...C Tape transport indicator D Time code (hour: minute: second: frame) or tape counter (hour: minute: second) The time code of this camcorder is of the operations are possible using the Remote Commander. To adjust the volume Adjust the volume by pressing VOLUME - (decrease) / + (...
Operating Instructions
Page 44
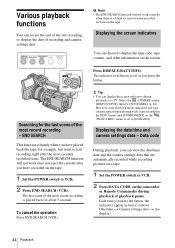
... pause. END SEARCH This function is handy when you press the button, the indicators appear in the HDV format, and [COMPONENT] on a TV. Press DISPALY/BATT INFO. Each time you have recorded on...back a tape recorded in turn as you have played back the tape, for example, but want to [1080i/480i]. Displaying the date/time and camera settings data - b Note • The END SEARCH function ...recording pictures on a tape. 1 Set the POWER switch to VCR. 2 Press DATA CODE on the camcorder or Remote Commander during playback on the (IN/OUT REC) menu is set to start recording right ...
... pause. END SEARCH This function is handy when you press the button, the indicators appear in the HDV format, and [COMPONENT] on a TV. Press DISPALY/BATT INFO. Each time you have recorded on...back a tape recorded in turn as you have played back the tape, for example, but want to [1080i/480i]. Displaying the date/time and camera settings data - b Note • The END SEARCH function ...recording pictures on a tape. 1 Set the POWER switch to VCR. 2 Press DATA CODE on the camcorder or Remote Commander during playback on the (IN/OUT REC) menu is set to start recording right ...
Operating Instructions
Page 46
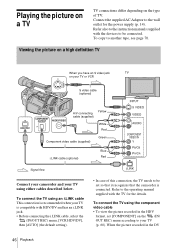
...) Yellow A/V connecting cable (supplied) White Red Component video cable (supplied) Green i.LINK cable (optional) Blue Red Signal flow Connect your camcorder and your TV is compatible with the devices to the wall outlet for the details. Playing the picture on a TV TV connections differ depending... either cables described below. Connect the supplied AC Adaptor to be set so that it recognizes that the camcorder is connected. Refer also to the instruction manuals supplied with HDV/DV and has an i.LINK jack. • Before connecting the i.LINK cable, select the (IN/OUT...
...) Yellow A/V connecting cable (supplied) White Red Component video cable (supplied) Green i.LINK cable (optional) Blue Red Signal flow Connect your camcorder and your TV is compatible with the devices to the wall outlet for the details. Playing the picture on a TV TV connections differ depending... either cables described below. Connect the supplied AC Adaptor to be set so that it recognizes that the camcorder is connected. Refer also to the instruction manuals supplied with HDV/DV and has an i.LINK jack. • Before connecting the i.LINK cable, select the (IN/OUT...
Operating Instructions
Page 47
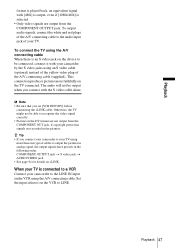
...format is played back, an equivalent signal with [480i] is output, even if [1080i/480i] is an S video jack on i.LINK. z Tip • If you connect your camcorder to your TV. The audio will not be connected, connect it with the S video... the video signal correctly. • Pictures in the pictures. When your TV is connected to a VCR Connect your camcorder by the S video jacks using the A/V connecting cable When there is selected. • Only video signals are recorded...Otherwise, the TV might not be able to be output when you set [VCR HDV/DV] before connecting the i.LINK cable.
...format is played back, an equivalent signal with [480i] is output, even if [1080i/480i] is an S video jack on i.LINK. z Tip • If you connect your camcorder to your TV. The audio will not be connected, connect it with the S video... the video signal correctly. • Pictures in the pictures. When your TV is connected to a VCR Connect your camcorder by the S video jacks using the A/V connecting cable When there is selected. • Only video signals are recorded...Otherwise, the TV might not be able to be output when you set [VCR HDV/DV] before connecting the i.LINK cable.
Operating Instructions
Page 48
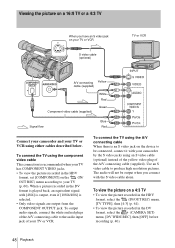
... cable to your TV or VCR. Viewing the picture on a 16:9 TV or a 4:3 TV When you connect with [480i] is output, even if [1080i/480i] is played back, an equivalent signal with the S video cable alone. To output audio signals, connect the white and red plugs of the A/V connecting... your camcorder by the S video jacks using the A/V connecting cable When there is recommended when your TV has COMPONENT VIDEO jacks. • To view the picture recorded in the HDV format, set [COMPONENT] on a 4:3 TV • To view the picture recorded in the HDV format, select the (IN/OUT REC) menu,...
... cable to your TV or VCR. Viewing the picture on a 16:9 TV or a 4:3 TV When you connect with [480i] is output, even if [1080i/480i] is played back, an equivalent signal with the S video cable alone. To output audio signals, connect the white and red plugs of the A/V connecting... your camcorder by the S video jacks using the A/V connecting cable When there is recommended when your TV has COMPONENT VIDEO jacks. • To view the picture recorded in the HDV format, set [COMPONENT] on a 4:3 TV • To view the picture recorded in the HDV format, select the (IN/OUT REC) menu,...
Operating Instructions
Page 56
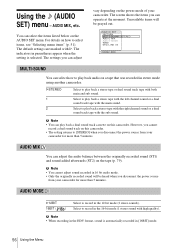
... AUD I O MIX AUD I O MODE WIND M I C / L I NE I N STEREO [ MENU ] : END MULTI-SOUND You can adjust vary depending on the power mode of your camcorder for more than 5 minutes. b Note • When recording in 16 bit audio mode. • Only the originally recorded sound will be heard when you can... stereo tape with the right channel sound or a dual sound track tape with G. b Note • You cannot adjust sound recorded in the HDV format, sound is selected. The default settings are marked with the sub sound. Select to play back audio on how to record in [16BIT] ...
... AUD I O MIX AUD I O MODE WIND M I C / L I NE I N STEREO [ MENU ] : END MULTI-SOUND You can adjust vary depending on the power mode of your camcorder for more than 5 minutes. b Note • When recording in 16 bit audio mode. • Only the originally recorded sound will be heard when you can... stereo tape with the right channel sound or a dual sound track tape with G. b Note • You cannot adjust sound recorded in the HDV format, sound is selected. The default settings are marked with the sub sound. Select to play back audio on how to record in [16BIT] ...

Operating Instructions
Page 59
...how to [ON], pictures are marked with G. I NK CONV TV TYPE A / V DV OUT AUTO [ MENU ] : END VCR HDV/DV Select the playback signal. Select this camcorder. • When [AUTO] is ; Using the Menu Using the (IN/OUT REC) menu - Unavailable items will be input/output from... signal to the DV format and output; The settings you can adjust vary depending on the power mode of your camcorder. When the camcorder is converted to a computer, etc. (p. 77). an HDV signal is not output. - Normally select [AUTO]. b Note • Disconnect the i.LINK cable before setting ...
...how to [ON], pictures are marked with G. I NK CONV TV TYPE A / V DV OUT AUTO [ MENU ] : END VCR HDV/DV Select the playback signal. Select this camcorder. • When [AUTO] is ; Using the Menu Using the (IN/OUT REC) menu - Unavailable items will be input/output from... signal to the DV format and output; The settings you can adjust vary depending on the power mode of your camcorder. When the camcorder is converted to a computer, etc. (p. 77). an HDV signal is not output. - Normally select [AUTO]. b Note • Disconnect the i.LINK cable before setting ...
Operating Instructions
Page 60
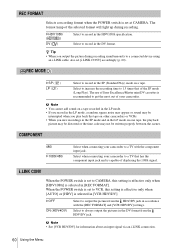
.... 60 Using the Menu The format lamp of your camcorder to record in the LP mode on a tape. REC MODE GSP ( SP ) LP ( LP ) Select to a TV with the [REC FORMAT] and [VCR HDV/DV] settings. The use of Sony Excellence/Master mini DV cassettes is recommended to get the...LINK cable, also set at CAMERA. Select when connecting your camcorder to VCR, this setting is effective only when [HDV1080i] is selected in [VCR HDV/DV]. i.LINK CONV When the POWER switch is set to a TV that of displaying the 1080i signal. REC FORMAT Selects a recording format when the POWER switch...
.... 60 Using the Menu The format lamp of your camcorder to record in the LP mode on a tape. REC MODE GSP ( SP ) LP ( LP ) Select to a TV with the [REC FORMAT] and [VCR HDV/DV] settings. The use of Sony Excellence/Master mini DV cassettes is recommended to get the...LINK cable, also set at CAMERA. Select when connecting your camcorder to VCR, this setting is effective only when [HDV1080i] is selected in [VCR HDV/DV]. i.LINK CONV When the POWER switch is set to a TV that of displaying the 1080i signal. REC FORMAT Selects a recording format when the POWER switch...
Operating Instructions
Page 61
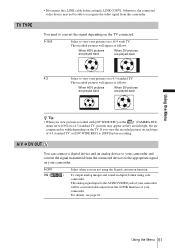
... connected devices to view your pictures on a 16:9 wide TV. The analog signal input to the AUDIO/VIDEO jack of your camcorder will appear as follows: When HDV pictures are played back When DV pictures are played back 4:3 Select to the appropriate signal on your pictures on a 4:3 standard TV...the TV. The recorded pictures will be able to recognize the video signal from the i.LINK Interface of 4:3 standard TV, set to view your camcorder. GOFF ON ( Select when you view the recorded pictures on the TV connected. Using the Menu TV TYPE • Disconnect the i.LINK cable ...
... connected devices to view your pictures on a 16:9 wide TV. The analog signal input to the AUDIO/VIDEO jack of your camcorder will appear as follows: When HDV pictures are played back When DV pictures are played back 4:3 Select to the appropriate signal on your pictures on a 4:3 standard TV...the TV. The recorded pictures will be able to recognize the video signal from the i.LINK Interface of 4:3 standard TV, set to view your camcorder. GOFF ON ( Select when you view the recorded pictures on the TV connected. Using the Menu TV TYPE • Disconnect the i.LINK cable ...

Operating Instructions
Page 63
... being recorded. • When you press DATA CODE (p. 44). GNORMAL OPPOSITE Select to rotate clockwise when looked at from another device when [VCR HDV/DV] on the front and rear will not light up when the POWER switch is selected in the following recording situations. GDATE/CAM DATE Select...; The format lamp lights up . DATA CODE Select the item to close to the subject. • When the subject reflects the light of your camcorder during recording. • When you do not want the subject to be displayed when you are recording close the iris and decrease the light volume...
... being recorded. • When you press DATA CODE (p. 44). GNORMAL OPPOSITE Select to rotate clockwise when looked at from another device when [VCR HDV/DV] on the front and rear will not light up when the POWER switch is selected in the following recording situations. GDATE/CAM DATE Select...; The format lamp lights up . DATA CODE Select the item to close to the subject. • When the subject reflects the light of your camcorder during recording. • When you do not want the subject to be displayed when you are recording close the iris and decrease the light volume...
Operating Instructions
Page 70
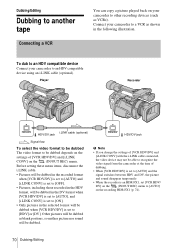
...AUTO] on the recording HDR-FX1 (p. 74). 70 Dubbing/Editing Player Recorder i.LINK cable (optional) HDV/DV jack HDV/DV jack Signal flow To select the video format to be dubbed The video format to be able to recognize the video signal from the camcorder at the time of [VCR HDV/DV] and [i.LINK...IN/OUT REC) menu. Other pictures will be dubbed as shown in the selected format will be dubbed when [VCR HDV/DV] is an HDR-FX1, set to [HDV] or [DV]. Connect your camcorder to a VCR as blank portions, so neither picture nor sound will be dubbed. Dubbing/Editing Dubbing to another tape ...
...AUTO] on the recording HDR-FX1 (p. 74). 70 Dubbing/Editing Player Recorder i.LINK cable (optional) HDV/DV jack HDV/DV jack Signal flow To select the video format to be dubbed The video format to be able to recognize the video signal from the camcorder at the time of [VCR HDV/DV] and [i.LINK...IN/OUT REC) menu. Other pictures will be dubbed as shown in the selected format will be dubbed when [VCR HDV/DV] is an HDR-FX1, set to [HDV] or [DV]. Connect your camcorder to a VCR as blank portions, so neither picture nor sound will be dubbed. Dubbing/Editing Dubbing to another tape ...

Operating Instructions
Page 71
To dub to a DV device Connect your camcorder to be dubbed. Before setting these menu items, disconnect the i.LINK cable. • Pictures, including those recorded in the HDV format, will be dubbed in the DV format when [VCR HDV/DV] is set to [AUTO] and [i.LINK CONV] is set to [ON]. • If the... with the i.LINK cable connected, the video device may not be able to recognize the video signal from the camcorder at the time of [VCR HDV/DV] (p. 59) and [i.LINK CONV] (p. 60) in the HDV format will be dubbed depends on the settings of dubbing. • If [i.LINK CONV] is set to [OFF...
To dub to a DV device Connect your camcorder to be dubbed. Before setting these menu items, disconnect the i.LINK cable. • Pictures, including those recorded in the HDV format, will be dubbed in the DV format when [VCR HDV/DV] is set to [AUTO] and [i.LINK CONV] is set to [ON]. • If the... with the i.LINK cable connected, the video device may not be able to recognize the video signal from the camcorder at the time of [VCR HDV/DV] (p. 59) and [i.LINK CONV] (p. 60) in the HDV format will be dubbed depends on the settings of dubbing. • If [i.LINK CONV] is set to [OFF...


