
Operating Instructions
Page 3
... no guarantee that appear constantly on a DV format cassette. • HDV signals are designed to a malfunction of the camcorder, storage media, etc. • TV color systems differ depending on , the user is connected. - Unauthorized recording of recording in a particular installation...both HDV and DV formats. Consult the dealer or an experienced radio/TV technician for help. If this equipment. z Tip • Your camcorder adopts the HDV1080i specification, which the receiver is encouraged to try to Part 15 of about 25 Mbps. To view your recordings on a ...
... no guarantee that appear constantly on a DV format cassette. • HDV signals are designed to a malfunction of the camcorder, storage media, etc. • TV color systems differ depending on , the user is connected. - Unauthorized recording of recording in a particular installation...both HDV and DV formats. Consult the dealer or an experienced radio/TV technician for help. If this equipment. z Tip • Your camcorder adopts the HDV1080i specification, which the receiver is encouraged to try to Part 15 of about 25 Mbps. To view your recordings on a ...
Operating Instructions
Page 4
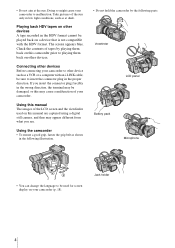
... illustration. • Do not hold the camcorder by playing them back on other devices Before connecting your camcorder to playing them back on your camcorder. If you see. Take pictures of your camcorder (p. 18). Connecting other devices. Using this camcorder prior to malfunction. Using the camcorder • To ensure a good grip,... used for screen display on this manual The images of tapes by the following parts. Doing so might cause your camcorder to other device such as shown in low light conditions, such as at the sun. • Do not aim at dusk.
... illustration. • Do not hold the camcorder by playing them back on other devices Before connecting your camcorder to playing them back on your camcorder. If you see. Take pictures of your camcorder (p. 18). Connecting other devices. Using this camcorder prior to malfunction. Using the camcorder • To ensure a good grip,... used for screen display on this manual The images of tapes by the following parts. Doing so might cause your camcorder to other device such as shown in low light conditions, such as at the sun. • Do not aim at dusk.
Operating Instructions
Page 7
...or TV 74 Connecting to a computer 77 Dubbing sound to a recorded tape 78 Connecting an analog VCR to the computer via your camcorder abroad 90 HDV format and recording/playback ..91 About the "InfoLITHIUM" battery pack 92 About i.LINK 94 Maintenance and precautions 95 ..., etc. ...59 Using the (OTHERS) menu - Signal conversion function ........81 Troubleshooting Troubleshooting 83 Warning indicators and messages .....88 Additional Information Using your camcorder - LCD COLOR, etc 58 Using the (IN/OUT REC) menu - AUDIO MIX, etc 56 Using the (LCD/VF SET) menu - STDYSHOT...
...or TV 74 Connecting to a computer 77 Dubbing sound to a recorded tape 78 Connecting an analog VCR to the computer via your camcorder abroad 90 HDV format and recording/playback ..91 About the "InfoLITHIUM" battery pack 92 About i.LINK 94 Maintenance and precautions 95 ..., etc. ...59 Using the (OTHERS) menu - Signal conversion function ........81 Troubleshooting Troubleshooting 83 Warning indicators and messages .....88 Additional Information Using your camcorder - LCD COLOR, etc 58 Using the (IN/OUT REC) menu - AUDIO MIX, etc 56 Using the (LCD/VF SET) menu - STDYSHOT...
Operating Instructions
Page 8
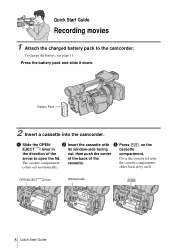
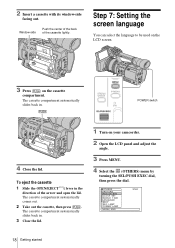
Battery Pack 2 Insert a cassette into the camcorder. a Slide the OPEN/ b Insert the cassette with c Press on the EJECT lever in by itself. Press the battery pack and slide it down. slides back ... of the Close the cassette lid after The cassette compartment cassette. of the back of the out, then push the center compartment. arrow to the camcorder. OPEN/EJECT lever Window-side 8 Quick Start Guide the cassette compartment comes out automatically. Quick Start Guide Recording movies 1 Attach the charged battery pack to...
Battery Pack 2 Insert a cassette into the camcorder. a Slide the OPEN/ b Insert the cassette with c Press on the EJECT lever in by itself. Press the battery pack and slide it down. slides back ... of the Close the cassette lid after The cassette compartment cassette. of the back of the out, then push the center compartment. arrow to the camcorder. OPEN/EJECT lever Window-side 8 Quick Start Guide the cassette compartment comes out automatically. Quick Start Guide Recording movies 1 Attach the charged battery pack to...
Operating Instructions
Page 10
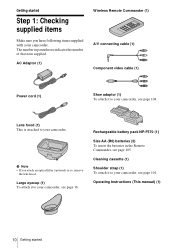
... page 105. b Note • If you have following items supplied with your camcorder, see page 104. Large eyecup (1) To attach it to your camcorder, see page 101. Rechargeable battery pack NP-F570 (1) Size AA (R6) batteries (2) To insert the batteries in ...16. AC Adaptor (1) Wireless Remote Commander (1) A/V connecting cable (1) Component video cable (1) Power cord (1) Shoe adaptor (1) To attach it to your camcorder. Operating Instructions (This manual) (1) 10 Getting started Step 1: Checking supplied items Make sure you attach an optical filter (optional) or so, remove the...
... page 105. b Note • If you have following items supplied with your camcorder, see page 104. Large eyecup (1) To attach it to your camcorder, see page 101. Rechargeable battery pack NP-F570 (1) Size AA (R6) batteries (2) To insert the batteries in ...16. AC Adaptor (1) Wireless Remote Commander (1) A/V connecting cable (1) Component video cable (1) Power cord (1) Shoe adaptor (1) To attach it to your camcorder. Operating Instructions (This manual) (1) 10 Getting started Step 1: Checking supplied items Make sure you attach an optical filter (optional) or so, remove the...
Operating Instructions
Page 11
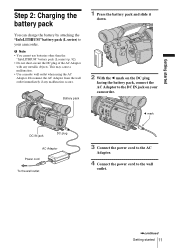
... slide it down. 2 With the b mark on the DC plug facing the battery pack, connect the AC Adaptor to the DC IN jack on your camcorder. b Note • You cannot use batteries other than the "InfoLITHIUM" battery pack (L series) (p. 92). • Do not short-circuit the DC plug of the AC... the wall outlet. ,continued Getting started Step 2: Charging the battery pack You can charge the battery by attaching the "InfoLITHIUM" battery pack (L series) to your camcorder. Getting started 11 This may cause a malfunction. • Use a nearby wall outlet when using the AC Adaptor.
... slide it down. 2 With the b mark on the DC plug facing the battery pack, connect the AC Adaptor to the DC IN jack on your camcorder. b Note • You cannot use batteries other than the "InfoLITHIUM" battery pack (L series) (p. 92). • Do not short-circuit the DC plug of the AC... the wall outlet. ,continued Getting started Step 2: Charging the battery pack You can charge the battery by attaching the "InfoLITHIUM" battery pack (L series) to your camcorder. Getting started 11 This may cause a malfunction. • Use a nearby wall outlet when using the AC Adaptor.
Operating Instructions
Page 13
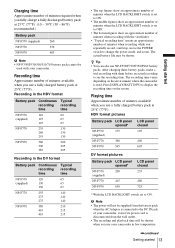
... of minutes when recording while you repeatedly record, start/stop, move the POWER switch to display the recording time on the environment where the camcorder is disconnected from the wall outlet. • The recording and playback time will be shorter. b Note • The power will not ...be used . The recording time varies depending on the screen. After charging these battery packs, make a trial recording with your camcorder in the DV format Battery pack Continuous Typical recording recording time time NP-F570 120 65 (supplied) 130 65 130 65 NP-F770 ...
... of minutes when recording while you repeatedly record, start/stop, move the POWER switch to display the recording time on the environment where the camcorder is disconnected from the wall outlet. • The recording and playback time will be shorter. b Note • The power will not ...be used . The recording time varies depending on the screen. After charging these battery packs, make a trial recording with your camcorder in the DV format Battery pack Continuous Typical recording recording time time NP-F570 120 65 (supplied) 130 65 130 65 NP-F770 ...

Operating Instructions
Page 14
...outside power source You can use the AC Adaptor as shown in following conditions. - PRECAUTION Even if your camcorder is attached to your camcorder as the power source when you are using this camcorder for the first time, the [CLOCK SET] screen appears (p. 16). • The CHG (charge)... in "Step 2: Charging the battery pack" (p. 11). • CAMERA: To record pictures. • VCR: To play back pictures. Connect your camcorder. Step 3: Turning the power on . While pressing the green button, set the POWER switch to the respective power mode to set the POWER switch.
...outside power source You can use the AC Adaptor as shown in following conditions. - PRECAUTION Even if your camcorder is attached to your camcorder as the power source when you are using this camcorder for the first time, the [CLOCK SET] screen appears (p. 16). • The CHG (charge)... in "Step 2: Charging the battery pack" (p. 11). • CAMERA: To record pictures. • VCR: To play back pictures. Connect your camcorder. Step 3: Turning the power on . While pressing the green button, set the POWER switch to the respective power mode to set the POWER switch.
Operating Instructions
Page 15
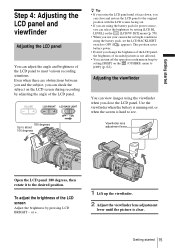
... for power source, you can select the brightness by setting [LCD BL LEVEL] on the [LCD/VF SET] menu (p. 58). • When you use your camcorder in bright conditions using the viewfinder when you close and restore the LCD panel to the original position with the LCD screen facing out. •...
... for power source, you can select the brightness by setting [LCD BL LEVEL] on the [LCD/VF SET] menu (p. 58). • When you use your camcorder in bright conditions using the viewfinder when you close and restore the LCD panel to the original position with the LCD screen facing out. •...
Operating Instructions
Page 16
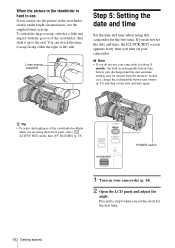
...attach the large eyecup, stretch it a little and align it up to step 6 when you are using this camcorder for about 3 months, the built-in the viewfinder clearly under bright circumstances, use your camcorder (p. 14). 2 Open the LCD panel and adjust the angle. In that case, charge the rechargeable button-...and time when using the battery pack, select (LCD/VF SET) menu, then [VF B.LIGHT] (p. 58). POWER switch 1 Turn on your camcorder. If you turn on your camcorder for the first time. b Note • If you do not set the date and time, the [CLOCK SET] screen appears every time you...
...attach the large eyecup, stretch it a little and align it up to step 6 when you are using this camcorder for about 3 months, the built-in the viewfinder clearly under bright circumstances, use your camcorder (p. 14). 2 Open the LCD panel and adjust the angle. In that case, charge the rechargeable button-...and time when using the battery pack, select (LCD/VF SET) menu, then [VF B.LIGHT] (p. 58). POWER switch 1 Turn on your camcorder. If you turn on your camcorder for the first time. b Note • If you do not set the date and time, the [CLOCK SET] screen appears every time you...
Operating Instructions
Page 17
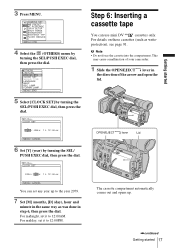
... cassette into the compartment. Step 6: Inserting a cassette tape You can set any year up . ,continued Getting started 3 Press MENU. This may cause a malfunction of your camcorder. 1 Slide the OPEN/EJECT lever in step 6, then press the dial. For midday, set it to 12:00PM. CAMERA SET WB PRESET AE RESPONSE GA...
... cassette into the compartment. Step 6: Inserting a cassette tape You can set any year up . ,continued Getting started 3 Press MENU. This may cause a malfunction of your camcorder. 1 Slide the OPEN/EJECT lever in step 6, then press the dial. For midday, set it to 12:00PM. CAMERA SET WB PRESET AE RESPONSE GA...
Operating Instructions
Page 18
... arrow and open the lid. Step 7: Setting the screen language You can select the language to be used on the LCD screen. 3 Press on your camcorder. 2 Open the LCD panel and adjust the angle. 3 Press MENU. 4 Select the (OTHERS) menu by turning the SEL/PUSH EXEC dial, then press the dial...
... arrow and open the lid. Step 7: Setting the screen language You can select the language to be used on the LCD screen. 3 Press on your camcorder. 2 Open the LCD panel and adjust the angle. 3 Press MENU. 4 Select the (OTHERS) menu by turning the SEL/PUSH EXEC dial, then press the dial...
Operating Instructions
Page 19
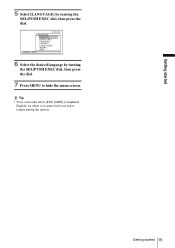
z Tip • Your camcorder offers [ENG [SIMP]] (simplified English) for when you cannot find your native tongue among the options. Getting started 19 Getting started 5 Select [LANGUAGE] by turning the SEL/PUSH EXEC dial, then press the dial. 0:00:00 LANGUAGE ENGLISH ENG [ S I MP ] FRANÇA I S ESPAÑOL PORTUGUÊS [ MENU ] : END 6 Select the desired language by turning the SEL/PUSH EXEC dial, then press the dial. 7 Press MENU to hide the menu screen.
z Tip • Your camcorder offers [ENG [SIMP]] (simplified English) for when you cannot find your native tongue among the options. Getting started 19 Getting started 5 Select [LANGUAGE] by turning the SEL/PUSH EXEC dial, then press the dial. 0:00:00 LANGUAGE ENGLISH ENG [ S I MP ] FRANÇA I S ESPAÑOL PORTUGUÊS [ MENU ] : END 6 Select the desired language by turning the SEL/PUSH EXEC dial, then press the dial. 7 Press MENU to hide the menu screen.
Operating Instructions
Page 20
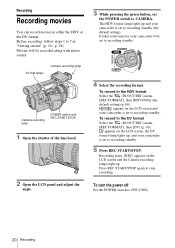
... to stop recording. Press REC START/STOP again to CAMERA. appears on the LCD screen and your camcorder is set to recording standby (the default setting). The HDV format lamp lights up and your camcorder is set to 7 in the HDV format Select the (IN/OUT REC) menu, [REC FORMAT], ...the POWER switch to recording standby. 5 Press REC START/STOP. appears on the LCD screen and the Camera recording lamps light up , and your camcorder to be recorded along with stereo sound. Recording Recording movies You can record movies in the DV format Select the (IN/OUT REC) menu, [...
... to stop recording. Press REC START/STOP again to CAMERA. appears on the LCD screen and your camcorder is set to recording standby (the default setting). The HDV format lamp lights up and your camcorder is set to 7 in the HDV format Select the (IN/OUT REC) menu, [REC FORMAT], ...the POWER switch to recording standby. 5 Press REC START/STOP. appears on the LCD screen and the Camera recording lamps light up , and your camcorder to be recorded along with stereo sound. Recording Recording movies You can record movies in the DV format Select the (IN/OUT REC) menu, [...
Operating Instructions
Page 21
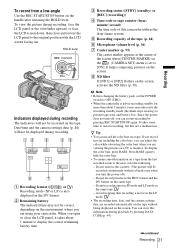
...same tape. - When you are viewing the pictures on the (CAMERA SET) menu is set the POWER switch to OFF (CHG). • When the camcorder is also displayed in the DV format. b Note • Before changing the battery pack, set to [ON]. Since the power does not turn the power...-angle Use the REC START/STOP button on the environment where you open or close and restore the LCD panel to restart recording, but this camcorder utilizes the drop-frame system. Date/time and the camera settings data (p. 44) will not be correct, depending on the handle after releasing ...
...same tape. - When you are viewing the pictures on the (CAMERA SET) menu is set the POWER switch to OFF (CHG). • When the camcorder is also displayed in the DV format. b Note • Before changing the battery pack, set to [ON]. Since the power does not turn the power...-angle Use the REC START/STOP button on the environment where you open or close and restore the LCD panel to restart recording, but this camcorder utilizes the drop-frame system. Date/time and the camera settings data (p. 44) will not be correct, depending on the handle after releasing ...
Operating Instructions
Page 22
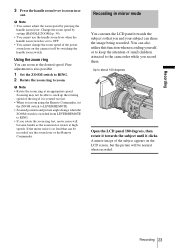
... Press the T side of the power zoom lever. Handle zoom lever Handle zoom switch Zoom levers are mounted on the camera itself and on this camcorder. A tape recorded in the SP mode. In the default setting, [H] is set memory - • Following functions may not work correctly with... - Index search Recording for the best results. 1 cm (approx. 1/2 inch)* 80 cm (approx. 2 5/8 feet)* Zoom ring * The minimum distance required between your camcorder and the subject to get a sharp focus with the handle zoom switch when using the handle zoom lever. You can when recording in the LP...
... Press the T side of the power zoom lever. Handle zoom lever Handle zoom switch Zoom levers are mounted on the camera itself and on this camcorder. A tape recorded in the SP mode. In the default setting, [H] is set memory - • Following functions may not work correctly with... - Index search Recording for the best results. 1 cm (approx. 1/2 inch)* 80 cm (approx. 2 5/8 feet)* Zoom ring * The minimum distance required between your camcorder and the subject to get a sharp focus with the handle zoom switch when using the handle zoom lever. You can when recording in the LP...
Operating Instructions
Page 23
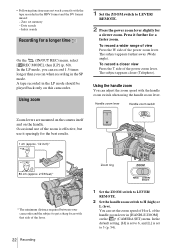
... not be normal when recorded. You can also utilize this function when recording yourself, or to keep the attention of small children attracted to the camcorder while you and your subject can share the image being recorded. Recording 3 Press the handle zoom lever to zoom in mirror mode You can turn...
... not be normal when recorded. You can also utilize this function when recording yourself, or to keep the attention of small children attracted to the camcorder while you and your subject can share the image being recorded. Recording 3 Press the handle zoom lever to zoom in mirror mode You can turn...
Operating Instructions
Page 26
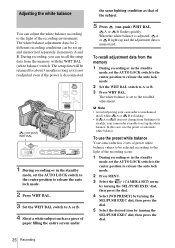
... long as that of the recording scene. 1 During recording or in the standby mode, set up the white balance. b Note • Avoid subjecting your camcorder is unable to set the AUTO LOCK switch to the center position to release the auto lock mode. 2 Press WHT BAL. 3 Set the WHT BAL... recording environment. To recall adjustment data from the memory 1 During recording or in memory A and B. In this case, use the preset white balance Your camcorder has 2 sets of preset white balance values to be set the AUTO LOCK switch to the center position to release the auto lock mode. 2 Set...
... long as that of the recording scene. 1 During recording or in the standby mode, set up the white balance. b Note • Avoid subjecting your camcorder is unable to set the AUTO LOCK switch to the center position to release the auto lock mode. 2 Press WHT BAL. 3 Set the WHT BAL... recording environment. To recall adjustment data from the memory 1 During recording or in memory A and B. In this case, use the preset white balance Your camcorder has 2 sets of preset white balance values to be set the AUTO LOCK switch to the center position to release the auto lock mode. 2 Set...
Operating Instructions
Page 30
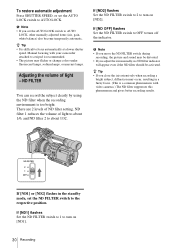
... extensively when recording a bright subject, diffraction may occur, resulting in the standby mode, set the ND FILTER switch to a tripod is a common phenomenon with your camcorder attached to the respective position. ND FILTER You can record the subject clearly by using the ND filter when the recording environment is difficult to...
... extensively when recording a bright subject, diffraction may occur, resulting in the standby mode, set the ND FILTER switch to a tripod is a common phenomenon with your camcorder attached to the respective position. ND FILTER You can record the subject clearly by using the ND filter when the recording environment is difficult to...

Operating Instructions
Page 34
... color intensity, brightness, white balance, etc. Customizing the picture quality or sound Customizing the picture quality - You can change the above default settings at your camcorder to 15 (clearer) 34 Recording
... color intensity, brightness, white balance, etc. Customizing the picture quality or sound Customizing the picture quality - You can change the above default settings at your camcorder to 15 (clearer) 34 Recording


