
Operating Instructions
Page 2
... the U.S.A. If you . Record the serial number in the literature accompanying the appliance. HDR-FX1 Serial No. You can help preserve our environment by returning your Sony dealer regarding recycling of important operating and maintenance (servicing) instructions in the space provided below...Regulatory Information Declaration of the FCC Rules. Telephone No.: 858-942-2230 This device complies with Part 15 of Conformity Trade Name: SONY Model No.: HDR-FX1 Responsible Party: Sony Electronics Inc. Operation is for future reference. For customers in the U.S.A. Read this first Before...
... the U.S.A. If you . Record the serial number in the literature accompanying the appliance. HDR-FX1 Serial No. You can help preserve our environment by returning your Sony dealer regarding recycling of important operating and maintenance (servicing) instructions in the space provided below...Regulatory Information Declaration of the FCC Rules. Telephone No.: 858-942-2230 This device complies with Part 15 of Conformity Trade Name: SONY Model No.: HDR-FX1 Responsible Party: Sony Electronics Inc. Operation is for future reference. For customers in the U.S.A. Read this first Before...
Operating Instructions
Page 3
... radio communications. However, there is no guarantee that interference will not occur in both HDV and DV formats. Notes on use Your camcorder is encouraged to try to Subpart B of Part 15 of such materials may be copyrighted. The HDV standards • Digital high-definition (HD) video signals are recorded and played...
... radio communications. However, there is no guarantee that interference will not occur in both HDV and DV formats. Notes on use Your camcorder is encouraged to try to Subpart B of Part 15 of such materials may be copyrighted. The HDV standards • Digital high-definition (HD) video signals are recorded and played...
Operating Instructions
Page 4
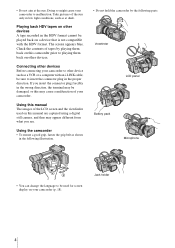
... compatible with an i.LINK cable, be used on your camcorder to insert the connector plug in the following illustration. • Do not hold the camcorder by the following parts. The screen appears blue. Take pictures of your camcorder to other device such as a VCR or a computer... with the HDV format. Connecting other devices Before connecting your camcorder. If you see. Viewfinder LCD panel ...
... compatible with an i.LINK cable, be used on your camcorder to insert the connector plug in the following illustration. • Do not hold the camcorder by the following parts. The screen appears blue. Take pictures of your camcorder to other device such as a VCR or a computer... with the HDV format. Connecting other devices Before connecting your camcorder. If you see. Viewfinder LCD panel ...
Operating Instructions
Page 7
...the (LCD/VF SET) menu - Signal conversion function ........81 Troubleshooting Troubleshooting 83 Warning indicators and messages .....88 Additional Information Using your camcorder - Advanced operations Using the Menu Selecting menu items 51 Using the (CAMERA SET) menu - STDYSHOT TYP/FRAME REC, etc 52 .../playback ..91 About the "InfoLITHIUM" battery pack 92 About i.LINK 94 Maintenance and precautions 95 Specification 98 Quick Reference Identifying parts and controls ...........100 Index 107 Note on the icons used in this manual : Features available for the HDV format only. ...
...the (LCD/VF SET) menu - Signal conversion function ........81 Troubleshooting Troubleshooting 83 Warning indicators and messages .....88 Additional Information Using your camcorder - Advanced operations Using the Menu Selecting menu items 51 Using the (CAMERA SET) menu - STDYSHOT TYP/FRAME REC, etc 52 .../playback ..91 About the "InfoLITHIUM" battery pack 92 About i.LINK 94 Maintenance and precautions 95 Specification 98 Quick Reference Identifying parts and controls ...........100 Index 107 Note on the icons used in this manual : Features available for the HDV format only. ...
Operating Instructions
Page 31
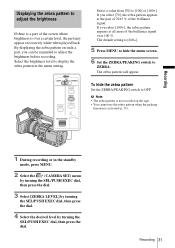
... appear excessively white when played back. b Note • The zebra pattern is not recorded on such a part, you select [100+], the zebra pattern appears at the part of 70±5 % of the screen where brightness is over 100 %. Recording 31 The default setting is activated (p. 33). To hide the zebra pattern Set...+]. 5 Press MENU to hide the menu screen. 6 Set the ZEBRA/PEAKING switch to ZEBRA. Displaying the zebra pattern to adjust the brightness If there is a part of the brilliance signal.
... appear excessively white when played back. b Note • The zebra pattern is not recorded on such a part, you select [100+], the zebra pattern appears at the part of 70±5 % of the screen where brightness is over 100 %. Recording 31 The default setting is activated (p. 33). To hide the zebra pattern Set...+]. 5 Press MENU to hide the menu screen. 6 Set the ZEBRA/PEAKING switch to ZEBRA. Displaying the zebra pattern to adjust the brightness If there is a part of the brilliance signal.
Operating Instructions
Page 35
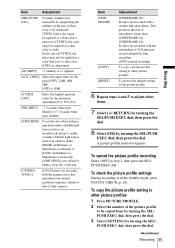
Item Adjustment [SKINTONE DTL] To make wrinkles less noticeable by suppressing the outlines on the part of skin color to be enhanced. [TYPE1] (the color range recognized as a skin color is narrow) to [TYPE3] (the color range recognized as a skin color ...] is 18dB. [AT IRIS LMT] Select the highest aperture value for the automatic adjustment (F11, F6.8, F4). [WB SHIFT] -7 (to make white parts bluish) to +7 (to make white parts reddish) [AWB SENS] To set the auto white balance operation under a reddish light source such as an incandescent lamp or candle, or under...
Item Adjustment [SKINTONE DTL] To make wrinkles less noticeable by suppressing the outlines on the part of skin color to be enhanced. [TYPE1] (the color range recognized as a skin color is narrow) to [TYPE3] (the color range recognized as a skin color ...] is 18dB. [AT IRIS LMT] Select the highest aperture value for the automatic adjustment (F11, F6.8, F4). [WB SHIFT] -7 (to make white parts bluish) to +7 (to make white parts reddish) [AWB SENS] To set the auto white balance operation under a reddish light source such as an incandescent lamp or candle, or under...
Operating Instructions
Page 96
...not a malfunction. When there are fingerprints on the screen during recording. • The video head suffers from being damaged. - A part of time. Please contact your camcorder after a squall or a shower. • When you cannot record pictures normally, or distorted picture or sound is exposed to salty air... hour). Remove the bag when the air temperature inside the plastic bag has reached the surrounding temperature (after long use your Sony dealer or local authorized Sony service facility to clean it might be because the video head is worn. Leaving the case in blue. - Do not...
...not a malfunction. When there are fingerprints on the screen during recording. • The video head suffers from being damaged. - A part of time. Please contact your camcorder after a squall or a shower. • When you cannot record pictures normally, or distorted picture or sound is exposed to salty air... hour). Remove the bag when the air temperature inside the plastic bag has reached the surrounding temperature (after long use your Sony dealer or local authorized Sony service facility to clean it might be because the video head is worn. Leaving the case in blue. - Do not...

Operating Instructions
Page 97
... pre-installed button-type battery is set to a wall outlet using your camcorder to OFF (CHG) for a long time. While sliding the viewfinder release lever down 1, slide and remove the viewfinder 2. 2 Remove dust from inside the viewfinder and the part shown below with the POWER switch set to keep it will not...
... pre-installed button-type battery is set to a wall outlet using your camcorder to OFF (CHG) for a long time. While sliding the viewfinder release lever down 1, slide and remove the viewfinder 2. 2 Remove dust from inside the viewfinder and the part shown below with the POWER switch set to keep it will not...
Operating Instructions
Page 99
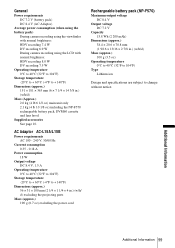
...;F) Storage temperature -20°C to + 60°C (-4°F to + 140°F) Dimensions (approx.) 56 × 31 × 100 mm (2 1/4 × 1 1/4 × 4 in.) (w/h/ d) excluding the projecting parts Mass (approx.) 190 g (6.7 oz) excluding the power cord Rechargeable battery pack (NP-F570) Maximum output voltage DC 8.4 V Output voltage DC 7.2 V Capacity 15.8 Wh (2 200 mAh...
...;F) Storage temperature -20°C to + 60°C (-4°F to + 140°F) Dimensions (approx.) 56 × 31 × 100 mm (2 1/4 × 1 1/4 × 4 in.) (w/h/ d) excluding the projecting parts Mass (approx.) 190 g (6.7 oz) excluding the power cord Rechargeable battery pack (NP-F570) Maximum output voltage DC 8.4 V Output voltage DC 7.2 V Capacity 15.8 Wh (2 200 mAh...

Operating Instructions
Page 100
I Battery pack (p. 11) J Shoe adaptor attaching part (p. 104) K Power zoom lever (p. 22) L EXPANDED FOCUS button (p. 32) M Grip belt (p. 4) 100 Quick Reference N POWER switch (p. 14) Quick Reference Identifying parts and controls Camcorder A SHOT TRANSITION operation buttons (p. 37) B Eyecup (p. 16) C Viewfinder release lever (p. 97) D Rear remote sensor E Rear camera recording lamp (p. 20) F BATT RELEASE (battery release) button (p. 12) G REC START/STOP button (p. 20) H i.LINK lamps (HDV/DV) (p. 73) Lights up when handling an i.LINK signal.
I Battery pack (p. 11) J Shoe adaptor attaching part (p. 104) K Power zoom lever (p. 22) L EXPANDED FOCUS button (p. 32) M Grip belt (p. 4) 100 Quick Reference N POWER switch (p. 14) Quick Reference Identifying parts and controls Camcorder A SHOT TRANSITION operation buttons (p. 37) B Eyecup (p. 16) C Viewfinder release lever (p. 97) D Rear remote sensor E Rear camera recording lamp (p. 20) F BATT RELEASE (battery release) button (p. 12) G REC START/STOP button (p. 20) H i.LINK lamps (HDV/DV) (p. 73) Lights up when handling an i.LINK signal.


