
Operating Instructions
Page 2
... Caution: Do not handle damaged or leaking Lithium-Ion batteries. Address: 16450 W. Telephone No.: 858-942-2230 This device complies with Part 15 of Conformity Trade Name: SONY Model No.: HDR-FX1 Responsible Party: Sony Electronics Inc. Record the serial number in the literature ...accompanying the appliance. and CANADA RECYCLING LITHIUM-ION BATTERIES Lithium-Ion batteries are located on the bottom. Bernardo Dr, San Diego...
... Caution: Do not handle damaged or leaking Lithium-Ion batteries. Address: 16450 W. Telephone No.: 858-942-2230 This device complies with Part 15 of Conformity Trade Name: SONY Model No.: HDR-FX1 Responsible Party: Sony Electronics Inc. Record the serial number in the literature ...accompanying the appliance. and CANADA RECYCLING LITHIUM-ION BATTERIES Lithium-Ion batteries are located on the bottom. Bernardo Dr, San Diego...
Operating Instructions
Page 4
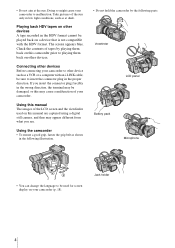
... a device that is not compatible with the HDV format. Viewfinder LCD panel Battery pack Microphone • You can change the language to malfunction. Doing so might cause your camcorder to be damaged, or this camcorder prior to insert the connector plug in the proper direction. Check the contents ...of the sun only in low light conditions, such as shown in the following illustration. • Do not hold the camcorder by playing them back on other devices A tape recorded in the wrong direction, the terminal may be used on this manual are captured using...
... a device that is not compatible with the HDV format. Viewfinder LCD panel Battery pack Microphone • You can change the language to malfunction. Doing so might cause your camcorder to be damaged, or this camcorder prior to insert the connector plug in the proper direction. Check the contents ...of the sun only in low light conditions, such as shown in the following illustration. • Do not hold the camcorder by playing them back on other devices A tape recorded in the wrong direction, the terminal may be used on this manual are captured using...
Operating Instructions
Page 5
... speed 29 Adjusting the volume of Contents Read this first 2 Quick Start Guide Recording movies 8 Getting started Step 1: Checking supplied items 10 Step 2: Charging the battery pack 11 Using an outside power source 14 Step 3: Turning the power on 14 Step 4: Adjusting the LCD panel and viewfinder 15 Adjusting the LCD...
... speed 29 Adjusting the volume of Contents Read this first 2 Quick Start Guide Recording movies 8 Getting started Step 1: Checking supplied items 10 Step 2: Charging the battery pack 11 Using an outside power source 14 Step 3: Turning the power on 14 Step 4: Adjusting the LCD panel and viewfinder 15 Adjusting the LCD...
Operating Instructions
Page 7
... Using the (IN/OUT REC) menu - Signal conversion function ........81 Troubleshooting Troubleshooting 83 Warning indicators and messages .....88 Additional Information Using your camcorder - AUDIO MIX, etc 56 Using the (LCD/VF SET) menu - STDYSHOT TYP/FRAME REC, etc 52 Using the (AUDIO SET) ...77 Dubbing sound to a recorded tape 78 Connecting an analog VCR to the computer via your camcorder abroad 90 HDV format and recording/playback ..91 About the "InfoLITHIUM" battery pack 92 About i.LINK 94 Maintenance and precautions 95 Specification 98 Quick Reference Identifying parts and ...
... Using the (IN/OUT REC) menu - Signal conversion function ........81 Troubleshooting Troubleshooting 83 Warning indicators and messages .....88 Additional Information Using your camcorder - AUDIO MIX, etc 56 Using the (LCD/VF SET) menu - STDYSHOT TYP/FRAME REC, etc 52 Using the (AUDIO SET) ...77 Dubbing sound to a recorded tape 78 Connecting an analog VCR to the computer via your camcorder abroad 90 HDV format and recording/playback ..91 About the "InfoLITHIUM" battery pack 92 About i.LINK 94 Maintenance and precautions 95 Specification 98 Quick Reference Identifying parts and ...
Operating Instructions
Page 8
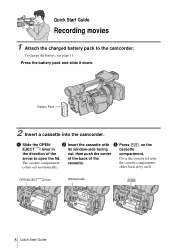
OPEN/EJECT lever Window-side 8 Quick Start Guide Quick Start Guide Recording movies 1 Attach the charged battery pack to open the lid. Press the battery pack and slide it down. of the back of the out, then push the center compartment. the cassette compartment comes out automatically. a Slide the OPEN/ b ... itself. slides back in its window-side facing cassette the direction of the Close the cassette lid after The cassette compartment cassette. To charge the battery, see page 11. Battery Pack 2 Insert a cassette into the camcorder. arrow to the...
OPEN/EJECT lever Window-side 8 Quick Start Guide Quick Start Guide Recording movies 1 Attach the charged battery pack to open the lid. Press the battery pack and slide it down. of the back of the out, then push the center compartment. the cassette compartment comes out automatically. a Slide the OPEN/ b ... itself. slides back in its window-side facing cassette the direction of the Close the cassette lid after The cassette compartment cassette. To charge the battery, see page 11. Battery Pack 2 Insert a cassette into the camcorder. arrow to the...
Operating Instructions
Page 10
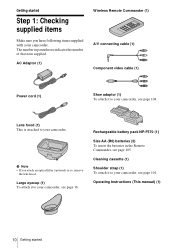
...items Make sure you attach an optical filter (optional) or so, remove the lens hood. Lens hood (1) This is attached to your camcorder, see page 105. The number in the Remote Commander, see page 104. Getting started AC Adaptor (1) Wireless Remote Commander (1) A/V ... attach it to your camcorder. b Note • If you have following items supplied with your camcorder, see page 16. Cleaning cassette (1) Shoulder strap (1) To attach it to your camcorder. Rechargeable battery pack NP-F570 (1) Size AA (R6) batteries (2) To insert the batteries in parentheses indicates the number...
...items Make sure you attach an optical filter (optional) or so, remove the lens hood. Lens hood (1) This is attached to your camcorder, see page 105. The number in the Remote Commander, see page 104. Getting started AC Adaptor (1) Wireless Remote Commander (1) A/V ... attach it to your camcorder. b Note • If you have following items supplied with your camcorder, see page 16. Cleaning cassette (1) Shoulder strap (1) To attach it to your camcorder. Rechargeable battery pack NP-F570 (1) Size AA (R6) batteries (2) To insert the batteries in parentheses indicates the number...
Operating Instructions
Page 11
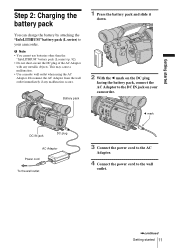
... plug AC Adaptor Power cord To the wall outlet 3 Connect the power cord to the AC Adaptor. 4 Connect the power cord to your camcorder. Disconnect the AC Adaptor from the wall outlet immediately if any metallic objects. This may cause a malfunction. • Use a nearby wall... outlet when using the AC Adaptor. b Note • You cannot use batteries other than the "InfoLITHIUM" battery pack (L series) (p. 92). • Do not short-circuit the DC plug of the AC Adaptor with any malfunction occurs. Getting started ...
... plug AC Adaptor Power cord To the wall outlet 3 Connect the power cord to the AC Adaptor. 4 Connect the power cord to your camcorder. Disconnect the AC Adaptor from the wall outlet immediately if any metallic objects. This may cause a malfunction. • Use a nearby wall... outlet when using the AC Adaptor. b Note • You cannot use batteries other than the "InfoLITHIUM" battery pack (L series) (p. 92). • Do not short-circuit the DC plug of the AC Adaptor with any malfunction occurs. Getting started ...
Operating Instructions
Page 12
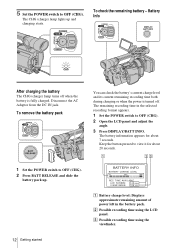
...panel and adjust the angle. 3 Press DISPLAY/BATT INFO. The battery information appears for about 7 seconds. BATTERY INFO BATTERY CHARGE LEVEL 0% 50% 100% REC T I ME AVA I LABLE LCD SCREEN: 1 1 0 min V I EWF I NDER: 1 2 5 min A Battery charge level: Displays approximate remaining amount of power left in the ...the POWER switch to OFF (CHG). The CHG (charge) lamp lights up . To check the remaining battery - To remove the battery pack You can check the battery's current charge level and its current remaining recording time both during charging or when the power is fully charged...
...panel and adjust the angle. 3 Press DISPLAY/BATT INFO. The battery information appears for about 7 seconds. BATTERY INFO BATTERY CHARGE LEVEL 0% 50% 100% REC T I ME AVA I LABLE LCD SCREEN: 1 1 0 min V I EWF I NDER: 1 2 5 min A Battery charge level: Displays approximate remaining amount of power left in the ...the POWER switch to OFF (CHG). The CHG (charge) lamp lights up . To check the remaining battery - To remove the battery pack You can check the battery's current charge level and its current remaining recording time both during charging or when the power is fully charged...
Operating Instructions
Page 13
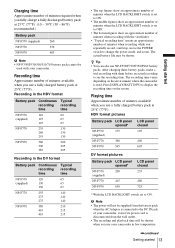
...NP-F570 (supplied) 260 NP-F770 370 NP-F970 485 b Note • NP-F330/F530/500/510/710 battery packs cannot be shorter when you use your camcorder in the DV format Battery pack Continuous Typical recording recording time time NP-F570 120 65 (supplied) 130 65 130 65 NP-F770 255 140...minutes when recording with them before an actual recording to change the power mode, and zoom. The actual battery life may be shorter. Press DISPLAY/BATT INFO to the DC IN jack of your camcorder, even if its power cord is set to OFF. • The bottom figures show an approximate ...
...NP-F570 (supplied) 260 NP-F770 370 NP-F970 485 b Note • NP-F330/F530/500/510/710 battery packs cannot be shorter when you use your camcorder in the DV format Battery pack Continuous Typical recording recording time time NP-F570 120 65 (supplied) 130 65 130 65 NP-F770 255 140...minutes when recording with them before an actual recording to change the power mode, and zoom. The actual battery life may be shorter. Press DISPLAY/BATT INFO to the DC IN jack of your camcorder, even if its power cord is set to OFF. • The bottom figures show an approximate ...

Operating Instructions
Page 14
... switch. To turn off , AC power (house current) is still supplied to it is attached to your camcorder. • The CHG (charge) lamp flashes during charging, or the battery information will not lose its charge even when it while connected to the wall outlet via the AC Adaptor. ... the POWER switch to the respective power mode to record or play or edit pictures. The battery pack is not attached correctly. - PRECAUTION Even if your camcorder as the power source when you are using this camcorder for the first time, the [CLOCK SET] screen appears (p. 16). Step 3: Turning the ...
... switch. To turn off , AC power (house current) is still supplied to it is attached to your camcorder. • The CHG (charge) lamp flashes during charging, or the battery information will not lose its charge even when it while connected to the wall outlet via the AC Adaptor. ... the POWER switch to the respective power mode to record or play or edit pictures. The battery pack is not attached correctly. - PRECAUTION Even if your camcorder as the power source when you are using this camcorder for the first time, the [CLOCK SET] screen appears (p. 16). Step 3: Turning the ...
Operating Instructions
Page 15
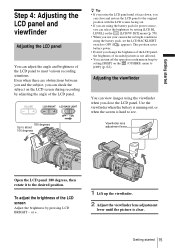
...• You can turn off the operation confirmation beep by setting [BEEP] on the [LCD/VF SET] menu (p. 58). • When you use your camcorder in bright conditions using the viewfinder when you change the brightness of the LCD panel, the brightness of the LCD panel to meet various recording...screen facing out. • If you are obstructions between you and the subject, you can select the brightness by pressing LCD BRIGHT - This position saves battery power. • Even if you close and restore the LCD panel to [OFF] (p. 62). To adjust the brightness of the LCD panel. 180 ...
...• You can turn off the operation confirmation beep by setting [BEEP] on the [LCD/VF SET] menu (p. 58). • When you use your camcorder in bright conditions using the viewfinder when you change the brightness of the LCD panel, the brightness of the LCD panel to meet various recording...screen facing out. • If you are obstructions between you and the subject, you can select the brightness by pressing LCD BRIGHT - This position saves battery power. • Even if you close and restore the LCD panel to [OFF] (p. 62). To adjust the brightness of the LCD panel. 180 ...
Operating Instructions
Page 16
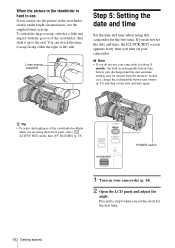
... • If you do not set the date and time, the [CLOCK SET] screen appears every time you turn on your camcorder. In that case, charge the rechargeable button-type battery (p. 97) and then set the clock for the first time. Proceed to step 6 when you set the date and time again... facing either the right or left side. POWER switch 1 Turn on your camcorder (p. 14). 2 Open the LCD panel and adjust the angle. Large eyecup (supplied) Step 5: Setting the date and time Set the date and time when using the battery pack, select (LCD/VF SET) menu, then [VF B.LIGHT] (p. 58). z Tip •...
... • If you do not set the date and time, the [CLOCK SET] screen appears every time you turn on your camcorder. In that case, charge the rechargeable button-type battery (p. 97) and then set the clock for the first time. Proceed to step 6 when you set the date and time again... facing either the right or left side. POWER switch 1 Turn on your camcorder (p. 14). 2 Open the LCD panel and adjust the angle. Large eyecup (supplied) Step 5: Setting the date and time Set the date and time when using the battery pack, select (LCD/VF SET) menu, then [VF B.LIGHT] (p. 58). z Tip •...
Operating Instructions
Page 21
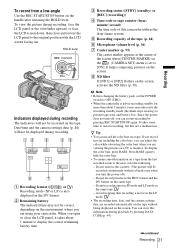
... cassette. (The picture will be correct, depending on the screen. When you open or close and restore the LCD panel to restart recording, but this camcorder utilizes the drop-frame system. C Recording status ([STBY] (standby) or [REC] (recording)) D Time code or tape counter (hour: minute: second...this not a malfunction. If you record movies including the color bars, you are using your camcorder exits the recording standby mode (the drum stops rotating) to prevent tape wear and battery loss. Since the power does not turn the power off , you can adjust the color while...
... cassette. (The picture will be correct, depending on the screen. When you open or close and restore the LCD panel to restart recording, but this camcorder utilizes the drop-frame system. C Recording status ([STBY] (standby) or [REC] (recording)) D Time code or tape counter (hour: minute: second...this not a malfunction. If you record movies including the color bars, you are using your camcorder exits the recording standby mode (the drum stops rotating) to prevent tape wear and battery loss. Since the power does not turn the power off , you can adjust the color while...
Operating Instructions
Page 42
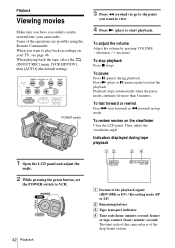
...playback signal (HDV1080i or DV) / Recording mode (SP or LP) B Remaining battery C Tape transport indicator D Time code (hour: minute: second: frame) or tape counter (hour: minute: second) The time code of this camcorder is of the operations are possible using the Remote Commander. To review movies on... your camcorder. Playback Viewing movies Make sure you want to view. 4 Press N (play) to restart the playback...
...playback signal (HDV1080i or DV) / Recording mode (SP or LP) B Remaining battery C Tape transport indicator D Time code (hour: minute: second: frame) or tape counter (hour: minute: second) The time code of this camcorder is of the operations are possible using the Remote Commander. To review movies on... your camcorder. Playback Viewing movies Make sure you want to view. 4 Press N (play) to restart the playback...

Operating Instructions
Page 80
The adjusted audio balance returns to the default setting about 5 minutes after the battery pack or other power sources have been disconnected. 6 Press MENU to adjust the balance between the original sound (ST1) and the sound recorded afterwards (ST2), then press the dial. 5 Turn the SEL/PUSH EXEC dial to hide the menu screen. 80 Dubbing/Editing The original sound (ST1) is output in the default setting.
The adjusted audio balance returns to the default setting about 5 minutes after the battery pack or other power sources have been disconnected. 6 Press MENU to adjust the balance between the original sound (ST1) and the sound recorded afterwards (ST2), then press the dial. 5 Turn the SEL/PUSH EXEC dial to hide the menu screen. 80 Dubbing/Editing The original sound (ST1) is output in the default setting.

Operating Instructions
Page 83
...mechanism. See page 88 for a long time. cAttach a charged battery pack to the wall outlet (p. 14). cUse the AC Adaptor to connect to the camcorder (p. 11). If the functions still do not work, press the RESET button using your Sony dealer. The supplied Remote Commander does not function. polarities correctly ... Troubleshooting 83 If the lamp still does not light up, then it after about 1 minute. The camcorder does not operate even when the power is set to on. If you run into the battery compartment with the POWER switch set to OFF (CHG) or VCR. • This is activated. ...
...mechanism. See page 88 for a long time. cAttach a charged battery pack to the wall outlet (p. 14). cUse the AC Adaptor to connect to the camcorder (p. 11). If the functions still do not work, press the RESET button using your Sony dealer. The supplied Remote Commander does not function. polarities correctly ... Troubleshooting 83 If the lamp still does not light up, then it after about 1 minute. The camcorder does not operate even when the power is set to on. If you run into the battery compartment with the POWER switch set to OFF (CHG) or VCR. • This is activated. ...

Operating Instructions
Page 84
...indicator (p. 64). 84 Troubleshooting cFully charge the battery again to OFF (CHG). Then, connect it again (p. 11). Cassette Memory. The battery pack may be ejected from the wall outlet and contact your Sony dealer. The battery pack is quickly discharged. • The ...is not a malfunction. cTurn off frequently although the remaining battery indicator indicates that the battery pack has enough power to the AC Adaptor. cAttach a charged battery pack to the camcorder correctly. The remaining battery time indicator does not indicate the correct time. • ...
...indicator (p. 64). 84 Troubleshooting cFully charge the battery again to OFF (CHG). Then, connect it again (p. 11). Cassette Memory. The battery pack may be ejected from the wall outlet and contact your Sony dealer. The battery pack is quickly discharged. • The ...is not a malfunction. cTurn off frequently although the remaining battery indicator indicates that the battery pack has enough power to the AC Adaptor. cAttach a charged battery pack to the camcorder correctly. The remaining battery time indicator does not indicate the correct time. • ...

Operating Instructions
Page 85
... screen. The picture is not displayed in the (CAMERA SET) menu (p. 54). cSet the POWER switch to H or L (p. 22). cCharge the battery pack (p. 11). cSet the handle zoom switch to CAMERA (p. 14). cPress the ASSIGN button assigned to REC or insert a new cassette (p. 91). ...-protect tab to the SteadyShot (p. 68). screen. The picture in the dark. ,continued Troubleshooting 85 Remove the cassette and leave your camcorder for auto focus. The power abruptly turns off. cWhen using the zoom lever on the cRefer to moisture condensation. This is recording candlelight...
... screen. The picture is not displayed in the (CAMERA SET) menu (p. 54). cSet the POWER switch to H or L (p. 22). cCharge the battery pack (p. 11). cSet the handle zoom switch to CAMERA (p. 14). cPress the ASSIGN button assigned to REC or insert a new cassette (p. 91). ...-protect tab to the SteadyShot (p. 68). screen. The picture in the dark. ,continued Troubleshooting 85 Remove the cassette and leave your camcorder for auto focus. The power abruptly turns off. cWhen using the zoom lever on the cRefer to moisture condensation. This is recording candlelight...
Operating Instructions
Page 88
... is nearly used . Remove and insert the cassette, then operate your camcorder for at least 1 hour, then re-insert the cassette (p. 95). cChange the tape. Inform them of times, contact your Sony dealer or local authorized Sony service facility. C:04:ss cA battery pack that are approximately 5 to 10 minutes remaining. % (Moisture condensation warning...
... is nearly used . Remove and insert the cassette, then operate your camcorder for at least 1 hour, then re-insert the cassette (p. 95). cChange the tape. Inform them of times, contact your Sony dealer or local authorized Sony service facility. C:04:ss cA battery pack that are approximately 5 to 10 minutes remaining. % (Moisture condensation warning...

Operating Instructions
Page 89
... added to correct tape format. x Dirty video head. cThe cassette might be played back because of a tape. cSee page 78. cSee page 78. Old battery. Turn off for the pictures recorded in SHOT-A. Q Insert a cassette. Q Z The tape is low. Not recorded in A (p. 37). Cannot add...page 92. - cSee page 78 cRegister a setting in SP mode. cRegister a setting in 12-bit audio. cSee page 96. * Appears only for 1H. Battery level is locked - Z Re-attach the power source. % Z Moisture condensation. Eject the cassette. % Moisture condensation. Disconnect the i.LINK cable. Cannot add ...
... added to correct tape format. x Dirty video head. cThe cassette might be played back because of a tape. cSee page 78. cSee page 78. Old battery. Turn off for the pictures recorded in SHOT-A. Q Insert a cassette. Q Z The tape is low. Not recorded in A (p. 37). Cannot add...page 92. - cSee page 78 cRegister a setting in SP mode. cRegister a setting in 12-bit audio. cSee page 96. * Appears only for 1H. Battery level is locked - Z Re-attach the power source. % Z Moisture condensation. Eject the cassette. % Moisture condensation. Disconnect the i.LINK cable. Cannot add ...


