
Operating Instructions
Page 3
... has been dropped. Important Safety Instructions 1) Read these instructions. 2) Keep these instructions. 3) Heed all warnings. 4) Follow all servicing to qualified service personnel. Install in this manual could void your authority to operate this apparatus near any way, such as radiators, heat registers, stoves, or other . The wide blade or the third...
... has been dropped. Important Safety Instructions 1) Read these instructions. 2) Keep these instructions. 3) Heed all warnings. 4) Follow all servicing to qualified service personnel. Install in this manual could void your authority to operate this apparatus near any way, such as radiators, heat registers, stoves, or other . The wide blade or the third...
Operating Instructions
Page 5
... of this product. and other side. Unit HCD-DJ2i - Speaker System • Front speakers SS-DJ2i • Subwoofer SA-WG2i 5GB Tracks in the... is recognized as the first session. Note on this manual The LBT-DJ2i consists of Sony Corporation. Music discs encoded with digital audio material on ...DualDiscs A DualDisc is a trademark of Apple Inc., registered in the second and subsequent sessions are played back if they are marketed by this product is a trademark of : - iPod...
... of this product. and other side. Unit HCD-DJ2i - Speaker System • Front speakers SS-DJ2i • Subwoofer SA-WG2i 5GB Tracks in the... is recognized as the first session. Note on this manual The LBT-DJ2i consists of Sony Corporation. Music discs encoded with digital audio material on ...DualDiscs A DualDisc is a trademark of Apple Inc., registered in the second and subsequent sessions are played back if they are marketed by this product is a trademark of : - iPod...
Operating Instructions
Page 6
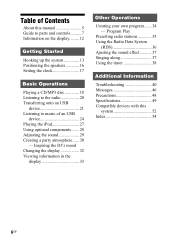
... 37 Singing along 37 Using the timer 38 Additional Information Troubleshooting 40 Messages 46 Precautions 48 Specifications 49 Compatible devices with this manual 5 Guide to parts and controls.......... 7 Information on the display......... 12 Getting Started Hooking up the system 13 Positioning the speakers...a CD/MP3 disc 18 Listening to the radio 20 Transferring onto an USB device 21 Listening to music of Contents About this system 52 Index 54 6GB Table of an USB device 24 Playing the iPod 27 Using optional components ....... 28 Adjusting the sound 29 Creating a party...
... 37 Singing along 37 Using the timer 38 Additional Information Troubleshooting 40 Messages 46 Precautions 48 Specifications 49 Compatible devices with this manual 5 Guide to parts and controls.......... 7 Information on the display......... 12 Getting Started Hooking up the system 13 Positioning the speakers...a CD/MP3 disc 18 Listening to the radio 20 Transferring onto an USB device 21 Listening to music of Contents About this system 52 Index 54 6GB Table of an USB device 24 Playing the iPod 27 Using optional components ....... 28 Adjusting the sound 29 Creating a party...

Operating Instructions
Page 7
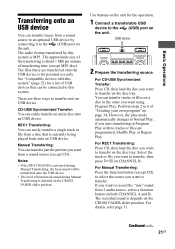
qa qsqd3 9 wj qf wh qg wg wf qh < < wd ws qj wa w; Front view 12 3 4 - ql 4 qk Continued l 7GB Top view 87 65 9 q; Unit - Guide to parts and controls Guide to parts and controls This manual mainly explains operations using the buttons on the unit, but the same operations can also be performed using the buttons on the remote having the same or similar names.
qa qsqd3 9 wj qf wh qg wg wf qh < < wd ws qj wa w; Front view 12 3 4 - ql 4 qk Continued l 7GB Top view 87 65 9 q; Unit - Guide to parts and controls Guide to parts and controls This manual mainly explains operations using the buttons on the unit, but the same operations can also be performed using the buttons on the remote having the same or similar names.
Operating Instructions
Page 21
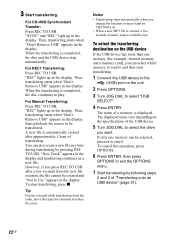
... of transferring time (except MP3 disc). Continued l 21GB Basic Operations Transferring onto an USB device You can transfer music from a sound source to an optional USB device by this system. For Manual Transferring: Press the function button (except CD) to select the source you want using...function button on CHANNEL B. The files those are three ways to this system is activated during Manual Transferring, the beat sound will be connected to transfer onto an USB device. You can transfer tracks or files on the CROSS FADER slider position. REC1 Transferring: You...
... of transferring time (except MP3 disc). Continued l 21GB Basic Operations Transferring onto an USB device You can transfer music from a sound source to an optional USB device by this system. For Manual Transferring: Press the function button (except CD) to select the source you want using...function button on CHANNEL B. The files those are three ways to this system is activated during Manual Transferring, the beat sound will be connected to transfer onto an USB device. You can transfer tracks or files on the CROSS FADER slider position. REC1 Transferring: You...
Operating Instructions
Page 22
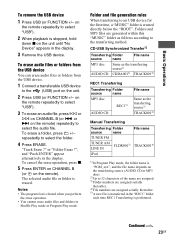
...created, a few seconds from the radio, move the respective antenna to select "USB SELECT". 4 Press ENTER. Then, transferring starts when "Don't Remove USB" appears in the display. For Manual Transferring: Press REC TO USB. If only one memory (for example, internal memory and a memory card), you... want. Start playback the source to the (USB) port on CHANNEL B. • When a new ...
...created, a few seconds from the radio, move the respective antenna to select "USB SELECT". 4 Press ENTER. Then, transferring starts when "Don't Remove USB" appears in the display. For Manual Transferring: Press REC TO USB. If only one memory (for example, internal memory and a memory card), you... want. Start playback the source to the (USB) port on CHANNEL B. • When a new ...
Operating Instructions
Page 23
...folder as follows according to the transferring method. To cancel the erase operation, press x. 5 Press ENTER on CHANNEL B (or on the unit. 2 Press USB (or FUNCTION +/- Notes • The program list is erased. or > on CHANNEL B (or . or "Folder Erase ?", and "Push ENTER" appear ...Transferring Transferring Folder source name MP3 disc REC15) AUDIO CD File name Same as the transferring source2) TRACK0014) Manual Transferring Transferring Folder source name TUNER FM TUNER AM FLDR0013) LINE IN iPod File name TRACK0014) 1) In Program Play mode, the folder name is performed.
...folder as follows according to the transferring method. To cancel the erase operation, press x. 5 Press ENTER on CHANNEL B (or on the unit. 2 Press USB (or FUNCTION +/- Notes • The program list is erased. or > on CHANNEL B (or . or "Folder Erase ?", and "Push ENTER" appear ...Transferring Transferring Folder source name MP3 disc REC15) AUDIO CD File name Same as the transferring source2) TRACK0014) Manual Transferring Transferring Folder source name TUNER FM TUNER AM FLDR0013) LINE IN iPod File name TRACK0014) 1) In Program Play mode, the folder name is performed.
Operating Instructions
Page 31
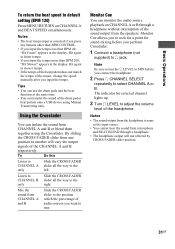
... only. Note Be sure to turn the i LEVEL to the position which the percentage of the drum pad or beat pattern onto a USB device using the Crossfader. Basic Operations To return the beat speed to the right. Notes • The beat tempo input is same as the input ... Cue allows you to seek for a point for selected channel lights up. 3 Turn i LEVEL to adjust the volume level of the music, change the speed manually after you perform Crossfader. 1 Connect a headphone (not supplied) to select CHANNEL A or B. To Do this Listen to CHANNEL A only Slide the CROSS FADER slider all...
... only. Note Be sure to turn the i LEVEL to the position which the percentage of the drum pad or beat pattern onto a USB device using the Crossfader. Basic Operations To return the beat speed to the right. Notes • The beat tempo input is same as the input ... Cue allows you to seek for a point for selected channel lights up. 3 Turn i LEVEL to adjust the volume level of the music, change the speed manually after you perform Crossfader. 1 Connect a headphone (not supplied) to select CHANNEL A or B. To Do this Listen to CHANNEL A only Slide the CROSS FADER slider all...
Operating Instructions
Page 39
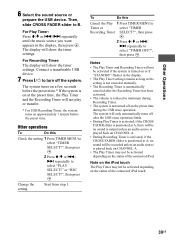
... want appears in the display. • The Play Timer setting remains as long as the setting is not canceled manually. • The Recording Timer is automatically canceled after the USB erase operation finish. • During Play Timer is activated, if the CROSS FADER slider is positioned at A, there... will be no sound will not play or transfer. * For USB Recording Timer, the system turns on the status of the connected iPod. Other Operations 6 Select the sound source or prepare the USB device. To Do this Check the setting 1 Press TIMER MENU to select "TIMER ...
... want appears in the display. • The Play Timer setting remains as long as the setting is not canceled manually. • The Recording Timer is automatically canceled after the USB erase operation finish. • During Play Timer is activated, if the CROSS FADER slider is positioned at A, there... will be no sound will not play or transfer. * For USB Recording Timer, the system turns on the status of the connected iPod. Other Operations 6 Select the sound source or prepare the USB device. To Do this Check the setting 1 Press TIMER MENU to select "TIMER ...

Operating Instructions
Page 54
... BLEND 30 Beat speed 30 C CD-USB Synchonized Transfer 21 COLD RESET 46 Compatible iPod with this system 53 Compatible USB devices with this system 52 Crossfader 31 D Demonstration 14, 32 Display 12 Display mode 32 F FM MODE 20 H Handling discs 48 Hooking up the system 13 M Manual Transferring 21 Monitor cue 31 MP3...
... BLEND 30 Beat speed 30 C CD-USB Synchonized Transfer 21 COLD RESET 46 Compatible iPod with this system 53 Compatible USB devices with this system 52 Crossfader 31 D Demonstration 14, 32 Display 12 Display mode 32 F FM MODE 20 H Handling discs 48 Hooking up the system 13 M Manual Transferring 21 Monitor cue 31 MP3...

