
Primary User Manual
Page 2
... Canadian ICES-003. For the customers in this manual describe the controls on the remote if they have any questions about this product, you may cause harmful interference to ...expressly approved in this manual is located inside of Conformity Trade name: SONY Model No.: HAR-D1000 Responsible Party: Sony Electronics Inc. WARNING To prevent fire or shock hazard, do not open...separation between the equipment and receiver. • Connect the equipment into an outlet on the recorder. Regulatory Information Declaration of the unit. Address: 680 Kinderkamack Road, Oradell, NJ 07649 USA ...
... Canadian ICES-003. For the customers in this manual describe the controls on the remote if they have any questions about this product, you may cause harmful interference to ...expressly approved in this manual is located inside of Conformity Trade name: SONY Model No.: HAR-D1000 Responsible Party: Sony Electronics Inc. WARNING To prevent fire or shock hazard, do not open...separation between the equipment and receiver. • Connect the equipment into an outlet on the recorder. Regulatory Information Declaration of the unit. Address: 680 Kinderkamack Road, Oradell, NJ 07649 USA ...

Primary User Manual
Page 3
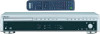
... Identification Front Panel 4 Rear Panel 4 Remote Control 5 Overview Getting Started Inserting batteries into the remote ......... 7 Hooking up the system 7 Playing CDs Loading a CD 9 Playing a CD -- Normal Play/Shuffle Play/ Repeat Play 9 Using the CD display 10 Programming the CD tracks 11 Recording to HDD Notes on handling the hard disc .......... 33 Troubleshooting 33 Display Messages...
... Identification Front Panel 4 Rear Panel 4 Remote Control 5 Overview Getting Started Inserting batteries into the remote ......... 7 Hooking up the system 7 Playing CDs Loading a CD 9 Playing a CD -- Normal Play/Shuffle Play/ Repeat Play 9 Using the CD display 10 Programming the CD tracks 11 Recording to HDD Notes on handling the hard disc .......... 33 Troubleshooting 33 Display Messages...

Primary User Manual
Page 4
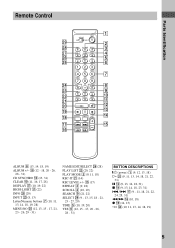
... - 18, 20 - 27, 29 - 31) CD SYNC qf (13, 31) CD H 4 (9, 11, 14) CD X 5 (9) CD x 6 (8, 9, 13, 14) CD l/L 8 (9, 10. 11) CLEAR qj (8, 16, 17, 28) Disc tray wf (9) DISPLAY w; (10, 19, 22) Display wd (10, 19, 21) HDD indicator 7 (33) HDD H 9 (13, 14, 18, 21, 22, 31) HDD X 0 (13, 14, 18..., 27, 28, 31) HDD z qs (14, 15) INPUT qg (8, 13) MENU/NO ws (12, 13, 15 - 17, 21, 23 - 27, 29 - 31) OPEN/CLOSE A 3 (9, 10) Remote sensor wa (7) SEARCH/CHAR ql (21, 22, 27) STANDBY indicator 2 (9, 12, 13, 18) YES qh (12, 15 - 17, 20 - 31) BUTTON DESCRIPTIONS @/1 (power) 1 (9, 12, 13...
... - 18, 20 - 27, 29 - 31) CD SYNC qf (13, 31) CD H 4 (9, 11, 14) CD X 5 (9) CD x 6 (8, 9, 13, 14) CD l/L 8 (9, 10. 11) CLEAR qj (8, 16, 17, 28) Disc tray wf (9) DISPLAY w; (10, 19, 22) Display wd (10, 19, 21) HDD indicator 7 (33) HDD H 9 (13, 14, 18, 21, 22, 31) HDD X 0 (13, 14, 18..., 27, 28, 31) HDD z qs (14, 15) INPUT qg (8, 13) MENU/NO ws (12, 13, 15 - 17, 21, 23 - 27, 29 - 31) OPEN/CLOSE A 3 (9, 10) Remote sensor wa (7) SEARCH/CHAR ql (21, 22, 27) STANDBY indicator 2 (9, 12, 13, 18) YES qh (12, 15 - 17, 20 - 31) BUTTON DESCRIPTIONS @/1 (power) 1 (9, 12, 13...
Primary User Manual
Page 5
... MNO 456 PQRS TUV WXYZ 789 ALBUM >10 10/0 INPUT SEARCH CLEAR HIGHREC-IT PLAY LIST LIGHT CD SYNCHRO ALBUM - < ALBUM + > REC LEVEL 1 2 3 4 5 6 7 8 9 q; Parts Identification Remote Control wl wk wj wh wg wf wd ws wa w; qg (17) REPEAT 3 (9, 18) SCROLL 4 (10, 19) SEARCH 9 (21, 22) SELECT wl (9 - 13, 15, 18...
... MNO 456 PQRS TUV WXYZ 789 ALBUM >10 10/0 INPUT SEARCH CLEAR HIGHREC-IT PLAY LIST LIGHT CD SYNCHRO ALBUM - < ALBUM + > REC LEVEL 1 2 3 4 5 6 7 8 9 q; Parts Identification Remote Control wl wk wj wh wg wf wd ws wa w; qg (17) REPEAT 3 (9, 18) SCROLL 4 (10, 19) SEARCH 9 (21, 22) SELECT wl (9 - 13, 15, 18...
Primary User Manual
Page 7
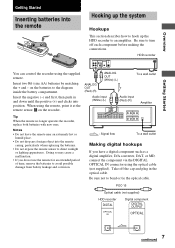
... on the batteries to the diagram inside the battery compartment. ANALOG OUT (Red) (R) ANALOG OUT (White) (L) To a wall outlet Audio input (White) (L) Audio input (Red) (R) Amplifier Tip When the remote no longer operates the recorder, replace both batteries with new ones. Take off each component before making the connections. Be sure to bend or...
... on the batteries to the diagram inside the battery compartment. ANALOG OUT (Red) (R) ANALOG OUT (White) (L) To a wall outlet Audio input (White) (L) Audio input (Red) (R) Amplifier Tip When the remote no longer operates the recorder, replace both batteries with new ones. Take off each component before making the connections. Be sure to bend or...

Primary User Manual
Page 8
...-ROM. • If "Din Unlock" or "Cannot Copy" flashes in the recorder, demonstration mode is activated automatically when the recorder is stopped for HAR-D1000 Operating Instructions". Demonstration mode When you turn off until you disconnect the power cord of the recorder. on the remote. Demonstration mode is turned off the demonstration mode. By connecting the...
...-ROM. • If "Din Unlock" or "Cannot Copy" flashes in the recorder, demonstration mode is activated automatically when the recorder is stopped for HAR-D1000 Operating Instructions". Demonstration mode When you turn off until you disconnect the power cord of the recorder. on the remote. Demonstration mode is turned off the demonstration mode. By connecting the...

Primary User Manual
Page 9
... on page 11) PROGRAM. 2 Press CD H. All the tracks in original order Select No display. The disc tray slides out. 4 Load a disc on the remote repeatedly to select the play The disc in random order. To play mode. Repeat Play Operations You can play the CD tracks repeatedly in any order... inner circle of the tray. 5 Press OPEN/CLOSE A again to close the disc tray. Other Operations To Stop playback Pause Select a track Do this recorder. 2 Press @/1 to turn on the CD in SHUFFLE. REPEAT 1. The recorder repeats the tracks as follows: When the CD is stopped, press PLAY MODE on...
... on page 11) PROGRAM. 2 Press CD H. All the tracks in original order Select No display. The disc tray slides out. 4 Load a disc on the remote repeatedly to select the play The disc in random order. To play mode. Repeat Play Operations You can play the CD tracks repeatedly in any order... inner circle of the tray. 5 Press OPEN/CLOSE A again to close the disc tray. Other Operations To Stop playback Pause Select a track Do this recorder. 2 Press @/1 to turn on the CD in SHUFFLE. REPEAT 1. The recorder repeats the tracks as follows: When the CD is stopped, press PLAY MODE on...

Primary User Manual
Page 10
... a track is selected, the total number of 12 or more characters by pressing the SCROLL button on the remote. When Program Play is playing. If the CD has no CD in the recorder, "No Disc" appears in the program and the total playing time of the program are pressing and holding down m/M on... the remote during playback, and release it at all times. • You can scroll a title of tracks in the display...
... a track is selected, the total number of 12 or more characters by pressing the SCROLL button on the remote. When Program Play is playing. If the CD has no CD in the recorder, "No Disc" appears in the program and the total playing time of the program are pressing and holding down m/M on... the remote during playback, and release it at all times. • You can scroll a title of tracks in the display...
Primary User Manual
Page 11
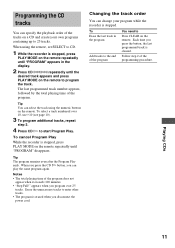
...tracks, repeat step 2. 4 Press CD H to Press CLEAR on the remote. Playing CDs 11 Programming the CD tracks You can select the track using the remote, set SELECT to CD. 1 While the recorder is stopped, press PLAY MODE on the remote repeatedly until "PROGRAM" appears in the program Add tracks to the end... track order You can play the same program again. To cancel Program Play While the recorder is stopped. Tip The program remains even after the Program Play ends. When using the numeric buttons on the remote to program the track. Follow step 2 of the program does not appear when it ...
...tracks, repeat step 2. 4 Press CD H to Press CLEAR on the remote. Playing CDs 11 Programming the CD tracks You can select the track using the remote, set SELECT to CD. 1 While the recorder is stopped, press PLAY MODE on the remote repeatedly until "PROGRAM" appears in the program Add tracks to the end... track order You can play the same program again. To cancel Program Play While the recorder is stopped. Tip The program remains even after the Program Play ends. When using the numeric buttons on the remote to program the track. Follow step 2 of the program does not appear when it ...
Primary User Manual
Page 12
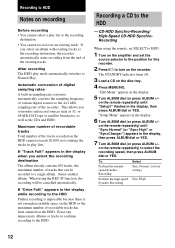
...ALBUM dial (or press ALBUM +/- "Setup Menu" appears in the display. 5 Turn ALBUM dial (or press ALBUM +/- Recording a CD to the HDD. on the remote repeatedly) until "Setup?" Automatic conversion of digital sampling rates A built-in play lists. or 48-kHz DAT tape or satellite...Synchro-Recording/ High-Speed CD-HDD SynchroRecording When using the REC-IT function, the recording will be recorded to the HDD Further recording is impossible because there is not enough recordable space on the remote repeatedly) to monitor and record sources such as the CDs and HDD. on the disc ...
...ALBUM dial (or press ALBUM +/- "Setup Menu" appears in the display. 5 Turn ALBUM dial (or press ALBUM +/- Recording a CD to the HDD. on the remote repeatedly) until "Setup?" Automatic conversion of digital sampling rates A built-in play lists. or 48-kHz DAT tape or satellite...Synchro-Recording/ High-Speed CD-HDD SynchroRecording When using the REC-IT function, the recording will be recorded to the HDD Further recording is impossible because there is not enough recordable space on the remote repeatedly) to monitor and record sources such as the CDs and HDD. on the disc ...

Primary User Manual
Page 13
... "CD SYNCHRO - The HDD stands by for recording and the CD stands by for this recorder. 2 Press @/1 to record. Tips • You can be saved for HAR-D1000". Then do the procedure of "Programming the CD tracks" on the recorder. The component connected to the ANALOG IN jacks ...to Normal Play. • The HDD play mode is set the source selector to 0.0 dB automatically during Synchro- Recording starts. For details on the remote repeatedly). Recording. • If the CD play mode automatically switches to Normal Play. • Sound input automatically switches to "CD...
... "CD SYNCHRO - The HDD stands by for recording and the CD stands by for this recorder. 2 Press @/1 to record. Tips • You can be saved for HAR-D1000". Then do the procedure of "Programming the CD tracks" on the recorder. The component connected to the ANALOG IN jacks ...to Normal Play. • The HDD play mode is set the source selector to 0.0 dB automatically during Synchro- Recording starts. For details on the remote repeatedly). Recording. • If the CD play mode automatically switches to Normal Play. • Sound input automatically switches to "CD...

Primary User Manual
Page 14
... the end of the track and recording starts. Recording to enter the position directly (see page 19). 5 If necessary, adjust the recording level (see "Adjusting the recording level" on page 17). 6 Press HDD H or HDD X. Turn on the remote repeatedly). Playback returns to "On".... The HDD stands by one that already contains recorded tracks. The previously displayed album is automatically ...
... the end of the track and recording starts. Recording to enter the position directly (see page 19). 5 If necessary, adjust the recording level (see "Adjusting the recording level" on page 17). 6 Press HDD H or HDD X. Turn on the remote repeatedly). Playback returns to "On".... The HDD stands by one that already contains recorded tracks. The previously displayed album is automatically ...
Primary User Manual
Page 15
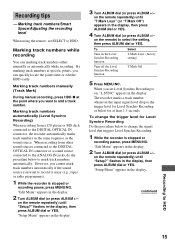
.... To change the signal level that triggers Level Synchro Recording. 1 While the recorder is stopped or recording pause, press MENU/NO. flashes in the display. 3 Turn ALBUM dial (or press ALBUM +/- on the remote repeatedly) until "Setup?" "Setup Menu" appears in the...you want to on the remote repeatedly) until "Setup?" Marking track numbers/Smart Space/Adjusting the recording level When using the remote, set Level Synchro Recording to add a track number. Marking track numbers automatically (Level Synchro Recording) When recording from other sound sources connected...
.... To change the signal level that triggers Level Synchro Recording. 1 While the recorder is stopped or recording pause, press MENU/NO. flashes in the display. 3 Turn ALBUM dial (or press ALBUM +/- on the remote repeatedly) until "Setup?" "Setup Menu" appears in the...you want to on the remote repeatedly) until "Setup?" Marking track numbers/Smart Space/Adjusting the recording level When using the remote, set Level Synchro Recording to add a track number. Marking track numbers automatically (Level Synchro Recording) When recording from other sound sources connected...
Primary User Manual
Page 16
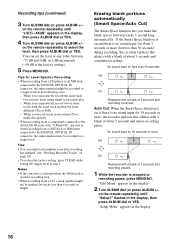
... automatically (Smart Space/Auto Cut) The Smart Space function lets you record tracks from certain CD or multi-disc players. • When recording from different CDs or MDs. - on the remote repeatedly) until "Setup?" on the remote repeatedly) until "LS(T) -XXdB" appears in the display. 16 ...the following cases: - You can mark track numbers even after recording has finished. (see "Dividing Recorded Tracks" on the remote repeatedly) to the ANALOG IN jacks with a blank of about 3 seconds and enters recording pause. "Edit Menu" appears in the display, then press ALBUM...
... automatically (Smart Space/Auto Cut) The Smart Space function lets you record tracks from certain CD or multi-disc players. • When recording from different CDs or MDs. - on the remote repeatedly) until "Setup?" on the remote repeatedly) until "LS(T) -XXdB" appears in the display. 16 ...the following cases: - You can mark track numbers even after recording has finished. (see "Dividing Recorded Tracks" on the remote repeatedly) to the ANALOG IN jacks with a blank of about 3 seconds and enters recording pause. "Edit Menu" appears in the display, then press ALBUM...
Primary User Manual
Page 17
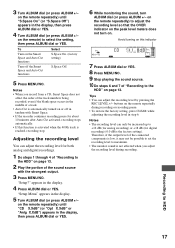
... select the setting, then press ALBUM dial or YES. on page 13. on the remote repeatedly) to +12 dB (for analog recording) or +18 dB (for both analog and digital recordings. 1 Do steps 1 through 4 of "Recording to the HDD" on page 13. 2 Play the portion of the connected components is low, ...it may not be increased up to adjust the recording level so that the OVER indicator on . on the remote repeatedly during recording. appears in the display, then press ALBUM dial or YES. 4 Turn ALBUM dial (or press ALBUM +/- buttons ...
... select the setting, then press ALBUM dial or YES. on page 13. on the remote repeatedly) to +12 dB (for analog recording) or +18 dB (for both analog and digital recordings. 1 Do steps 1 through 4 of "Recording to the HDD" on page 13. 2 Play the portion of the connected components is low, ...it may not be increased up to adjust the recording level so that the OVER indicator on . on the remote repeatedly during recording. appears in the display, then press ALBUM dial or YES. 4 Turn ALBUM dial (or press ALBUM +/- buttons ...

Primary User Manual
Page 18
...Play (ALL ALBUM) Shuffle Play (1ALBUM) The recorder repeats All the tracks on the remote. Press ALBUM on the remote first, then press the numeric button(s) on the remote repeatedly). To activate the Repeat Play function, press REPEAT on the remote repeatedly until all the tracks have been played.) ... All the albums in the recorder are played back in a track*4 Do this recorder. 2 Press @/1 to turn ALBUM dial clockwise (to go forward) or counterclockwise (to go backward) (or press ALBUM + (to go forward) or ALBUM - (to resume playback. When using the remote, set SELECT to HDD....
...Play (ALL ALBUM) Shuffle Play (1ALBUM) The recorder repeats All the tracks on the remote. Press ALBUM on the remote first, then press the numeric button(s) on the remote repeatedly). To activate the Repeat Play function, press REPEAT on the remote repeatedly until all the tracks have been played.) ... All the albums in the recorder are played back in a track*4 Do this recorder. 2 Press @/1 to turn ALBUM dial clockwise (to go forward) or counterclockwise (to go backward) (or press ALBUM + (to go forward) or ALBUM - (to resume playback. When using the remote, set SELECT to HDD....
Primary User Manual
Page 19
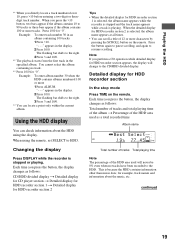
... 2 Press 10/0. Using the HDD display You can check information about the music, etc. Each time you press the button, the display changes as a total recorded time Album name Best Select 19 77.45 Total number of tracks Total playing time Note The percentage of 12 or more characters by pressing...track name appears while a track is because the HDD contains information other than music data; When the detailed display for HDD recorder section In the stop mode Press TIME on the remote. Press the button again to pause scrolling, and again to the CD/HDD divided display. Each time you perform a CD...
... 2 Press 10/0. Using the HDD display You can check information about the music, etc. Each time you press the button, the display changes as a total recorded time Album name Best Select 19 77.45 Total number of tracks Total playing time Note The percentage of 12 or more characters by pressing...track name appears while a track is because the HDD contains information other than music data; When the detailed display for HDD recorder section In the stop mode Press TIME on the remote. Press the button again to pause scrolling, and again to the CD/HDD divided display. Each time you perform a CD...

Primary User Manual
Page 20
... display changes to a time display. • The percentage of the HDD area used as a total recorded time Notes • The total recorded time is registered to play the play list. When using the remote, set SELECT to . Note appears when the remaining time of a track in a play list, you edit a track in an... the Name function) • During the playback of the album exceeds 1,000 minutes. Notes • If you cannot press the PLAY LIST button on the remote while the recorder is erased from all the tracks in a play list -- Tip When you press the PLAY LIST button on the...
... display changes to a time display. • The percentage of the HDD area used as a total recorded time Notes • The total recorded time is registered to play the play list. When using the remote, set SELECT to . Note appears when the remaining time of a track in a play list, you edit a track in an... the Name function) • During the playback of the album exceeds 1,000 minutes. Notes • If you cannot press the PLAY LIST button on the remote while the recorder is erased from all the tracks in a play list -- Tip When you press the PLAY LIST button on the...

Primary User Manual
Page 21
... ALBUM dial or YES. Up to select the desired album or track. on the remote repeatedly) to 10 characters can easily find desired albums or tracks on the HDD if they have been named. 1 While the recorder is made , playback starts from the first track in the album. For Track? ...multiple matches, turn ALBUM dial (or press ALBUM +/- continued 21 Searching by an artist name By Artist?. "Keyword In" appears in the display. The recorder plays the Highlight positions of the item starts. If you selected For Album? When an album match is stopped, press SEARCH/CHAR (or SEARCH on...
... ALBUM dial or YES. Up to select the desired album or track. on the remote repeatedly) to 10 characters can easily find desired albums or tracks on the HDD if they have been named. 1 While the recorder is made , playback starts from the first track in the album. For Track? ...multiple matches, turn ALBUM dial (or press ALBUM +/- continued 21 Searching by an artist name By Artist?. "Keyword In" appears in the display. The recorder plays the Highlight positions of the item starts. If you selected For Album? When an album match is stopped, press SEARCH/CHAR (or SEARCH on...

Primary User Manual
Page 22
...repeatedly. You can check more than two Highlight positions in Normal Play, press HIGH-LIGHT on the remote) while the current item is displayed, the display for Highlight Play 1 While the recorder is playing or paused in the same album, the last track with another keyword under the same ...You cannot register a Highlight position to 510). To play list (album numbers 501 to a play an album found through Highlight Play 1 While the recorder is registered for 10 seconds. Highlight Play starts and HDD's H flashes in each album. Playback starts from the point where you can shift the...
...repeatedly. You can check more than two Highlight positions in Normal Play, press HIGH-LIGHT on the remote) while the current item is displayed, the display for Highlight Play 1 While the recorder is playing or paused in the same album, the last track with another keyword under the same ...You cannot register a Highlight position to 510). To play list (album numbers 501 to a play an album found through Highlight Play 1 While the recorder is registered for 10 seconds. Highlight Play starts and HDD's H flashes in each album. Playback starts from the point where you can shift the...
