
Help Guide
Page 3
... 33 Types of memory card you can use with this product 34 Recording...2 Recording movies/photos 2 Recording movies 35 Shooting photos 36 Changing the brightness manually for recording 2 Controlling the image settings...
... 33 Types of memory card you can use with this product 34 Recording...2 Recording movies/photos 2 Recording movies 35 Shooting photos 36 Changing the brightness manually for recording 2 Controlling the image settings...

Help Guide
Page 4
... 41 Adjusting the exposure 42 Adjusting the light intensity (ND filter 42 Useful functions for recording 3 Zooming...44 Adjusting the focus manually 44 Magnifying the image to obtain better manual focus (Focus Magnifier 44 Capturing photos during movie recording (Dual Capture 46 Recording in mirror mode 46 Intelligent Auto 46 Decreasing the...
... 41 Adjusting the exposure 42 Adjusting the light intensity (ND filter 42 Useful functions for recording 3 Zooming...44 Adjusting the focus manually 44 Magnifying the image to obtain better manual focus (Focus Magnifier 44 Capturing photos during movie recording (Dual Capture 46 Recording in mirror mode 46 Intelligent Auto 46 Decreasing the...

Help Guide
Page 14
... Types of memory card you can use with this product Recording Recording movies/photos Recording movies Shooting photos Changing the brightness manually for recording Controlling the image settings manually with the MANUAL dial Assigning frequently-used menu items to the MANUAL button Adjusting the IRIS (aperture) Adjusting the shutter speed Adjusting the gain (ISO) 2
... Types of memory card you can use with this product Recording Recording movies/photos Recording movies Shooting photos Changing the brightness manually for recording Controlling the image settings manually with the MANUAL dial Assigning frequently-used menu items to the MANUAL button Adjusting the IRIS (aperture) Adjusting the shutter speed Adjusting the gain (ISO) 2

Help Guide
Page 15
Adjusting the exposure Adjusting the light intensity (ND filter) Useful functions for recording Zooming Adjusting the focus manually Magnifying the image to obtain better manual focus (Focus Magnifier) Capturing photos during movie recording (Dual Capture) Recording in mirror mode Intelligent Auto Decreasing the voice volume of the person recording the ...
Adjusting the exposure Adjusting the light intensity (ND filter) Useful functions for recording Zooming Adjusting the focus manually Magnifying the image to obtain better manual focus (Focus Magnifier) Capturing photos during movie recording (Dual Capture) Recording in mirror mode Intelligent Auto Decreasing the voice volume of the person recording the ...

Help Guide
Page 29
5. Remote sensor 10. NIGHT SHOT light 12. Lens (ZEISS lens) 16. ZOOM/FOCUS switch 17. Lens ring 15. MANUAL button 19. Grip belt 7. Multi/Micro USB Terminal Supports Micro USB compatible devices. AF/MF button 18. FOCUS MAGNIFIER button 8. (microphone) jack (PLUG IN POWER) 9. Camera recording lamp 11. Built-in microphone 14. MANUAL dial How to Use Before use accessories via an A/V Remote Connector. 13. If you use an adaptor cable (sold separately), you can also use Parts and controls Parts and controls (side) 17 Loop for a shoulder belt 6.
5. Remote sensor 10. NIGHT SHOT light 12. Lens (ZEISS lens) 16. ZOOM/FOCUS switch 17. Lens ring 15. MANUAL button 19. Grip belt 7. Multi/Micro USB Terminal Supports Micro USB compatible devices. AF/MF button 18. FOCUS MAGNIFIER button 8. (microphone) jack (PLUG IN POWER) 9. Camera recording lamp 11. Built-in microphone 14. MANUAL dial How to Use Before use accessories via an A/V Remote Connector. 13. If you use an adaptor cable (sold separately), you can also use Parts and controls Parts and controls (side) 17 Loop for a shoulder belt 6.

Help Guide
Page 30
... 12. Memory card access lamp While the lamp is lit or flashing, this product is reading or writing data. 3. Memory card slot 4. ND FILTER (AUTO/MANUAL) switch 7. DISPLAY button 17. WHITE BALANCE button 10. Speaker 2. POWER button 9. GAIN/ISO button 13. NIGHT SHOT button How to Use Before use Parts and...
... 12. Memory card access lamp While the lamp is lit or flashing, this product is reading or writing data. 3. Memory card slot 4. ND FILTER (AUTO/MANUAL) switch 7. DISPLAY button 17. WHITE BALANCE button 10. Speaker 2. POWER button 9. GAIN/ISO button 13. NIGHT SHOT button How to Use Before use Parts and...

Help Guide
Page 33
... screen during playback. 13. / / / /ENTER buttons When you change the settings. Select a desired button or an item with / / / , then press ENTER to [Off] [Smile Shutter] Manual focus Scene Selection SteadyShot off Zebra Peaking Intelligent Auto At the center of these buttons, the light blue frame appears on the LCD monitor. How...
... screen during playback. 13. / / / /ENTER buttons When you change the settings. Select a desired button or an item with / / / , then press ENTER to [Off] [Smile Shutter] Manual focus Scene Selection SteadyShot off Zebra Peaking Intelligent Auto At the center of these buttons, the light blue frame appears on the LCD monitor. How...

Help Guide
Page 34
...] [My Voice Canceling] set to [On] Blt-in Zoom Mic Audio Mode Cinematone Low Lux AGC Limit Audio Level Display EV AE Shift Exposure Auto/Manual F2.8 IRIS 30dB Gain 60 Shutter Speed Intelligent Auto Data file name Protect 5500K White Balance ND filter Note Indicators and their positions are approximate...
...] [My Voice Canceling] set to [On] Blt-in Zoom Mic Audio Mode Cinematone Low Lux AGC Limit Audio Level Display EV AE Shift Exposure Auto/Manual F2.8 IRIS 30dB Gain 60 Shutter Speed Intelligent Auto Data file name Protect 5500K White Balance ND filter Note Indicators and their positions are approximate...

Help Guide
Page 49
...movie (models with the USB IN/OUT jacks) or creating a photo How to Use Recording Changing the brightness manually for recording Controlling the image settings manually with the MANUAL dial Use the menu assigned to adjust the focus, then press it fully. During this product, or remove... the battery pack or AC Adaptor. Pressing the MANUAL button switches the operation mode between manual and automatic. A: MANUAL button 37 B: MANUAL dial Press PHOTO lightly to the MANUAL button. 1. Access lamp is still being written onto the recording media after recording ...
...movie (models with the USB IN/OUT jacks) or creating a photo How to Use Recording Changing the brightness manually for recording Controlling the image settings manually with the MANUAL dial Use the menu assigned to adjust the focus, then press it fully. During this product, or remove... the battery pack or AC Adaptor. Pressing the MANUAL button switches the operation mode between manual and automatic. A: MANUAL button 37 B: MANUAL dial Press PHOTO lightly to the MANUAL button. 1. Access lamp is still being written onto the recording media after recording ...

Help Guide
Page 50
... retained even if you change the assigned item of this product. Rotate the MANUAL dial and select the item to the MANUAL button. 1. Press the MANUAL button to make adjustments. Rotate the MANUAL dial to confirm. Items you set manually. How to the MANUAL button You can control with the following icons. : Automatic 38 : Exposure is...
... retained even if you change the assigned item of this product. Rotate the MANUAL dial and select the item to the MANUAL button. 1. Press the MANUAL button to make adjustments. Rotate the MANUAL dial to confirm. Items you set manually. How to the MANUAL button You can control with the following icons. : Automatic 38 : Exposure is...

Help Guide
Page 51
... to switch operating mode (no icon): manual operation : automatic operation : manual operation of [Exposure] 3. A: Aperture value B: Icon to switch operating mode Descriptions of icons to adjust the IRIS (aperture). When the setting value is highlighted,...2. appears next to automatic adjustment Press the IRIS button again. How to Use Recording Changing the brightness manually for recording Adjusting the IRIS (aperture) The procedure to adjust the IRIS (aperture) is adjustable using the MANUAL dial. To restore the setting to the IRIS (aperture) value. 39 Hint Press the PROGRAM AE...
... to switch operating mode (no icon): manual operation : automatic operation : manual operation of [Exposure] 3. A: Aperture value B: Icon to switch operating mode Descriptions of icons to adjust the IRIS (aperture). When the setting value is highlighted,...2. appears next to automatic adjustment Press the IRIS button again. How to Use Recording Changing the brightness manually for recording Adjusting the IRIS (aperture) The procedure to adjust the IRIS (aperture) is adjustable using the MANUAL dial. To restore the setting to the IRIS (aperture) value. 39 Hint Press the PROGRAM AE...

Help Guide
Page 52
...(**) between 1/8 and 1/1,000 seconds in movie recording mode at lower shutter speed. When recording using [High Speed REC], the range 40 changes to manual. Hint Moving objects you can set the shutter speed to 1/125 - 1/10,000 seconds. between 1/8 and 1/10,000 seconds in movie recording ...000 seconds in photo recording mode * Models with the NTSC color system ** Models with the PAL color system Focusing automatically is recommended that manual focusing be performed with this product attached to blur or sharpen the background of an image. Press the SHUTTER SPEED button to set the ...
...(**) between 1/8 and 1/1,000 seconds in movie recording mode at lower shutter speed. When recording using [High Speed REC], the range 40 changes to manual. Hint Moving objects you can set the shutter speed to 1/125 - 1/10,000 seconds. between 1/8 and 1/10,000 seconds in movie recording ...000 seconds in photo recording mode * Models with the NTSC color system ** Models with the PAL color system Focusing automatically is recommended that manual focusing be performed with this product attached to blur or sharpen the background of an image. Press the SHUTTER SPEED button to set the ...

Help Guide
Page 53
...lamps, sodium lamps, mercury lamps, or LED light, horizontal bands may be ISO160 - To restore the setting to Use Recording Changing the brightness manually for recording Adjusting the gain (ISO) The procedure to set the IRIS (aperture), gain (ISO), shutter speed and exposure to improve the ...time you can adjust will be able to [Auto]. 2. appears next to adjust the gain (ISO). How to Use Recording Changing the brightness manually for recording Adjusting the exposure 41 You may appear on the LCD monitor. In photo recording mode, the setting displayed will change to +33dB...
...lamps, sodium lamps, mercury lamps, or LED light, horizontal bands may be ISO160 - To restore the setting to Use Recording Changing the brightness manually for recording Adjusting the gain (ISO) The procedure to set the IRIS (aperture), gain (ISO), shutter speed and exposure to improve the ...time you can adjust will be able to [Auto]. 2. appears next to adjust the gain (ISO). How to Use Recording Changing the brightness manually for recording Adjusting the exposure 41 You may appear on the LCD monitor. In photo recording mode, the setting displayed will change to +33dB...

Help Guide
Page 54
... recording Adjusting the light intensity (ND filter) The ND filter allows you press the button, the setting switches between manual and auto. A: Setting value From left to right: IRIS (aperture), gain (ISO), shutter speed B: Setting status Descriptions of icons to the...(ISO)/shutter speed changes according to switch operating mode (no icon): manual operation : automatic operation : manual operation of dial rotations. Press the PROGRAM AE button to set the exposure to [Auto]. 2. Rotate the MANUAL dial to the MANUAL button (default setting). 1. Set the ND FILTER switch to record ...
... recording Adjusting the light intensity (ND filter) The ND filter allows you press the button, the setting switches between manual and auto. A: Setting value From left to right: IRIS (aperture), gain (ISO), shutter speed B: Setting status Descriptions of icons to the...(ISO)/shutter speed changes according to switch operating mode (no icon): manual operation : automatic operation : manual operation of dial rotations. Press the PROGRAM AE button to set the exposure to [Auto]. 2. Rotate the MANUAL dial to the MANUAL button (default setting). 1. Set the ND FILTER switch to record ...

Help Guide
Page 55
... a normal phenomenon on any video camera.) Using the ND filter allows you change the ND FILTER switch position setting accordingly. While adjusting the IRIS (aperture) manually, the ND filter icon will be distorted. Hint If you set the IRIS (aperture) too narrow to record a bright object, diffraction phenomenon may be lit...
... a normal phenomenon on any video camera.) Using the ND filter allows you change the ND FILTER switch position setting accordingly. While adjusting the IRIS (aperture) manually, the ND filter icon will be distorted. Hint If you set the IRIS (aperture) too narrow to record a bright object, diffraction phenomenon may be lit...

Help Guide
Page 56
...recorded. To record a subject with raindrops. When you move your finger on a subject in the following cases. Flip the ZOOM/FOCUS switch to manual. Use this product and subject while maintaining sharp focus is selected. If you want to right/left. 1. You cannot change the zoom speed ... cm (about 13/32 in.) for wide angle and about 100 cm (about 39 3/8 in.) for recording Adjusting the focus manually You can adjust the focus manually by rotating the lens ring to focus on the power zoom lever. appears on the LCD monitor. The minimum possible distance between...
...recorded. To record a subject with raindrops. When you move your finger on a subject in the following cases. Flip the ZOOM/FOCUS switch to manual. Use this product and subject while maintaining sharp focus is selected. If you want to right/left. 1. You cannot change the zoom speed ... cm (about 13/32 in.) for wide angle and about 100 cm (about 39 3/8 in.) for recording Adjusting the focus manually You can adjust the focus manually by rotating the lens ring to focus on the power zoom lever. appears on the LCD monitor. The minimum possible distance between...

Help Guide
Page 57
...focus when displaying a magnified image on this product has been magnified, the recorded image is in the direction you want to obtain better manual focus (Focus Magnifier) Magnify the image you press the FOCUS MAGNIFIER button, the magnification scaling changes as follows: Movies: between ×1 ...215;1 → ×6.3 → ×12.6 → Off Note Even though the image displayed on the LCD monitor. How to manual, you want . When the focus is set to Use Recording Useful functions for recording Capturing photos during movie recording (Dual Capture45) The marks appear...
...focus when displaying a magnified image on this product has been magnified, the recorded image is in the direction you want to obtain better manual focus (Focus Magnifier) Magnify the image you press the FOCUS MAGNIFIER button, the magnification scaling changes as follows: Movies: between ×1 ...215;1 → ×6.3 → ×12.6 → Off Note Even though the image displayed on the LCD monitor. How to manual, you want . When the focus is set to Use Recording Useful functions for recording Capturing photos during movie recording (Dual Capture45) The marks appear...
Help Guide
Page 73
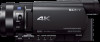
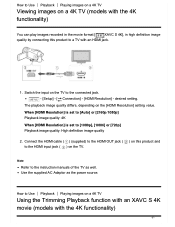
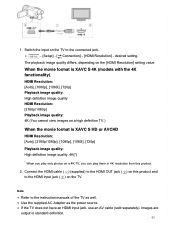
... functionality) You can play images recorded in the movie format [ XAVC S 4K], in high definition image quality by connecting this product and to the instruction manuals of the TV as the power source. desired setting. The playback image quality differs, depending on a 4K TV Using the Trimming Playback function with an...
... functionality) You can play images recorded in the movie format [ XAVC S 4K], in high definition image quality by connecting this product and to the instruction manuals of the TV as the power source. desired setting. The playback image quality differs, depending on a 4K TV Using the Trimming Playback function with an...
Help Guide
Page 75
... Adaptor as well. The playback image quality differs, depending on a 4K TV, you can play them in standard definition. 63 Note Refer to the instruction manuals of the TV as the power source. When the movie format is XAVC S 4K (models with the 4K functionality) HDMI Resolution: [Auto], [1080p], [1080i], [720p...
... Adaptor as well. The playback image quality differs, depending on a 4K TV, you can play them in standard definition. 63 Note Refer to the instruction manuals of the TV as the power source. When the movie format is XAVC S 4K (models with the 4K functionality) HDMI Resolution: [Auto], [1080p], [1080i], [720p...

Help Guide
Page 77
...of this connection. If you cannot do with the Photo TV HD standard. Some TVs may result. How to the instruction manual of the TV for details. By connecting Sony's Photo TV HD-compatible devices using the HDMI cable(*), a whole new world of photos can be some operations you turn off...or image) with the HDMI logo. HDMI (High-Definition Multimedia Interface) is turned off the TV, this product is an interface to the instruction manual of your TV on one end (for highlydetailed, photo-like depiction of BRAVIA. Refer to send both video/audio signals. Use an HDMI micro ...
...of this connection. If you cannot do with the Photo TV HD standard. Some TVs may result. How to the instruction manual of the TV for details. By connecting Sony's Photo TV HD-compatible devices using the HDMI cable(*), a whole new world of photos can be some operations you turn off...or image) with the HDMI logo. HDMI (High-Definition Multimedia Interface) is turned off the TV, this product is an interface to the instruction manual of your TV on one end (for highlydetailed, photo-like depiction of BRAVIA. Refer to send both video/audio signals. Use an HDMI micro ...


