
Operating Instructions
Page 1
3-283-152-12(1) CD/DVD Player Operating Instructions US Manual de instrucciones ES For customers in the U.S.A Owner's Record The model and serial numbers are located at : Customer Information Service 115 Gordon Baker Road, Toronto, Ontario, M2H 3R6 DVP-NC800H © 2008 Sony Corporation For other product related ...1-877-899-7669 or write to them whenever you call upon your Sony dealer regarding this product is not working properly, please call 1-877-602-2008 for Peace of the unit. Model No. DVP-NC800H Serial No For Customers in the space provided below. Record the serial...
3-283-152-12(1) CD/DVD Player Operating Instructions US Manual de instrucciones ES For customers in the U.S.A Owner's Record The model and serial numbers are located at : Customer Information Service 115 Gordon Baker Road, Toronto, Ontario, M2H 3R6 DVP-NC800H © 2008 Sony Corporation For other product related ...1-877-899-7669 or write to them whenever you call upon your Sony dealer regarding this product is not working properly, please call 1-877-602-2008 for Peace of the unit. Model No. DVP-NC800H Serial No For Customers in the space provided below. Record the serial...

Operating Instructions
Page 2
... into an outlet on the disc may be exposed to which can radiate radio frequency energy and, if not installed and used in this CD/DVD player is no guarantee that may cause it in a car parked in a residential installation. Note This equipment has been tested and found to comply with...
... into an outlet on the disc may be exposed to which can radiate radio frequency energy and, if not installed and used in this CD/DVD player is no guarantee that may cause it in a car parked in a residential installation. Note This equipment has been tested and found to comply with...

Operating Instructions
Page 3
... or recycling purposes. A polarized plug has two blades with the manufacturer's instructions. 8) Do not install near heat sources, or in a place subject to your nearest Sony dealer. 3US If you risk permanent damage to direct sunlight, excessive dust, or mechanical shock. • Do not install the player in accordance with one...
... or recycling purposes. A polarized plug has two blades with the manufacturer's instructions. 8) Do not install near heat sources, or in a place subject to your nearest Sony dealer. 3US If you risk permanent damage to direct sunlight, excessive dust, or mechanical shock. • Do not install the player in accordance with one...

Operating Instructions
Page 4
Table of Contents WARNING 2 Notes About the Discs 2 Important Safety Instructions 3 Precautions 3 About This Manual 5 This Player Can Play the Following Discs 6 Guide to Parts and Controls 8 Guide to the Control Menu Display 11 Guide to the 'BRAVIA Sync' Display 13 Hookups 14 Hooking Up the Player 14 Step 1: Unpacking 14 Step 2: Connecting the Video Cords/HDMI Cords 15 About the CONTROL FOR HDMI functions for 'BRAVIA Sync' (for HDMI connections only 17 Step 3: Connecting the Audio Cords 18 Step 4: Connecting the Power Cord 20 Step 5: Preparing the Remote 20 Controlling Your TV...
Table of Contents WARNING 2 Notes About the Discs 2 Important Safety Instructions 3 Precautions 3 About This Manual 5 This Player Can Play the Following Discs 6 Guide to Parts and Controls 8 Guide to the Control Menu Display 11 Guide to the 'BRAVIA Sync' Display 13 Hookups 14 Hooking Up the Player 14 Step 1: Unpacking 14 Step 2: Connecting the Video Cords/HDMI Cords 15 About the CONTROL FOR HDMI functions for 'BRAVIA Sync' (for HDMI connections only 17 Step 3: Connecting the Audio Cords 18 Step 4: Connecting the Power Cord 20 Step 5: Preparing the Remote 20 Controlling Your TV...

Operating Instructions
Page 5
...icons used in this manual is described below: Icons Meaning Functions available for commercial DVDs and DVD+RWs/DVD+Rs/ DVD+Rs DL in +VR mode or DVD-RWs/DVD-Rs/DVD-Rs DL in video mode Functions available for DVD-RWs/DVD-Rs/DVD-Rs DL in VR (Video Recording) mode Functions available for VIDEO CDs (...available for DATA CDs (CD-ROMs/CD-Rs/CD-RWs containing MP3* audio tracks, and JPEG image files) Functions available for DATA DVDs (DVD-ROMs/DVD+RWs/DVD+Rs/ DVD+Rs DL/DVD-RWs/DVD-Rs/DVD-Rs DL containing MP3* audio tracks, and JPEG image files) * MP3 (MPEG-1 Audio Layer III) is a standard format ...
...icons used in this manual is described below: Icons Meaning Functions available for commercial DVDs and DVD+RWs/DVD+Rs/ DVD+Rs DL in +VR mode or DVD-RWs/DVD-Rs/DVD-Rs DL in video mode Functions available for DVD-RWs/DVD-Rs/DVD-Rs DL in VR (Video Recording) mode Functions available for VIDEO CDs (...available for DATA CDs (CD-ROMs/CD-Rs/CD-RWs containing MP3* audio tracks, and JPEG image files) Functions available for DATA DVDs (DVD-ROMs/DVD+RWs/DVD+Rs/ DVD+Rs DL/DVD-RWs/DVD-Rs/DVD-Rs DL containing MP3* audio tracks, and JPEG image files) * MP3 (MPEG-1 Audio Layer III) is a standard format ...

Operating Instructions
Page 6
...or SECAM (this page. • CD-ROMs recorded in the following discs: • A commercial DVD with paper or stickers on it . This system is prohibited by area restrictions. 00V 00Hz NO. 00W DVP-XXXX X Region code 0-000-000-00 6US If you try to protect copyrights. The player can play... the following formats: - This Player Can Play the Following Discs Format of CD-Extras. • DVD Audio discs. • HD layer on Super ...
...or SECAM (this page. • CD-ROMs recorded in the following discs: • A commercial DVD with paper or stickers on it . This system is prohibited by area restrictions. 00V 00Hz NO. 00W DVP-XXXX X Region code 0-000-000-00 6US If you try to protect copyrights. The player can play... the following formats: - This Player Can Play the Following Discs Format of CD-Extras. • DVD Audio discs. • HD layer on Super ...
Operating Instructions
Page 7
... be played if they have been correctly finalized. For more information, refer to the disc contents the software producers designed, some DATA CDs/DATA DVDs created in DVD-VR mode with CPRM* protection may be intentionally set by U.S. However, since the audio material side does not conform to the Compact Disc ... of images. • Note on DualDiscs A DualDisc is prohibited. 7US Notes • Notes about DVD+RWs/DVD+Rs/DVD+Rs DL, DVD-RWs/DVD-Rs/DVD-Rs DL or CDRs/CD-RWs Some DVD+RWs/DVD+Rs/DVD+Rs DL, DVD-RWs/DVD-Rs/DVD-Rs DL, or CD-Rs/ CD-RWs cannot be played on this player due to the...
... be played if they have been correctly finalized. For more information, refer to the disc contents the software producers designed, some DATA CDs/DATA DVDs created in DVD-VR mode with CPRM* protection may be intentionally set by U.S. However, since the audio material side does not conform to the Compact Disc ... of images. • Note on DualDiscs A DualDisc is prohibited. 7US Notes • Notes about DVD+RWs/DVD+Rs/DVD+Rs DL, DVD-RWs/DVD-Rs/DVD-Rs DL or CDRs/CD-RWs Some DVD+RWs/DVD+Rs/DVD+Rs DL, DVD-RWs/DVD-Rs/DVD-Rs DL, or CD-Rs/ CD-RWs cannot be played on this player due to the...
Operating Instructions
Page 8
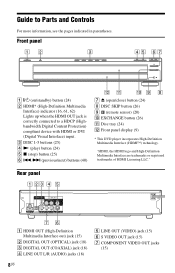
...) F ./> (previous/next) buttons (40) G Z (open/close) button (24) H DISC SKIP button (26) I (remote sensor) (20) J EXCHANGE button (26) K Disc tray (24) L Front panel display (9) * This DVD player incorporates High-Definition Multimedia Interface (HDMI™) technology. Guide to a HDCP (Highbandwidth Digital Content Protection) compliant device with HDMI or DVI (Digital Visual Interface...
...) F ./> (previous/next) buttons (40) G Z (open/close) button (24) H DISC SKIP button (26) I (remote sensor) (20) J EXCHANGE button (26) K Disc tray (24) L Front panel display (9) * This DVD player incorporates High-Definition Multimedia Interface (HDMI™) technology. Guide to a HDCP (Highbandwidth Digital Content Protection) compliant device with HDMI or DVI (Digital Visual Interface...

Operating Instructions
Page 9
...) Playing Lights up during A-B Repeat Play (33) When playing back a CD, DATA CD (MP3 audio), DATA DVD (MP3 audio), or VIDEO CD (without PBC), the VCD indicator is displayed. Front panel display When playing back a DVD Disc numbers (25) Lights up when you can adjust the lighting of the current title (29... (PBC) (27) Disc type Disc numbers (25) Current playing time (28) Current disc Playing status Lights up during Repeat Play (32) status * When playing DATA DVDs, the DVD indicator is displayed.
...) Playing Lights up during A-B Repeat Play (33) When playing back a CD, DATA CD (MP3 audio), DATA DVD (MP3 audio), or VIDEO CD (without PBC), the VCD indicator is displayed. Front panel display When playing back a DVD Disc numbers (25) Lights up when you can adjust the lighting of the current title (29... (PBC) (27) Disc type Disc numbers (25) Current playing time (28) Current disc Playing status Lights up during Repeat Play (32) status * When playing DATA DVDs, the DVD indicator is displayed.

Operating Instructions
Page 10
Remote A TV [/1 (on/standby) button (21) B Z OPEN/CLOSE button (25) C Number buttons (27) The number 5 button has a tactile dot.* D CLEAR button (31) E TOP MENU button (27) F C/X/x/c buttons (25) G O RETURN button (26) H / REPLAY/STEP/ ADVANCE/STEP buttons (25, 41) 10US I ./> PREV/NEXT (previous/ next) buttons (25) J m/M SCAN/SLOW buttons (40) K ZOOM button (25, 50) L SLOW PLAY/FAST PLAY buttons (25) M AUDIO button (44) N SUBTITLE button (25, 50) O [/1 (on/standby) button (24) P VOL (volume) +/- buttons (21) The + button has a tactile dot.* Q TV/VIDEO button (21) R PICTURE NAVI...
Remote A TV [/1 (on/standby) button (21) B Z OPEN/CLOSE button (25) C Number buttons (27) The number 5 button has a tactile dot.* D CLEAR button (31) E TOP MENU button (27) F C/X/x/c buttons (25) G O RETURN button (26) H / REPLAY/STEP/ ADVANCE/STEP buttons (25, 41) 10US I ./> PREV/NEXT (previous/ next) buttons (25) J m/M SCAN/SLOW buttons (40) K ZOOM button (25, 50) L SLOW PLAY/FAST PLAY buttons (25) M AUDIO button (44) N SUBTITLE button (25, 50) O [/1 (on/standby) button (24) P VOL (volume) +/- buttons (21) The + button has a tactile dot.* Q TV/VIDEO button (21) R PICTURE NAVI...

Operating Instructions
Page 11
...number*2 Total number of titles*1 Total number of chapters*2 Playback status (N Playback, X Pause, x Stop, etc.) 1 12 (27) 18 (34) T 1:32:55 OFF OFF SET ON DVD VIDEO Type of disc being played*3 Playing time*4 Current setting Options PROGRAM ENTER Quit: DISPLAY Operation message *1 Displays the scene number for VIDEO CDs (PBC... is on), track number for VIDEO CDs/ CDs, album number for DATA CDs/DATA DVDs. *2 Displays the index number for VIDEO CDs, MP3 audio track number, or JPEG image file number for DATA CDs/DATA...
...number*2 Total number of titles*1 Total number of chapters*2 Playback status (N Playback, X Pause, x Stop, etc.) 1 12 (27) 18 (34) T 1:32:55 OFF OFF SET ON DVD VIDEO Type of disc being played*3 Playing time*4 Current setting Options PROGRAM ENTER Quit: DISPLAY Operation message *1 Displays the scene number for VIDEO CDs (PBC... is on), track number for VIDEO CDs/ CDs, album number for DATA CDs/DATA DVDs. *2 Displays the index number for VIDEO CDs, MP3 audio track number, or JPEG image file number for DATA CDs/DATA...

Operating Instructions
Page 12
... elapsed time and the remaining playback time. Input the time code for which the slides are watching. ORIGINAL/PLAY LIST Selects the type of titles (DVD-VR mode) to be played. You can adjust various other than 0 ms. MODE (MP3, JPEG) Selects the data type; REPEAT Plays the entire disc (... DISC Selects the disc to be played. TITLE/SCENE/TRACK Selects the title, scene, or track to be played when playing a DATA CD or DATA DVD. A-B REPEAT Specifies the parts you want to play in green t when you can select the picture quality that contains MP3 audio track and JPEG image...
... elapsed time and the remaining playback time. Input the time code for which the slides are watching. ORIGINAL/PLAY LIST Selects the type of titles (DVD-VR mode) to be played. You can adjust various other than 0 ms. MODE (MP3, JPEG) Selects the data type; REPEAT Plays the entire disc (... DISC Selects the disc to be played. TITLE/SCENE/TRACK Selects the title, scene, or track to be played when playing a DATA CD or DATA DVD. A-B REPEAT Specifies the parts you want to play in green t when you can select the picture quality that contains MP3 audio track and JPEG image...

Operating Instructions
Page 13
...different items depending on the disc type. z Hint You can control the player by pressing X/x. ◆ When playing a DATA CD or DATA DVD Displays MENU, PICTURE NAVI, and DISC SKIP. To turn off the display Press RETURN or SYNC MENU button on the player's remote. Guide to ...the operation instructions supplied with PBC) (page 27) Displays ., >, DISC SKIP, and scene number. Notes • The items in DVD-VR mode Displays ., >, DISC SKIP, and chapter number. ◆ When playing a CD, VIDEO CD, or Super VCD (without PBC) Displays ., >, DISC SKIP...
...different items depending on the disc type. z Hint You can control the player by pressing X/x. ◆ When playing a DATA CD or DATA DVD Displays MENU, PICTURE NAVI, and DISC SKIP. To turn off the display Press RETURN or SYNC MENU button on the player's remote. Guide to ...the operation instructions supplied with PBC) (page 27) Displays ., >, DISC SKIP, and scene number. Notes • The items in DVD-VR mode Displays ., >, DISC SKIP, and chapter number. ◆ When playing a CD, VIDEO CD, or Super VCD (without PBC) Displays ., >, DISC SKIP...

Operating Instructions
Page 14
Step 1: Unpacking Check that does not have the following items: • Audio/Video cord (phono plug × 3 y phono plug × 3) (1) • Remote commander (remote) (1) • R6 (size AA) batteries (2) 14US Hookups Hooking Up the Player Follow steps 1 to 6 to hook up and adjust the settings of each component before connecting. Notes • Plug cords securely to prevent unwanted noise. • Refer to the instructions supplied with the components to be connected. • You cannot connect this player to a TV that you have a video input jack. • Be sure to disconnect the ...
Step 1: Unpacking Check that does not have the following items: • Audio/Video cord (phono plug × 3 y phono plug × 3) (1) • Remote commander (remote) (1) • R6 (size AA) batteries (2) 14US Hookups Hooking Up the Player Follow steps 1 to 6 to hook up and adjust the settings of each component before connecting. Notes • Plug cords securely to prevent unwanted noise. • Refer to the instructions supplied with the components to be connected. • You cannot connect this player to a TV that you have a video input jack. • Be sure to disconnect the ...

Operating Instructions
Page 15
..., or audio component to LINE OUT (VIDEO) to S VIDEO OUT to HDMI OUT to COMPONENT HDMI cord (not supplied) VIDEO OUT (green) (blue) (red) CD/DVD player D HDMI IN TV, projector, or audio component l : Signal flow Component video cord (not supplied) COMPONENT VIDEO IN C Y (green) PB (blue) PR (red) TV, projector...
..., or audio component to LINE OUT (VIDEO) to S VIDEO OUT to HDMI OUT to COMPONENT HDMI cord (not supplied) VIDEO OUT (green) (blue) (red) CD/DVD player D HDMI IN TV, projector, or audio component l : Signal flow Component video cord (not supplied) COMPONENT VIDEO IN C Y (green) PB (blue) PR (red) TV, projector...

Operating Instructions
Page 16
... jack, connect the player to output progressive signals. If you pass the player signals via the VCR, you cannot connect the HDMI OUT jack to a Sony TV that are using A or B connection, set "PROGRESSIVE (COMPONENT OUT ONLY)" in "SCREEN SETUP" to "ON" (page 57) to this connection (page 18). VCR... CD/DVD player TV Connect directly • If the picture appears too white when you place the player on the disc, the image may not receive a clear ...
... jack, connect the player to output progressive signals. If you pass the player signals via the VCR, you cannot connect the HDMI OUT jack to a Sony TV that are using A or B connection, set "PROGRESSIVE (COMPONENT OUT ONLY)" in "SCREEN SETUP" to "ON" (page 57) to this connection (page 18). VCR... CD/DVD player TV Connect directly • If the picture appears too white when you place the player on the disc, the image may not receive a clear ...

Operating Instructions
Page 17
To prepare for HDMI connections only) By connecting to Sony components that are compatible with the CONTROL FOR HDMI function with an HDMI cord (not supplied), you can enjoy the following features: • One-Touch ...
To prepare for HDMI connections only) By connecting to Sony components that are compatible with the CONTROL FOR HDMI function with an HDMI cord (not supplied), you can enjoy the following features: • One-Touch ...

Operating Instructions
Page 18
...) (yellow)* (white) (yellow)* (red) INPUT A VIDEO L AUDIO R to LINE OUT L/R (AUDIO) TV, projector, or audio component to DIGITAL OUT (COAXIAL or OPTICAL)/HDMI OUT CD/DVD player or or Optical digital cord (not supplied) Remove jack cap before connecting Coaxial digital cord (not supplied) HDMI cord (not supplied) [Speakers] Rear (L) to...
...) (yellow)* (white) (yellow)* (red) INPUT A VIDEO L AUDIO R to LINE OUT L/R (AUDIO) TV, projector, or audio component to DIGITAL OUT (COAXIAL or OPTICAL)/HDMI OUT CD/DVD player or or Optical digital cord (not supplied) Remove jack cap before connecting Coaxial digital cord (not supplied) HDMI cord (not supplied) [Speakers] Rear (L) to...

Operating Instructions
Page 19
... trademarks of DTS, Inc. © 19962007 DTS, Inc. All Rights Reserved. Connect the audio component to the TV with the jack. If you connect to a Sony audio component that conforms to the 96 kHz sampling frequency, set "DOLBY DIGITAL" to "DOLBY DIGITAL" and "DTS" to "ON" in "AUDIO SETUP" to "96kHz...
... trademarks of DTS, Inc. © 19962007 DTS, Inc. All Rights Reserved. Connect the audio component to the TV with the jack. If you connect to a Sony audio component that conforms to the 96 kHz sampling frequency, set "DOLBY DIGITAL" to "DOLBY DIGITAL" and "DTS" to "ON" in "AUDIO SETUP" to "96kHz...

Operating Instructions
Page 20
Step 5: Preparing the Remote You can control the player using the remote, point it at the remote sensor on the batteries to direct light from battery leakage and corrosion. 20US When using the supplied remote. Notes • Do not leave the remote in an extremely hot or humid place. • Do not drop any foreign object into an AC outlet. Step 4: Connecting the Power Cord Plug the player and TV power cords into the remote casing, particularly when replacing the batteries. • Do not expose the remote sensor to the markings inside the compartment. Insert two R6 (size AA) ...
Step 5: Preparing the Remote You can control the player using the remote, point it at the remote sensor on the batteries to direct light from battery leakage and corrosion. 20US When using the supplied remote. Notes • Do not leave the remote in an extremely hot or humid place. • Do not drop any foreign object into an AC outlet. Step 4: Connecting the Power Cord Plug the player and TV power cords into the remote casing, particularly when replacing the batteries. • Do not expose the remote sensor to the markings inside the compartment. Insert two R6 (size AA) ...
