
Operating Instructions
Page 1
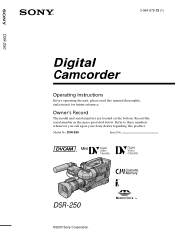
Refer to these numbers whenever you call upon your Sony dealer regarding this manual thoroughly, and retain it for future reference. Model No. DSR-250 Serial No. DSR-250 ©2000 Sony Corporation Owner's Record The model and serial numbers are located on the bottom. Record the serial number in the space provided below. DSR-250 3-064-678-12 (1) Digital Camcorder Operating Instructions Before operating the unit, please read this product.
Refer to these numbers whenever you call upon your Sony dealer regarding this manual thoroughly, and retain it for future reference. Model No. DSR-250 Serial No. DSR-250 ©2000 Sony Corporation Owner's Record The model and serial numbers are located on the bottom. Record the serial number in the space provided below. DSR-250 3-064-678-12 (1) Digital Camcorder Operating Instructions Before operating the unit, please read this product.
Operating Instructions
Page 2
...dangerous voltage" within the product's enclosure that may be producing home video that may not cause harmful interference, and (2) this Sony Digital camcorder. For customers in which case the user will soon be of sufficient magnitude to constitute a risk of electric shock to your .... You can enjoy for a Class A digital device, pursuant to rain or moisture. Your Digital camcorder is subject to radio communications. You will be prohibited. CAUTION You are designed to operate this manual could void your nearest Sony Service Center or Factory Service Center. These ...
...dangerous voltage" within the product's enclosure that may be producing home video that may not cause harmful interference, and (2) this Sony Digital camcorder. For customers in which case the user will soon be of sufficient magnitude to constitute a risk of electric shock to your .... You can enjoy for a Class A digital device, pursuant to rain or moisture. Your Digital camcorder is subject to radio communications. You will be prohibited. CAUTION You are designed to operate this manual could void your nearest Sony Service Center or Factory Service Center. These ...

Operating Instructions
Page 3
... indicators and messages 169 Frame by date - PROG. Print mark 154 Additional Information Using the wide mode 66 Compatibility of DVCAM and Using the fader function 67 DV formats 156 Using special effects - END SEARCH / EDITSEARCH / Rec Review 29 Playback... ... 76 Using your own titles 114 Labeling a cassette 116 Erasing the cassette memory data 118 Customizing Your Camcorder Advanced Recording Operations Changing the menu settings 120 Shooting with digital effects ......... 84 Step 1 Installing the microphone 7 Step 2 Preparing the power supply 8 Step 3 Inserting ...
... indicators and messages 169 Frame by date - PROG. Print mark 154 Additional Information Using the wide mode 66 Compatibility of DVCAM and Using the fader function 67 DV formats 156 Using special effects - END SEARCH / EDITSEARCH / Rec Review 29 Playback... ... 76 Using your own titles 114 Labeling a cassette 116 Erasing the cassette memory data 118 Customizing Your Camcorder Advanced Recording Operations Changing the menu settings 120 Shooting with digital effects ......... 84 Step 1 Installing the microphone 7 Step 2 Preparing the power supply 8 Step 3 Inserting ...
Operating Instructions
Page 4
...hear a beep or a melody sound to ON. The functions which require different operations depending on the DVCAM/DV format. For details, see this manual, buttons and settings on cassette memory Your camcorder is being carried out. end search (p. 29, 33) •Searching a recording by date - index...8226;Searching the end point of recorded tape by title - title search (p. 79) •Superimposing a title (p. 110) •Making your camcorder are shown in the introduction of the features that are : •Searching the boundaries of the recording - You see page 158. Tapes with...
...hear a beep or a melody sound to ON. The functions which require different operations depending on the DVCAM/DV format. For details, see this manual, buttons and settings on cassette memory Your camcorder is being carried out. end search (p. 29, 33) •Searching a recording by date - index...8226;Searching the end point of recorded tape by title - title search (p. 79) •Superimposing a title (p. 110) •Making your camcorder are shown in the introduction of the features that are : •Searching the boundaries of the recording - You see page 158. Tapes with...
Operating Instructions
Page 5
...viewfinder or the LCD screen or lens toward the sun. Unauthorized recording of such materials may be repaired [a]. •Never leave your camcorder exposed to temperatures above 60 °C (140 °F), such as cellular phones or transceivers near the unit should be switched off... cannot be contrary to a malfunction of the copyright laws. Precautions on a TV, you need an NTSC system-based TV. Keep your camcorder to country. Copyright precautions Television programs, films, video tapes, and other materials may be copyrighted. The inside of the viewfinder, LCD screen...
...viewfinder or the LCD screen or lens toward the sun. Unauthorized recording of such materials may be repaired [a]. •Never leave your camcorder exposed to temperatures above 60 °C (140 °F), such as cellular phones or transceivers near the unit should be switched off... cannot be contrary to a malfunction of the copyright laws. Precautions on a TV, you need an NTSC system-based TV. Keep your camcorder to country. Copyright precautions Television programs, films, video tapes, and other materials may be copyrighted. The inside of the viewfinder, LCD screen...
Operating Instructions
Page 6
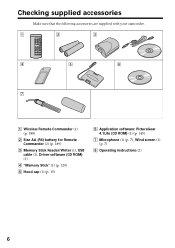
Checking supplied accessories Make sure that the following accessories are supplied with your camcorder. 1 2 3 4 5 6 7 1 Wireless Remote Commander (1) (p. 188) 2 Size AA (R6) battery for Remote Commander (2) (p. 189) 3 Memory Stick Reader/Writer (1), USB cable (1), Driver software (CD ROM) (1) 4 "Memory Stick" (1) (p. 129) 5 Hood cap (1) (p. 15) 6 Application software: PictureGear 4.1Lite (CD ROM) (1) (p. 145) 7 Microphone (1) (p. 7), Wind screen (1) (p. 7) 8 Operating instructions (2) 6
Checking supplied accessories Make sure that the following accessories are supplied with your camcorder. 1 2 3 4 5 6 7 1 Wireless Remote Commander (1) (p. 188) 2 Size AA (R6) battery for Remote Commander (2) (p. 189) 3 Memory Stick Reader/Writer (1), USB cable (1), Driver software (CD ROM) (1) 4 "Memory Stick" (1) (p. 129) 5 Hood cap (1) (p. 15) 6 Application software: PictureGear 4.1Lite (CD ROM) (1) (p. 145) 7 Microphone (1) (p. 7), Wind screen (1) (p. 7) 8 Operating instructions (2) 6

Operating Instructions
Page 8
... BP-L40 (A), the BP-L60A/L90A offer better performance at low temperatures. There is no need to discharge it is connected to the camcorder with the camcorder. •BP-L40 (A)/L60A/L90A lithium-ion battery pack •NP-1B Ni-Cd Battery Pack (The DC-L1Battery Adaptor is required... at low temperatures. •Carrying a spare battery pack is recommended. Using a BP-L40 (A)/L60A/L90A battery pack With a battery pack, the camcorder will operate continuously for example), power may not be used with accessories which is operated at 30 W or higher, especially when the ambient temperature is...
... BP-L40 (A), the BP-L60A/L90A offer better performance at low temperatures. There is no need to discharge it is connected to the camcorder with the camcorder. •BP-L40 (A)/L60A/L90A lithium-ion battery pack •NP-1B Ni-Cd Battery Pack (The DC-L1Battery Adaptor is required... at low temperatures. •Carrying a spare battery pack is recommended. Using a BP-L40 (A)/L60A/L90A battery pack With a battery pack, the camcorder will operate continuously for example), power may not be used with accessories which is operated at 30 W or higher, especially when the ambient temperature is...
Operating Instructions
Page 9
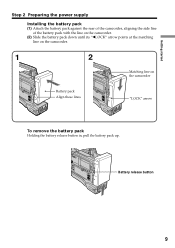
Battery release button LOCK 9 Getting started Step 2 Preparing the power supply Installing the battery pack (1) Attach the battery pack against the rear of the camcorder, aligning the side line of the battery pack with the line on the camcorder. (2) Slide the battery pack down until its "bLOCK" arrow points at the matching line on the camcorder. 1 2 Matching line on the camcorder Battery pack LOCK Align these lines. LOCK "LOCK" arrow To remove the battery pack Holding the battery release button in, pull the battery pack up.
Battery release button LOCK 9 Getting started Step 2 Preparing the power supply Installing the battery pack (1) Attach the battery pack against the rear of the camcorder, aligning the side line of the battery pack with the line on the camcorder. (2) Slide the battery pack down until its "bLOCK" arrow points at the matching line on the camcorder. 1 2 Matching line on the camcorder Battery pack LOCK Align these lines. LOCK "LOCK" arrow To remove the battery pack Holding the battery release button in, pull the battery pack up.
Operating Instructions
Page 10
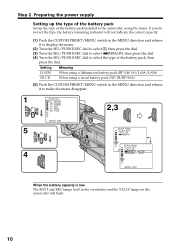
.../L90A) When using a nicad battery pack (NP-1B/BP-90A) (5) Push the CUSTOM PRESET/MENU switch in the viewfinder and the TALLY lamps on the camcorder will not indicate the correct capacity. (1) Push the CUSTOM PRESET/MENU switch in the MENU direction and release it to make the menu disappear. 1 TC... dial to select uREMAIN, then press the dial. (4) Turn the SEL/PUSH EXEC dial to select the type of the battery pack installed to the camcorder, using the menu. Step 2 Preparing the power supply Setting up the type of the battery pack Set up the type of the battery pack, then...
.../L90A) When using a nicad battery pack (NP-1B/BP-90A) (5) Push the CUSTOM PRESET/MENU switch in the viewfinder and the TALLY lamps on the camcorder will not indicate the correct capacity. (1) Push the CUSTOM PRESET/MENU switch in the MENU direction and release it to make the menu disappear. 1 TC... dial to select uREMAIN, then press the dial. (4) Turn the SEL/PUSH EXEC dial to select the type of the battery pack installed to the camcorder, using the menu. Step 2 Preparing the power supply Setting up the type of the battery pack Set up the type of the battery pack, then...
Operating Instructions
Page 11
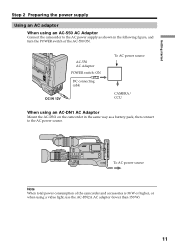
... DC connecting cable DC IN 12V To AC power source CAMERA/ CCU When using an AC-DN1 AC Adaptor Mount the AC-DN1 on the camcorder in the same way as a battery pack, then connect to the AC power supply as shown in the following figure, and turn the POWER switch... of the camcorder and accessories is 38 W or higher, or when using an AC-550 AC Adaptor Connect the camcorder to the AC power source. To AC power source Note When total power consumption of the AC...
... DC connecting cable DC IN 12V To AC power source CAMERA/ CCU When using an AC-DN1 AC Adaptor Mount the AC-DN1 on the camcorder in the same way as a battery pack, then connect to the AC power supply as shown in the following figure, and turn the POWER switch... of the camcorder and accessories is 38 W or higher, or when using an AC-550 AC Adaptor Connect the camcorder to the AC power source. To AC power source Note When total power consumption of the AC...
Operating Instructions
Page 12
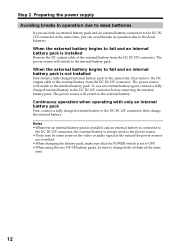
... begins to fail and an internal battery pack is set to OFF. •When using the two NP-1B battery packs, be sure to the camcorder, then remove the DC output cable of the external battery from the DC IN 12V connector. Notes •Whenever an internal battery pack is installed...
... begins to fail and an internal battery pack is set to OFF. •When using the two NP-1B battery packs, be sure to the camcorder, then remove the DC output cable of the external battery from the DC IN 12V connector. Notes •Whenever an internal battery pack is installed...
Operating Instructions
Page 13
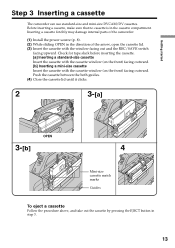
... Step 3 Inserting a cassette The camcorder can use standard-size and mini-size DVCAM/DV cassettes. Check for tape slack before inserting the cassette. [a] Inserting a standard-size cassette Insert the cassette with the cassette window (on the front) facing outward. Inserting a cassette forcibly may damage internal parts of the camcorder. (1) Install the power source...
... Step 3 Inserting a cassette The camcorder can use standard-size and mini-size DVCAM/DV cassettes. Check for tape slack before inserting the cassette. [a] Inserting a standard-size cassette Insert the cassette with the cassette window (on the front) facing outward. Inserting a cassette forcibly may damage internal parts of the camcorder. (1) Install the power source...
Operating Instructions
Page 14
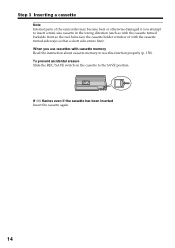
... on the cassette to use cassettes with the cassette turned sideways so that a short side enters first). Step 3 Inserting a cassette Note Internal parts of the camcorder may become bent or otherwise damaged if you use this function properly (p. 158). When you attempt to insert a mini-size cassette in the wrong direction...
... on the cassette to use cassettes with the cassette turned sideways so that a short side enters first). Step 3 Inserting a cassette Note Internal parts of the camcorder may become bent or otherwise damaged if you use this function properly (p. 158). When you attempt to insert a mini-size cassette in the wrong direction...
Operating Instructions
Page 15
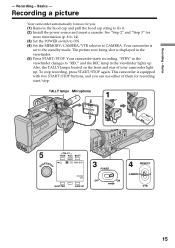
..." in the viewfinder changes to fix it. (2) Install the power source and insert a cassette. Basics - Your camcorder starts recording. This camcorder is displayed in the viewfinder lights up . Your camcorder is set to CAMERA. See "Step 2" and "Step 3" for recording start/stop recording, press START/STOP again.... Recording a picture Your camcorder automatically focuses for you can use either of your camcorder light up . TALLY lamps Microphone 1 S 5 TART/STO TALLY TAKE REC BATT Li REC 00:00:00:01 SHUTTER DVCAM 32K GAIN UP 3 POWER OFF ON 4 MEMORY...
..." in the viewfinder changes to fix it. (2) Install the power source and insert a cassette. Basics - Your camcorder starts recording. This camcorder is displayed in the viewfinder lights up . Your camcorder is set to CAMERA. See "Step 2" and "Step 3" for recording start/stop recording, press START/STOP again.... Recording a picture Your camcorder automatically focuses for you can use either of your camcorder light up . TALLY lamps Microphone 1 S 5 TART/STO TALLY TAKE REC BATT Li REC 00:00:00:01 SHUTTER DVCAM 32K GAIN UP 3 POWER OFF ON 4 MEMORY...

Operating Instructions
Page 16
... to prevent the tape wear and save the battery power. The picture quality improves in standby mode for five minutes The head drum of the camcorder automatically stops rotating. When you use a tape with cassette memory, however, you can be written properly between the last scene you recorded and... the next scene is not a malfunction. 16 We recommend that you set REC MODE to DVCAM in the menu settings to obtain reliable clear pictures. This is played back. If you leave your camcorder. SCAN to ON in DV format, the transition of a tape may not be smooth. However,...
... to prevent the tape wear and save the battery power. The picture quality improves in standby mode for five minutes The head drum of the camcorder automatically stops rotating. When you use a tape with cassette memory, however, you can be written properly between the last scene you recorded and... the next scene is not a malfunction. 16 We recommend that you set REC MODE to DVCAM in the menu settings to obtain reliable clear pictures. This is played back. If you leave your camcorder. SCAN to ON in DV format, the transition of a tape may not be smooth. However,...
Operating Instructions
Page 18
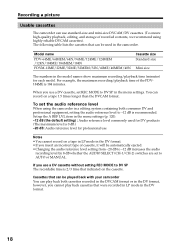
... level commonly used in a editing system containing both cassettes recorded in the DVCAM format or in the DV format, however, you insert an incorrect type of recorded contents, we recommend using the camcorder in the camcorder. Model name PDV-64ME/64MEM/64N/94ME/124ME/124MEM /124N/184ME/184MEM/184N...that indicated on the cassette. If you use standard-size and mini-size DVCAM/DV cassettes. (To ensure high-quality playback, editing, and storage of cassette, it will be played back with your camcorder You can play back both consumer DV and professional equipment, setting the ...
... level commonly used in a editing system containing both cassettes recorded in the DVCAM format or in the DV format, however, you insert an incorrect type of recorded contents, we recommend using the camcorder in the camcorder. Model name PDV-64ME/64MEM/64N/94ME/124ME/124MEM /124N/184ME/184MEM/184N...that indicated on the cassette. If you use standard-size and mini-size DVCAM/DV cassettes. (To ensure high-quality playback, editing, and storage of cassette, it will be played back with your camcorder You can play back both consumer DV and professional equipment, setting the ...
Operating Instructions
Page 19
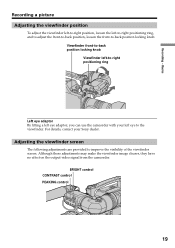
..., contact your left eye to -right positioning ring Left eye adaptor By fitting a left eye adaptor, you can use the camcorder with your Sony dealer. Viewfinder front-to-back position locking knob Viewfinder left -to-right positioning ring, and to adjust the front-to-back ...the viewfinder screen. Although these adjustments may make the viewfinder image clearer, they have no effect on the output video signal from the camcorder. Adjusting the viewfinder screen The following adjustments are provided to -back position locking knob. Basics Recording a picture Adjusting the viewfinder position ...
..., contact your left eye to -right positioning ring Left eye adaptor By fitting a left eye adaptor, you can use the camcorder with your Sony dealer. Viewfinder front-to-back position locking knob Viewfinder left -to-right positioning ring, and to adjust the front-to-back ...the viewfinder screen. Although these adjustments may make the viewfinder image clearer, they have no effect on the output video signal from the camcorder. Adjusting the viewfinder screen The following adjustments are provided to -back position locking knob. Basics Recording a picture Adjusting the viewfinder position ...
Operating Instructions
Page 22
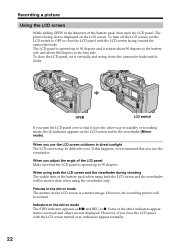
To close the LCD panel, set the LCD switch to OFF or close the LCD panel with the LCD screen facing toward the camcorder body. When you close the LCD panel with the LCD screen turned over so that it rotates about 90 degrees to the battery side and ... up to see. Some of the LCD panel Make sure that you turn off the LCD screen, set it vertically and swing it into the camcorder body until it clicks. 180° 90° OPEN LCD switch If you use the LCD screen outdoors in the direction of the battery pack...
To close the LCD panel, set the LCD switch to OFF or close the LCD panel with the LCD screen facing toward the camcorder body. When you close the LCD panel with the LCD screen turned over so that it rotates about 90 degrees to the battery side and ... up to see. Some of the LCD panel Make sure that you turn off the LCD screen, set it vertically and swing it into the camcorder body until it clicks. 180° 90° OPEN LCD switch If you use the LCD screen outdoors in the direction of the battery pack...
Operating Instructions
Page 27
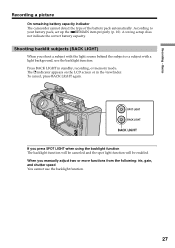
... The backlight function will be canceled and the spot light function will be enabled. The . Recording - Basics Recording a picture On remaining battery capacity indicator The camcorder cannot detect the type of the battery pack automatically. To cancel, press BACK LIGHT again. A wrong setup does not indicate the correct battery capacity. Press...
... The backlight function will be canceled and the spot light function will be enabled. The . Recording - Basics Recording a picture On remaining battery capacity indicator The camcorder cannot detect the type of the battery pack automatically. To cancel, press BACK LIGHT again. A wrong setup does not indicate the correct battery capacity. Press...

Operating Instructions
Page 29
...You cannot monitor the sound. Press the -7 side of picture is played back. +: to go forward - : to go to standby. Recording - The camcorder rewinds or fast-forwards the tape and the last five-second recorded picture is a blank portion at the beginning or between the last recorded scene... and the next scene you released EDITSEARCH. After playback the camcorder turns to stop playback. The recorded picture is played back and the camcorder returns to the end of the recording - Basics EDITSEARCH END SEARCH Searching the end point of ...
...You cannot monitor the sound. Press the -7 side of picture is played back. +: to go forward - : to go to standby. Recording - The camcorder rewinds or fast-forwards the tape and the last five-second recorded picture is a blank portion at the beginning or between the last recorded scene... and the next scene you released EDITSEARCH. After playback the camcorder turns to stop playback. The recorded picture is played back and the camcorder returns to the end of the recording - Basics EDITSEARCH END SEARCH Searching the end point of ...


