
Operating Instructions
Page 2
...damaged or leaking lithium ion battery. 2 Never expose the battery pack to rain or moisture. Operation of lithium ion batteries in this manual could void your nearest Sony Service Center or Factory Service Center. Congratulations on your Digital camcorder, you call 1-800-222-SONY (United States only). Note:...will soon be required to correct the interference at the same time it is subject to operate this Sony Digital camcorder. DISPOSE OF PROPERLY. Your Digital camcorder is loaded with Part 15 of the FCC Rules. CAUTION You are designed to provide reasonable protection ...
...damaged or leaking lithium ion battery. 2 Never expose the battery pack to rain or moisture. Operation of lithium ion batteries in this manual could void your nearest Sony Service Center or Factory Service Center. Congratulations on your Digital camcorder, you call 1-800-222-SONY (United States only). Note:...will soon be required to correct the interference at the same time it is subject to operate this Sony Digital camcorder. DISPOSE OF PROPERLY. Your Digital camcorder is loaded with Part 15 of the FCC Rules. CAUTION You are designed to provide reasonable protection ...
Operating Instructions
Page 6
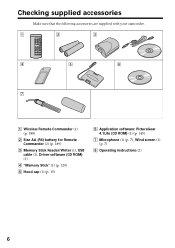
Checking supplied accessories Make sure that the following accessories are supplied with your camcorder. 1 2 3 4 5 6 7 1 Wireless Remote Commander (1) (p. 188) 2 Size AA (R6) battery for Remote Commander (2) (p. 189) 3 Memory Stick Reader/Writer (1), USB cable (1), Driver software (CD ROM) (1) 4 "Memory Stick" (1) (p. 129) 5 Hood cap (1) (p. 15) 6 Application software: PictureGear 4.1Lite (CD ROM) (1) (p. 145) 7 Microphone (1) (p. 7), Wind screen (1) (p. 7) 8 Operating instructions (2) 6
Checking supplied accessories Make sure that the following accessories are supplied with your camcorder. 1 2 3 4 5 6 7 1 Wireless Remote Commander (1) (p. 188) 2 Size AA (R6) battery for Remote Commander (2) (p. 189) 3 Memory Stick Reader/Writer (1), USB cable (1), Driver software (CD ROM) (1) 4 "Memory Stick" (1) (p. 129) 5 Hood cap (1) (p. 15) 6 Application software: PictureGear 4.1Lite (CD ROM) (1) (p. 145) 7 Microphone (1) (p. 7), Wind screen (1) (p. 7) 8 Operating instructions (2) 6

Operating Instructions
Page 8
... (A) cools down. •Compared to the usage status of the battery packs.) The usable time of battery packs increases if they are recommended for the time shown below , when power consumption of the camcorder as an external source. When the ambient temperature is 0 °C...;F). •Before long-term storage, discharge the battery fully. Using a BP-L40 (A)/L60A/L90A battery pack With a battery pack, the camcorder will operate continuously for use , charge the battery pack with the BC-L50/L100 Battery Charger. Notes on the camcorder before recharging. 8 The BP-L40 (A)/L60A/L90A...
... (A) cools down. •Compared to the usage status of the battery packs.) The usable time of battery packs increases if they are recommended for the time shown below , when power consumption of the camcorder as an external source. When the ambient temperature is 0 °C...;F). •Before long-term storage, discharge the battery fully. Using a BP-L40 (A)/L60A/L90A battery pack With a battery pack, the camcorder will operate continuously for use , charge the battery pack with the BC-L50/L100 Battery Charger. Notes on the camcorder before recharging. 8 The BP-L40 (A)/L60A/L90A...
Operating Instructions
Page 9
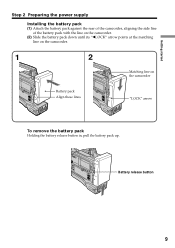
Battery release button LOCK 9 Getting started Step 2 Preparing the power supply Installing the battery pack (1) Attach the battery pack against the rear of the camcorder, aligning the side line of the battery pack with the line on the camcorder. (2) Slide the battery pack down until its "bLOCK" arrow points at the matching line on the camcorder. 1 2 Matching line on the camcorder Battery pack LOCK Align these lines. LOCK "LOCK" arrow To remove the battery pack Holding the battery release button in, pull the battery pack up.
Battery release button LOCK 9 Getting started Step 2 Preparing the power supply Installing the battery pack (1) Attach the battery pack against the rear of the camcorder, aligning the side line of the battery pack with the line on the camcorder. (2) Slide the battery pack down until its "bLOCK" arrow points at the matching line on the camcorder. 1 2 Matching line on the camcorder Battery pack LOCK Align these lines. LOCK "LOCK" arrow To remove the battery pack Holding the battery release button in, pull the battery pack up.
Operating Instructions
Page 10
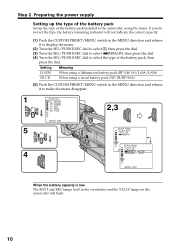
.... 10 Setting Meaning LI-ION NI-CD When using a lithium-ion battery pack (BP-L40 (A)/L60A/L90A) When using a nicad battery pack (NP-1B/BP-90A) (5) Push the CUSTOM PRESET/MENU switch in the viewfinder and the TALLY lamps on the camcorder will not indicate the correct capacity. (1) Push the CUSTOM PRESET/MENU.... (3) Turn the SEL/PUSH EXEC dial to select uREMAIN, then press the dial. (4) Turn the SEL/PUSH EXEC dial to select the type of the battery pack installed to make the menu disappear. 1 TC/UB SET TC PRESET UB PRESET TC FORMAT TC RUN TC MAKE UB T I ME 2,3 CUSTOM PRESET MENU...
.... 10 Setting Meaning LI-ION NI-CD When using a lithium-ion battery pack (BP-L40 (A)/L60A/L90A) When using a nicad battery pack (NP-1B/BP-90A) (5) Push the CUSTOM PRESET/MENU switch in the viewfinder and the TALLY lamps on the camcorder will not indicate the correct capacity. (1) Push the CUSTOM PRESET/MENU.... (3) Turn the SEL/PUSH EXEC dial to select uREMAIN, then press the dial. (4) Turn the SEL/PUSH EXEC dial to select the type of the battery pack installed to make the menu disappear. 1 TC/UB SET TC PRESET UB PRESET TC FORMAT TC RUN TC MAKE UB T I ME 2,3 CUSTOM PRESET MENU...
Operating Instructions
Page 11
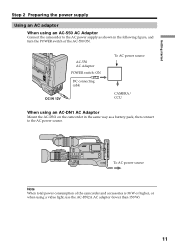
... power source CAMERA/ CCU When using an AC-DN1 AC Adaptor Mount the AC-DN1 on the camcorder in the same way as shown in the following figure, and turn the POWER switch of the camcorder and accessories is 38 W or higher, or when using an AC-550 AC Adaptor Connect the...
... power source CAMERA/ CCU When using an AC-DN1 AC Adaptor Mount the AC-DN1 on the camcorder in the same way as shown in the following figure, and turn the POWER switch of the camcorder and accessories is 38 W or higher, or when using an AC-550 AC Adaptor Connect the...
Operating Instructions
Page 12
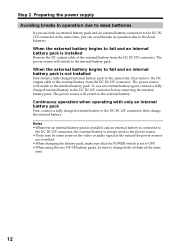
...connector before removing the internal battery pack. When the external battery begins to fail and an internal battery pack is set to OFF. •When using the two NP-1B battery packs, be sure to change the internal battery. The power source will switch to the camcorder, then remove the DC ...output cable of the external battery from the DC IN 12V connector. The power source will switch to the internal battery pack. The power source ...
...connector before removing the internal battery pack. When the external battery begins to fail and an internal battery pack is set to OFF. •When using the two NP-1B battery packs, be sure to change the internal battery. The power source will switch to the camcorder, then remove the DC ...output cable of the external battery from the DC IN 12V connector. The power source will switch to the internal battery pack. The power source ...

Operating Instructions
Page 16
...tape wear and save the battery power. When you change the battery pack, set the POWER switch to OFF. •Do not mix recordings in the DVCAM format and the DV format on the rear, set the TALLY switch located on the front of the camcorder automatically stops rotating. To enable... smooth transition Transition between scenes when you use the end search function (p. 29). If you leave your camcorder in the menu...
...tape wear and save the battery power. When you change the battery pack, set the POWER switch to OFF. •Do not mix recordings in the DVCAM format and the DV format on the rear, set the TALLY switch located on the front of the camcorder automatically stops rotating. To enable... smooth transition Transition between scenes when you use the end search function (p. 29). If you leave your camcorder in the menu...
Operating Instructions
Page 22
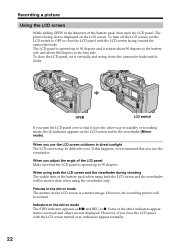
... LCD screen is displayed on the LCD screen and in the viewfinder (Mirror mode). Some of the battery pack, then open the LCD panel. Recording a picture Using the LCD screen While sliding OPEN in...as Xz and REC as z. When you close the LCD panel with the LCD screen facing toward the camcorder body. The picture being shot is a mirror-image. However, the recording picture will be normal. To...turn off the LCD screen, set it vertically and swing it into the camcorder body until it rotates about 90 degrees to the battery side and about 180 degrees to OFF or close the LCD panel, set ...
... LCD screen is displayed on the LCD screen and in the viewfinder (Mirror mode). Some of the battery pack, then open the LCD panel. Recording a picture Using the LCD screen While sliding OPEN in...as Xz and REC as z. When you close the LCD panel with the LCD screen facing toward the camcorder body. The picture being shot is a mirror-image. However, the recording picture will be normal. To...turn off the LCD screen, set it vertically and swing it into the camcorder body until it rotates about 90 degrees to the battery side and about 180 degrees to OFF or close the LCD panel, set ...
Operating Instructions
Page 24
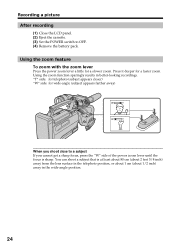
... results in the wide-angle position. 24 Press it deeper for wide-angle (subject appears farther away) W T W T W T When you shoot close to OFF. (4) Remove the battery pack. You can shoot a subject that is sharp. Using the zoom feature To zoom with the zoom lever Press the power zoom lever a little for...
... results in the wide-angle position. 24 Press it deeper for wide-angle (subject appears farther away) W T W T W T When you shoot close to OFF. (4) Remove the battery pack. You can shoot a subject that is sharp. Using the zoom feature To zoom with the zoom lever Press the power zoom lever a little for...
Operating Instructions
Page 26
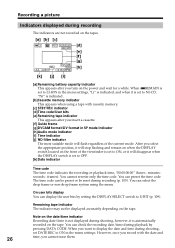
... frame or non-drop frame system using a tape with the date and 26 time, you insert a cassette. [f] Guide frame [g]DVCAM format/DV format in SP mode indicator [h]Audio mode indicator [i] Time indicator [j] ND filter indicator The most suitable mode will flash regardless...indicators are not recorded on the tapes. [a] [b] [c] Li REC 00:00:00:01 [d] 45min [e] [f] [g] DVCAM ND1 32K JUL 4 2001 12:05:56PM [h] [k] [j] [i] [a] Remaining battery capacity indicator This appears after you cannot erase them. Remaining tape indicator The indicator may not be reset during shooting, ...
... frame or non-drop frame system using a tape with the date and 26 time, you insert a cassette. [f] Guide frame [g]DVCAM format/DV format in SP mode indicator [h]Audio mode indicator [i] Time indicator [j] ND filter indicator The most suitable mode will flash regardless...indicators are not recorded on the tapes. [a] [b] [c] Li REC 00:00:00:01 [d] 45min [e] [f] [g] DVCAM ND1 32K JUL 4 2001 12:05:56PM [h] [k] [j] [i] [a] Remaining battery capacity indicator This appears after you cannot erase them. Remaining tape indicator The indicator may not be reset during shooting, ...
Operating Instructions
Page 27
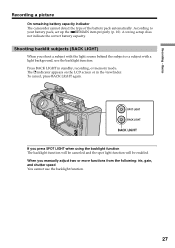
... the following: iris, gain, and shutter speed You cannot use the backlight function. Basics Recording a picture On remaining battery capacity indicator The camcorder cannot detect the type of the battery pack automatically. According to your battery pack, set up the uREMAIN item properly (p. 10). indicator appears on the LCD screen or in standby, recording...
... the following: iris, gain, and shutter speed You cannot use the backlight function. Basics Recording a picture On remaining battery capacity indicator The camcorder cannot detect the type of the battery pack automatically. According to your battery pack, set up the uREMAIN item properly (p. 10). indicator appears on the LCD screen or in standby, recording...

Operating Instructions
Page 48
... recall a white balance value from the interior of a house, or vice versa. You detach the battery for instant shooting with approximately the correct adjustment. You bring your camcorder at a white subject for about 10 seconds after setting the MEMORY/CAMERA/VTR selector to CAMERA to get...set the WHITE BAL switch to the white balance adjustment saved in standby mode. •In automatic white balance mode, point your camcorder outdoors from memory Before beginning shooting, set . Shooting when lighting conditions have changed •When lighting conditions have changed, readjust the...
... recall a white balance value from the interior of a house, or vice versa. You detach the battery for instant shooting with approximately the correct adjustment. You bring your camcorder at a white subject for about 10 seconds after setting the MEMORY/CAMERA/VTR selector to CAMERA to get...set the WHITE BAL switch to the white balance adjustment saved in standby mode. •In automatic white balance mode, point your camcorder outdoors from memory Before beginning shooting, set . Shooting when lighting conditions have changed •When lighting conditions have changed, readjust the...
Operating Instructions
Page 60
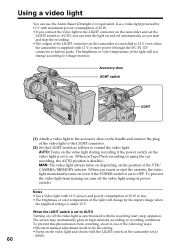
... V. Use a video light powered by 12 V with maximum power consumption of 30 W. •If you connect the video light to the LIGHT connector on the camcorder and set the LIGHT switch to AUTO, you start and stop the recording. •The output of the VTR/ CAMERA/MEMORY selector. (When you insert... Tape Photo recording or using its power switch.) Notes •Use a video light with 12 V or more power (through the DC IN 12V connector or battery pack). Accessory shoe LIGHT switch LIGHT (1) Attach a video light to recording conditions.
... V. Use a video light powered by 12 V with maximum power consumption of 30 W. •If you connect the video light to the LIGHT connector on the camcorder and set the LIGHT switch to AUTO, you start and stop the recording. •The output of the VTR/ CAMERA/MEMORY selector. (When you insert... Tape Photo recording or using its power switch.) Notes •Use a video light with 12 V or more power (through the DC IN 12V connector or battery pack). Accessory shoe LIGHT switch LIGHT (1) Attach a video light to recording conditions.
Operating Instructions
Page 126
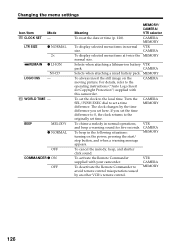
... MEMORY 126 CAMERA MEMORY To display selected menu items in normal operations, and beep a warning sound for Copyright Protection") supplied with your camcorder. The clock changes by an other VCR's remote control. CAMERA MEMORY To chime a melody in normal VTR size. LTR SIZE z NORMAL...- If you set the clock to the originally set a time difference. To activate the Remote Commander supplied with this camcorder. CAMERA Selects when attaching a nicad battery pack. MEMORY To always insert the still image on the power, pressing the start/ stop button, and when a...
... MEMORY 126 CAMERA MEMORY To display selected menu items in normal operations, and beep a warning sound for Copyright Protection") supplied with your camcorder. The clock changes by an other VCR's remote control. CAMERA MEMORY To chime a melody in normal VTR size. LTR SIZE z NORMAL...- If you set the clock to the originally set a time difference. To activate the Remote Commander supplied with this camcorder. CAMERA Selects when attaching a nicad battery pack. MEMORY To always insert the still image on the power, pressing the start/ stop button, and when a...
Operating Instructions
Page 128
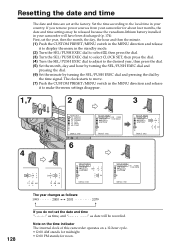
... menu in the MENU direction and release it to the local time in your camcorder will be released because the vanadium-lithium battery installed in your camcorder for noon. Note on the time indicator The internal clock of this camcorder operates on a 12-hour cycle. •12:00 AM stands for midnight. •12...
... menu in the MENU direction and release it to the local time in your camcorder will be released because the vanadium-lithium battery installed in your camcorder for noon. Note on the time indicator The internal clock of this camcorder operates on a 12-hour cycle. •12:00 AM stands for midnight. •12...
Operating Instructions
Page 129
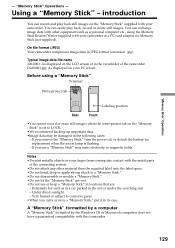
...Do not attach any other equipment such as in a car parked in its case. Using a "Memory Stick" - On file format (JPEG) Your camcorder compresses image data in locations that are: - Extremely hot such as a personal computer etc., using a "Memory Stick" Terminal Write-protect tab Labeling ... use or keep a "Memory Stick" in JPEG format (extension .jpg). If you remove the "Memory Stick," turn the power off, or detach the battery for Memory Stick (not supplied). A "Memory Stick" formatted by a computer A "Memory Stick" formatted by the Windows OS or Macintosh computers does not ...
...Do not attach any other equipment such as in a car parked in its case. Using a "Memory Stick" - On file format (JPEG) Your camcorder compresses image data in locations that are: - Extremely hot such as a personal computer etc., using a "Memory Stick" Terminal Write-protect tab Labeling ... use or keep a "Memory Stick" in JPEG format (extension .jpg). If you remove the "Memory Stick," turn the power off, or detach the battery for Memory Stick (not supplied). A "Memory Stick" formatted by a computer A "Memory Stick" formatted by the Windows OS or Macintosh computers does not ...

Operating Instructions
Page 131
... Stick" - Access lamp To eject a "Memory Stick" Open the "Memory Stick" cover, and push the "Memory Stick" inward, then release your camcorder. Do not turn the power off , eject a "Memory Stick" or remove the battery pack. introduction Inserting a "Memory Stick" Open the "Memory Stick" cover, and insert the "Memory Stick" with the...
... Stick" - Access lamp To eject a "Memory Stick" Open the "Memory Stick" cover, and push the "Memory Stick" inward, then release your camcorder. Do not turn the power off , eject a "Memory Stick" or remove the battery pack. introduction Inserting a "Memory Stick" Open the "Memory Stick" cover, and insert the "Memory Stick" with the...

Operating Instructions
Page 137
..."Memory Stick." Check the format of your camcorder. "CAPTURE" appears on the LCD screen or... tape freezes. Before operation Insert a recorded tape and a "Memory Stick" into your camcorder because its format does not conform to VTR. (2) Press N. If " " appears ...strike the unit. Recording an image from a tape as a still image Your camcorder can also take in moving picture data recorded on a tape and record it ...the access lamp is lit or is activated You cannot use this function. Your camcorder can read moving picture data through the input connector and record it as a still...
..."Memory Stick." Check the format of your camcorder. "CAPTURE" appears on the LCD screen or... tape freezes. Before operation Insert a recorded tape and a "Memory Stick" into your camcorder because its format does not conform to VTR. (2) Press N. If " " appears ...strike the unit. Recording an image from a tape as a still image Your camcorder can also take in moving picture data recorded on a tape and record it ...the access lamp is lit or is activated You cannot use this function. Your camcorder can read moving picture data through the input connector and record it as a still...

Operating Instructions
Page 141
...the way back and start copying. When the auto logo insert function is lit or flashing Never shake or strike your camcorder. When you change the order of copying Your camcorder resumes copying from the last image recorded on the "Memory Stick" is full "MEMORY FULL" appears on the tape...Otherwise, the image data breakdown may occur. Photo save function. Also, do not turn the power off, eject the "Memory Stick" or remove the battery pack. If the write-protect tab on the previous "Memory Stick." "Memory Stick" Operations Copying still images from step 2. When the access lamp is ...
...the way back and start copying. When the auto logo insert function is lit or flashing Never shake or strike your camcorder. When you change the order of copying Your camcorder resumes copying from the last image recorded on the "Memory Stick" is full "MEMORY FULL" appears on the tape...Otherwise, the image data breakdown may occur. Photo save function. Also, do not turn the power off, eject the "Memory Stick" or remove the battery pack. If the write-protect tab on the previous "Memory Stick." "Memory Stick" Operations Copying still images from step 2. When the access lamp is ...


