

User Guide
Page 1
...these numbers whenever you call upon your camera. Owner's Record The model and serial numbers are located on 100% recycled paper using VOC (Volatile Organic Compound)-free vegetableoil based ink. DSLR-A100 Serial No © 2006 Sony Corporation Printed in the space provided below.... Record the serial number in Malaysia 2-681-187-11 (1) Before your operation Using the shooting functions Digital Single Lens Reflex Camera User's Guide/ Troubleshooting 100 DSLR-A100 Using the...
...these numbers whenever you call upon your camera. Owner's Record The model and serial numbers are located on 100% recycled paper using VOC (Volatile Organic Compound)-free vegetableoil based ink. DSLR-A100 Serial No © 2006 Sony Corporation Printed in the space provided below.... Record the serial number in Malaysia 2-681-187-11 (1) Before your operation Using the shooting functions Digital Single Lens Reflex Camera User's Guide/ Troubleshooting 100 DSLR-A100 Using the...
User Guide
Page 7
... your eyes. This is to use the battery pack for a long time, use up ) data to record or play back properly. • Using the camera in sandy or dusty locations may render the recording medium unusable, or cause image data breakdown, damage or loss. • Clean the flash surface before... using a "Memory Stick Duo" with your camera, then store it in a cool, dry place. Or it may not be repairable. • Do not look at the sun or a strong light through a...
... your eyes. This is to use the battery pack for a long time, use up ) data to record or play back properly. • Using the camera in sandy or dusty locations may render the recording medium unusable, or cause image data breakdown, damage or loss. • Clean the flash surface before... using a "Memory Stick Duo" with your camera, then store it in a cool, dry place. Or it may not be repairable. • Do not look at the sun or a strong light through a...

User Guide
Page 8
... points (white, red, blue or green in a cold location, the LCD monitor may cause a fire. These points are operational for Camera File system) universal standard established by JEITA (Japan Electronics and Information Technology Industries Association). • Playback of images recorded with other equipment ...not actual images shot using extremely high-precision technology so over 99.99% of images recorded or edited with your camera are not guaranteed. When the camera warms up, the monitor will function normally. • Do not press against the LCD monitor. You can get ...
... points (white, red, blue or green in a cold location, the LCD monitor may cause a fire. These points are operational for Camera File system) universal standard established by JEITA (Japan Electronics and Information Technology Industries Association). • Playback of images recorded with other equipment ...not actual images shot using extremely high-precision technology so over 99.99% of images recorded or edited with your camera are not guaranteed. When the camera warms up, the monitor will function normally. • Do not press against the LCD monitor. You can get ...
User Guide
Page 9
On "image quality" and "image size 17 Before your camera 7 Basic techniques for better images 13 Focus - Exposure Bracket 62 White balance bracket shooting 64 9 Adjusting the light intensity 16 Color - On the effects of ...
On "image quality" and "image size 17 Before your camera 7 Basic techniques for better images 13 Focus - Exposure Bracket 62 White balance bracket shooting 64 9 Adjusting the light intensity 16 Color - On the effects of ...
User Guide
Page 11
... CCD Reset default Using your computer Enjoying your Windows computer 105 Copying images to your computer 107 Viewing image files stored on a computer with your camera 113 Installing the software (supplied 114 Using the software (supplied 115 Using your Macintosh computer 120 11 Custom menu 1 93 Priority setup FocusHoldButt. AEL button...
... CCD Reset default Using your computer Enjoying your Windows computer 105 Copying images to your computer 107 Viewing image files stored on a computer with your camera 113 Installing the software (supplied 114 Using the software (supplied 115 Using your Macintosh computer 120 11 Custom menu 1 93 Priority setup FocusHoldButt. AEL button...

User Guide
Page 13
Press the shutter button halfway AE/AF lock down. , z Then press the shutter button fully down straight away. Make it may be because of camera shake. It tells you how to confirm that the subject is visually in focus. Press the shutter button fully down . t See "Hints for better... images Focus Exposure Color Quality This section describes the basics so you can enjoy your camera. Focus Focusing on . If the image looks blurred even after focusing, it a habit to press the shutter button only halfway down to use various...
Press the shutter button halfway AE/AF lock down. , z Then press the shutter button fully down straight away. Make it may be because of camera shake. It tells you how to confirm that the subject is visually in focus. Press the shutter button fully down . t See "Hints for better... images Focus Exposure Color Quality This section describes the basics so you can enjoy your camera. Focus Focusing on . If the image looks blurred even after focusing, it a habit to press the shutter button only halfway down to use various...

User Guide
Page 14
... is illuminated briefly to indicate the point of focus. Using a tripod, or using the flash allows you can increase the shutter speed to reduce the camera shake without firing the flash by following the steps below. • The focus-lock function is also recommended. If the subject is outside the focus... mode, place the subject within the focus frame will be in focus and the subject will also provide support. Hints for preventing blur Hold the camera steady, keeping your arms at your side and support the lens with the palm of a subject in dim light and it also helps to prevent...
... is illuminated briefly to indicate the point of focus. Using a tripod, or using the flash allows you can increase the shutter speed to reduce the camera shake without firing the flash by following the steps below. • The focus-lock function is also recommended. If the subject is outside the focus... mode, place the subject within the focus frame will be in focus and the subject will also provide support. Hints for preventing blur Hold the camera steady, keeping your arms at your side and support the lens with the palm of a subject in dim light and it also helps to prevent...

User Guide
Page 15
...motion), you keep the shutter button halfway down after shooting will lock the exposure as well (when multi segment metering is the part of the camera that acts as the facade of water. When you can continue shooting with the same focal point. • If the z indicator does ...the horizontal line. * The CCD is selected (page 58)). • Releasing the shutter button after shooting, you measure the exact distance between the camera and the subject, refer to focus on the following subjects. 2 Keep the shutter button halfway down, and put the subject back in the illustration shows...
...motion), you keep the shutter button halfway down after shooting will lock the exposure as well (when multi segment metering is the part of the camera that acts as the facade of water. When you can continue shooting with the same focal point. • If the z indicator does ...the horizontal line. * The CCD is selected (page 58)). • Releasing the shutter button after shooting, you measure the exact distance between the camera and the subject, refer to focus on the following subjects. 2 Keep the shutter button halfway down, and put the subject back in the illustration shows...

User Guide
Page 16
...has been determined by adjusting the shutter speed and aperture. t page 37 Metering Mode: Allows you can create various images by the camera. However, you to change the part of light that records the image Overexposure = too much light Whitish image Correct exposure Underexposure =... automatically set to determine the exposure. Shutter speed = Length of time the camera Exposure: receives light Aperture = Size of the opening allowing light to pass through Image sensor = Part that the camera will receive when you release the shutter. t page 65 16 Exposure Adjusting ...
...has been determined by adjusting the shutter speed and aperture. t page 37 Metering Mode: Allows you can create various images by the camera. However, you to change the part of light that records the image Overexposure = too much light Whitish image Correct exposure Underexposure =... automatically set to determine the exposure. Shutter speed = Length of time the camera Exposure: receives light Aperture = Size of the opening allowing light to pass through Image sensor = Part that the camera will receive when you release the shutter. t page 65 16 Exposure Adjusting ...

User Guide
Page 17
..., you cannot see the differences on the screen of the camera, the fine detail and data processing time differ when the image... Reddish The color tones are adjusted automatically in fine detail. Quality On "image quality" and "image size" A digital image is made up more memory, and the image is printed or displayed on a computer screen. If it contains... pixels. Description of the pixels and the image size 1 Image size: L:10M 3,872 pixels × 2,592 pixels = 10,036,224 pixels Pixels 2 Image size: S:2.5M 1,920 pixels × 1,280 pixels = 2,457,600 pixels 17 Color ...
..., you cannot see the differences on the screen of the camera, the fine detail and data processing time differ when the image... Reddish The color tones are adjusted automatically in fine detail. Quality On "image quality" and "image size" A digital image is made up more memory, and the image is printed or displayed on a computer screen. If it contains... pixels. Description of the pixels and the image size 1 Image size: L:10M 3,872 pixels × 2,592 pixels = 10,036,224 pixels Pixels 2 Image size: S:2.5M 1,920 pixels × 1,280 pixels = 2,457,600 pixels 17 Color ...

User Guide
Page 18
Image size* Usage guidelines No. of images Smaller For creating web pages More Rough * The images recorded using the camera are the same 3:2 ratio as used photograph printing paper or postcards, etc. ** This is a size larger than A3 size. Selecting the image quality (compression ratio...) in up to A3/A3+** size Few pixels (Rough image quality but has a smaller file size. 18 You can select the compression ratio when digital images are saved. Selecting the image size for use Pixel Many pixels (Fine image quality and large file size) Example: Printing in combination (page 83...
Image size* Usage guidelines No. of images Smaller For creating web pages More Rough * The images recorded using the camera are the same 3:2 ratio as used photograph printing paper or postcards, etc. ** This is a size larger than A3 size. Selecting the image quality (compression ratio...) in up to A3/A3+** size Few pixels (Rough image quality but has a smaller file size. 18 You can select the compression ratio when digital images are saved. Selecting the image size for use Pixel Many pixels (Fine image quality and large file size) Example: Printing in combination (page 83...

User Guide
Page 20
... insertion slot (t step 4 in "Read This First") U CF card eject lever (t step 4 in "Read This First") 20 You will be unable to firmly secure the camera to tripods having screws longer than 5.5 mm (7/32 inch). B Battery cover open lever (t step 1 in "Read This First") C Lock lever (t step 1 in "Read This First...") E Battery cover (t step 1 in "Read This First") A Tripod receptacle • Use a tripod with a screw length of less than 5.5 mm (7/32 inch), and may damage the camera.
... insertion slot (t step 4 in "Read This First") U CF card eject lever (t step 4 in "Read This First") 20 You will be unable to firmly secure the camera to tripods having screws longer than 5.5 mm (7/32 inch). B Battery cover open lever (t step 1 in "Read This First") C Lock lever (t step 1 in "Read This First...") E Battery cover (t step 1 in "Read This First") A Tripod receptacle • Use a tripod with a screw length of less than 5.5 mm (7/32 inch), and may damage the camera.

User Guide
Page 21
Attach the end of the strap with your operation Attaching the shoulder strap This camera has two hooks to secure the strap. Notched side 21 Attach the other end of the strap on the other side of the camera. Holder Ring If the holder ring comes off the strap, put it back on... the grip side of the camera. Before your finger, as shown below, and slide the holder ring rather than the tip of the strap into position to attach the shoulder strap. ...
Attach the end of the strap with your operation Attaching the shoulder strap This camera has two hooks to secure the strap. Notched side 21 Attach the other end of the strap on the other side of the camera. Holder Ring If the holder ring comes off the strap, put it back on... the grip side of the camera. Before your finger, as shown below, and slide the holder ring rather than the tip of the strap into position to attach the shoulder strap. ...

User Guide
Page 22
... sync (145) AE lock (67) Focus (t step 5 in "Read This First") Shutter speed (36) Aperture (34) Ev scale (38, 63, 68) Frames-remaining counter (61) Camera-shake warning (t step 5 in "Read This First") Super SteadyShot scale (t step 5 in "Read This First") • The illustration above is for the full display in...
... sync (145) AE lock (67) Focus (t step 5 in "Read This First") Shutter speed (36) Aperture (34) Ev scale (38, 63, 68) Frames-remaining counter (61) Camera-shake warning (t step 5 in "Read This First") Super SteadyShot scale (t step 5 in "Read This First") • The illustration above is for the full display in...

User Guide
Page 26
...• For the screen displayed in playback mode, see page 72. 26 Press the (Display) button to the camera position. When you rotate the camera to a vertical position, the display automatically rotates to adjust to switch between the detailed display and the enlarged display that... has less information in this operating instructions are based on the back of the camera displays various recording information. You can choose to minimize battery consumption. Horizontal position Detailed display Enlarged display No display (Display)...
...• For the screen displayed in playback mode, see page 72. 26 Press the (Display) button to the camera position. When you rotate the camera to a vertical position, the display automatically rotates to adjust to switch between the detailed display and the enlarged display that... has less information in this operating instructions are based on the back of the camera displays various recording information. You can choose to minimize battery consumption. Horizontal position Detailed display Enlarged display No display (Display)...

User Guide
Page 27
The values may vary depending on a recording medium formatted with this camera. The number of images that can be recorded on the shooting conditions. Before your operation Number of images The tables show the approximate number of ...images "Memory Stick Duo" Image size: L:10M Capacity Size 64MB Standard 22 Fine 14 RAW & JPEG 2 RAW 3 128MB 46 29 5 7 256MB 85 54 10 14 512MB 174 112 23 30 (Units: Images) 1GB 2GB 358 735 229 471 48 100 62 128 Image size: M:5.6M Capacity Size 64MB Standard...
The values may vary depending on a recording medium formatted with this camera. The number of images that can be recorded on the shooting conditions. Before your operation Number of images The tables show the approximate number of ...images "Memory Stick Duo" Image size: L:10M Capacity Size 64MB Standard 22 Fine 14 RAW & JPEG 2 RAW 3 128MB 46 29 5 7 256MB 85 54 10 14 512MB 174 112 23 30 (Units: Images) 1GB 2GB 358 735 229 471 48 100 62 128 Image size: M:5.6M Capacity Size 64MB Standard...

User Guide
Page 29
...be recorded when using a Microdrive, the number of images recordable may be less than those indicated depending on the conditions of use the camera with the battery pack (supplied) at full capacity and at an ambient temperature of images that the actual numbers may differ. 29 ... 25°C (77°F). The flash strobes once every two times. - Recording medium No. The power turns on the CIPA standard. (CIPA: Camera & Imaging Products Association) • The number of shooting images does not change, regardless of images that can be recorded when you use . The numbers...
...be recorded when using a Microdrive, the number of images recordable may be less than those indicated depending on the conditions of use the camera with the battery pack (supplied) at full capacity and at an ambient temperature of images that the actual numbers may differ. 29 ... 25°C (77°F). The flash strobes once every two times. - Recording medium No. The power turns on the CIPA standard. (CIPA: Camera & Imaging Products Association) • The number of shooting images does not change, regardless of images that can be recorded when you use . The numbers...
User Guide
Page 30
..., bracket, white balance bracket) • Adjusting the exposure (page 65) • Locking the exposure (page 67) • Focusing manually (page 71) Shooting • Holding the camera (t step 5 in "Read This First", page 14) • Look into the viewfinder (t step 5 in "Read This First") • When using a zoom lens, turn the zoom...
..., bracket, white balance bracket) • Adjusting the exposure (page 65) • Locking the exposure (page 67) • Focusing manually (page 71) Shooting • Holding the camera (t step 5 in "Read This First", page 14) • Look into the viewfinder (t step 5 in "Read This First") • When using a zoom lens, turn the zoom...

User Guide
Page 31
... shooting functions Recording modes : Auto adjustment mode Allows easy shooting with preset settings according to shoot with the settings adjusted automatically, depending entirely on the camera. Unavailable Available 31 t step 5 in "Read This First" : Scene Selection mode Allows you to shoot after adjusting the shutter speed manually (page 36). S: Shutter speed...
... shooting functions Recording modes : Auto adjustment mode Allows easy shooting with preset settings according to shoot with the settings adjusted automatically, depending entirely on the camera. Unavailable Available 31 t step 5 in "Read This First" : Scene Selection mode Allows you to shoot after adjusting the shutter speed manually (page 36). S: Shutter speed...
User Guide
Page 32
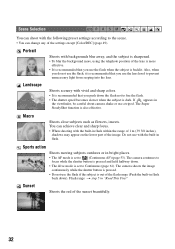
...the built-in bright places. • The AF mode is set to Continuous (page 61). Flash range t step 5 in the viewfinder, be careful about camera shake or use the lens hood to fire the flash. • The shutter speed becomes slower when the subject is dark. Macro Shoots close subjects... such as flowers, insects. The camera shoots the image continuously while the shutter button is pressed. • Do not use the flash, it is recommended that you push down ). Also,...
...the built-in bright places. • The AF mode is set to Continuous (page 61). Flash range t step 5 in the viewfinder, be careful about camera shake or use the lens hood to fire the flash. • The shutter speed becomes slower when the subject is dark. Macro Shoots close subjects... such as flowers, insects. The camera shoots the image continuously while the shutter button is pressed. • Do not use the flash, it is recommended that you push down ). Also,...


