
Instruction Manual
Page 2
... - Record the serial number in fire. • Do not handle damaged or leaking lithium ion batteries. • Be sure to these numbers whenever you call upon your Sony dealer regarding this product. DSLR-A500/A550 Serial No WARNING To reduce fire or shock hazard, do not allow metal objects to ...come into contact with the battery terminals. • Do not expose to high temperature above 60°C (...
... - Record the serial number in fire. • Do not handle damaged or leaking lithium ion batteries. • Be sure to these numbers whenever you call upon your Sony dealer regarding this product. DSLR-A500/A550 Serial No WARNING To reduce fire or shock hazard, do not allow metal objects to ...come into contact with the battery terminals. • Do not expose to high temperature above 60°C (...

Instruction Manual
Page 3
...For more information regarding recycling of rechargeable batteries, call : Sony Customer Information Services Center 1-800-222-SONY (7669) The number below is an internationally recognized safety organization. If some trouble occurs while using the battery charger, immediately shut off the power...RECYCLING LITHIUM-ION BATTERIES Lithium-Ion batteries are recyclable. You can help preserve our environment by returning your used battery pack promptly described the instructions. This Class B digital apparatus complies with Canadian ICES-003. For Customers in the U.S.A. Battery pack This device...
...For more information regarding recycling of rechargeable batteries, call : Sony Customer Information Services Center 1-800-222-SONY (7669) The number below is an internationally recognized safety organization. If some trouble occurs while using the battery charger, immediately shut off the power...RECYCLING LITHIUM-ION BATTERIES Lithium-Ion batteries are recyclable. You can help preserve our environment by returning your used battery pack promptly described the instructions. This Class B digital apparatus complies with Canadian ICES-003. For Customers in the U.S.A. Battery pack This device...

Instruction Manual
Page 6
... complying with an or mark) must be used in combination with this product or battery, please contact your local Civic Office, your nearest Sony service station. 6 Notice for the recycling of waste batteries. Disposal of waste batteries (applicable in the European Union and other batteries, please view the section on the packaging indicates that the...
... complying with an or mark) must be used in combination with this product or battery, please contact your local Civic Office, your nearest Sony service station. 6 Notice for the recycling of waste batteries. Disposal of waste batteries (applicable in the European Union and other batteries, please view the section on the packaging indicates that the...
Instruction Manual
Page 7
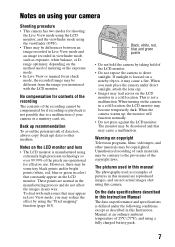
...shot using this manual The photographs used as exposure, white balance, or Drange optimizer, depending on the method used of your camera Shooting procedure • This camera has two modes for effective use. However, there may cause a malfunction. Black, white, red, blue and green points &#...8226; Do not hold the camera by using extremely high-precision technology so over 99.99% of 25ºC (77°F), and using a fully charged battery pack. 7 This is not a malfunction. Warning on the LCD monitor.
...shot using this manual The photographs used as exposure, white balance, or Drange optimizer, depending on the method used of your camera Shooting procedure • This camera has two modes for effective use. However, there may cause a malfunction. Black, white, red, blue and green points &#...8226; Do not hold the camera by using extremely high-precision technology so over 99.99% of 25ºC (77°F), and using a fully charged battery pack. 7 This is not a malfunction. Warning on the LCD monitor.

Instruction Manual
Page 8
... your operation Shooting images Notes on using your camera 7 Checking the accessories supplied 12 Preparing the battery pack 13 Attaching a lens 20 Inserting a memory card 22 Preparing the camera 25 Using the accessories supplied 27 Checking the number of recordable images 29 Cleaning 32 Identifying parts ... 44 The functions selected by the Fn (Function) button ... 45 The functions selected by the MENU button 45 Shooting an image without camera shake 47 Correct posture 47 Using the SteadyShot function 48 Using a tripod 49 / Shooting with the automatic setting 50 Using the Face ...
... your operation Shooting images Notes on using your camera 7 Checking the accessories supplied 12 Preparing the battery pack 13 Attaching a lens 20 Inserting a memory card 22 Preparing the camera 25 Using the accessories supplied 27 Checking the number of recordable images 29 Cleaning 32 Identifying parts ... 44 The functions selected by the Fn (Function) button ... 45 The functions selected by the MENU button 45 Shooting an image without camera shake 47 Correct posture 47 Using the SteadyShot function 48 Using a tripod 49 / Shooting with the automatic setting 50 Using the Face ...

Instruction Manual
Page 12
Preparing the camera Checking the accessories supplied The number in parentheses indicates the number of pieces. • BC-VM10 Battery charger (1)/ Power cord (mains lead) (1) • Instruction Manual (This manual) (1) • Rechargeable battery pack NPFM500H (1) • USB cable (1) • Shoulder strap (1) • Eyepiece cover (1) • Body cap (1) (Attached on the camera) • Eyecup (1) (Attached on the camera) • CD-ROM (Application Software for α camera) (1) 12
Preparing the camera Checking the accessories supplied The number in parentheses indicates the number of pieces. • BC-VM10 Battery charger (1)/ Power cord (mains lead) (1) • Instruction Manual (This manual) (1) • Rechargeable battery pack NPFM500H (1) • USB cable (1) • Shoulder strap (1) • Eyepiece cover (1) • Body cap (1) (Attached on the camera) • Eyecup (1) (Attached on the camera) • CD-ROM (Application Software for α camera) (1) 12

Instruction Manual
Page 13
... not been fully depleted. Full charge Normal charge Approx. 235 min. Preparing the camera Preparing the battery pack When using the camera for the first time, be charged even when it clicks. 2 Connect the power cord (mains lead). Light on the battery charger. Approx. 175 min. • The charging time differs depending on the...
... not been fully depleted. Full charge Normal charge Approx. 235 min. Preparing the camera Preparing the battery pack When using the camera for the first time, be charged even when it clicks. 2 Connect the power cord (mains lead). Light on the battery charger. Approx. 175 min. • The charging time differs depending on the...

Instruction Manual
Page 14
... to 240 V AC, 50/60 Hz. If the battery charger operates correctly, a battery error may have occurred. • If the battery charger is the specified type. Clean the battery charger with your camera. Power sources You can use your camera abroad - Check that a battery pack other than the specified kind may leak, overheat, or explode if you...
... to 240 V AC, 50/60 Hz. If the battery charger operates correctly, a battery error may have occurred. • If the battery charger is the specified type. Clean the battery charger with your camera. Power sources You can use your camera abroad - Check that a battery pack other than the specified kind may leak, overheat, or explode if you...

Instruction Manual
Page 17
Lock lever To remove the battery pack Turn off the camera and slide the lock lever in the direction of the battery. 3 Close the battery cover. Lock lever 17 Preparing the camera Inserting the charged battery pack 1 While sliding the battery cover open lever, open the battery cover. 2 Firmly insert the battery pack all the way while pressing the lock lever with the tip of the arrow. Be careful not to drop the battery pack.
Lock lever To remove the battery pack Turn off the camera and slide the lock lever in the direction of the battery. 3 Close the battery cover. Lock lever 17 Preparing the camera Inserting the charged battery pack 1 While sliding the battery cover open lever, open the battery cover. 2 Firmly insert the battery pack all the way while pressing the lock lever with the tip of the arrow. Be careful not to drop the battery pack.

Instruction Manual
Page 18
...is an "InfoLITHIUM" battery pack? To remove the cover, push the lever in . Note that has functions for exchanging information related to the operating conditions of the arrow and slide it in the direction of your camera. To remove the battery cover The battery cover can be used.... 18 To check the remaining battery level Check the level with your camera. Notes • The displayed level may not be correct under direct sunlight. Battery level High "Battery exhausted" Low You cannot ...
...is an "InfoLITHIUM" battery pack? To remove the cover, push the lever in . Note that has functions for exchanging information related to the operating conditions of the arrow and slide it in the direction of your camera. To remove the battery cover The battery cover can be used.... 18 To check the remaining battery level Check the level with your camera. Notes • The displayed level may not be correct under direct sunlight. Battery level High "Battery exhausted" Low You cannot ...

Instruction Manual
Page 19
... flash frequently, use continuous shooting often, or turn the camera on and off frequently. • The time available in the viewfinder mode. Battery life • The battery life is shorter in cold places and the speed of the battery pack • Battery performance decreases in a pocket close to your body to... and then fully use it up , and insert it in your camera before storing the battery pack in a dry, cool place to warm it up once a year on your camera immediately before you start shooting. • The battery pack will run out quickly if you use of continuous shooting slows ...
... flash frequently, use continuous shooting often, or turn the camera on and off frequently. • The time available in the viewfinder mode. Battery life • The battery life is shorter in cold places and the speed of the battery pack • Battery performance decreases in a pocket close to your body to... and then fully use it up , and insert it in your camera before storing the battery pack in a dry, cool place to warm it up once a year on your camera immediately before you start shooting. • The battery pack will run out quickly if you use of continuous shooting slows ...

Instruction Manual
Page 23
... it in direct sunlight. - Locations exposed to the LOCK position, you handle it has been used for a long time. Humid locations or locations with this camera. 23 Preparing the camera To remove the memory card Check that the access lamp is lit, do not remove the memory card or the...
... it in direct sunlight. - Locations exposed to the LOCK position, you handle it has been used for a long time. Humid locations or locations with this camera. 23 Preparing the camera To remove the memory card Check that the access lamp is lit, do not remove the memory card or the...
Instruction Manual
Page 27
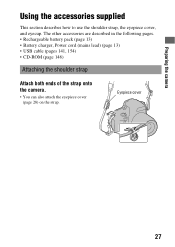
Preparing the camera Using the accessories supplied This section describes how to use the shoulder strap, the eyepiece cover, and eyecup. The other accessories are described in the following pages. • Rechargeable battery pack (page 13) • Battery charger, Power cord (mains lead) (page 13) • USB cable (pages 141, 154) • CD-ROM (page 148) Attaching the shoulder strap Attach both ends of the strap onto the camera. • You can also attach the eyepiece cover (page 28) on the strap. Eyepiece cover 27
Preparing the camera Using the accessories supplied This section describes how to use the shoulder strap, the eyepiece cover, and eyecup. The other accessories are described in the following pages. • Rechargeable battery pack (page 13) • Battery charger, Power cord (mains lead) (page 13) • USB cable (pages 141, 154) • CD-ROM (page 148) Attaching the shoulder strap Attach both ends of the strap onto the camera. • You can also attach the eyepiece cover (page 28) on the strap. Eyepiece cover 27

Instruction Manual
Page 31
Live View mode DSLR-A550 Approx. 480 images DSLR-A500 Approx. 520 images Viewfinder mode Approx. 950 images Approx. 1000 images • The number is calculated with the battery pack (supplied) at full capacity and in the following situation: - Shooting once every 30 seconds. - The flash strobes once ...two times. - The power turns on and off once every ten times. • The measurement method is based on the conditions of use the camera with a battery pack at full capacity. At an ambient temperature of 25°C (77°F). - [Quality] is set to [Fine]. - [Autofocus mode...
Live View mode DSLR-A550 Approx. 480 images DSLR-A500 Approx. 520 images Viewfinder mode Approx. 950 images Approx. 1000 images • The number is calculated with the battery pack (supplied) at full capacity and in the following situation: - Shooting once every 30 seconds. - The flash strobes once ...two times. - The power turns on and off once every ten times. • The measurement method is based on the conditions of use the camera with a battery pack at full capacity. At an ambient temperature of 25°C (77°F). - [Quality] is set to [Fine]. - [Autofocus mode...

Instruction Manual
Page 33
... button 3 Select [Cleaning mode] with v, and press the center of the controller. The message "After cleaning, turn camera off. Notes • Cleaning can be completed quickly. Low battery power during cleaning can easily clean the image sensor using only the blower and the anti-dust function. Continue?" If there... is dust on the image sensor, use a spray blower because it may scatter water droplets inside the camera body. 1 Confirm that the battery is lifted. 5 Detach the lens (page 21). 33 After the image sensor vibrates for a short time, the mirror in front is fully ...
... button 3 Select [Cleaning mode] with v, and press the center of the controller. The message "After cleaning, turn camera off. Notes • Cleaning can be completed quickly. Low battery power during cleaning can easily clean the image sensor using only the blower and the anti-dust function. Continue?" If there... is dust on the image sensor, use a spray blower because it may scatter water droplets inside the camera body. 1 Confirm that the battery is lifted. 5 Detach the lens (page 21). 33 After the image sensor vibrates for a short time, the mirror in front is fully ...

Instruction Manual
Page 34
Complete the cleaning quickly. • Hold the camera's face downward to clean the image sensor surface and the surrounding area. • Do not touch the image sensor with the tip of a blower into the cavity beyond the mount. 7 Attach the lens and turn the camera off . Stop cleaning immediately and turn the camera off . 34 Note • The camera starts beeping if the battery pack becomes low during cleaning. 6 Use the blower to prevent the dust from resettling in the camera. • When cleaning the image sensor, do not put the tip of the blower.
Complete the cleaning quickly. • Hold the camera's face downward to clean the image sensor surface and the surrounding area. • Do not touch the image sensor with the tip of a blower into the cavity beyond the mount. 7 Attach the lens and turn the camera off . Stop cleaning immediately and turn the camera off . 34 Note • The camera starts beeping if the battery pack becomes low during cleaning. 6 Use the blower to prevent the dust from resettling in the camera. • When cleaning the image sensor, do not put the tip of the blower.

Instruction Manual
Page 39
...Stick PRO Duo" media insertion slot (22) I Memory card cover J Battery cover (17) K Tripod receptacle • Use a tripod with a screw length of the plug on the camera. You will be unable to firmly secure the camera to the camera, insert the plug of the Remote Commander in the REMOTE terminal, aligning ...(125) B (USB) terminal (141, 154) C REMOTE terminal • When connecting the RMS1AM/RM-L1AM Remote Commander (sold separately) to the camera, turn the camera off, then plug the connector of the AC Adaptor to the DC IN terminal on the guide of the REMOTE terminal. D Hooks for shoulder...
...Stick PRO Duo" media insertion slot (22) I Memory card cover J Battery cover (17) K Tripod receptacle • Use a tripod with a screw length of the plug on the camera. You will be unable to firmly secure the camera to the camera, insert the plug of the Remote Commander in the REMOTE terminal, aligning ...(125) B (USB) terminal (141, 154) C REMOTE terminal • When connecting the RMS1AM/RM-L1AM Remote Commander (sold separately) to the camera, turn the camera off, then plug the connector of the AC Adaptor to the DC IN terminal on the guide of the REMOTE terminal. D Hooks for shoulder...
Instruction Manual
Page 41
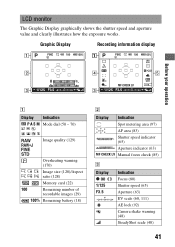
... (129) Overheating warning (170) Image size (128)/Aspect ratio (128) Memory card (22) 100 Remaining number of recordable images (29) 100% Remaining battery (18) B Display Indication Spot metering area (97) AF area (83) Shutter speed indicator (65) Aperture indicator (63) MF CHECK LV Manual focus check... C Display z 1/125 F3.5 Indication Focus (80) Shutter speed (65) Aperture (63) EV scale (68, 111) AE lock (92) Camera shake warning (48) SteadyShot scale (48) 41 LCD monitor The Graphic Display graphically shows the shutter speed and aperture value and clearly illustrates how the...
... (129) Overheating warning (170) Image size (128)/Aspect ratio (128) Memory card (22) 100 Remaining number of recordable images (29) 100% Remaining battery (18) B Display Indication Spot metering area (97) AF area (83) Shutter speed indicator (65) Aperture indicator (63) MF CHECK LV Manual focus check... C Display z 1/125 F3.5 Indication Focus (80) Shutter speed (65) Aperture (63) EV scale (68, 111) AE lock (92) Camera shake warning (48) SteadyShot scale (48) 41 LCD monitor The Graphic Display graphically shows the shutter speed and aperture value and clearly illustrates how the...

Instruction Manual
Page 74
...aperture value and clearly illustrates how the exposure works. See the pages in parentheses for details of recordable images (29) 100% Remaining battery (18) B Display Indication Shutter speed indicator (65) Aperture indicator (63) Display C Display Indication Exposure compensation indicator (93) ...Indication Flash mode (88)/Red-eye reduction (90) Drive mode (108) • is only for the DSLR-A550. A Display Indication P A S M Mode dial (50 - 70) Image quality (129) Image size (128)/Aspect ratio (128) Memory card...
...aperture value and clearly illustrates how the exposure works. See the pages in parentheses for details of recordable images (29) 100% Remaining battery (18) B Display Indication Shutter speed indicator (65) Aperture indicator (63) Display C Display Indication Exposure compensation indicator (93) ...Indication Flash mode (88)/Red-eye reduction (90) Drive mode (108) • is only for the DSLR-A550. A Display Indication P A S M Mode dial (50 - 70) Image quality (129) Image size (128)/Aspect ratio (128) Memory card...

Instruction Manual
Page 76
LCD monitor (Standard Display) See pages in parentheses for details of recordable images (29) 100% Remaining battery (18) B Display Indication Flash mode (88)/Red-eye reduction (90) 76 Display Indication Drive mode (108) • is only for the DSLR-A550. Focus mode (82) AWB 7500K G9 AF area (83) White balance (Auto, Preset...
LCD monitor (Standard Display) See pages in parentheses for details of recordable images (29) 100% Remaining battery (18) B Display Indication Flash mode (88)/Red-eye reduction (90) 76 Display Indication Drive mode (108) • is only for the DSLR-A550. Focus mode (82) AWB 7500K G9 AF area (83) White balance (Auto, Preset...


