
Instruction Manual
Page 13
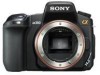
Preparing the camera Preparing the camera Checking the accessories supplied The number in parentheses indicates the number of pieces. • BC-VM10 Battery charger (1)/ Power cord (mains lead) (1) • Rechargeable battery pack NPFM500H (1) • Eyecup (1) (Attached on the camera) • CD-ROM (Application Software for α camera) (1) • Quick Start Guide (1) • Instruction Manual (This manual) (1) • USB cable (1) • Video cable (1) • Shoulder strap (1) • Eyepiece cover (1) • Body cap (1) (Attached on the camera) 13
Preparing the camera Preparing the camera Checking the accessories supplied The number in parentheses indicates the number of pieces. • BC-VM10 Battery charger (1)/ Power cord (mains lead) (1) • Rechargeable battery pack NPFM500H (1) • Eyecup (1) (Attached on the camera) • CD-ROM (Application Software for α camera) (1) • Quick Start Guide (1) • Instruction Manual (This manual) (1) • USB cable (1) • Video cable (1) • Shoulder strap (1) • Eyepiece cover (1) • Body cap (1) (Attached on the camera) 13
Instruction Manual
Page 14
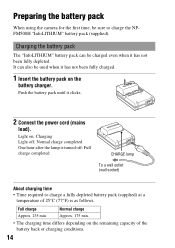
It can be used when it clicks. 2 Connect the power cord (mains lead). Push the battery pack until it has not been fully charged. 1 Insert the battery pack on the battery charger. Light on the remaining capacity of 25°C (77°F) is as follows. Approx. 175 min. ... to charge the NPFM500H "InfoLITHIUM" battery pack (supplied). Full charge Normal charge Approx. 235 min. Charging the battery pack The "InfoLITHIUM" battery pack can also be charged even when it has not been fully depleted. Preparing the battery pack When using the camera for the first time, be sure...
It can be used when it clicks. 2 Connect the power cord (mains lead). Push the battery pack until it has not been fully charged. 1 Insert the battery pack on the battery charger. Light on the remaining capacity of 25°C (77°F) is as follows. Approx. 175 min. ... to charge the NPFM500H "InfoLITHIUM" battery pack (supplied). Full charge Normal charge Approx. 235 min. Charging the battery pack The "InfoLITHIUM" battery pack can also be charged even when it has not been fully depleted. Preparing the battery pack When using the camera for the first time, be sure...
Instruction Manual
Page 15
... with new one or another one and check if the battery charger operates correctly. Power sources You can use your camera and the battery charger and the AC-VQ900AM AC Adaptor/charger (not supplied) in any battery pack other than the specified kind may leak, overheat, ...posing a risk of this temperature range. Clean the battery charger with your camera abroad - Preparing the camera • We recommend charging the battery pack in the battery charger (supplied) with dry cloth, etc. If some trouble occurs while using the battery charger, immediately shut off the power by . •...
... with new one or another one and check if the battery charger operates correctly. Power sources You can use your camera and the battery charger and the AC-VQ900AM AC Adaptor/charger (not supplied) in any battery pack other than the specified kind may leak, overheat, ...posing a risk of this temperature range. Clean the battery charger with your camera abroad - Preparing the camera • We recommend charging the battery pack in the battery charger (supplied) with dry cloth, etc. If some trouble occurs while using the battery charger, immediately shut off the power by . •...
Instruction Manual
Page 27
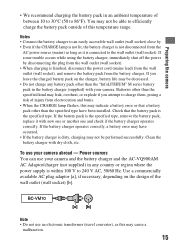
... This section describes how to use of the strap on the camera. • You can prevent light from entering through the viewfinder and affecting the exposure. The other accessories are described in the following pages. • Rechargeable battery pack (page 14) • Battery charger, Power cord (mains lead) (page 14) • Eyecup (page 68...
... This section describes how to use of the strap on the camera. • You can prevent light from entering through the viewfinder and affecting the exposure. The other accessories are described in the following pages. • Rechargeable battery pack (page 14) • Battery charger, Power cord (mains lead) (page 14) • Eyecup (page 68...
Instruction Manual
Page 32
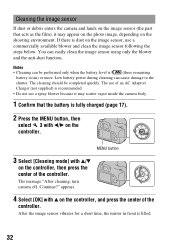
...) or more. Continue?" If there is dust on the image sensor, use a spray blower because it may scatter vapor inside the camera body. 1 Confirm that the battery is fully charged (page 17). 2 Press the MENU button, then select 3 with v/V on the controller, then press the center of the ... b/B on the controller. After the image sensor vibrates for a short time, the mirror in front is lifted. 32 The use of an AC Adaptor/ Charger (not supplied) is recommended. • Do not use a commercially available blower and clean the image sensor following the steps below. appears. 4 Select [...
...) or more. Continue?" If there is dust on the image sensor, use a spray blower because it may scatter vapor inside the camera body. 1 Confirm that the battery is fully charged (page 17). 2 Press the MENU button, then select 3 with v/V on the controller, then press the center of the ... b/B on the controller. After the image sensor vibrates for a short time, the mirror in front is lifted. 32 The use of an AC Adaptor/ Charger (not supplied) is recommended. • Do not use a commercially available blower and clean the image sensor following the steps below. appears. 4 Select [...

Instruction Manual
Page 37
...Battery cover (17) I Tripod receptacle • Use a tripod with a screw length of less than 5.5 mm (7/32 inch), and may damage the camera. 37 G DC IN terminal • When connecting the ACVQ900AM AC Adaptor/ Charger (not supplied) to the camera, turn the camera off, then plug the connector of the AC Adaptor/Charger... to the DC IN terminal on the guide of the REMOTE terminal. You will be unable to firmly secure the camera to tripods having screws longer...
...Battery cover (17) I Tripod receptacle • Use a tripod with a screw length of less than 5.5 mm (7/32 inch), and may damage the camera. 37 G DC IN terminal • When connecting the ACVQ900AM AC Adaptor/ Charger (not supplied) to the camera, turn the camera off, then plug the connector of the AC Adaptor/Charger... to the DC IN terminal on the guide of the REMOTE terminal. You will be unable to firmly secure the camera to tripods having screws longer...

Instruction Manual
Page 128
...memory card with recorded images into the camera. 2 Insert the sufficiently charged battery pack in the camera, or connect the camera to a wall outlet (wall socket) with the AC Adaptor/charger (not supplied). • When you copy images to your computer using insufficient battery pack, copying may fail or image... data may become corrupted if the battery pack shuts down too soon. 3 Turn on the camera and the computer. 4 Check that [...
...memory card with recorded images into the camera. 2 Insert the sufficiently charged battery pack in the camera, or connect the camera to a wall outlet (wall socket) with the AC Adaptor/charger (not supplied). • When you copy images to your computer using insufficient battery pack, copying may fail or image... data may become corrupted if the battery pack shuts down too soon. 3 Turn on the camera and the computer. 4 Check that [...
Instruction Manual
Page 149
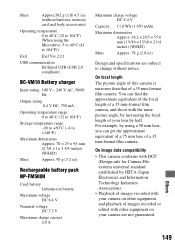
... image data compatibility • This camera conforms with DCF (Design rule for Camera File system) universal standard established by half. For example, by using the Microdrive: 5 to 40°C (41 to 104°F)) Exif Exif Ver.2.21 USB communication Hi-Speed USB (USB 2.0 compliant) BC-VM10 Battery charger Input rating 100 V - 240 V AC, 50...
... image data compatibility • This camera conforms with DCF (Design rule for Camera File system) universal standard established by half. For example, by using the Microdrive: 5 to 40°C (41 to 104°F)) Exif Exif Ver.2.21 USB communication Hi-Speed USB (USB 2.0 compliant) BC-VM10 Battery charger Input rating 100 V - 240 V AC, 50...

Instruction Manual
Page 156
... card. • Insertion direction of each software. Your computer does not recognize your camera. • Check that the camera is turned on. • When the battery level is low, install the charged battery pack (page 16), or use the AC Adaptor/charger (not supplied). • Use the USB cable (supplied) (page 128). • Disconnect the...
... card. • Insertion direction of each software. Your computer does not recognize your camera. • Check that the camera is turned on. • When the battery level is low, install the charged battery pack (page 16), or use the AC Adaptor/charger (not supplied). • Use the USB cable (supplied) (page 128). • Disconnect the...
Instruction Manual
Page 159
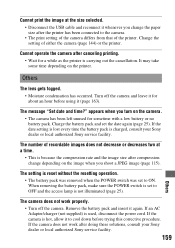
... it (page 163). Charge the battery pack and set to the camera. • The print setting of the camera differs from that of the printer. The camera does not work after doing these solutions, consult your Sony dealer or local authorized Sony service facility. It may take some... on the printer. If an AC Adaptor/charger (not supplied) is charged, consult your Sony dealer or local authorized Sony service facility. 159 Others Cannot operate the camera after canceling printing. • Wait for sometime with a low battery or no battery pack. If the date setting is lost every...
... it (page 163). Charge the battery pack and set to the camera. • The print setting of the camera differs from that of the printer. The camera does not work after doing these solutions, consult your Sony dealer or local authorized Sony service facility. It may take some... on the printer. If an AC Adaptor/charger (not supplied) is charged, consult your Sony dealer or local authorized Sony service facility. 159 Others Cannot operate the camera after canceling printing. • Wait for sometime with a low battery or no battery pack. If the date setting is lost every...
Instruction Manual
Page 161
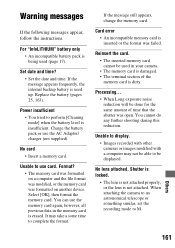
... recording mode to use the AC Adaptor/ charger (not supplied). Unable to M. You cannot do any further shooting during this reduction. If the message appears frequently, the internal backup battery is inserted or the format was failed. Unable to display. • Images recorded with other cameras or images modified with a computer may take...
... recording mode to use the AC Adaptor/ charger (not supplied). Unable to M. You cannot do any further shooting during this reduction. If the message appears frequently, the internal backup battery is inserted or the format was failed. Unable to display. • Images recorded with other cameras or images modified with a computer may take...

Instruction Manual
Page 164
... a trial recording to a wall outlet (wall socket) using the AC Adaptor/charger (not supplied), and leave the camera for 24 hours or more with the power off. The heat of flash emission may not be able to charge this rechargeable battery is neither dust-proof, nor splash-proof, nor water-proof. • Do...
... a trial recording to a wall outlet (wall socket) using the AC Adaptor/charger (not supplied), and leave the camera for 24 hours or more with the power off. The heat of flash emission may not be able to charge this rechargeable battery is neither dust-proof, nor splash-proof, nor water-proof. • Do...

