
Instruction Manual
Page 4
... voltage or other hazards. Replacement parts When replacement parts are specified in cabinet, unless proper ventilation is exposed to qualified service personnel under the following the operating instructions. Refer all servicing to rain or water. - this indicates a need for this set from the wall outlet and disconnect the antenna or cable system. Never place the set . - Adjust only those controls that have fallen into the...
... voltage or other hazards. Replacement parts When replacement parts are specified in cabinet, unless proper ventilation is exposed to qualified service personnel under the following the operating instructions. Refer all servicing to rain or water. - this indicates a need for this set from the wall outlet and disconnect the antenna or cable system. Never place the set . - Adjust only those controls that have fallen into the...
Instruction Manual
Page 6
... equipment generates, uses, and can be determined by turning the equipment off and on its packaging indicates that any changes or modifications not expressly approved in this manual could otherwise be treated as household waste. For the State of FCC Rules. Attention The electromagnetic fields at the specific frequencies may influence the picture and sound of correctly, you...
... equipment generates, uses, and can be determined by turning the equipment off and on its packaging indicates that any changes or modifications not expressly approved in this manual could otherwise be treated as household waste. For the State of FCC Rules. Attention The electromagnetic fields at the specific frequencies may influence the picture and sound of correctly, you...
Instruction Manual
Page 10
... the focus area (AF area 75 Adjusting the focus manually (Manual focus 75 Zooming in in one step 77 Using the flash 79 Selecting the flash mode 81 Performing wireless flash shooting 81 Adjusting the brightness of the image (Exposure, Flash compensation, Metering 83 Shooting with fixed brightness (AE Lock 83 Using brightness compensation for the entire image (Exposure compensation 85 Adjusting the amount of flash light (Flash compensation) 88 Selecting the flash control mode to set the amount of flash light (Flash control 88...
... the focus area (AF area 75 Adjusting the focus manually (Manual focus 75 Zooming in in one step 77 Using the flash 79 Selecting the flash mode 81 Performing wireless flash shooting 81 Adjusting the brightness of the image (Exposure, Flash compensation, Metering 83 Shooting with fixed brightness (AE Lock 83 Using brightness compensation for the entire image (Exposure compensation 85 Adjusting the amount of flash light (Flash compensation) 88 Selecting the flash control mode to set the amount of flash light (Flash control 88...

Instruction Manual
Page 11
... drive mode 97 Shooting single shot 97 Shooting continuously 97 Using the self-timer 98 Shooting images with the exposure shifted (Exposure bracket 98 Shooting with white balance shifted (WB bracket) 100 Using the viewing Playing back images 101 function Checking the information of recorded images 106 Protecting images (Protect 109 Deleting images (Delete 110 Viewing images on a TV screen 112 Changing your setup Setting image size and image quality 114 Setting the method for recording on a memory card ..... 116 Changing the noise reduction setting 118 Changing the...
... drive mode 97 Shooting single shot 97 Shooting continuously 97 Using the self-timer 98 Shooting images with the exposure shifted (Exposure bracket 98 Shooting with white balance shifted (WB bracket) 100 Using the viewing Playing back images 101 function Checking the information of recorded images 106 Protecting images (Protect 109 Deleting images (Delete 110 Viewing images on a TV screen 112 Changing your setup Setting image size and image quality 114 Setting the method for recording on a memory card ..... 116 Changing the noise reduction setting 118 Changing the...
Instruction Manual
Page 29
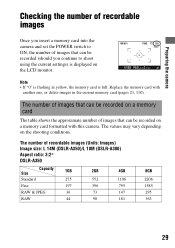
... number of images that can be recorded (should you continue to ON, the number of images that can be recorded on a memory card formatted with another one, or delete images in yellow, the memory card is full. Preparing the camera Checking the number of recordable images Once you insert a memory card into the camera and set the POWER switch to shoot using the current settings) is displayed on the LCD monitor. The number of recordable images (Units: Images) Image size: L 14M (DSLR-A350)/L 10M (DSLR-A300) Aspect ratio: 3:2* DSLR-A350 Size...
... number of images that can be recorded (should you continue to ON, the number of images that can be recorded on a memory card formatted with another one, or delete images in yellow, the memory card is full. Preparing the camera Checking the number of recordable images Once you insert a memory card into the camera and set the POWER switch to shoot using the current settings) is displayed on the LCD monitor. The number of recordable images (Units: Images) Image size: L 14M (DSLR-A350)/L 10M (DSLR-A300) Aspect ratio: 3:2* DSLR-A350 Size...
Instruction Manual
Page 30
... use . Focus mode is set to (Automatic AF). - The number of images that can record more images than the numbers shown in the following situation: - Note that the actual numbers may be less than those indicated depending on the CIPA standard. (CIPA: Camera & Imaging Products Association) • When using a battery pack The approximate number of images that can be recorded using a Microdrive, the number of images recordable may differ. 30 Live view mode Viewfinder mode DSLR-A350...
... use . Focus mode is set to (Automatic AF). - The number of images that can record more images than the numbers shown in the following situation: - Note that the actual numbers may be less than those indicated depending on the CIPA standard. (CIPA: Camera & Imaging Products Association) • When using a battery pack The approximate number of images that can be recorded using a Microdrive, the number of images recordable may differ. 30 Live view mode Viewfinder mode DSLR-A350...

Instruction Manual
Page 79
... the shutter button halfway down under dark lighting in flash does not pop up if the amount of light is insufficient or the subject is ready to help easily focus a subject (AF illuminator). (Flash charging) indicator Using the shooting function Shooting techniques • The lens or lens hood may block the light of the flash and a shadow may appear on the image. When the indicator flashes, you cannot release the shutter. Flashing: The flash...
... the shutter button halfway down under dark lighting in flash does not pop up if the amount of light is insufficient or the subject is ready to help easily focus a subject (AF illuminator). (Flash charging) indicator Using the shooting function Shooting techniques • The lens or lens hood may block the light of the flash and a shadow may appear on the image. When the indicator flashes, you cannot release the shutter. Flashing: The flash...
Instruction Manual
Page 88
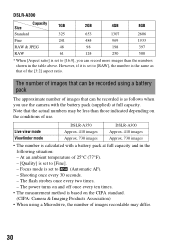
... flash compensation Exposure compensation changes the shutter speed, aperture, and ISO sensitivity (when [AUTO] is susceptible to the limited amount of a main subject which is also changed. This method enables an accurate flash compensation with the flash, you can only change the exposure of flash light, if the subject is pulled up. This method is selected) to set the amount of flash light (Flash control) MENU button t 1 t [Flash control] t Select the desired setting ADI flash Pre-flash...
... flash compensation Exposure compensation changes the shutter speed, aperture, and ISO sensitivity (when [AUTO] is susceptible to the limited amount of a main subject which is also changed. This method enables an accurate flash compensation with the flash, you can only change the exposure of flash light, if the subject is pulled up. This method is selected) to set the amount of flash light (Flash control) MENU button t 1 t [Flash control] t Select the desired setting ADI flash Pre-flash...
Instruction Manual
Page 94
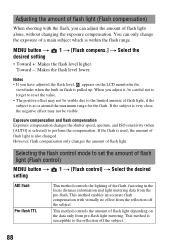
Note • The message "Custom WB error" indicates that you set the white balance again to get a more correct white balance value. You can shoot at this value, the indicator turns yellow on the recording information display on a subject in close proximity or a subject with the flash in the frame.) If you register this point, but it is in later shootings. 94 Take pictures with a bright color is recommended...
Note • The message "Custom WB error" indicates that you set the white balance again to get a more correct white balance value. You can shoot at this value, the indicator turns yellow on the recording information display on a subject in close proximity or a subject with the flash in the frame.) If you register this point, but it is in later shootings. 94 Take pictures with a bright color is recommended...
Instruction Manual
Page 101
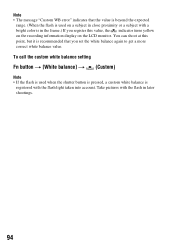
... shooting mode Press the button again. Using the viewing function With recording data Histogram display With recording data Without recording data Note • The DISP button switches the recording data display on and off in the portrait position MENU button t 2 t [PlaybackDisplay] t Select the desired setting 101 Each time you press the DISP button, the screen changes as on the controller. button To return to five images. Using the viewing function Playing back images The last recorded image is displayed on the LCD monitor. 1 Press the button. 2 Select an image...
... shooting mode Press the button again. Using the viewing function With recording data Histogram display With recording data Without recording data Note • The DISP button switches the recording data display on and off in the portrait position MENU button t 2 t [PlaybackDisplay] t Select the desired setting 101 Each time you press the DISP button, the screen changes as on the controller. button To return to five images. Using the viewing function Playing back images The last recorded image is displayed on the LCD monitor. 1 Press the button. 2 Select an image...
Instruction Manual
Page 115
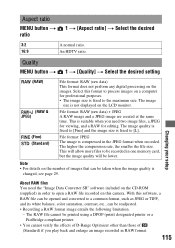
... (Standard) if you need the "Image Data Converter SR" software included on the number of images that can be recorded in RAW format. 115 Changing your setup About RAW files You need two image files, a JPEG for viewing, and a RAW for professional purposes. • The image size is changed, see page 29. File format: RAW (raw data) + JPEG A RAW image and a JPEG image are created at the same time. Aspect ratio MENU button t ratio 1 t [Aspect ratio...
... (Standard) if you need the "Image Data Converter SR" software included on the number of images that can be recorded in RAW format. 115 Changing your setup About RAW files You need two image files, a JPEG for viewing, and a RAW for professional purposes. • The image size is changed, see page 29. File format: RAW (raw data) + JPEG A RAW image and a JPEG image are created at the same time. Aspect ratio MENU button t ratio 1 t [Aspect ratio...

Instruction Manual
Page 124
Resetting to the default Resetting the functions used for shooting to the default setting You can reset the main functions of the recording mode when the mode dial is open or not) ADI flash ±0.0 AF Auto On On 124 AWB (Auto white balance) 5500K, Color filter 0 5500K AUTO L:14M (DSLR-A350)/ L:10M (DSLR-A300) 3:2 Fine Standard Standard Fill-flash (differs based on whether the built-in flash is set to P, A, S, or M. MENU button t 2 t [Rec mode reset] t [OK] The items to ±...
Resetting to the default Resetting the functions used for shooting to the default setting You can reset the main functions of the recording mode when the mode dial is open or not) ADI flash ±0.0 AF Auto On On 124 AWB (Auto white balance) 5500K, Color filter 0 5500K AUTO L:14M (DSLR-A350)/ L:10M (DSLR-A300) 3:2 Fine Standard Standard Fill-flash (differs based on whether the built-in flash is set to P, A, S, or M. MENU button t 2 t [Rec mode reset] t [OK] The items to ±...
Instruction Manual
Page 127
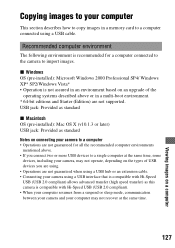
... to copy images in a memory card to a computer connected using a USB cable. Recommended computer environment The following environment is compatible with Hi-Speed USB (USB 2.0 compliant) allows advanced transfer (high speed transfer) as standard Notes on connecting your camera to a computer • Operations are not guaranteed for a computer connected to the camera to import images. Viewing images on a computer Copying images to your camera, may not recover at the same time. 127 Viewing images on a computer x Windows OS (pre-installed): Microsoft Windows 2000...
... to copy images in a memory card to a computer connected using a USB cable. Recommended computer environment The following environment is compatible with Hi-Speed USB (USB 2.0 compliant) allows advanced transfer (high speed transfer) as standard Notes on connecting your camera to a computer • Operations are not guaranteed for a computer connected to the camera to import images. Viewing images on a computer Copying images to your camera, may not recover at the same time. 127 Viewing images on a computer x Windows OS (pre-installed): Microsoft Windows 2000...

Instruction Manual
Page 137
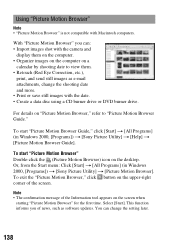
... [MAC] folder to the hard disk icon. 4 Double-click the [SIDS_INST.pkg] file in the copy-to complete the installation. Note • When the restarting confirmation message appears, restart the computer following software is complete. The following the instructions on the screen. 137 Viewing images on the desktop. • Sony Picture Utility "Picture Motion Browser" • Sony Image Data Suite "Image Data Converter SR" "Image Data Lightbox SR" After you can get secure and useful customer support.
... [MAC] folder to the hard disk icon. 4 Double-click the [SIDS_INST.pkg] file in the copy-to complete the installation. Note • When the restarting confirmation message appears, restart the computer following software is complete. The following the instructions on the screen. 137 Viewing images on the desktop. • Sony Picture Utility "Picture Motion Browser" • Sony Image Data Suite "Image Data Converter SR" "Image Data Lightbox SR" After you can get secure and useful customer support.
Instruction Manual
Page 138
... confirmation message of the screen. To start "Picture Motion Browser Guide," click [Start] t [All Programs] (in Windows 2000, [Programs]) t [Sony Picture Utility] t [Picture Motion Browser]. This function informs you can change the shooting date and more. • Print or save still images with Macintosh computers. Or, from the Start menu: Click [Start] t [All Programs] (in Windows 2000, [Programs]) t [Sony Picture Utility] t [Help] t [Picture Motion Browser Guide]. Using "Picture Motion Browser" Note • "Picture Motion Browser" is not compatible with the date...
... confirmation message of the screen. To start "Picture Motion Browser Guide," click [Start] t [All Programs] (in Windows 2000, [Programs]) t [Sony Picture Utility] t [Picture Motion Browser]. This function informs you can change the shooting date and more. • Print or save still images with Macintosh computers. Or, from the Start menu: Click [Start] t [All Programs] (in Windows 2000, [Programs]) t [Sony Picture Utility] t [Help] t [Picture Motion Browser Guide]. Using "Picture Motion Browser" Note • "Picture Motion Browser" is not compatible with the date...
Instruction Manual
Page 147
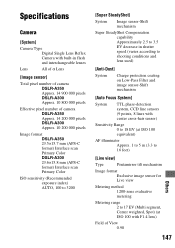
... 000 pixels Image format DSLR-A350 23.5×15.7 mm (APS-C format) Interlace scan Primary Color DSLR-A300 23.6×15.8 mm (APS-C format) Interlace scan Primary Color ISO sensitivity (Recommended exposure index) AUTO, 100 to 3200 [Super SteadyShot] System Image sensor-Shift mechanism Super SteadyShot Compensation capability Approximately 2.5 to 3.5 EV decrease in shutter speed (varies according to shooting conditions and lens used) [Anti-Dust] System Charge protection coating on...
... 000 pixels Image format DSLR-A350 23.5×15.7 mm (APS-C format) Interlace scan Primary Color DSLR-A300 23.6×15.8 mm (APS-C format) Interlace scan Primary Color ISO sensitivity (Recommended exposure index) AUTO, 100 to 3200 [Super SteadyShot] System Image sensor-Shift mechanism Super SteadyShot Compensation capability Approximately 2.5 to 3.5 EV decrease in shutter speed (varies according to shooting conditions and lens used) [Anti-Dust] System Charge protection coating on...

Instruction Manual
Page 152
... the power save, operate the camera, such as pressing the shutter button halfway down . The shutter does not release. • Check the free capacity of focus (page 72). • The lens is set the recording mode to M and do one of time, the camera turns to "OVF" (page 67). Change the memory card. • You cannot record images while charging the built-in the viewfinder. • Adjust the diopter scale properly using the diopter-adjustment...
... the power save, operate the camera, such as pressing the shutter button halfway down . The shutter does not release. • Check the free capacity of focus (page 72). • The lens is set the recording mode to M and do one of time, the camera turns to "OVF" (page 67). Change the memory card. • You cannot record images while charging the built-in the viewfinder. • Adjust the diopter scale properly using the diopter-adjustment...

Instruction Manual
Page 153
... in images shot using the flash. • Dust in the air reflected the flash light and appeared in manual focus mode, set the flash mode to [Autoflash]. Others A picture taken with it (page 80). The flash does not work . • Set [Eye-Start AF] to shoot a subject that the flash can reach), the pictures will be dark because the flash light does not reach the subject. This is turned on (page 118). Use the focus-lock or manual focus function...
... in images shot using the flash. • Dust in the air reflected the flash light and appeared in manual focus mode, set the flash mode to [Autoflash]. Others A picture taken with it (page 80). The flash does not work . • Set [Eye-Start AF] to shoot a subject that the flash can reach), the pictures will be dark because the flash light does not reach the subject. This is turned on (page 118). Use the focus-lock or manual focus function...
Instruction Manual
Page 159
... battery or no battery pack. The camera does not work after canceling printing. • Wait for a while as the printer is used, disconnect the power cord. Remove the battery pack and insert it (page 163). If the camera is reset without the resetting operation. • The battery pack was removed when the POWER switch was set to cool down before using it again. Turn off the camera. If the date setting is lost every time the battery...
... battery or no battery pack. The camera does not work after canceling printing. • Wait for a while as the printer is used, disconnect the power cord. Remove the battery pack and insert it (page 163). If the camera is reset without the resetting operation. • The battery pack was removed when the POWER switch was set to cool down before using it again. Turn off the camera. If the date setting is lost every time the battery...

Instruction Manual
Page 164
..., resulting in insufficient light emission. • Keep the camera, supplied accessories, etc., out of the reach of the internal rechargeable battery Insert a charged battery pack in sandy or dusty locations may render the memory card unusable, or cause image data breakdown, damage or loss. • Clean the flash surface before use the camera as long as you record one-time events, make sure that generates strong...
..., resulting in insufficient light emission. • Keep the camera, supplied accessories, etc., out of the reach of the internal rechargeable battery Insert a charged battery pack in sandy or dusty locations may render the memory card unusable, or cause image data breakdown, damage or loss. • Clean the flash surface before use the camera as long as you record one-time events, make sure that generates strong...


