Instruction Manual
Page 6
... - For more of materials will not occur in a particular installation. Consult the dealer or an experienced radio/TV technician for a digital device pursuant to Subpart B of Part 15 of Old Electrical & Electronic Equipment (Applicable in the European Union and other European countries with...Notice If static electricity or electromagnetism causes data transfer to discontinue midway (fail), restart the application or disconnect and connect the communication cable (USB, etc.) again. By ensuring this product shall not be used in accordance with the instructions, may apply, See www.dtsc.ca...
... - For more of materials will not occur in a particular installation. Consult the dealer or an experienced radio/TV technician for a digital device pursuant to Subpart B of Part 15 of Old Electrical & Electronic Equipment (Applicable in the European Union and other European countries with...Notice If static electricity or electromagnetism causes data transfer to discontinue midway (fail), restart the application or disconnect and connect the communication cable (USB, etc.) again. By ensuring this product shall not be used in accordance with the instructions, may apply, See www.dtsc.ca...

Instruction Manual
Page 13
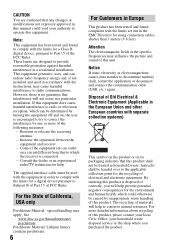
Preparing the camera Preparing the camera Checking the accessories supplied The number in parentheses indicates the number of pieces. • BC-VM10 Battery charger (1)/ Power cord (mains lead) (1) • Rechargeable battery pack NPFM500H (1) • Eyecup (1) (Attached on the camera) • CD-ROM (Application Software for α camera) (1) • Quick Start Guide (1) • Instruction Manual (This manual) (1) • USB cable (1) • Video cable (1) • Shoulder strap (1) • Eyepiece cover (1) • Body cap (1) (Attached on the camera) 13
Preparing the camera Preparing the camera Checking the accessories supplied The number in parentheses indicates the number of pieces. • BC-VM10 Battery charger (1)/ Power cord (mains lead) (1) • Rechargeable battery pack NPFM500H (1) • Eyecup (1) (Attached on the camera) • CD-ROM (Application Software for α camera) (1) • Quick Start Guide (1) • Instruction Manual (This manual) (1) • USB cable (1) • Video cable (1) • Shoulder strap (1) • Eyepiece cover (1) • Body cap (1) (Attached on the camera) 13
Instruction Manual
Page 27
...eyepiece cover. Preparing the camera Using the accessories supplied This section describes how to use of the viewfinder, as in the following pages. • Rechargeable battery pack (page 14) • Battery charger, Power cord (mains lead) (page 14) • Eyecup (page 68) • USB cable (pages 128, 144)... • Video cable (page 112) • CD-ROM (page 136) Attaching the shoulder strap Attach the both ends of the strap on the camera. • You can prevent light from entering through the viewfinder and ...
...eyepiece cover. Preparing the camera Using the accessories supplied This section describes how to use of the viewfinder, as in the following pages. • Rechargeable battery pack (page 14) • Battery charger, Power cord (mains lead) (page 14) • Eyecup (page 68) • USB cable (pages 128, 144)... • Video cable (page 112) • CD-ROM (page 136) Attaching the shoulder strap Attach the both ends of the strap on the camera. • You can prevent light from entering through the viewfinder and ...
Instruction Manual
Page 127
... images on an upgrade of USB devices you connect two or more USB devices to import images. USB jack: Provided as standard x Macintosh OS (pre-installed): Mac OS X (v10.1.3 or later) USB jack: Provided as this camera is compatible with Hi-Speed USB (USB 2.0 compliant). • When...operating systems described above . • If you are using. • Operations are not guaranteed when using a USB hub or an extension cable. • Connecting your camera using a USB cable. x Windows OS (pre-installed): Microsoft Windows 2000 Professional SP4/ Windows XP* SP2/Windows Vista* • ...
... images on an upgrade of USB devices you connect two or more USB devices to import images. USB jack: Provided as standard x Macintosh OS (pre-installed): Mac OS X (v10.1.3 or later) USB jack: Provided as this camera is compatible with Hi-Speed USB (USB 2.0 compliant). • When...operating systems described above . • If you are using. • Operations are not guaranteed when using a USB hub or an extension cable. • Connecting your camera using a USB cable. x Windows OS (pre-installed): Microsoft Windows 2000 Professional SP4/ Windows XP* SP2/Windows Vista* • ...

Instruction Manual
Page 128
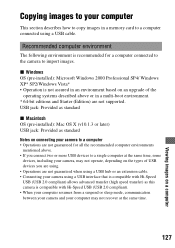
... your computer 1 Insert a memory card with recorded images into the camera. 2 Insert the sufficiently charged battery pack in the camera, or connect the camera to a wall outlet (wall socket) with the AC Adaptor/charger (not supplied). • When you copy images to your computer ... become corrupted if the battery pack shuts down too soon. 3 Turn on the camera and the computer. 4 Check that [USB connection] in 2 is set to [Mass Storage]. 5 Connect the camera and your computer. • The AutoPlay wizard appears on the desktop. 1 To the USB terminal USB cable 2 To the USB terminal 128
... your computer 1 Insert a memory card with recorded images into the camera. 2 Insert the sufficiently charged battery pack in the camera, or connect the camera to a wall outlet (wall socket) with the AC Adaptor/charger (not supplied). • When you copy images to your computer ... become corrupted if the battery pack shuts down too soon. 3 Turn on the camera and the computer. 4 Check that [USB connection] in 2 is set to [Mass Storage]. 5 Connect the camera and your computer. • The AutoPlay wizard appears on the desktop. 1 To the USB terminal USB cable 2 To the USB terminal 128

Instruction Manual
Page 132
... click [OK] t [OK] (unnecessary for Windows XP/Vista). x For Windows Double-click on the tasktray, then click (USB Mass Storage Device) t [Stop]. Deleting the USB connection Perform the procedures listed below beforehand when: • Disconnecting the USB cable. • Removing the memory card. • Turning off the camera. The device is disconnected from the computer.
... click [OK] t [OK] (unnecessary for Windows XP/Vista). x For Windows Double-click on the tasktray, then click (USB Mass Storage Device) t [Stop]. Deleting the USB connection Perform the procedures listed below beforehand when: • Disconnecting the USB cable. • Removing the memory card. • Turning off the camera. The device is disconnected from the computer.

Instruction Manual
Page 144
...USB terminal USB cable 2 To the USB terminal 2 Turn on setting items, see "PictBridge menu." 4 Select [Print] t [OK] in the menu, then press the center of the controller. 144 The image is printed. • After the screen indicating that the print is completed appears, press the center of the controller. Stage 2: Connecting the camera... to the printer 1 Connect the camera to print appears. Stage 3: Printing 1 Select the image to print with b/B on the controller, then...
...USB terminal USB cable 2 To the USB terminal 2 Turn on setting items, see "PictBridge menu." 4 Select [Print] t [OK] in the menu, then press the center of the controller. 144 The image is printed. • After the screen indicating that the print is completed appears, press the center of the controller. Stage 2: Connecting the camera... to the printer 1 Connect the camera to print appears. Stage 3: Printing 1 Select the image to print with b/B on the controller, then...

Instruction Manual
Page 145
... 3) above. PictBridge menu Page 1 Print Prints the selected images. When you want to print again, follow the procedure (Stages 1 to 20. Remove the USB cable or turn off the camera. To cancel the print During printing, pressing the center of prints is specified on all the selected images. The same number of the...
... 3) above. PictBridge menu Page 1 Print Prints the selected images. When you want to print again, follow the procedure (Stages 1 to 20. Remove the USB cable or turn off the camera. To cancel the print During printing, pressing the center of prints is specified on all the selected images. The same number of the...

Instruction Manual
Page 156
...), or use the AC Adaptor/charger (not supplied). • Use the USB cable (supplied) (page 128). • Disconnect the USB cable, and connect it in the correct direction (page 21). 156 You cannot copy images. • Make the USB connection by properly connecting the camera with your computer (page 128). • Follow the designated copy procedure...
...), or use the AC Adaptor/charger (not supplied). • Use the USB cable (supplied) (page 128). • Disconnect the USB cable, and connect it in the correct direction (page 21). 156 You cannot copy images. • Make the USB connection by properly connecting the camera with your computer (page 128). • Follow the designated copy procedure...

Instruction Manual
Page 158
... instructions supplied with the date inserted. PictBridge compliant printer For details, refer to [PTP] (page 143). • Disconnect and connect the USB cable again. Consult the printer manufacturer as to whether the printer is not compliant with PictBridge or not. • Set...again (page 146). 158 Set [Date imprint] to a printer that the camera and the printer are properly connected using the USB cable. • RAW data files cannot be printed. • Images shot using cameras other than this camera or images modified with a computer may not be printed with the printer. Cannot...
... instructions supplied with the date inserted. PictBridge compliant printer For details, refer to [PTP] (page 143). • Disconnect and connect the USB cable again. Consult the printer manufacturer as to whether the printer is not compliant with PictBridge or not. • Set...again (page 146). 158 Set [Date imprint] to a printer that the camera and the printer are properly connected using the USB cable. • RAW data files cannot be printed. • Images shot using cameras other than this camera or images modified with a computer may not be printed with the printer. Cannot...
Instruction Manual
Page 159
... cancellation. If an AC Adaptor/charger (not supplied) is charged, consult your Sony dealer or local authorized Sony service facility. 159 Others Others The lens gets fogged. • Moisture condensation has occurred. The camera does not work after canceling printing. • Wait for a while as the...for sometime with a low battery or no battery pack. Turn off the camera. The number of recordable images does not decrease or decreases two at the size selected. • Disconnect the USB cable and reconnect it whenever you change the paper size after compression change depending on...
... cancellation. If an AC Adaptor/charger (not supplied) is charged, consult your Sony dealer or local authorized Sony service facility. 159 Others Others The lens gets fogged. • Moisture condensation has occurred. The camera does not work after canceling printing. • Wait for a while as the...for sometime with a low battery or no battery pack. Turn off the camera. The number of recordable images does not decrease or decreases two at the size selected. • Disconnect the USB cable and reconnect it whenever you change the paper size after compression change depending on...

Instruction Manual
Page 162
... has been established. Do not disconnect the USB cable. Printing canceled • The print job was selected. Disconnect the USB cable or turn the camera off . Turn the power off . Unable to magnify. Disconnect the USB cable and connect it . If the message appears frequently, consult your Sony dealer or local authorized Sony service facility. 162 Unable to rotate...
... has been established. Do not disconnect the USB cable. Printing canceled • The print job was selected. Disconnect the USB cable or turn the camera off . Turn the power off . Unable to magnify. Disconnect the USB cable and connect it . If the message appears frequently, consult your Sony dealer or local authorized Sony service facility. 162 Unable to rotate...


