Instruction Manual
Page 9
... 14 Attaching a lens 19 Inserting a memory card 21 Preparing the camera 25 Using the accessories supplied 27 Checking the number of recordable images 29 Cleaning 31 Identifying parts and screen indicators 34 Front side 34 Rear side 35 Sides/Bottom 37 LCD monitor 38 Selecting a function/setting 40 The functions selected by the...
... 14 Attaching a lens 19 Inserting a memory card 21 Preparing the camera 25 Using the accessories supplied 27 Checking the number of recordable images 29 Cleaning 31 Identifying parts and screen indicators 34 Front side 34 Rear side 35 Sides/Bottom 37 LCD monitor 38 Selecting a function/setting 40 The functions selected by the...

Instruction Manual
Page 11
... viewing Playing back images 101 function Checking the information of recorded images 106 Protecting images (Protect 109 Deleting images (Delete 110 Viewing images on a TV screen 112 Changing your setup Setting image size and image quality 114 Setting the method for recording on a memory card ..... 116 Changing the noise reduction setting... the conditions under which the shutter can be released 119 Changing the functions of the button and dial 120 Changing other settings 121 Setting the LCD monitor 122 Resetting to the default 124 11
... viewing Playing back images 101 function Checking the information of recorded images 106 Protecting images (Protect 109 Deleting images (Delete 110 Viewing images on a TV screen 112 Changing your setup Setting image size and image quality 114 Setting the method for recording on a memory card ..... 116 Changing the noise reduction setting... the conditions under which the shutter can be released 119 Changing the functions of the button and dial 120 Changing other settings 121 Setting the LCD monitor 122 Resetting to the default 124 11
Instruction Manual
Page 25
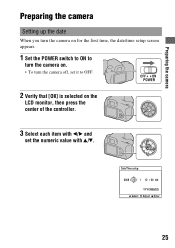
Preparing the camera Preparing the camera Setting up the date When you turn the camera on for the first time, the date/time setup screen appears. 1 Set the POWER switch to ON to turn the camera on. • To turn the camera off, set it to OFF. 2 Verify that [OK] is selected on the LCD monitor, then press the center of the controller. 3 Select each item with b/B and set the numeric value with v/V. 25
Preparing the camera Preparing the camera Setting up the date When you turn the camera on for the first time, the date/time setup screen appears. 1 Set the POWER switch to ON to turn the camera on. • To turn the camera off, set it to OFF. 2 Verify that [OK] is selected on the LCD monitor, then press the center of the controller. 3 Select each item with b/B and set the numeric value with v/V. 25
Instruction Manual
Page 31
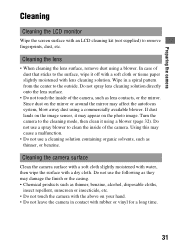
... thinner, or benzine. Wipe in contact with lens cleaning solution. Cleaning the camera surface Clean the camera surface with a soft cloth slightly moistened with water, then wipe the surface with an LCD cleaning kit (not supplied) to remove fingerprints, dust, etc. Using this may...Chemical products such as lens contacts, or the mirror. Since dust on the image sensor, it using a blower. Preparing the camera Cleaning Cleaning the LCD monitor Wipe the screen surface with a dry cloth. Cleaning the lens • When cleaning the lens surface, remove dust using a blower (page...
... thinner, or benzine. Wipe in contact with lens cleaning solution. Cleaning the camera surface Clean the camera surface with a soft cloth slightly moistened with water, then wipe the surface with an LCD cleaning kit (not supplied) to remove fingerprints, dust, etc. Using this may...Chemical products such as lens contacts, or the mirror. Since dust on the image sensor, it using a blower. Preparing the camera Cleaning Cleaning the LCD monitor Wipe the screen surface with a dry cloth. Cleaning the lens • When cleaning the lens surface, remove dust using a blower (page...
Instruction Manual
Page 67
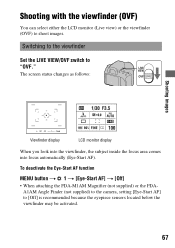
The screen status changes as follows: Shooting images Viewfinder display LCD monitor display When you look into the viewfinder, the subject inside the focus area comes into focus automatically (Eye-Start AF). To deactivate the Eye-... function MENU button t 1 t [Eye-Start AF] t [Off] • When attaching the FDA-M1AM Magnifier (not supplied) or the FDAA1AM Angle Finder (not supplied) to the camera, setting [Eye-Start AF] to "OVF." Switching to the viewfinder Set the LIVE VIEW/OVF switch to [Off] is recommended because the eyepiece sensors located...
The screen status changes as follows: Shooting images Viewfinder display LCD monitor display When you look into the viewfinder, the subject inside the focus area comes into focus automatically (Eye-Start AF). To deactivate the Eye-... function MENU button t 1 t [Eye-Start AF] t [Off] • When attaching the FDA-M1AM Magnifier (not supplied) or the FDAA1AM Angle Finder (not supplied) to the camera, setting [Eye-Start AF] to "OVF." Switching to the viewfinder Set the LIVE VIEW/OVF switch to [Off] is recommended because the eyepiece sensors located...
Instruction Manual
Page 70
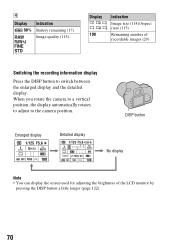
...(115) Display 100 Indication Image size (114)/Aspect ratio (115) Remaining number of the LCD monitor by pressing the DISP button a little longer (page 122). 70 When you rotate the camera to a vertical position, the display automatically rotates to adjust to switch between the enlarged display... and the detailed display. DISP button Enlarged display Detailed display No display Note • You can display the screen used for adjusting the brightness ...
...(115) Display 100 Indication Image size (114)/Aspect ratio (115) Remaining number of the LCD monitor by pressing the DISP button a little longer (page 122). 70 When you rotate the camera to a vertical position, the display automatically rotates to adjust to switch between the enlarged display... and the detailed display. DISP button Enlarged display Detailed display No display Note • You can display the screen used for adjusting the brightness ...
Instruction Manual
Page 101
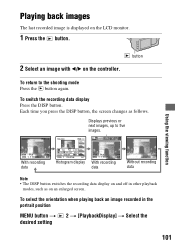
Each time you press the DISP button, the screen changes as on the controller. Using the viewing function With recording data Histogram display With recording data Without recording data Note • The DISP button ... an image recorded in other playback modes, such as follows. Using the viewing function Playing back images The last recorded image is displayed on the LCD monitor. 1 Press the button. 2 Select an image with b/B on an enlarged screen. button To return to five images.
Each time you press the DISP button, the screen changes as on the controller. Using the viewing function With recording data Histogram display With recording data Without recording data Note • The DISP button ... an image recorded in other playback modes, such as follows. Using the viewing function Playing back images The last recorded image is displayed on the LCD monitor. 1 Press the button. 2 Select an image with b/B on an enlarged screen. button To return to five images.
Instruction Manual
Page 112
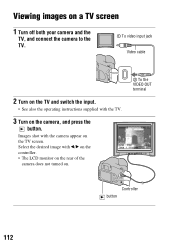
Select the desired image with b/B on the controller. • The LCD monitor on the rear of the camera does not turned on the TV screen. Images shot with the TV. 3 Turn on the camera, and press the button. Viewing images on a TV screen 1 Turn off both your camera and the TV, and connect the camera to the TV. 1 To video input jack Video cable 2 Turn on the TV and switch the input. • See also the operating instructions supplied with the camera appear on . 2 To the VIDEO OUT terminal Controller button 112
Select the desired image with b/B on the controller. • The LCD monitor on the rear of the camera does not turned on the TV screen. Images shot with the TV. 3 Turn on the camera, and press the button. Viewing images on a TV screen 1 Turn off both your camera and the TV, and connect the camera to the TV. 1 To video input jack Video cable 2 Turn on the TV and switch the input. • See also the operating instructions supplied with the camera appear on . 2 To the VIDEO OUT terminal Controller button 112
Instruction Manual
Page 122
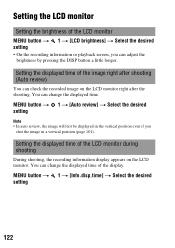
... t [Info.disp.time] t Select the desired setting 122 Setting the LCD monitor Setting the brightness of the LCD monitor MENU button t 1 t [LCD brightness] t Select the desired setting • On the recording information or playback screen, you shot the image in the vertical position even if you can check ...the recorded image on the LCD monitor. Setting the displayed...
... t [Info.disp.time] t Select the desired setting 122 Setting the LCD monitor Setting the brightness of the LCD monitor MENU button t 1 t [LCD brightness] t Select the desired setting • On the recording information or playback screen, you shot the image in the vertical position even if you can check ...the recorded image on the LCD monitor. Setting the displayed...

Instruction Manual
Page 155
... (pages 127, 135). 155 Delete the USB connection (page 132). We recommend that you protect images that of your camera, playback on your computer (page 133). • When an image file has been processed by mistake. • Once...that you cannot restore it. You cannot mark a DPOF mark. • You cannot mark DPOF marks on the LCD monitor before shooting. In such cases, the expected result may not be obtained. The color of an image recorded in... displayed on RAW data files. The image does not appear on the TV screen. • Check [Video output] to the Live view mode.
... (pages 127, 135). 155 Delete the USB connection (page 132). We recommend that you protect images that of your camera, playback on your computer (page 133). • When an image file has been processed by mistake. • Once...that you cannot restore it. You cannot mark a DPOF mark. • You cannot mark DPOF marks on the LCD monitor before shooting. In such cases, the expected result may not be obtained. The color of an image recorded in... displayed on RAW data files. The image does not appear on the TV screen. • Check [Video output] to the Live view mode.


