
Limited Warranty (U.S. Only)
Page 1
SONY® Digital Camera LIMITED WARRANTY (US Only) Sony Electronics Inc. ("Sony") warrants this product against defects in either its original packaging or packaging affording an equal degree of the product, Sony will become the property of a defect, these are your exclusive remedies. Term: For a period of one (1)... for hardware or software usage and it does not cover product issues caused by defects in material or workmanship during service and Sony will , at its original specifications. any such software is required. A dated purchase receipt from state to www.sonv.com/su000rt...
SONY® Digital Camera LIMITED WARRANTY (US Only) Sony Electronics Inc. ("Sony") warrants this product against defects in either its original packaging or packaging affording an equal degree of the product, Sony will become the property of a defect, these are your exclusive remedies. Term: For a period of one (1)... for hardware or software usage and it does not cover product issues caused by defects in material or workmanship during service and Sony will , at its original specifications. any such software is required. A dated purchase receipt from state to www.sonv.com/su000rt...
Instruction Manual
Page 2
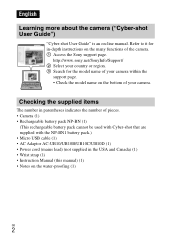
...-shot User Guide") "Cyber-shot User Guide" is an on the water-proofing (1) GB 2 Refer to it for the model name of your camera. http://www.sony.net/SonyInfo/Support/ 2 Select your country or region. 3 Search for in the USA and Canada) (1) • Wrist strap (1) • Instruction Manual (this manual) (1) • Notes...
...-shot User Guide") "Cyber-shot User Guide" is an on the water-proofing (1) GB 2 Refer to it for the model name of your camera. http://www.sony.net/SonyInfo/Support/ 2 Select your country or region. 3 Search for in the USA and Canada) (1) • Wrist strap (1) • Instruction Manual (this manual) (1) • Notes...

Instruction Manual
Page 4
...the AC Adaptor from the wall outlet (wall socket) immediately if any interference received, including interference that can help preserve our environment by Sony. • Dispose of small children. • Keep the battery pack dry. • Replace only with other electrical equipment. You can...Lithium-Ion batteries are recyclable. • Be sure to charge the battery pack using a genuine Sony battery charger or a device that may not cause harmful interference, and (2) this camera only, and should not be used with the same or equivalent type recommended by returning your ...
...the AC Adaptor from the wall outlet (wall socket) immediately if any interference received, including interference that can help preserve our environment by Sony. • Dispose of small children. • Keep the battery pack dry. • Replace only with other electrical equipment. You can...Lithium-Ion batteries are recyclable. • Be sure to charge the battery pack using a genuine Sony battery charger or a device that may not cause harmful interference, and (2) this camera only, and should not be used with the same or equivalent type recommended by returning your ...

Instruction Manual
Page 8
.... Even a small scratch may lead to have not become scratched. Department of Defense test method standard for shock), by the limited warranty. • This camera is operable up to a water depth of 10 m (33 ft.) for a fee. 1 Sealing gasket 2 Surface contacting the sealing gasket GB 8 Even... a small amount of the camera This camera has enhanced water-proof, dust-proof and shock-proof protection. If the sealing gasket or its mating surfaces have the sealing gasket replaced for 60...
.... Even a small scratch may lead to have not become scratched. Department of Defense test method standard for shock), by the limited warranty. • This camera is operable up to a water depth of 10 m (33 ft.) for a fee. 1 Sealing gasket 2 Surface contacting the sealing gasket GB 8 Even... a small amount of the camera This camera has enhanced water-proof, dust-proof and shock-proof protection. If the sealing gasket or its mating surfaces have the sealing gasket replaced for 60...

Instruction Manual
Page 9
...Prevent the sealing gasket from jumping into water. • Do not open /close the battery/memory card cover while under/near water. • This camera sinks in under /near water. GB 9 Touch for a few seconds to shock such as from becoming scratched by touching it while charging a battery ...or using the camera under -water flash photos due to sand or water getting inside places where it is whirling. When using a cable. • Do not open ...
...Prevent the sealing gasket from jumping into water. • Do not open /close the battery/memory card cover while under/near water. • This camera sinks in under /near water. GB 9 Touch for a few seconds to shock such as from becoming scratched by touching it while charging a battery ...or using the camera under -water flash photos due to sand or water getting inside places where it is whirling. When using a cable. • Do not open ...

Instruction Manual
Page 10
...corrosion or discoloration, and degradation of water-proof performance. • To maintain the water-proof performance, we recommend that once a year you take the camera to your dealer, or to an authorized repair shop, to drain. • Bubbles may become discolored if it clean. • Do not allow...sealing gasket of deformation and/or degraded waterproof performance. • Wipe away water drops or dust on the surface. Then, gently shake the camera, press each button, slide the zoom lever or the lens cover inside or on the memory card/battery cover with sunscreen or suntan oil....
...corrosion or discoloration, and degradation of water-proof performance. • To maintain the water-proof performance, we recommend that once a year you take the camera to your dealer, or to an authorized repair shop, to drain. • Bubbles may become discolored if it clean. • Do not allow...sealing gasket of deformation and/or degraded waterproof performance. • Wipe away water drops or dust on the surface. Then, gently shake the camera, press each button, slide the zoom lever or the lens cover inside or on the memory card/battery cover with sunscreen or suntan oil....
Instruction Manual
Page 11
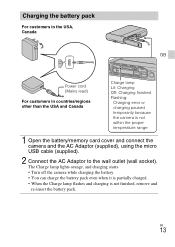
... slot T Access lamp U HDMI micro jack V Tripod receptacle • Use a tripod with a screw less than 5.5 mm (7/32 inches) long. Otherwise, you cannot firmly secure the camera, and damage to the camera may occur. * Supports Micro USB compatible device. GB 11
... slot T Access lamp U HDMI micro jack V Tripod receptacle • Use a tripod with a screw less than 5.5 mm (7/32 inches) long. Otherwise, you cannot firmly secure the camera, and damage to the camera may occur. * Supports Micro USB compatible device. GB 11

Instruction Manual
Page 12
GB 12 Insert the battery pack until the battery eject lever locks into place. • Securely close the battery cover until you hear the slide lock on the cover catch in place and so that the yellow mark under the slide lock can no longer be seen. • Closing the cover with the guide inside the battery insertion slot. Inserting the battery pack Battery eject lever 1 Open the cover. 2 Insert the battery pack. • Align the battery pack with the battery inserted incorrectly may damage the camera.
GB 12 Insert the battery pack until the battery eject lever locks into place. • Securely close the battery cover until you hear the slide lock on the cover catch in place and so that the yellow mark under the slide lock can no longer be seen. • Closing the cover with the guide inside the battery insertion slot. Inserting the battery pack Battery eject lever 1 Open the cover. 2 Insert the battery pack. • Align the battery pack with the battery inserted incorrectly may damage the camera.
Instruction Manual
Page 13
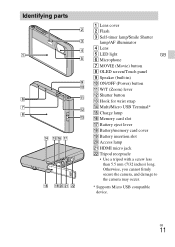
... in countries/regions other than the USA and Canada Charge lamp Lit: Charging Off: Charging finished Flashing: Charging error or charging paused temporarily because the camera is not finished, remove and re-insert the battery pack. The Charge lamp lights orange, and charging starts. • Turn off the... charged. • When the Charge lamp flashes and charging is not within the proper temperature range 1 Open the battery/memory card cover and connect the camera and the AC Adaptor (supplied), using the micro USB cable (supplied). 2 Connect the AC Adaptor to the wall outlet (wall socket).
... in countries/regions other than the USA and Canada Charge lamp Lit: Charging Off: Charging finished Flashing: Charging error or charging paused temporarily because the camera is not finished, remove and re-insert the battery pack. The Charge lamp lights orange, and charging starts. • Turn off the... charged. • When the Charge lamp flashes and charging is not within the proper temperature range 1 Open the battery/memory card cover and connect the camera and the AC Adaptor (supplied), using the micro USB cable (supplied). 2 Connect the AC Adaptor to the wall outlet (wall socket).
Instruction Manual
Page 14
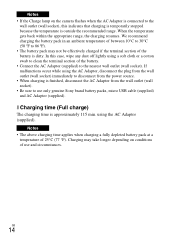
... outlet (wall socket). • Be sure to use and circumstances. Charging may not be effectively charged if the terminal section of use only genuine Sony brand battery packs, micro USB cable (supplied) and AC Adaptor (supplied). Notes • If the Charge lamp on conditions of the battery is... the recommended range. using a soft cloth or a cotton swab to 86 ºF). • The battery pack may take longer depending on the camera flashes when the AC Adaptor is connected to the wall outlet (wall socket), this case, wipe any dust off lightly using the AC Adaptor (supplied...
... outlet (wall socket). • Be sure to use and circumstances. Charging may not be effectively charged if the terminal section of use only genuine Sony brand battery packs, micro USB cable (supplied) and AC Adaptor (supplied). Notes • If the Charge lamp on conditions of the battery is... the recommended range. using a soft cloth or a cotton swab to 86 ºF). • The battery pack may take longer depending on the camera flashes when the AC Adaptor is connected to the wall outlet (wall socket), this case, wipe any dust off lightly using the AC Adaptor (supplied...

Instruction Manual
Page 15
...- Do not charge for charging using a micro USB cable. x Charging by connecting to a computer The battery pack can be charged by connecting the camera to a computer using a custom-built computer or a modified computer. Do not turn on /off or restart the computer, or wake the computer to ...turning on /off , or restarting the computer or waking the computer from sleep mode when a USB connection has been established between the computer and the camera. GB To a USB jack Notes • Note the following points when charging via a computer: - No guarantees are made for an extended period...
...- Do not charge for charging using a micro USB cable. x Charging by connecting to a computer The battery pack can be charged by connecting the camera to a computer using a custom-built computer or a modified computer. Do not turn on /off or restart the computer, or wake the computer to ...turning on /off , or restarting the computer or waking the computer from sleep mode when a USB connection has been established between the computer and the camera. GB To a USB jack Notes • Note the following points when charging via a computer: - No guarantees are made for an extended period...
Instruction Manual
Page 16
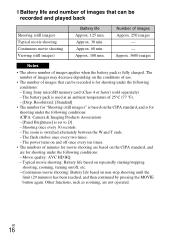
Approx. 60 min. Resolution]: [Standard] • The number for shooting under the following conditions: (CIPA: Camera & Imaging Products Association) - [Panel Brightness] is based on non-stop shooting until the limit (29 minutes) has been reached, and then... of images Approx. 250 images - - Shooting once every 30 seconds. - Other functions, such as zooming, are for shooting under the following conditions: - Using Sony microSD memory card (Class 4 or faster) (sold separately) - Number of images that can be recorded is switched alternately between the W and T ends. - ...
Approx. 60 min. Resolution]: [Standard] • The number for shooting under the following conditions: (CIPA: Camera & Imaging Products Association) - [Panel Brightness] is based on non-stop shooting until the limit (29 minutes) has been reached, and then... of images Approx. 250 images - - Shooting once every 30 seconds. - Other functions, such as zooming, are for shooting under the following conditions: - Using Sony microSD memory card (Class 4 or faster) (sold separately) - Number of images that can be recorded is switched alternately between the W and T ends. - ...

Instruction Manual
Page 17
... be supplied when the battery pack is not inserted in the camera. • Shooting is not possible when the camera is in playback mode, the display on the camera will change from the wall outlet (wall socket) by connecting the camera to a computer using the micro USB cable (supplied). You can...; Power cannot be supplied with power from the playback screen to supply power when shooting. In addition, you connect the camera and a computer using the micro USB cable while the camera is connected directly to a computer or to a power outlet using the supplied AC Adaptor. • If you can ...
... be supplied when the battery pack is not inserted in the camera. • Shooting is not possible when the camera is in playback mode, the display on the camera will change from the wall outlet (wall socket) by connecting the camera to a computer using the micro USB cable (supplied). You can...; Power cannot be supplied with power from the playback screen to supply power when shooting. In addition, you connect the camera and a computer using the micro USB cable while the camera is connected directly to a computer or to a power outlet using the supplied AC Adaptor. • If you can ...
Instruction Manual
Page 18
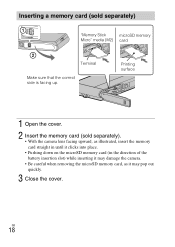
... clicks into place. • Pushing down on the microSD memory card (in the direction of the battery insertion slot) while inserting it may damage the camera. • Be careful when removing the microSD memory card, as it may pop out quickly. 3 Close the cover. GB 18 Printing surface 1 Open the cover...
... clicks into place. • Pushing down on the microSD memory card (in the direction of the battery insertion slot) while inserting it may damage the camera. • Be careful when removing the microSD memory card, as it may pop out quickly. 3 Close the cover. GB 18 Printing surface 1 Open the cover...

Instruction Manual
Page 19
... this manual, products in A are collectively referred to eject the memory card. Confirm the direction of the memory card and reinsert it straight into the camera.
... this manual, products in A are collectively referred to eject the memory card. Confirm the direction of the memory card and reinsert it straight into the camera.

Instruction Manual
Page 20
...) button Lens cover 1 Lower the lens cover. Resolution] is turned on the screen. • The battery pack will run out quickly when: - [Disp. The camera is set to turn on and allow operation. 2 Select a desired language. 3 Select a desired geographic location by following the on-screen instructions, then touch [Next]. ... PM. 5 Touch [OK]. 6 Follow the instructions on . GB 20 Date & Time setting is displayed when you turn on the camera for the first time. • You can also turn on the camera by pressing the ON/OFF (Power) button. • It may take time for the power to [High].
...) button Lens cover 1 Lower the lens cover. Resolution] is turned on the screen. • The battery pack will run out quickly when: - [Disp. The camera is set to turn on and allow operation. 2 Select a desired language. 3 Select a desired geographic location by following the on-screen instructions, then touch [Next]. ... PM. 5 Touch [OK]. 6 Follow the instructions on . GB 20 Date & Time setting is displayed when you turn on the camera for the first time. • You can also turn on the camera by pressing the ON/OFF (Power) button. • It may take time for the power to [High].

Instruction Manual
Page 21
... lever operating will be recorded when movie recording is finished. • Continuous shooting is possible for approximately 29 minutes at one time at the camera's default settings and when the temperature is approximately 25°C (77 °F). GB 21 Shooting movies 1 Press the MOVIE (Movie) button ...recording. • Use the W/T (zoom) lever to change the zoom scale. 2 Press the MOVIE button again to stop to protect the camera depending on the ambient temperature. When the image is finished, you can restart recording by pressing the MOVIE button again. When movie recording is in...
... lever operating will be recorded when movie recording is finished. • Continuous shooting is possible for approximately 29 minutes at one time at the camera's default settings and when the temperature is approximately 25°C (77 °F). GB 21 Shooting movies 1 Press the MOVIE (Movie) button ...recording. • Use the W/T (zoom) lever to change the zoom scale. 2 Press the MOVIE button again to stop to protect the camera depending on the ambient temperature. When the image is finished, you can restart recording by pressing the MOVIE button again. When movie recording is in...

Instruction Manual
Page 22
Viewing images 1 Touch (Playback). • When images on a memory card recorded with other cameras are played back on the screen. • You can also return to the T side. x Selecting next/previous image Touch (Next)/ (Previous) on the screen. • ... shooting mode by pressing the shutter button halfway down. x Deleting an image Touch (Delete) t [This Image]. GB 22 x Returning to shooting images Touch on this camera, the registration screen for the data file appears.
Viewing images 1 Touch (Playback). • When images on a memory card recorded with other cameras are played back on the screen. • You can also return to the T side. x Selecting next/previous image Touch (Next)/ (Previous) on the screen. • ... shooting mode by pressing the shutter button halfway down. x Deleting an image Touch (Delete) t [This Image]. GB 22 x Returning to shooting images Touch on this camera, the registration screen for the data file appears.
Instruction Manual
Page 23
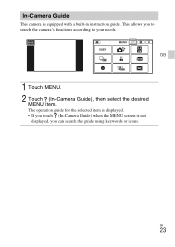
GB 1 Touch MENU. 2 Touch (In-Camera Guide), then select the desired MENU item. The operation guide for the selected item is displayed. • If you touch (In-Camera Guide) when the MENU screen is equipped with a built-in instruction guide. GB 23 This allows you can search the guide using keywords or icons. In-Camera Guide This camera is not displayed, you to search the camera's functions according to your needs.
GB 1 Touch MENU. 2 Touch (In-Camera Guide), then select the desired MENU item. The operation guide for the selected item is displayed. • If you touch (In-Camera Guide) when the MENU screen is equipped with a built-in instruction guide. GB 23 This allows you can search the guide using keywords or icons. In-Camera Guide This camera is not displayed, you to search the camera's functions according to your needs.

Instruction Manual
Page 25
... Picture Effect, selects the color to focus on. Smile Shutter Set to automatically detect shooting conditions. In-Camera Guide Search the camera's functions according to detect faces and adjust various settings automatically. Color hue When [Toy camera] is detected. Focus Select the focus method. Face Detection Select to your needs. Exposure Compensation Adjust...
... Picture Effect, selects the color to focus on. Smile Shutter Set to automatically detect shooting conditions. In-Camera Guide Search the camera's functions according to detect faces and adjust various settings automatically. Color hue When [Toy camera] is detected. Focus Select the focus method. Face Detection Select to your needs. Exposure Compensation Adjust...


