
Instruction Manual
Page 1
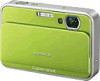
Digital Still Camera Instruction Manual GB DSC-T2 For details on the CD-ROM (supplied) using a computer. Operating Instructions Before operating the unit, please read "Cybershot Handbook" (PDF) and "Cyber-shot Step-up Guide" on advanced operations, please read this manual thoroughly, and retain it for future reference. © 2007 Sony Corporation 3-273-227-11(1)
Digital Still Camera Instruction Manual GB DSC-T2 For details on the CD-ROM (supplied) using a computer. Operating Instructions Before operating the unit, please read "Cybershot Handbook" (PDF) and "Cyber-shot Step-up Guide" on advanced operations, please read this manual thoroughly, and retain it for future reference. © 2007 Sony Corporation 3-273-227-11(1)
Instruction Manual
Page 9
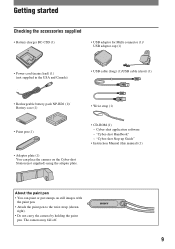
... (1) • Adaptor plate (1) You can paint or put stamps on the Cyber-shot Station (not supplied) using the adaptor plate. • CD-ROM (1) - "Cyber-shot Handbook" - "Cyber-shot Step-up Guide" • Instruction Manual (this manual) (1) About the paint pen • You can place the camera on still images with the paint pen. • Attach the paint pen to...
... (1) • Adaptor plate (1) You can paint or put stamps on the Cyber-shot Station (not supplied) using the adaptor plate. • CD-ROM (1) - "Cyber-shot Handbook" - "Cyber-shot Step-up Guide" • Instruction Manual (this manual) (1) About the paint pen • You can place the camera on still images with the paint pen. • Attach the paint pen to...

Instruction Manual
Page 14
... touch panel. 1 Touch the desired date display format, then touch . 2 Touch each item, then set its numeric value by touching [BACK]. • Touching [?] displays the guide about the touched item. Taking your finger. • When the item you want to the previous screen by touching v/V. 3 Touch [OK]. To hide this... lightly touching the buttons or icons on the screen with your finger off the screen will momentarily disappear. 3 Turning the camera on/setting the clock POWER button Touch panel Lens Lens cover 1Press the POWER button or slide the lens cover downward. 2Set the clock by...
... touch panel. 1 Touch the desired date display format, then touch . 2 Touch each item, then set its numeric value by touching [BACK]. • Touching [?] displays the guide about the touched item. Taking your finger. • When the item you want to the previous screen by touching v/V. 3 Touch [OK]. To hide this... lightly touching the buttons or icons on the screen with your finger off the screen will momentarily disappear. 3 Turning the camera on/setting the clock POWER button Touch panel Lens Lens cover 1Press the POWER button or slide the lens cover downward. 2Set the clock by...

Instruction Manual
Page 24
Folder Mass Storage Function Guide Calibration COMPONENT Grid Line Digital Zoom Auto Review 24 Categories Shooting View Images Printing, Other Manage Memory Settings Items Auto Adjustment Scene Selection Program Auto Movie Mode Album List Calendar ... details on the operation 1 page 23 HOME items Touching [HOME] displays the following items. Details on the items are displayed on the screen by the guide.
Folder Mass Storage Function Guide Calibration COMPONENT Grid Line Digital Zoom Auto Review 24 Categories Shooting View Images Printing, Other Manage Memory Settings Items Auto Adjustment Scene Selection Program Auto Movie Mode Album List Calendar ... details on the operation 1 page 23 HOME items Touching [HOME] displays the following items. Details on the items are displayed on the screen by the guide.
Instruction Manual
Page 25
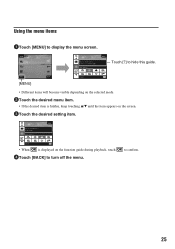
to turn off the menu. Touch [?] to hide this guide. [MENU] • Different items will become visible depending on the selected mode. 2Touch the desired menu item. • If the desired item is hidden, keep touching v/V until the item appears on the screen. 3Touch the desired setting item. • When is displayed on the function guide during playback, touch 4Touch [BACK] to confirm. 25 Using the menu items 1Touch [MENU] to display the menu screen.
to turn off the menu. Touch [?] to hide this guide. [MENU] • Different items will become visible depending on the selected mode. 2Touch the desired menu item. • If the desired item is hidden, keep touching v/V until the item appears on the screen. 3Touch the desired setting item. • When is displayed on the function guide during playback, touch 4Touch [BACK] to confirm. 25 Using the menu items 1Touch [MENU] to display the menu screen.

Instruction Manual
Page 29
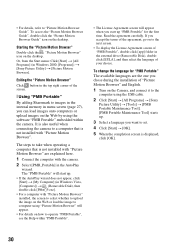
...computers to enjoy the still images and movies shot with Macintosh computers. • For details on the screen. When you to the camera. • You can organize images in the disc drive of the still image. • ...Cyber-shot Handbook" and the "Cyber-shot Step-up Guide" will vary depending on the operating environment, refer to install the software. 29 click the shortcut created on the CD-ROM (supplied), describes in factory setting. • "Picture Motion Browser" and "PMB Portable" are not compatible with the camera more efficiently. Viewing "Cyber-shot Handbook" "Cyber-shot...
...computers to enjoy the still images and movies shot with Macintosh computers. • For details on the screen. When you to the camera. • You can organize images in the disc drive of the still image. • ...Cyber-shot Handbook" and the "Cyber-shot Step-up Guide" will vary depending on the operating environment, refer to install the software. 29 click the shortcut created on the CD-ROM (supplied), describes in factory setting. • "Picture Motion Browser" and "PMB Portable" are not compatible with the camera more efficiently. Viewing "Cyber-shot Handbook" "Cyber-shot...
Instruction Manual
Page 30
... click [Start] t [My Computer] (in Windows Vista, [Computers]) t (Removable Disk), then double-click [PMB_P.exe]. • For a computer with the camera. 2 Select [PMB_Portable] in the AutoPlay wizard. Read the agreement carefully. To change the language for the first time. If you chose during the installation of... the next screen. • To display the License Agreement screen of "PMB Portable", double-click [app] folder in Windows 2000, [Programs]) t [Sony Picture Utility] t [Picture Motion Browser]. To access the "Picture Motion Browser Guide", double-click the "Picture Motion Browser...
... click [Start] t [My Computer] (in Windows Vista, [Computers]) t (Removable Disk), then double-click [PMB_P.exe]. • For a computer with the camera. 2 Select [PMB_Portable] in the AutoPlay wizard. Read the agreement carefully. To change the language for the first time. If you chose during the installation of... the next screen. • To display the License Agreement screen of "PMB Portable", double-click [app] folder in Windows 2000, [Programs]) t [Sony Picture Utility] t [Picture Motion Browser]. To access the "Picture Motion Browser Guide", double-click the "Picture Motion Browser...
Instruction Manual
Page 31
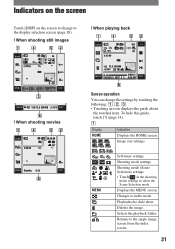
... mode settings to the single image screen from the index screen. 31 Selects the playback folder. Deletes the image. To hide this guide, touch [?] (page 14). Displays the MENU screen. Playbacks the slide show. A Display HOME Indication Displays the HOME screen. Returns... to select the Scene Selection mode. Changes to the display selection screen (page 18). [ When shooting still images [ When playing back [ When shooting movies Screen operation You can change the settings by touching the following: 1, 2, 3. • ...
... mode settings to the single image screen from the index screen. 31 Selects the playback folder. Deletes the image. To hide this guide, touch [?] (page 14). Displays the MENU screen. Playbacks the slide show. A Display HOME Indication Displays the HOME screen. Returns... to select the Scene Selection mode. Changes to the display selection screen (page 18). [ When shooting still images [ When playing back [ When shooting movies Screen operation You can change the settings by touching the following: 1, 2, 3. • ...
Cyber-shot® Handbook
Page 1
Digital Still Camera Cyber-shot Handbook DSC-T2 Before operating the unit, please read this Handbook thoroughly together with the "Instruction Manual" and the "Cyber-shot Step-up Guide", and retain them for future reference. © 2007 Sony Corporation VCLICK! Table of contents Basic Operations Using the shooting functions Using the viewing functions Customizing the settings Viewing images on a TV Using your computer Printing still images Troubleshooting Others Index 3-273-224-11(1) GB
Digital Still Camera Cyber-shot Handbook DSC-T2 Before operating the unit, please read this Handbook thoroughly together with the "Instruction Manual" and the "Cyber-shot Step-up Guide", and retain them for future reference. © 2007 Sony Corporation VCLICK! Table of contents Basic Operations Using the shooting functions Using the viewing functions Customizing the settings Viewing images on a TV Using your computer Printing still images Troubleshooting Others Index 3-273-224-11(1) GB

Cyber-shot® Handbook
Page 5
...on a TV Viewing images on a TV 86 Viewing images by connecting the camera to a TV with the cable for multi-use terminal (not supplied 86 Viewing an image by connecting the camera to an HD TV 88 Using your computer Enjoying your Windows computer 90 Installing... the "Music Transfer" (supplied 99 Viewing "Cyber-shot Step-up Guide 100 5 Internal Memory Tool 77 Format Settings 78 Main Settings - Main Settings 2 80 USB Connect COMPONENT Video Out Shooting Settings - Shooting Settings 1 81 AF Illuminator AF Mode Grid Line Digital Zoom Shooting Settings - Main Settings 1 78 ...
...on a TV Viewing images on a TV 86 Viewing images by connecting the camera to a TV with the cable for multi-use terminal (not supplied 86 Viewing an image by connecting the camera to an HD TV 88 Using your computer Enjoying your Windows computer 90 Installing... the "Music Transfer" (supplied 99 Viewing "Cyber-shot Step-up Guide 100 5 Internal Memory Tool 77 Format Settings 78 Main Settings - Main Settings 2 80 USB Connect COMPONENT Video Out Shooting Settings - Shooting Settings 1 81 AF Illuminator AF Mode Grid Line Digital Zoom Shooting Settings - Main Settings 1 78 ...

Cyber-shot® Handbook
Page 7
...". To save images in "Memory Stick Duo", copy (export) the images in the internal memory to "Picture Motion Browser Guide". • Even if "Memory Stick Duo" is inserted in the camera, images will not be saved in "Memory Stick Duo" until the capacity of the internal memory is full. Features of... the camera Storing Storing images in the internal memory The camera has approximately 4 GB of internal memory and can load images ...
...". To save images in "Memory Stick Duo", copy (export) the images in the internal memory to "Picture Motion Browser Guide". • Even if "Memory Stick Duo" is inserted in the camera, images will not be saved in "Memory Stick Duo" until the capacity of the internal memory is full. Features of... the camera Storing Storing images in the internal memory The camera has approximately 4 GB of internal memory and can load images ...
Cyber-shot® Handbook
Page 18
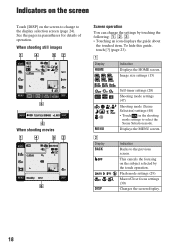
...Changes the screen display. 18 Indicators on the screen Touch [DISP] on the subject selected by touching the following: 1, 2, 3. • Touching an icon displays the guide about the touched item. Image size settings (15) When shooting movies MENU B Display BACK DISP Self-timer settings (28) Shooting mode settings (47) Shooting mode... (Scene Selection) settings (48) • Touch in parentheses for details of operation. A Display HOME Indication Displays the HOME screen. When shooting still images Screen operation You can change to the previous screen.
...Changes the screen display. 18 Indicators on the screen Touch [DISP] on the subject selected by touching the following: 1, 2, 3. • Touching an icon displays the guide about the touched item. Image size settings (15) When shooting movies MENU B Display BACK DISP Self-timer settings (28) Shooting mode settings (47) Shooting mode... (Scene Selection) settings (48) • Touch in parentheses for details of operation. A Display HOME Indication Displays the HOME screen. When shooting still images Screen operation You can change to the previous screen.

Cyber-shot® Handbook
Page 23
To hide this guide, touch [?] again. [?] • To operate the touch panel, press it lightly with your finger or the supplied paint pen. • Do not press the touch ...; When the item you want to the previous screen by touching [BACK]. • Touching [?] displays the guide about the touched item. Operate the touch panel This LCD screen also displays the buttons for operating the camera (touch panel). The buttons appear on the screen. 2 Touch the buttons on the screen lightly with...
To hide this guide, touch [?] again. [?] • To operate the touch panel, press it lightly with your finger or the supplied paint pen. • Do not press the touch ...; When the item you want to the previous screen by touching [BACK]. • Touching [?] displays the guide about the touched item. Operate the touch panel This LCD screen also displays the buttons for operating the camera (touch panel). The buttons appear on the screen. 2 Touch the buttons on the screen lightly with...

Cyber-shot® Handbook
Page 24
Changing the screen display Touch [DISP] on the screen. Normal DISP Simple Image Only • [DISP] is displayed on the screen only when shooting. • During playback, touch the right or left side of the screen to display the next/previous image, and press the center to the display selection screen. • In index mode, you can set the number of images displayed. • Settings other than [LCD Brightness] can be made separately for shooting and playback. [Display Setup] This sets if the icons are displayed on the screen to change to display the guide. 24
Changing the screen display Touch [DISP] on the screen. Normal DISP Simple Image Only • [DISP] is displayed on the screen only when shooting. • During playback, touch the right or left side of the screen to display the next/previous image, and press the center to the display selection screen. • In index mode, you can set the number of images displayed. • Settings other than [LCD Brightness] can be made separately for shooting and playback. [Display Setup] This sets if the icons are displayed on the screen to change to display the guide. 24

Cyber-shot® Handbook
Page 36
v/V/b/B: Adjusts the position. Touch to "Picture Motion Browser Guide". 36 Album List Single Image Index Calendar • You can move from the Album List screen to search. You can change how to play back .... BACK: Cancels playback zoom. : Turns v/V/b/B on/off. • To store enlarged images, see [Trimming] (page 64). Viewing images Viewing an enlarged image (playback zoom) Touch a still image while it is displayed to play back images Images stored in the camera are separated into groups by using "Picture Motion Browser".
v/V/b/B: Adjusts the position. Touch to "Picture Motion Browser Guide". 36 Album List Single Image Index Calendar • You can move from the Album List screen to search. You can change how to play back .... BACK: Cancels playback zoom. : Turns v/V/b/B on/off. • To store enlarged images, see [Trimming] (page 64). Viewing images Viewing an enlarged image (playback zoom) Touch a still image while it is displayed to play back images Images stored in the camera are separated into groups by using "Picture Motion Browser".

Cyber-shot® Handbook
Page 44
... Settings 1 (page 78) Beep Initialize Main Settings 2 (page 80) USB Connect Video Out Function Guide Calibration COMPONENT Shooting Settings Shooting Settings 1 (page 81) AF Illuminator AF Mode Shooting Settings 2 (page 83) Auto Orientation Smile Level Grid Line Digital Zoom Auto Review Clock Settings (page 84) Language Setting (page 85) 44 Learning the...
... Settings 1 (page 78) Beep Initialize Main Settings 2 (page 80) USB Connect Video Out Function Guide Calibration COMPONENT Shooting Settings Shooting Settings 1 (page 81) AF Illuminator AF Mode Shooting Settings 2 (page 83) Auto Orientation Smile Level Grid Line Digital Zoom Auto Review Clock Settings (page 84) Language Setting (page 85) 44 Learning the...

Cyber-shot® Handbook
Page 45
HOME/Menu Using the menu items 1 Touch [MENU] to turn off the menu. 45 Touch [?] to hide the function guide when shooting (page 23). • Different items will become visible depending on the selected mode. 2 Touch the desired menu item. • If the desired item is hidden, keep touching v/V until the item appears on the screen. 3 Touch the desired setting item. • When is displayed on the function guide during playback, touch to confirm. 4 Touch [BACK] to display the MENU screen. Basic Operations Learning the various functions -
HOME/Menu Using the menu items 1 Touch [MENU] to turn off the menu. 45 Touch [?] to hide the function guide when shooting (page 23). • Different items will become visible depending on the selected mode. 2 Touch the desired menu item. • If the desired item is hidden, keep touching v/V until the item appears on the screen. 3 Touch the desired setting item. • When is displayed on the function guide during playback, touch to confirm. 4 Touch [BACK] to display the MENU screen. Basic Operations Learning the various functions -

Cyber-shot® Handbook
Page 77
... internal memory will be erased" appears. 2 Touch [OK]. Customizing the settings 77 Manage Memory For details on how to operate, refer to "Picture Motion Browser Guide". Formatting starts. If you format the internal memory, the embedded application "PMB Portable" will be erased together with the images. The message "All data in..." (supplied). For details on the operation 1 page 74 Memory Tool - Format Formats the internal memory. • Note that formatting permanently erases all data in the camera.
... internal memory will be erased" appears. 2 Touch [OK]. Customizing the settings 77 Manage Memory For details on how to operate, refer to "Picture Motion Browser Guide". Formatting starts. If you format the internal memory, the embedded application "PMB Portable" will be erased together with the images. The message "All data in..." (supplied). For details on the operation 1 page 74 Memory Tool - Format Formats the internal memory. • Note that formatting permanently erases all data in the camera.

Cyber-shot® Handbook
Page 78
...sound. The settings are marked with . Touch [?] again to power off the camera while initializing. 78 Even if you execute this guide can be turned on and off by the setting made above. • The guide displayed by touching [?] cannot be turned on the beep/shutter sound when you... are reset to the default setting. Off Turns off by touching [?] (page 23). On Displays the function guide. Settings For details on the shutter sound when you operate the camera. Shutter Turns on the operation 1 page 74 Main Settings - Beep Selects the sound produced when you press ...
...sound. The settings are marked with . Touch [?] again to power off the camera while initializing. 78 Even if you execute this guide can be turned on and off by the setting made above. • The guide displayed by touching [?] cannot be turned on the beep/shutter sound when you... are reset to the default setting. Off Turns off by touching [?] (page 23). On Displays the function guide. Settings For details on the shutter sound when you operate the camera. Shutter Turns on the operation 1 page 74 Main Settings - Beep Selects the sound produced when you press ...

Cyber-shot® Handbook
Page 94
Installing the software (supplied) After you install the software, the short cut icons for "Picture Motion Browser", "Picture Motion Browser Guide", "Music Transfer" are created on the desktop. • Double-click to start "Picture Motion Browser". • Double-click to start "Picture Motion Browser Guide". • Double-click to start "Music Transfer". 94
Installing the software (supplied) After you install the software, the short cut icons for "Picture Motion Browser", "Picture Motion Browser Guide", "Music Transfer" are created on the desktop. • Double-click to start "Picture Motion Browser". • Double-click to start "Picture Motion Browser Guide". • Double-click to start "Music Transfer". 94


