Instruction Manual
Page 7
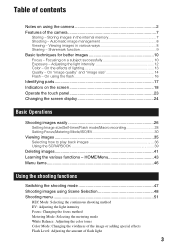
...28 Connecting the camera to your computer 28 Viewing "Cyber-shot Handbook 29 Enjoying the supplied software 29 Indicators on the screen 31 Battery life and memory capacity 34 Battery life and number of images that you can record/view 34 Number of still images and ...recording time of contents IMPORTANT SAFEGUARDS 2 Read this first 4 Notes on using the camera 8 Getting started 9 Checking the accessories supplied 9 1 Preparing the battery pack 11 2 Inserting the battery pack 12 3 Turning the camera on/setting the clock 14 Shooting images easily 16 Image size...
...28 Connecting the camera to your computer 28 Viewing "Cyber-shot Handbook 29 Enjoying the supplied software 29 Indicators on the screen 31 Battery life and memory capacity 34 Battery life and number of images that you can record/view 34 Number of still images and ...recording time of contents IMPORTANT SAFEGUARDS 2 Read this first 4 Notes on using the camera 8 Getting started 9 Checking the accessories supplied 9 1 Preparing the battery pack 11 2 Inserting the battery pack 12 3 Turning the camera on/setting the clock 14 Shooting images easily 16 Image size...

Instruction Manual
Page 17
...camera detects a smile, the shutter is released automatically to shoot the image. Still image For prints up to A3 (11 × 17") Shoot in 3:2 aspect ratio For prints up to A4 (8.5 × 11") For prints up F Changing the screen display [ Changing the image size Touch the image size setting icon on the screen. Image size.../Self-timer/Shooting mode/Flash/Macro/Display A Changing the image size B Using the self-timer C Changing the shooting mode D Selecting a flash mode for still images ...
...camera detects a smile, the shutter is released automatically to shoot the image. Still image For prints up to A3 (11 × 17") Shoot in 3:2 aspect ratio For prints up to A4 (8.5 × 11") For prints up F Changing the screen display [ Changing the image size Touch the image size setting icon on the screen. Image size.../Self-timer/Shooting mode/Flash/Macro/Display A Changing the image size B Using the self-timer C Changing the shooting mode D Selecting a flash mode for still images ...
Instruction Manual
Page 22
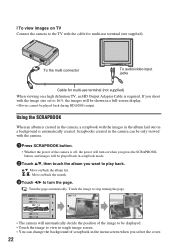
...created. [ To view images on TV Connect the camera to the TV with the cable for multi-use terminal (not supplied). If you shoot with the image size set to 16:9, the images will be displayed. • Touch the image to view in single image screen. • You can be only viewed with... the camera. 1Press SCRAPBOOK button. • Whether the power of scrapbook in scrapbook mode...
...created. [ To view images on TV Connect the camera to the TV with the cable for multi-use terminal (not supplied). If you shoot with the image size set to 16:9, the images will be displayed. • Touch the image to view in single image screen. • You can be only viewed with... the camera. 1Press SCRAPBOOK button. • Whether the power of scrapbook in scrapbook mode...
Instruction Manual
Page 31
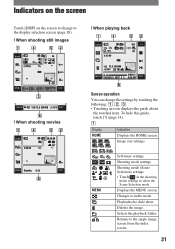
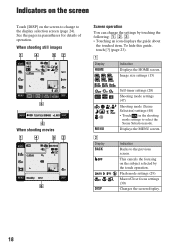
... [?] (page 14). Image size settings MENU Self-timer settings Shooting mode settings Shooting mode (Scene Selection) settings • Touch in the shooting mode settings to the single image screen from the index screen. 31 Displays the MENU screen. Returns to select the Scene... an icon displays the guide about the touched item. A Display HOME Indication Displays the HOME screen. Playbacks the slide show. Changes to the display selection screen (page 18). [ When shooting still images [ When playing back [ When shooting movies Screen operation You can change to index mode.
... [?] (page 14). Image size settings MENU Self-timer settings Shooting mode settings Shooting mode (Scene Selection) settings • Touch in the shooting mode settings to the single image screen from the index screen. 31 Displays the MENU screen. Returns to select the Scene... an icon displays the guide about the touched item. A Display HOME Indication Displays the HOME screen. Playbacks the slide show. Changes to the display selection screen (page 18). [ When shooting still images [ When playing back [ When shooting movies Screen operation You can change to index mode.
Cyber-shot® Handbook
Page 3
...quality" and "image size 14 Flash - Adjusting the light intensity 12 Color - Table of contents Notes on a subject successfully 10 Exposure - Storing images in various ways 8 Sharing - Viewing images in the internal memory 7 Shooting - Focusing on using the camera 2 Features of the camera 7 Storing - On... images using the flash 16 Identifying parts 17 Indicators on the screen 18 Operate the touch panel 23 Changing the screen display 24 Basic Operations Shooting images easily 26 Setting Image size/Self-timer/Flash mode/Macro recording 28 Setting Focus/Metering Mode...
...quality" and "image size 14 Flash - Adjusting the light intensity 12 Color - Table of contents Notes on a subject successfully 10 Exposure - Storing images in various ways 8 Sharing - Viewing images in the internal memory 7 Shooting - Focusing on using the camera 2 Features of the camera 7 Storing - On... images using the flash 16 Identifying parts 17 Indicators on the screen 18 Operate the touch panel 23 Changing the screen display 24 Basic Operations Shooting images easily 26 Setting Image size/Self-timer/Flash mode/Macro recording 28 Setting Focus/Metering Mode...

Cyber-shot® Handbook
Page 14
...contains a large number of pixels. Although you cannot see the differences on the screen of the camera, the fine detail and data processing time differ when the image is made up to A3 size Example: An attached image to be sent by the number of pixels, the image...; 2448 pixels = 7,990,272 pixels Pixels 2 Image size: VGA 640 pixels × 480 pixels = 307,200 pixels Selecting the image size for better images Quality On "image quality" and "image size" A digital image is printed or displayed on a computer screen. Description of small dots called pixels. Basic techniques for ...
...contains a large number of pixels. Although you cannot see the differences on the screen of the camera, the fine detail and data processing time differ when the image is made up to A3 size Example: An attached image to be sent by the number of pixels, the image...; 2448 pixels = 7,990,272 pixels Pixels 2 Image size: VGA 640 pixels × 480 pixels = 307,200 pixels Selecting the image size for better images Quality On "image quality" and "image size" A digital image is printed or displayed on a computer screen. Description of small dots called pixels. Basic techniques for ...
Cyber-shot® Handbook
Page 18
...) Macro/Close focus settings (30) Changes the screen display. 18 A Display HOME Indication Displays the HOME screen. See the pages in the shooting mode settings to the display selection screen (page 24). When shooting still images Screen operation You can change to select the Scene Selection... mode. Indication Backs to change the settings by the touch operation. Image size settings (15) When shooting movies MENU B ...
...) Macro/Close focus settings (30) Changes the screen display. 18 A Display HOME Indication Displays the HOME screen. See the pages in the shooting mode settings to the display selection screen (page 24). When shooting still images Screen operation You can change to select the Scene Selection... mode. Indication Backs to change the settings by the touch operation. Image size settings (15) When shooting movies MENU B ...

Cyber-shot® Handbook
Page 22
Image size (15) PictBridge connecting (102) E Display 125 F3.5 ISO400 +2.0EV Indication Low battery warning (116) Shutter speed Aperture value ISO number (34) Exposure Value (34) Metering ... Duo") Recorded date/time of images recorded in selected folder Changing folder (71) • This does not appear when using internal memory. Indicators on the screen D Display 8/8 Indication Playback Media (internal memory, "Memory Stick Duo") Playback folder (71) • This does not appear when using internal memory. Image number/Number of...
Image size (15) PictBridge connecting (102) E Display 125 F3.5 ISO400 +2.0EV Indication Low battery warning (116) Shutter speed Aperture value ISO number (34) Exposure Value (34) Metering ... Duo") Recorded date/time of images recorded in selected folder Changing folder (71) • This does not appear when using internal memory. Indicators on the screen D Display 8/8 Indication Playback Media (internal memory, "Memory Stick Duo") Playback folder (71) • This does not appear when using internal memory. Image number/Number of...
Cyber-shot® Handbook
Page 28
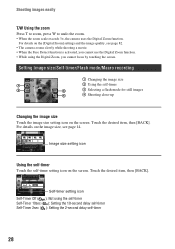
...BACK]. Setting Image size/Self-timer/Flash mode/Macro recording A Changing the image size B Using the self-timer C Selecting a flash mode for still images D Shooting close-up Changing the image size Touch the image size setting icon on the image size, see page 82. • The camera zooms slowly while shooting... touching the screen. For details on the screen. For details on the screen. Shooting images easily T/W Using the zoom Press T to zoom, press W to undo the zoom. • When the zoom scale exceeds 3×, the camera uses the Digital Zoom function. Image size setting icon Using...
...BACK]. Setting Image size/Self-timer/Flash mode/Macro recording A Changing the image size B Using the self-timer C Selecting a flash mode for still images D Shooting close-up Changing the image size Touch the image size setting icon on the image size, see page 82. • The camera zooms slowly while shooting... touching the screen. For details on the screen. For details on the screen. Shooting images easily T/W Using the zoom Press T to zoom, press W to undo the zoom. • When the zoom scale exceeds 3×, the camera uses the Digital Zoom function. Image size setting icon Using...

Cyber-shot® Handbook
Page 35
...Fast forward: m/M (Touch B or x to return to play back a movie. Stop: Touch x. • Movies of image size [320] are displayed in "Memory Stick Duo", touch HOME screen (page 60). Movie: Touch B to normal playback.) Volume control: Touch , then adjust the volume with / . Basic Operations ... / (Playback zoom) button To view images in a smaller size. 35 Viewing a single image (Memory Stick) in (View Images) in 1 Press (Playback) button. • If you press (Playback) when the camera is powered off, the camera is turned on automatically and set to select an image. The...
...Fast forward: m/M (Touch B or x to return to play back a movie. Stop: Touch x. • Movies of image size [320] are displayed in "Memory Stick Duo", touch HOME screen (page 60). Movie: Touch B to normal playback.) Volume control: Touch , then adjust the volume with / . Basic Operations ... / (Playback zoom) button To view images in a smaller size. 35 Viewing a single image (Memory Stick) in (View Images) in 1 Press (Playback) button. • If you press (Playback) when the camera is powered off, the camera is turned on automatically and set to select an image. The...

Cyber-shot® Handbook
Page 64
...completed, touch [Save]. • You may not be retouched while the camera is retained. Corrects the red-eye phenomenon caused by following the instructions ...depending on the operation 1 page 45 (Retouch): Retouching still images Adds effects or makes corrections to retouch while displaying in the Retouch screen enables checking of trimmed images may vary depending on the ...) button to zoom in on the trimming range. 2 Set the point with v/V/b/B, then touch . 3 Select an image size with b/B, then touch . 4 Touch [Save]. • The quality of the effects that you want to a recorded ...
...completed, touch [Save]. • You may not be retouched while the camera is retained. Corrects the red-eye phenomenon caused by following the instructions ...depending on the operation 1 page 45 (Retouch): Retouching still images Adds effects or makes corrections to retouch while displaying in the Retouch screen enables checking of trimmed images may vary depending on the ...) button to zoom in on the trimming range. 2 Set the point with v/V/b/B, then touch . 3 Select an image size with b/B, then touch . 4 Touch [Save]. • The quality of the effects that you want to a recorded ...

Cyber-shot® Handbook
Page 73
...applied to the latest state). • You can select the image size to be saved from the image. Select the desired frame with b/B, then touch . To save... frame. Using the viewing functions Painting or putting stamps on the image. Touch [Cancel] to the painting screen. Touch [BACK] to return to cancel the operation. The selected thickness is recorded in the same way ...as the newest file. Touch the stamp select button, the desired stamp, then [BACK]. 3 Put stamps on still images (Paint) To stamp 1 Touch . 2 Select a stamp. Erasing all painting 1 Touch . All painting...
...applied to the latest state). • You can select the image size to be saved from the image. Select the desired frame with b/B, then touch . To save... frame. Using the viewing functions Painting or putting stamps on the image. Touch [Cancel] to the painting screen. Touch [BACK] to return to cancel the operation. The selected thickness is recorded in the same way ...as the newest file. Touch the stamp select button, the desired stamp, then [BACK]. 3 Put stamps on still images (Paint) To stamp 1 Touch . 2 Select a stamp. Erasing all painting 1 Touch . All painting...

Cyber-shot® Handbook
Page 89
...Sony's PhotoTV HD-compatible devices using the camera abroad, it may be necessary to switch the video signal output to match that of the digital still camera. The color system of the TV must match that of the country or region where the camera...size reduced. On TV color systems If you need a TV with the camera... appear on a TV NTSC system Bahama Islands, Bolivia, Canada, Central America, Chile, Colombia, Ecuador, Jamaica, Japan, Korea, Mexico, Peru, Surinam, Taiwan, the Philippines, the U.S.A., Venezuela, etc. Images shot...TV screen, you want to view images on the HOME screen ...
...Sony's PhotoTV HD-compatible devices using the camera abroad, it may be necessary to switch the video signal output to match that of the digital still camera. The color system of the TV must match that of the country or region where the camera...size reduced. On TV color systems If you need a TV with the camera... appear on a TV NTSC system Bahama Islands, Bolivia, Canada, Central America, Chile, Colombia, Ecuador, Jamaica, Japan, Korea, Mexico, Peru, Surinam, Taiwan, the Philippines, the U.S.A., Venezuela, etc. Images shot...TV screen, you want to view images on the HOME screen ...

Cyber-shot® Handbook
Page 103
...), A print menu appears on to print. Move on the screen. 3 Touch [This Image] or [Multiple Images]. Single image screen is made, the indicator appears. The mark appears on the ... want to print side by side on the printer. 103 Printing still images When you want to print. When the [Layout] is ...you choose [Date], the date will be provided depending on a sheet. [Size] Select the size of the printing sheet. [Date] Select [Day & Time] or [...This function may not all fit onto a single sheet depending on the camera and the printer. When you select [Multiple Images] You can print ...
...), A print menu appears on to print. Move on the screen. 3 Touch [This Image] or [Multiple Images]. Single image screen is made, the indicator appears. The mark appears on the ... want to print side by side on the printer. 103 Printing still images When you want to print. When the [Layout] is ...you choose [Date], the date will be provided depending on a sheet. [Size] Select the size of the printing sheet. [Date] Select [Day & Time] or [...This function may not all fit onto a single sheet depending on the camera and the printer. When you select [Multiple Images] You can print ...
Cyber-shot® Handbook
Page 107
...page 49). - Troubleshooting Fuzzy white circular spots appear in images shot using the flash. • Particles (dust, pollen, etc.)...(Fireworks) mode is selected in the Scene Selection when shooting still images. • The Focus preset function is selected in ... You cannot use the Smart zoom when the image size is set to (Close focus enabled) mode and... 1 to 20 cm (13/32 to use the Digital Zoom, when the Face Detect function is not a malfunction...page 30). Troubleshooting This subject is not visible on the screen. • The camera is activated (page 20). Recording takes a long time. ...
...page 49). - Troubleshooting Fuzzy white circular spots appear in images shot using the flash. • Particles (dust, pollen, etc.)...(Fireworks) mode is selected in the Scene Selection when shooting still images. • The Focus preset function is selected in ... You cannot use the Smart zoom when the image size is set to (Close focus enabled) mode and... 1 to 20 cm (13/32 to use the Digital Zoom, when the Face Detect function is not a malfunction...page 30). Troubleshooting This subject is not visible on the screen. • The camera is activated (page 20). Recording takes a long time. ...
Cyber-shot® Handbook
Page 127
... Printer 102 TV 86 Create REC.Folder 75 Cross Filter 65 D Date 84, 103 Daylight 53 Delete 41, 67 Format 75, 77 Deleting images 41 Digital Zoom 82 DirectX 93 DISP 24 Download Music 99 E Electronic transformer........ 120 EV 34 Export 70 Exposure 12 Exposure Bracket 52 F Face Detection 56 Favorites... Shutter mode.........48 Histogram 25 HOME 43 HOME items 44 I Identifying parts 17 Image file storage destinations and file names 97 Image quality 14 Image size 14, 28 Import 70 Incandescent 53 Index screen 37 Indicator 18 127 Index
... Printer 102 TV 86 Create REC.Folder 75 Cross Filter 65 D Date 84, 103 Daylight 53 Delete 41, 67 Format 75, 77 Deleting images 41 Digital Zoom 82 DirectX 93 DISP 24 Download Music 99 E Electronic transformer........ 120 EV 34 Export 70 Exposure 12 Exposure Bracket 52 F Face Detection 56 Favorites... Shutter mode.........48 Histogram 25 HOME 43 HOME items 44 I Identifying parts 17 Image file storage destinations and file names 97 Image quality 14 Image size 14, 28 Import 70 Incandescent 53 Index screen 37 Indicator 18 127 Index


