
Instruction Manual
Page 13
...PM. [ To change the date and time Select [Clock Settings] in the (Setup) screen (page 21). [ Notes on when the power is turned on • Once the battery pack is inserted in the camera, it may take time before operation becomes possible. • If the camera is running on battery power... and you do not operate the camera for superimposing dates on /setting the clock ON/OFF (power) button 1 ɟ Control button z...
...PM. [ To change the date and time Select [Clock Settings] in the (Setup) screen (page 21). [ Notes on when the power is turned on • Once the battery pack is inserted in the camera, it may take time before operation becomes possible. • If the camera is running on battery power... and you do not operate the camera for superimposing dates on /setting the clock ON/OFF (power) button 1 ɟ Control button z...
Instruction Manual
Page 20
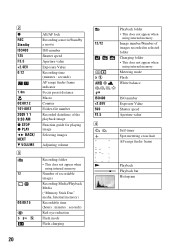
... movie/Standby a movie ISO number Shutter speed Aperture value Exposure Value Recording time (minutes : seconds) AF range finder frame indicator Focus preset distance Macro Counter Folder-file number Recorded date/time of the playback image Function guide for playing image Selecting images Adjusting volume ... range finder frame Playback Playback bar Histogram Number of recordable images Recording Media/Playback Media ("Memory Stick Duo" media, Internal memory) Recordable time (hours : minutes : seconds) Red-eye reduction Flash mode Flash charging 101 12/12 ISO400 +2.0EV 500 F3.5 D N 20 ...
... movie/Standby a movie ISO number Shutter speed Aperture value Exposure Value Recording time (minutes : seconds) AF range finder frame indicator Focus preset distance Macro Counter Folder-file number Recorded date/time of the playback image Function guide for playing image Selecting images Adjusting volume ... range finder frame Playback Playback bar Histogram Number of recordable images Recording Media/Playback Media ("Memory Stick Duo" media, Internal memory) Recordable time (hours : minutes : seconds) Red-eye reduction Flash mode Flash charging 101 12/12 ISO400 +2.0EV 500 F3.5 D N 20 ...

Instruction Manual
Page 24
...Connect Selects the USB mode to be used for recording images. Shooting Settings Grid Line Digital Zoom Auto Review Displays lines to a computer or a PictBridge compliant printer using the ...the language to the default setting. Main Settings - Clock Settings Clock Settings Sets the date and time. Create REC.Folder Creates a folder in the menu items, warnings, and messages. ... for approximately two seconds immediately after shooting a still image. Initialize Initializes the setting to be used when connecting the camera to easily set a subject in the internal memory...
...Connect Selects the USB mode to be used for recording images. Shooting Settings Grid Line Digital Zoom Auto Review Displays lines to a computer or a PictBridge compliant printer using the ...the language to the default setting. Main Settings - Clock Settings Clock Settings Sets the date and time. Create REC.Folder Creates a folder in the menu items, warnings, and messages. ... for approximately two seconds immediately after shooting a still image. Initialize Initializes the setting to be used when connecting the camera to easily set a subject in the internal memory...
Instruction Manual
Page 32
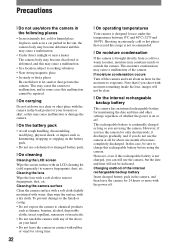
...the battery pack. • Do not use the camera, but the date and time will not be clear. [ On the internal rechargeable backup battery This camera has an internal rechargeable battery for maintaining the date and time and other place with the camera in the back pocket of the above on your ...case, be indicated. If moisture condensation occurs Turn off . This rechargeable battery is designed for use the camera at all for only short periods, it discharges gradually, and if you can still use a deformed or damaged battery pack. [ On cleaning Cleaning the LCD screen Wipe the screen surface...
...the battery pack. • Do not use the camera, but the date and time will not be clear. [ On the internal rechargeable backup battery This camera has an internal rechargeable battery for maintaining the date and time and other place with the camera in the back pocket of the above on your ...case, be indicated. If moisture condensation occurs Turn off . This rechargeable battery is designed for use the camera at all for only short periods, it discharges gradually, and if you can still use a deformed or damaged battery pack. [ On cleaning Cleaning the LCD screen Wipe the screen surface...
Cyber-shot® Handbook
Page 16
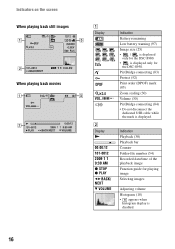
Indication Playback (30) Playback bar Counter Folder-file number (54) Recorded date/time of the playback image Function guide for the DSC-S950. PictBridge connecting (83) Protect (52) Print order (DPOF) mark (85) Zoom scaling (30) Volume (30) PictBridge connecting (84...STOP z PLAY BACK/ NEXT V VOLUME Indication Battery remaining Low battery warning (97) Image size (25) • / is displayed only for the DSC-S980. • is displayed only for playing image Selecting images Adjusting volume Histogram (18) • appears when histogram display is displayed. Indicators on ...
Indication Playback (30) Playback bar Counter Folder-file number (54) Recorded date/time of the playback image Function guide for the DSC-S950. PictBridge connecting (83) Protect (52) Print order (DPOF) mark (85) Zoom scaling (30) Volume (30) PictBridge connecting (84...STOP z PLAY BACK/ NEXT V VOLUME Indication Battery remaining Low battery warning (97) Image size (25) • / is displayed only for the DSC-S980. • is displayed only for playing image Selecting images Adjusting volume Histogram (18) • appears when histogram display is displayed. Indicators on ...

Cyber-shot® Handbook
Page 31
Bar 31 To return to display the index screen while a still image is displayed. Basic Operations Viewing images To view an index screen Press (Index) to the single image screen, press z. • Each time you press (Index), the number of images on the index screen increases. • When using "Memory Stick Duo" media, you can select the desired date/folder with v/V after selecting the bar with v/V/b/B. Select an image with b.
Bar 31 To return to display the index screen while a still image is displayed. Basic Operations Viewing images To view an index screen Press (Index) to the single image screen, press z. • Each time you press (Index), the number of images on the index screen increases. • When using "Memory Stick Duo" media, you can select the desired date/folder with v/V after selecting the bar with v/V/b/B. Select an image with b.

Cyber-shot® Handbook
Page 52
...to protect with v, then press z. In index mode: 3 Select the image you want to protect with b/B, then press z. To select all the images of a date/folder/favorites, select the bar with b, then press z. 5 Press the MENU button. 6 Select [OK] with v, then press z. • Note that the ...button. 3 Select [Protect] with v/V on the recording media, even if the images are protected, and these images cannot be restored. • It may take some time to protect, then press z. 5 Press the MENU button. 6 Select [OK] with v/V/b/B, then press z. The is attached to the selected image. 4 Press b/B...
...to protect with v, then press z. In index mode: 3 Select the image you want to protect with b/B, then press z. To select all the images of a date/folder/favorites, select the bar with b, then press z. 5 Press the MENU button. 6 Select [OK] with v, then press z. • Note that the ...button. 3 Select [Protect] with v/V on the recording media, even if the images are protected, and these images cannot be restored. • It may take some time to protect, then press z. 5 Press the MENU button. 6 Select [OK] with v/V/b/B, then press z. The is attached to the selected image. 4 Press b/B...

Cyber-shot® Handbook
Page 63
Using the Setup screen 63 To cancel the clock setting Select [Cancel] in step 5, then press z. Clock Settings For details on the operation 1 page 55 Clock Settings Sets the date and time. 1 Select [Clock Settings] from the (Setup) screen. 2 Press z on the control button. 3 Select the date display format with v/V, then press z. 4 Select each item with b/B and set the numeric value with v/V, then press z. 5 Select [OK], then press z. • Midnight is indicated as 12:00 AM, and noon as 12:00 PM.
Using the Setup screen 63 To cancel the clock setting Select [Cancel] in step 5, then press z. Clock Settings For details on the operation 1 page 55 Clock Settings Sets the date and time. 1 Select [Clock Settings] from the (Setup) screen. 2 Press z on the control button. 3 Select the date display format with v/V, then press z. 4 Select each item with b/B and set the numeric value with v/V, then press z. 5 Select [OK], then press z. • Midnight is indicated as 12:00 AM, and noon as 12:00 PM.
Cyber-shot® Handbook
Page 70
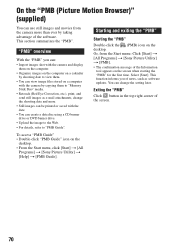
...(Picture Motion Browser)" (supplied) You can use still images and movies from the Start menu: Click [Start] t [All Programs] t [Sony Picture Utility] t [PMB]. • The confirmation message of the Information tool appears on a computer with the camera by copying them on the computer. • Organize...computer on a calendar by shooting date to "PMB Guide". Or, from the camera more . • Still images can view image files stored on the screen when starting the "PMB" for the first time. This function informs you can: • Import images shot with the date. • You can create...
...(Picture Motion Browser)" (supplied) You can use still images and movies from the Start menu: Click [Start] t [All Programs] t [Sony Picture Utility] t [PMB]. • The confirmation message of the Information tool appears on a computer with the camera by copying them on the computer. • Organize...computer on a calendar by shooting date to "PMB Guide". Or, from the camera more . • Still images can view image files stored on the screen when starting the "PMB" for the first time. This function informs you can: • Import images shot with the date. • You can create...

Cyber-shot® Handbook
Page 84
... to print side by side on a sheet. [Size] Select the size of images may not be inserted in the order you choose [Date], the date will be provided depending on the screen. The image is printed. • Do not disconnect the dedicated USB cable while the (PictBridge Connecting...] Selects the number of copies of the specified image to be printed. • The designated number of the printing sheet. [Date] Select [Day&Time] or [Date] to Stage 2, and disconnect the dedicated USB cable from the camera. 84 Stage 5: Completing the printing Make sure the screen has returned to insert the...
... to print side by side on a sheet. [Size] Select the size of images may not be inserted in the order you choose [Date], the date will be provided depending on the screen. The image is printed. • Do not disconnect the dedicated USB cable while the (PictBridge Connecting...] Selects the number of copies of the specified image to be printed. • The designated number of the printing sheet. [Date] Select [Day&Time] or [Date] to Stage 2, and disconnect the dedicated USB cable from the camera. 84 Stage 5: Completing the printing Make sure the screen has returned to insert the...

Cyber-shot® Handbook
Page 90
Cannot insert dates on images. • This camera does not have a feature for releasing a macro. The screen is selected in the Scene Selection mode (page 23). Shooting movies. • Set the flash to (..., the date and time are not displayed. In possible even in the macro shooting condition. (Auto) mode, telephoto shooting is not a malfunction (page 11). By using the flash. • Particles (dust, pollen, etc.) in the air reflected the flash light and appeared in the image. Fuzzy specks appear in images shot using "PMB...
Cannot insert dates on images. • This camera does not have a feature for releasing a macro. The screen is selected in the Scene Selection mode (page 23). Shooting movies. • Set the flash to (..., the date and time are not displayed. In possible even in the macro shooting condition. (Auto) mode, telephoto shooting is not a malfunction (page 11). By using the flash. • Particles (dust, pollen, etc.) in the air reflected the flash light and appeared in the image. Fuzzy specks appear in images shot using "PMB...
Cyber-shot® Handbook
Page 91
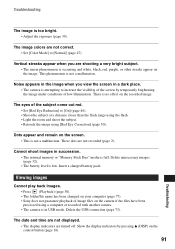
...not a malfunction. Dots appear and remain on your computer (page 77). • Sony does not guarantee playback of the subject come out red. • Set [Red Eye... • The battery level is occurring and white, black, red, purple, or other streaks appear on the camera if the files have been processed using [Red Eye Correction] (page 50). The image colors are shooting a ...low. There is no effect on the control button (page 18). 91 Troubleshooting The date and time are not displayed. • The display indicators are not recorded (page 2). These dots are turned off. Insert ...
...not a malfunction. Dots appear and remain on your computer (page 77). • Sony does not guarantee playback of the subject come out red. • Set [Red Eye... • The battery level is occurring and white, black, red, purple, or other streaks appear on the camera if the files have been processed using [Red Eye Correction] (page 50). The image colors are shooting a ...low. There is no effect on the control button (page 18). 91 Troubleshooting The date and time are not displayed. • The display indicators are not recorded (page 2). These dots are turned off. Insert ...
Cyber-shot® Handbook
Page 96
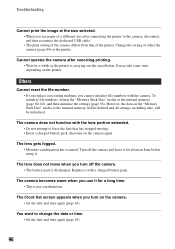
...to force the lens that of the printer. The Clock Set screen appears when you turn on the camera. • Set the date and time again (page 63). It may take some time depending on the "Memory Stick Duo" media or the internal memory will be deleted and all settings, ...including date, will be initialized. The camera does not function with the camera. Turn off the camera. • The battery pack is discharged. Cannot operate the camera after connecting the printer to change the date or time. • Set the date and time again (page 63). 96 The lens ...
...to force the lens that of the printer. The Clock Set screen appears when you turn on the camera. • Set the date and time again (page 63). It may take some time depending on the "Memory Stick Duo" media or the internal memory will be deleted and all settings, ...including date, will be initialized. The camera does not function with the camera. Turn off the camera. • The battery pack is discharged. Cannot operate the camera after connecting the printer to change the date or time. • Set the date and time again (page 63). 96 The lens ...
Marketing Specifications (Black Model)
Page 2
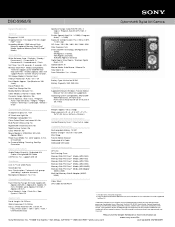
...) Multi-slot Memory Stick® Adaptor (MSAC- Requires Microsoft Windows 2000 Professional SP4, Windows XP SP2, or Windows Vista. DSC-S950/B Cyber-shot® Digital Still Camera Specifications General Megapixel: 10.1MP Imaging Device: 1/2.3 type(7.70 mm) Super HAD™ CCD Recording Media: 12MB internal Flash ...Diego, CA 92127 •1.800.222.7669 •www.sony.com Last Updated: 05/06/2009 Still Image Mode(s): Normal, Burst Red-Eye Reduction: Auto / On / Off Burst Mode: Approx. 1 fps(Maximum 100 shots) Erase/Protect: No Date/Time Stamp: No/ No Media/Battery Indicator: Yes Color ...
...) Multi-slot Memory Stick® Adaptor (MSAC- Requires Microsoft Windows 2000 Professional SP4, Windows XP SP2, or Windows Vista. DSC-S950/B Cyber-shot® Digital Still Camera Specifications General Megapixel: 10.1MP Imaging Device: 1/2.3 type(7.70 mm) Super HAD™ CCD Recording Media: 12MB internal Flash ...Diego, CA 92127 •1.800.222.7669 •www.sony.com Last Updated: 05/06/2009 Still Image Mode(s): Normal, Burst Red-Eye Reduction: Auto / On / Off Burst Mode: Approx. 1 fps(Maximum 100 shots) Erase/Protect: No Date/Time Stamp: No/ No Media/Battery Indicator: Yes Color ...

