Instruction Manual
Page 3
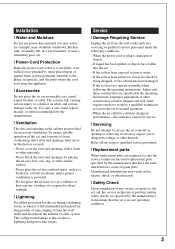
... fallen into the set. - for long periods of the set during a lightning storm, or when it from the wall outlet and disconnect the antenna or cable system. this set , and to protect it is not likely to be walked on or pinched by items placed upon or against them, paying particular...
... fallen into the set. - for long periods of the set during a lightning storm, or when it from the wall outlet and disconnect the antenna or cable system. this set , and to protect it is not likely to be walked on or pinched by items placed upon or against them, paying particular...
Instruction Manual
Page 4
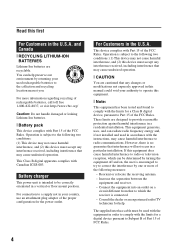
... For connection to a supply not in your authority to operate this device must be used in a particular installation. The supplied interface cable must accept any interference received, including interference that any interference received, including interference that interference will not occur in accordance with the limits...: Do not handle damaged or leaking Lithium-Ion batteries. [ Battery pack This device complies with the limits for a digital device pursuant to Subpart B of Part 15 of FCC Rules. 4 Consult the dealer or an experienced radio/TV technician for a Class...
... For connection to a supply not in your authority to operate this device must be used in a particular installation. The supplied interface cable must accept any interference received, including interference that any interference received, including interference that interference will not occur in accordance with the limits...: Do not handle damaged or leaking Lithium-Ion batteries. [ Battery pack This device complies with the limits for a digital device pursuant to Subpart B of Part 15 of FCC Rules. 4 Consult the dealer or an experienced radio/TV technician for a Class...
Instruction Manual
Page 5
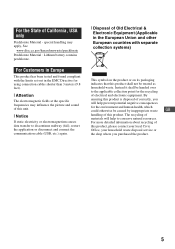
...help prevent potential negative consequences for the environment and human health, which could otherwise be handed over to the applicable collection point for using connection cables shorter than 3 meters (9.8 feet). [ Attention The electromagnetic fields at the specific frequencies may apply, See www.dtsc.ca.gov/hazardouswaste/perchlorate ... equipment. The recycling of materials will help to discontinue midway (fail), restart the application or disconnect and connect the communication cable (USB, etc.) again. [ Disposal of this product shall not be treated as household waste.
...help prevent potential negative consequences for the environment and human health, which could otherwise be handed over to the applicable collection point for using connection cables shorter than 3 meters (9.8 feet). [ Attention The electromagnetic fields at the specific frequencies may apply, See www.dtsc.ca.gov/hazardouswaste/perchlorate ... equipment. The recycling of materials will help to discontinue midway (fail), restart the application or disconnect and connect the communication cable (USB, etc.) again. [ Disposal of this product shall not be treated as household waste.
Instruction Manual
Page 9
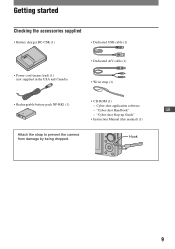
"Cyber-shot Handbook" GB - "Cyber-shot Step-up Guide" • Instruction Manual (this manual) (1) Attach the strap to prevent the camera from damage by being dropped. Getting started Checking the accessories supplied • Battery charger BC-CSK (1) • Dedicated USB cable (1) • Power cord (mains lead) (1) (not supplied in the USA and Canada) • Dedicated A/V cable (1) • Wrist strap (1) • CD-ROM (1) • Rechargeable battery pack NP-BK1 (1) - Hook 9 Cyber-shot application software -
"Cyber-shot Handbook" GB - "Cyber-shot Step-up Guide" • Instruction Manual (this manual) (1) Attach the strap to prevent the camera from damage by being dropped. Getting started Checking the accessories supplied • Battery charger BC-CSK (1) • Dedicated USB cable (1) • Power cord (mains lead) (1) (not supplied in the USA and Canada) • Dedicated A/V cable (1) • Wrist strap (1) • CD-ROM (1) • Rechargeable battery pack NP-BK1 (1) - Hook 9 Cyber-shot application software -
Instruction Manual
Page 18
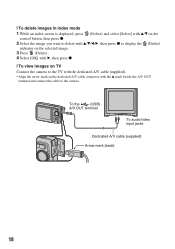
To the (USB) · A/V OUT terminal To audio/video input jacks Dedicated A/V cable (supplied) Arrow mark (back) 18 [ To delete images in index mode 1 While an index screen is displayed, press (Delete) and select [Select] with v/V on the ... press z to display the (Delete) indicator on the selected image. 3 Press (Delete). 4 Select [OK] with B, then press z. [ To view images on TV Connect the camera to the TV with the dedicated A/V cable (supplied). • Align the arrow mark on the dedicated A/V cable connector with the v mark beside the A/V OUT terminal and connect the...
To the (USB) · A/V OUT terminal To audio/video input jacks Dedicated A/V cable (supplied) Arrow mark (back) 18 [ To delete images in index mode 1 While an index screen is displayed, press (Delete) and select [Select] with v/V on the ... press z to display the (Delete) indicator on the selected image. 3 Press (Delete). 4 Select [OK] with B, then press z. [ To view images on TV Connect the camera to the TV with the dedicated A/V cable (supplied). • Align the arrow mark on the dedicated A/V cable connector with the v mark beside the A/V OUT terminal and connect the...
Instruction Manual
Page 23
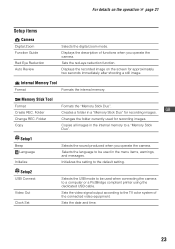
... the language to be used for recording images. Initializes the setting to a computer or a PictBridge compliant printer using the dedicated USB cable. Sets the video signal output according to a "Memory Stick Duo". Memory Stick Tool Format Create REC. Setup1 Beep Language Initialize Selects...page 21 Setup items Camera Digital Zoom Function Guide Red Eye Reduction Auto Review Selects the digital zoom mode. Copy Copies all images in the menu items, warnings, and messages. For details on the screen for approximately two seconds immediately after shooting a still image. Displays the ...
... the language to be used for recording images. Initializes the setting to a computer or a PictBridge compliant printer using the dedicated USB cable. Sets the video signal output according to a "Memory Stick Duo". Memory Stick Tool Format Create REC. Setup1 Beep Language Initialize Selects...page 21 Setup items Camera Digital Zoom Function Guide Red Eye Reduction Auto Review Selects the digital zoom mode. Copy Copies all images in the menu items, warnings, and messages. For details on the screen for approximately two seconds immediately after shooting a still image. Displays the ...
Cyber-shot® Handbook
Page 17
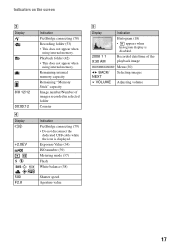
... images Adjusting volume 17 Recorded date/time of images recorded in selected folder Counter Indication PictBridge connecting (79) • Do not disconnect the dedicated USB cable while the icon is disabled. Exposure Value (34) ISO number (39) Metering mode (37) Flash White balance (38) Shutter speed Aperture value E Display 2008 1 1 9:30...
... images Adjusting volume 17 Recorded date/time of images recorded in selected folder Counter Indication PictBridge connecting (79) • Do not disconnect the dedicated USB cable while the icon is disabled. Exposure Value (34) ISO number (39) Metering mode (37) Flash White balance (38) Shutter speed Aperture value E Display 2008 1 1 9:30...
Cyber-shot® Handbook
Page 19
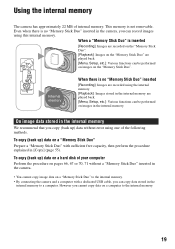
..." inserted in [Copy] (page 55). To copy (back up) data on a "Memory Stick Duo" Prepare a "Memory Stick Duo" with a dedicated USB cable, you can copy data stored in the internal memory to the internal memory. 19 However you cannot copy data on a "Memory Stick Duo" to the... internal memory. • By connecting the camera and a computer with sufficient free capacity, then perform the procedure explained in the camera, you can record images using one of internal memory. On image data stored in the internal memory. B ...
..." inserted in [Copy] (page 55). To copy (back up) data on a "Memory Stick Duo" Prepare a "Memory Stick Duo" with a dedicated USB cable, you can copy data stored in the internal memory to the internal memory. 19 However you cannot copy data on a "Memory Stick Duo" to the... internal memory. • By connecting the camera and a computer with sufficient free capacity, then perform the procedure explained in the camera, you can record images using one of internal memory. On image data stored in the internal memory. B ...
Cyber-shot® Handbook
Page 57
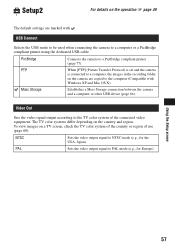
... a computer or a PictBridge compliant printer using the dedicated USB cable. NTSC Sets the video output signal to the TV color system of use (page 60). Setup2 2 For details on the camera are marked with Windows XP and Mac OS X). Video Out Sets the video signal output according to ... 1 page 49 The default settings are copied to PAL mode (e.g., for the USA, Japan). Mass Storage Establishes a Mass Storage connection between the camera and a computer or other USB device (page 66). The TV color systems differ depending on a TV screen, check the TV color system of...
... a computer or a PictBridge compliant printer using the dedicated USB cable. NTSC Sets the video output signal to the TV color system of use (page 60). Setup2 2 For details on the camera are marked with Windows XP and Mac OS X). Video Out Sets the video signal output according to ... 1 page 49 The default settings are copied to PAL mode (e.g., for the USA, Japan). Mass Storage Establishes a Mass Storage connection between the camera and a computer or other USB device (page 66). The TV color systems differ depending on a TV screen, check the TV color system of...
Cyber-shot® Handbook
Page 59
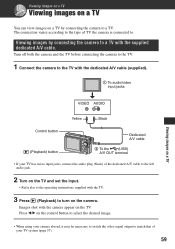
...images on a TV You can view images on a TV by connecting the camera to a TV. Turn off both the camera and the TV before connecting the camera to the TV. 1 Connect the camera to the TV with the dedicated A/V cable (supplied). 1 To audio/video input jacks Viewing images on the TV ...a TV VIDEO AUDIO Yellow Black Control button (Playback) button Dedicated A/V cable 2 To the (USB) · A/V OUT terminal • If your TV has stereo input jacks, connect the audio plug (black) of your TV system (page 57). 59 Images shot with the TV. 3 Press (Playback) to . The connection varies ...
...images on a TV You can view images on a TV by connecting the camera to a TV. Turn off both the camera and the TV before connecting the camera to the TV. 1 Connect the camera to the TV with the dedicated A/V cable (supplied). 1 To audio/video input jacks Viewing images on the TV ...a TV VIDEO AUDIO Yellow Black Control button (Playback) button Dedicated A/V cable 2 To the (USB) · A/V OUT terminal • If your TV has stereo input jacks, connect the audio plug (black) of your TV system (page 57). 59 Images shot with the TV. 3 Press (Playback) to . The connection varies ...
Cyber-shot® Handbook
Page 60
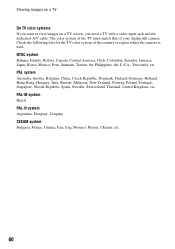
Check the following lists for the TV color system of your digital still camera. PAL system Australia, Austria, Belgium, China, Czech Republic, Denmark, Finland, Germany, Holland, Hong Kong, Hungary, Italy, Kuwait, Malaysia, New Zealand, Norway, Poland, Portugal, Singapore... on a TV On TV color systems If you want to view images on a TV screen, you need a TV with a video input jack and the dedicated A/V cable. NTSC system Bahama Islands, Bolivia, Canada, Central America, Chile, Colombia, Ecuador, Jamaica, Japan, Korea, Mexico, Peru, Surinam, Taiwan, the Philippines, the U.S.A., Venezuela, etc....
Check the following lists for the TV color system of your digital still camera. PAL system Australia, Austria, Belgium, China, Czech Republic, Denmark, Finland, Germany, Holland, Hong Kong, Hungary, Italy, Kuwait, Malaysia, New Zealand, Norway, Poland, Portugal, Singapore... on a TV On TV color systems If you want to view images on a TV screen, you need a TV with a video input jack and the dedicated A/V cable. NTSC system Bahama Islands, Bolivia, Canada, Central America, Chile, Colombia, Ecuador, Jamaica, Japan, Korea, Mexico, Peru, Surinam, Taiwan, the Philippines, the U.S.A., Venezuela, etc....
Cyber-shot® Handbook
Page 66
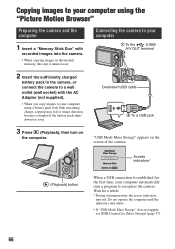
...a battery pack with little remaining charge, copying may fail or image data may become corrupted if the battery pack shuts down too soon. Dedicated USB cable 2 To a USB jack 3 Press (Playback), then turn red. Do not operate the computer until the indicators turn white. • If ...(not supplied). • When you copy images to your computer using the "Picture Motion Browser" Preparing the camera and the computer 1 Insert a "Memory Stick Duo" with recorded images into the camera. • When copying images in the internal memory, this step is established for a while. * During ...
...a battery pack with little remaining charge, copying may fail or image data may become corrupted if the battery pack shuts down too soon. Dedicated USB cable 2 To a USB jack 3 Press (Playback), then turn red. Do not operate the computer until the indicators turn white. • If ...(not supplied). • When you copy images to your computer using the "Picture Motion Browser" Preparing the camera and the computer 1 Insert a "Memory Stick Duo" with recorded images into the camera. • When copying images in the internal memory, this step is established for a while. * During ...
Cyber-shot® Handbook
Page 68
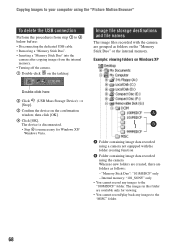
... (USB Mass Storage Device) t [Stop]. 3 Confirm the device on the tasktray. A Folder containing image data recorded using a camera not equipped with the camera are folders as folders on the "Memory Stick Duo" or the internal memory. Copying images to your computer using the... from step 1 to 4 below before: • Disconnecting the dedicated USB cable. • Removing a "Memory Stick Duo". • Inserting a "Memory Stick Duo" into the camera after copying images from the internal memory. • Turning off the camera. 1 Double-click on the confirmation window, then click [OK]. 4 Click...
... (USB Mass Storage Device) t [Stop]. 3 Confirm the device on the tasktray. A Folder containing image data recorded using a camera not equipped with the camera are folders as folders on the "Memory Stick Duo" or the internal memory. Copying images to your computer using the... from step 1 to 4 below before: • Disconnecting the dedicated USB cable. • Removing a "Memory Stick Duo". • Inserting a "Memory Stick Duo" into the camera after copying images from the internal memory. • Turning off the camera. 1 Double-click on the confirmation window, then click [OK]. 4 Click...
Cyber-shot® Handbook
Page 70
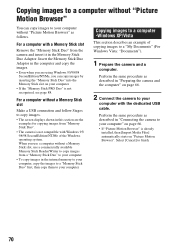
... insert it in this section are the examples for copying images from "Memory Stick Duo". • The camera is not compatible with the dedicated USB cable. Copying images to a computer -Windows XP/Vista This section describes an example of the Windows operating system. Select [Cancel] to... a "My Documents" (For Windows Vista: "Documents"). 1 Prepare the camera and a computer. Copying images to a computer without "...
... insert it in this section are the examples for copying images from "Memory Stick Duo". • The camera is not compatible with the dedicated USB cable. Copying images to a computer -Windows XP/Vista This section describes an example of the Windows operating system. Select [Cancel] to... a "My Documents" (For Windows Vista: "Documents"). 1 Prepare the camera and a computer. Copying images to a computer without "...
Cyber-shot® Handbook
Page 73
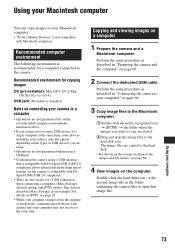
...on the storage location of USB devices you are using. • Operations are not guaranteed when using a USB hub. • Connecting the camera using a USB interface that image file. Using your Macintosh computer. • "Picture Motion Browser" is compatible with HiSpeed USB (USB 2.0 ... image files to v10.4) USB jack: Provided as an example. Copying and viewing images on connecting your camera, may not operate depending on page 66. 2 Connect the dedicated USB cable. Recommended environment for a USB connection when connecting a computer, [Mass Storage] (default setting) and ...
...on the storage location of USB devices you are using. • Operations are not guaranteed when using a USB hub. • Connecting the camera using a USB interface that image file. Using your Macintosh computer. • "Picture Motion Browser" is compatible with HiSpeed USB (USB 2.0 ... image files to v10.4) USB jack: Provided as an example. Copying and viewing images on connecting your camera, may not operate depending on page 66. 2 Connect the dedicated USB cable. Recommended environment for a USB connection when connecting a computer, [Mass Storage] (default setting) and ...
Cyber-shot® Handbook
Page 74
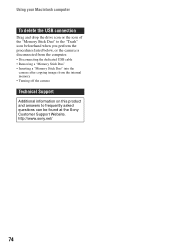
...sony.net/ 74 Using your Macintosh computer To delete the USB connection Drag and drop the drive icon or the icon of the "Memory Stick Duo" to the "Trash" icon beforehand when you perform the procedures listed below, or the camera is disconnected from the computer. • Disconnecting the dedicated USB cable... • Removing a "Memory Stick Duo" • Inserting a "Memory Stick Duo" into the camera after copying images from the internal memory • ...
...sony.net/ 74 Using your Macintosh computer To delete the USB connection Drag and drop the drive icon or the icon of the "Memory Stick Duo" to the "Trash" icon beforehand when you perform the procedures listed below, or the camera is disconnected from the computer. • Disconnecting the dedicated USB cable... • Removing a "Memory Stick Duo" • Inserting a "Memory Stick Duo" into the camera after copying images from the internal memory • ...

Cyber-shot® Handbook
Page 77
... the printer. • The quantity of the camera for about five seconds (error notification), check the connected printer. Printing still images 77 Index button • "PictBridge" is based on the CIPA standard. (CIPA: Camera & Imaging Products Association) In single image mode You...select [USB Connect] with v/V/B. 4 Select [PictBridge] with the dedicated USB cable. In index mode You can print a single image on the screen of images that can print images shot using your camera by connecting the camera directly to a PictBridge compliant printer. MENU button Control Button • It ...
... the printer. • The quantity of the camera for about five seconds (error notification), check the connected printer. Printing still images 77 Index button • "PictBridge" is based on the CIPA standard. (CIPA: Camera & Imaging Products Association) In single image mode You...select [USB Connect] with v/V/B. 4 Select [PictBridge] with the dedicated USB cable. In index mode You can print a single image on the screen of images that can print images shot using your camera by connecting the camera directly to a PictBridge compliant printer. MENU button Control Button • It ...
Cyber-shot® Handbook
Page 78
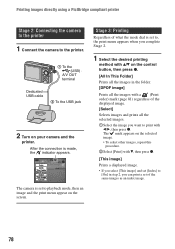
Printing images directly using a PictBridge compliant printer Stage 2: Connecting the camera to the printer 1 Connect the camera to the printer. 1 To the (USB) · A/V OUT terminal Dedicated USB cable 2 To the USB jack 2 Turn on the screen. Stage 3: Printing Regardless of what the mode dial is set to, the print menu appears when you... connection is set to [On] in step 2, you can print a set [Index] to playback mode, then an image and the print menu appear on your camera and the printer. The camera is made, the indicator appears.
Printing images directly using a PictBridge compliant printer Stage 2: Connecting the camera to the printer 1 Connect the camera to the printer. 1 To the (USB) · A/V OUT terminal Dedicated USB cable 2 To the USB jack 2 Turn on the screen. Stage 3: Printing Regardless of what the mode dial is set to, the print menu appears when you... connection is set to [On] in step 2, you can print a set [Index] to playback mode, then an image and the print menu appear on your camera and the printer. The camera is made, the indicator appears.
Cyber-shot® Handbook
Page 79
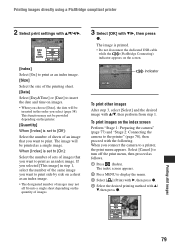
...This image] in the order you select (page 58). Printing still images 79 When [Index] is set to [Off]: Select the.... • Do not disconnect the dedicated USB cable while the (PictBridge Connecting) indicator appears on the index screen Perform "Stage 1: Preparing the camera" (page 77) and "Stage 2: Connecting the camera to turn off the print menu, then proceed... then press z. The image will be inserted in step 1, select the number of images that you connect the camera to a printer, the print menu appears. indicator To print other images After step 3, select [Select] and the...
...This image] in the order you select (page 58). Printing still images 79 When [Index] is set to [Off]: Select the.... • Do not disconnect the dedicated USB cable while the (PictBridge Connecting) indicator appears on the index screen Perform "Stage 1: Preparing the camera" (page 77) and "Stage 2: Connecting the camera to turn off the print menu, then proceed... then press z. The image will be inserted in step 1, select the number of images that you connect the camera to a printer, the print menu appears. indicator To print other images After step 3, select [Select] and the...
Cyber-shot® Handbook
Page 88
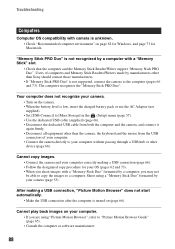
..." does not start automatically. • Make the USB connection after the computer is not supported, connect the camera to your computer without passing through a USB hub or other than Sony should contact those manufacturers. • If "Memory Stick PRO Duo" is turned on page 62 for Windows,...) menu (page 57). • Use the dedicated USB cable (supplied) (page 66). • Disconnect the dedicated USB cable from both the computer and the camera, and connect it again firmly. • Disconnect all equipment other than the camera, the keyboard and the mouse from the USB connectors of ...
..." does not start automatically. • Make the USB connection after the computer is not supported, connect the camera to your computer without passing through a USB hub or other than Sony should contact those manufacturers. • If "Memory Stick PRO Duo" is turned on page 62 for Windows,...) menu (page 57). • Use the dedicated USB cable (supplied) (page 66). • Disconnect the dedicated USB cable from both the computer and the camera, and connect it again firmly. • Disconnect all equipment other than the camera, the keyboard and the mouse from the USB connectors of ...


