Operating Instructions (primary manual)
Page 3
... regarding recycling of this product. If the plug supplied with BS 1363 is fitted to power this digital camera. Attention The electromagnetic fields at the specific frequencies may regulate disposal of the battery used . and Canada... RECYCLING NICKEL METAL HYDRIDE BATTERIES Nickel Metal Hydride batteries are recyclable. Please consult with the limits sets out in the United Kingdom A moulded plug complying with this equipment for using connection cables shorter than 3 ... product has been tested and found compliant with your nearest Sony service station.
... regarding recycling of this product. If the plug supplied with BS 1363 is fitted to power this digital camera. Attention The electromagnetic fields at the specific frequencies may regulate disposal of the battery used . and Canada... RECYCLING NICKEL METAL HYDRIDE BATTERIES Nickel Metal Hydride batteries are recyclable. Please consult with the limits sets out in the United Kingdom A moulded plug complying with this equipment for using connection cables shorter than 3 ... product has been tested and found compliant with your nearest Sony service station.

Operating Instructions (primary manual)
Page 6
...finder 30 Inserting the date and time on a still image 31 6 Viewing still images Viewing images on the LCD screen of your camera .. 41 Changing menu settings 41 Changing items in the SET UP screen 41 Deciding the still image quality 42 Creating or selecting a folder ... still image shooting Choosing a focus method 44 Setting the distance to the subject - Trimming 59 Playing back successive images - Table of a still image.........58 Enlarging an image - Folder 57 Enlarging a portion of contents Before using auto mode 22 Checking the last image shot - using your camera...
...finder 30 Inserting the date and time on a still image 31 6 Viewing still images Viewing images on the LCD screen of your camera .. 41 Changing menu settings 41 Changing items in the SET UP screen 41 Deciding the still image quality 42 Creating or selecting a folder ... still image shooting Choosing a focus method 44 Setting the distance to the subject - Trimming 59 Playing back successive images - Table of a still image.........58 Enlarging an image - Folder 57 Enlarging a portion of contents Before using auto mode 22 Checking the last image shot - using your camera...
Operating Instructions (primary manual)
Page 7
... Transfer 76 Installing "ImageMixer 77 Connecting the camera to your computer 78 Copying images using "Image Transfer" 79 Changing "Image Transfer" settings .. 80 Copying images without using "Image Transfer... 80 Viewing the images on your computer Copying images to your computer - Playing back images shot in Multi Burst mode...unnecessary portions of images that can be saved/ shooting time 97 Menu items 98 SET UP items 102 Precautions 104 The "Memory Stick 105 The nickel-metal hydride batteries...
... Transfer 76 Installing "ImageMixer 77 Connecting the camera to your computer 78 Copying images using "Image Transfer" 79 Changing "Image Transfer" settings .. 80 Copying images without using "Image Transfer... 80 Viewing the images on your computer Copying images to your computer - Playing back images shot in Multi Burst mode...unnecessary portions of images that can be saved/ shooting time 97 Menu items 98 SET UP items 102 Precautions 104 The "Memory Stick 105 The nickel-metal hydride batteries...
Operating Instructions (primary manual)
Page 9
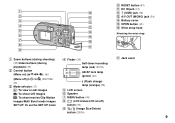
... playback) (33) B Control button (Menu on) (v/V/b/B/z) (16)/ (Menu off) ( / /7/ ) (28/27/24/ 26) C Mode selector (17) : To view or edit images : To shoot still images : To shoot movies/Clip Motion images/Multi Burst mode images lamp (red) (27/23) AE/AF lock lamp (green) (22) (Flash charge) lamp (orange...) (28) E LCD screen F Speaker G MENU button (98) H (LCD status/LCD on/off) SET UP: To set the SET UP items button (30) I (Image Size/Delete) button (20/36) 9 J RESET button (87) K DC IN jack (15) 1 q;
... playback) (33) B Control button (Menu on) (v/V/b/B/z) (16)/ (Menu off) ( / /7/ ) (28/27/24/ 26) C Mode selector (17) : To view or edit images : To shoot still images : To shoot movies/Clip Motion images/Multi Burst mode images lamp (red) (27/23) AE/AF lock lamp (green) (22) (Flash charge) lamp (orange...) (28) E LCD screen F Speaker G MENU button (98) H (LCD status/LCD on/off) SET UP: To set the SET UP items button (30) I (Image Size/Delete) button (20/36) 9 J RESET button (87) K DC IN jack (15) 1 q;
Operating Instructions (primary manual)
Page 10
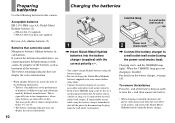
...polarity +/-. • You cannot charge alkaline batteries using the battery charger. • Be sure to charge the Nickel-Metal Hydride batteries supplied with your camera before using the battery charger, immediately shut off the power by property of the batteries, such as brownout of batteries made by . • Even... if the CHARGE lamp is not lit, the set is not disconnected from the AC power source (mains) as long as it is especially true in temperatures below 5°C (41°F). - For...
...polarity +/-. • You cannot charge alkaline batteries using the battery charger. • Be sure to charge the Nickel-Metal Hydride batteries supplied with your camera before using the battery charger, immediately shut off the power by property of the batteries, such as brownout of batteries made by . • Even... if the CHARGE lamp is not lit, the set is not disconnected from the AC power source (mains) as long as it is especially true in temperatures below 5°C (41°F). - For...
Operating Instructions (primary manual)
Page 13
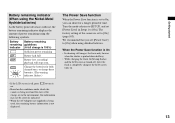
...indicator (A full charge is turned off , press to [On] when using alkaline batteries. When the Power Save function is On • In shooting still images, the focus only focuses when the shutter is pushed down halfway. • While charging the flash, the lamp flashes and the LCD screen ... Nickel-Metal Hydride batteries) As the battery power decreases with use, the battery remaining indicator displays the amount of the camera is set to [On] (page 103). The factory setting of power remaining using the following symbols. After the flash is off . The Power Save function When the Power Save...
...indicator (A full charge is turned off , press to [On] when using alkaline batteries. When the Power Save function is On • In shooting still images, the focus only focuses when the shutter is pushed down halfway. • While charging the flash, the lamp flashes and the LCD screen ... Nickel-Metal Hydride batteries) As the battery power decreases with use, the battery remaining indicator displays the amount of the camera is set to [On] (page 103). The factory setting of power remaining using the following symbols. After the flash is off . The Power Save function When the Power Save...
Operating Instructions (primary manual)
Page 14
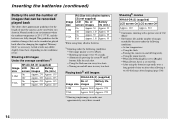
... order, one image every 30 seconds. - Playing back2) still images NH-AA-DA (2) (supplied) No. At low temperatures. - Shooting still images Under the average conditions1) Image size 5.0M VGA NH...106). 14 Turning on and off once in every ten shots. Using the flash. - When [Power Save] is set to [Bright]. - After using Sony alkaline batteries 1) Shooting under the following conditions: - of ...when you shoot in Normal mode in an environment where the ambient temperature is set to [Fine]. - Turning the camera on and off frequently. - When [LCD Backlight] is 25°C ...
... order, one image every 30 seconds. - Playing back2) still images NH-AA-DA (2) (supplied) No. At low temperatures. - Shooting still images Under the average conditions1) Image size 5.0M VGA NH...106). 14 Turning on and off once in every ten shots. Using the flash. - When [Power Save] is set to [Bright]. - After using Sony alkaline batteries 1) Shooting under the following conditions: - of ...when you shoot in Normal mode in an environment where the ambient temperature is set to [Fine]. - Turning the camera on and off frequently. - When [LCD Backlight] is 25°C ...
Operating Instructions (primary manual)
Page 15
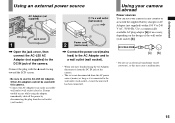
...wall socket) [b]. Use a commercially available AC plug adaptor [a], if necessary, depending on the design of the camera. If some trouble occurs while using the AC Adaptor, disconnect it from the DC IN jack of the camera. • The set is not disconnected from the AC power source (mains) as long as this... camera. • Connect the AC Adaptor to an easily accessible wall outlet (wall socket) close by. Connect...
...wall socket) [b]. Use a commercially available AC plug adaptor [a], if necessary, depending on the design of the camera. If some trouble occurs while using the AC Adaptor, disconnect it from the DC IN jack of the camera. • The set is not disconnected from the AC power source (mains) as long as this... camera. • Connect the AC Adaptor to an easily accessible wall outlet (wall socket) close by. Connect...
Operating Instructions (primary manual)
Page 16
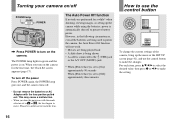
...press v/V/b/B to select the desired value, then press z or b/B to touch the lens. When you turn on the camera for a while* when shooting, viewing images, or setting up the menu or the SET UP screen (page 41), and use the control button to preserve battery power. This may cause a malfunction. •...off POWER lamp POWER POWER , Press POWER to turn off the power Press POWER again, the POWER lamp goes out, and the camera turns off to make the setting. 16 The POWER lamp lights in the following circumstances, even if the batteries are being shown • A cable is connected to ...
...press v/V/b/B to select the desired value, then press z or b/B to touch the lens. When you turn on the camera for a while* when shooting, viewing images, or setting up the menu or the SET UP screen (page 41), and use the control button to preserve battery power. This may cause a malfunction. •...off POWER lamp POWER POWER , Press POWER to turn off the power Press POWER again, the POWER lamp goes out, and the camera turns off to make the setting. 16 The POWER lamp lights in the following circumstances, even if the batteries are being shown • A cable is connected to ...
Operating Instructions (primary manual)
Page 17
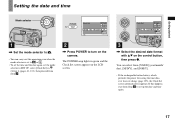
...start from Step 3 to turn on the camera. If this operation even when the mode selector is set to or . • To set the time and the date again, set the mode selector to SET UP, select [Clock Set] in green and the Clock Set screen appears on the control button, then press... z. Getting started Setting the date and time Mode selector POWER Clock Set Y/M/D M/D/Y D/M/Y 2003 / OK...
...start from Step 3 to turn on the camera. If this operation even when the mode selector is set to or . • To set the time and the date again, set the mode selector to SET UP, select [Clock Set] in green and the Clock Set screen appears on the control button, then press... z. Getting started Setting the date and time Mode selector POWER Clock Set Y/M/D M/D/Y D/M/Y 2003 / OK...
Operating Instructions (primary manual)
Page 18
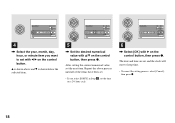
... to keep time. • To cancel the setting process, select [Cancel], then press z. 18 After setting the current numerical value, set with v/V on the control button, then press z. Clock Set Y/M/D M/D/Y D/M/Y 2003 / 7 / 4 12 : 00 OK AM Cancel OK 5 , Set the desired numerical value with b/B on a 24- hour cycle. Clock Set Y/M/D M/D/Y D/M/Y 2003 / OK 1/ 1 12 : 00 OK AM Cancel...
... to keep time. • To cancel the setting process, select [Cancel], then press z. 18 After setting the current numerical value, set with v/V on the control button, then press z. Clock Set Y/M/D M/D/Y D/M/Y 2003 / 7 / 4 12 : 00 OK AM Cancel OK 5 , Set the desired numerical value with b/B on a 24- hour cycle. Clock Set Y/M/D M/D/Y D/M/Y 2003 / OK 1/ 1 12 : 00 OK AM Cancel...
Operating Instructions (primary manual)
Page 20
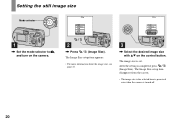
The Image Size setup item disappears from the screen. • The image size value selected here is preserved even when the camera is completed, press (Image Size). After the setting is turned off. 20 The Image Size setup item appears. • For more information about the image size, see ... 21. 3 , Select the desired image size with v/V on the camera. 5.0M 5.0M 4.5M(3:2) 3.1M 1.2M VGA Image Size VGA 5.0M 4.5M(3:2) 3.1M 1.2M VGA Image Size 2 , Press (Image Size). Setting the still image size Mode selector 1 , Set the mode selector to , and turn on the control button. The ...
The Image Size setup item disappears from the screen. • The image size value selected here is preserved even when the camera is completed, press (Image Size). After the setting is turned off. 20 The Image Size setup item appears. • For more information about the image size, see ... 21. 3 , Select the desired image size with v/V on the camera. 5.0M 5.0M 4.5M(3:2) 3.1M 1.2M VGA Image Size VGA 5.0M 4.5M(3:2) 3.1M 1.2M VGA Image Size 2 , Press (Image Size). Setting the still image size Mode selector 1 , Set the mode selector to , and turn on the control button. The ...
Operating Instructions (primary manual)
Page 21
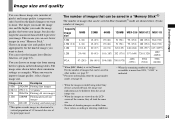
...(1320) 1482 (2694) 394 (985) 790 (1975) 1428 (3571) 2904 5928 (7261) (14821) 2) When [REC Mode] is set to [Normal] For the number of images that can be saved in other Sony devices are played back, the image size indication may be saved in Fine (Standard)3) mode are viewed on the... size from these values according to shooting conditions. 21 Image size and quality Shooting still images You can choose image size (number of pixels) and image quality (compression ratio) based on the LCD screen of the camera, they all look the same size. • Number of shooting images can differ...
...(1320) 1482 (2694) 394 (985) 790 (1975) 1428 (3571) 2904 5928 (7261) (14821) 2) When [REC Mode] is set to [Normal] For the number of images that can be saved in other Sony devices are played back, the image size indication may be saved in Fine (Standard)3) mode are viewed on the... size from these values according to shooting conditions. 21 Image size and quality Shooting still images You can choose image size (number of pixels) and image quality (compression ratio) based on the LCD screen of the camera, they all look the same size. • Number of shooting images can differ...
Operating Instructions (primary manual)
Page 22
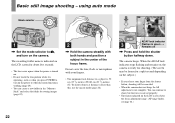
Basic still image shooting - using auto mode Mode selector VGA FINE 101 98 F2.8 30 1 , Set the mode selector to , and turn on the power or...microphone with your finger from the shutter button, shooting will be canceled. • When the camera does not beep, the AF adjustment is ready for shooting. (The screen may be frozen for storing images...camera is not complete. The camera beeps. You can create a new folder in the "Memory Stick" and select the folder for a split second depending on the subject.) • If you release your fingers. • The minimum focal distance to a subject is not set...
Basic still image shooting - using auto mode Mode selector VGA FINE 101 98 F2.8 30 1 , Set the mode selector to , and turn on the power or...microphone with your finger from the shutter button, shooting will be canceled. • When the camera does not beep, the AF adjustment is ready for shooting. (The screen may be frozen for storing images...camera is not complete. The camera beeps. You can create a new folder in the "Memory Stick" and select the folder for a split second depending on the subject.) • If you release your fingers. • The minimum focal distance to a subject is not set...
Operating Instructions (primary manual)
Page 23
... b on the control button. 4 Select the desired camera mode with the camera turned on the control button. 23 Shooting still images Program mode shooting [Program] You can display are performed for a while with v/ V on , power is set to , the functions that can be selected change the camera mode 1 Set the mode selector to preserve battery power...
... b on the control button. 4 Select the desired camera mode with the camera turned on the control button. 23 Shooting still images Program mode shooting [Program] You can display are performed for a while with v/ V on , power is set to , the functions that can be selected change the camera mode 1 Set the mode selector to preserve battery power...
Operating Instructions (primary manual)
Page 24
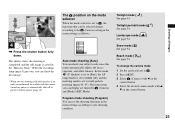
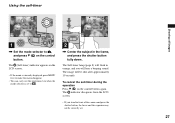
... for Auto Focus function: Multipoint AF and Center AF (page 44). To delete the image displayed on the control button again. When (Camera) is set to shooting mode, press the shutter button lightly or press b (7) on the LCD screen 1 Press (Delete). 2 Select [Delete] with in ...shot - To return to [Auto] in the following subjects. The image is automatically selected. Quick Review Review VGA 101 98 101-0008 2003 7 4 10:30PM RETURN , Press b (7) on the control button, then press z. The Auto Focus function may be difficult to use with v on the control button. Basic still...
... for Auto Focus function: Multipoint AF and Center AF (page 44). To delete the image displayed on the control button again. When (Camera) is set to shooting mode, press the shutter button lightly or press b (7) on the LCD screen 1 Press (Delete). 2 Select [Delete] with in ...shot - To return to [Auto] in the following subjects. The image is automatically selected. Quick Review Review VGA 101 98 101-0008 2003 7 4 10:30PM RETURN , Press b (7) on the control button, then press z. The Auto Focus function may be difficult to use with v on the control button. Basic still...
Operating Instructions (primary manual)
Page 25
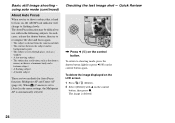
... zoom. When 9 (Focus) is not shown when using a digital zoom process with no effect on the recorded image. • AF range finder is set [Smart Zoom] to focus on the image using the smart zoom...shows the extent of the lens • The lens moves when the zoom feature is not needed, set to [Multi AF] or [Center AF], or flashes and the centrally-located subject has priority to ...image size is carried out using the smart zoom, the image on the LCD screen. Using the zoom feature Shooting still images W (wide-angle) T (telephoto) x1.1 VGA 101 98 x5.0 VGA 101 98 , Press the zoom...
... zoom. When 9 (Focus) is not shown when using a digital zoom process with no effect on the recorded image. • AF range finder is set [Smart Zoom] to focus on the image using the smart zoom...shows the extent of the lens • The lens moves when the zoom feature is not needed, set to [Multi AF] or [Center AF], or flashes and the centrally-located subject has priority to ...image size is carried out using the smart zoom, the image on the LCD screen. Using the zoom feature Shooting still images W (wide-angle) T (telephoto) x1.1 VGA 101 98 x5.0 VGA 101 98 , Press the zoom...
Operating Instructions (primary manual)
Page 26
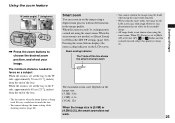
...98 VGA FINE 101 97 For close -ups - When the zoom is set all the way to the T side: 60 cm (23 5/8 inches) from the end of the lens 1 , Set the mode selector to shoot when using the macro feature. The indicator disappears ...• You can use the finder, the limits of what you see and what you use this operation even when the mode selector is set all the way to the W side: 10 cm (4 inches) from the LCD screen. • Use the LCD screen to , and ...down. To return to normal shooting Press B ( ) on the LCD screen. • If the menu is set to the distances specified below.
...98 VGA FINE 101 97 For close -ups - When the zoom is set all the way to the T side: 60 cm (23 5/8 inches) from the end of the lens 1 , Set the mode selector to shoot when using the macro feature. The indicator disappears ...• You can use the finder, the limits of what you see and what you use this operation even when the mode selector is set all the way to the W side: 10 cm (4 inches) from the LCD screen. • Use the LCD screen to , and ...down. To return to normal shooting Press B ( ) on the LCD screen. • If the menu is set to the distances specified below.
Operating Instructions (primary manual)
Page 27
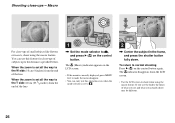
...; If you will hear a beeping sound. The Self-timer lamp (page 8) will be correctly set to . 2 , Center the subject in front of the camera and press the shutter button, the focus and the exposure may not be shot after approximately 10 seconds. The image will flash in orange, and you stand in the... menu is currently displayed, press MENU first to make the menu disappear. • You can carry out this operation even when the mode selector is set . 27 To cancel the self-timer during the operation Press V ( ) on the control button. Using the self-timer VGA 101 98 VGA FINE 101 ...
...; If you will hear a beeping sound. The Self-timer lamp (page 8) will be correctly set to . 2 , Center the subject in front of the camera and press the shutter button, the focus and the exposure may not be shot after approximately 10 seconds. The image will flash in orange, and you stand in the... menu is currently displayed, press MENU first to make the menu disappear. • You can carry out this operation even when the mode selector is set . 27 To cancel the self-timer during the operation Press V ( ) on the control button. Using the self-timer VGA 101 98 VGA FINE 101 ...
Operating Instructions (primary manual)
Page 28
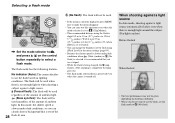
... to 12 feet 5 19/32 inches) (W)/0.6 m to 2.5 m (23 5/8 inches to 8 feet 2 7/16 inches) (T) (when [ISO] is set the flash mode to select a flash mode. No indicator (Auto): The camera decides to [Auto]). • You can clearly shoot a background that is recommended that you do not want to use the... flash, set to use a tripod. • While the flash is turned off. Selecting a flash mode VGA 101 98 , Set the mode selector to , and...
... to 12 feet 5 19/32 inches) (W)/0.6 m to 2.5 m (23 5/8 inches to 8 feet 2 7/16 inches) (T) (when [ISO] is set the flash mode to select a flash mode. No indicator (Auto): The camera decides to [Auto]). • You can clearly shoot a background that is recommended that you do not want to use the... flash, set to use a tripod. • While the flash is turned off. Selecting a flash mode VGA 101 98 , Set the mode selector to , and...


