
Operating Instructions
Page 3
... AC power adaptor for the customers in the plug supplied need to be replaced, a 5 AMP fuse approved by returning your used . "Memory Stick" and battery pack N50 For the Customers in the U.S.A. OPERATION IS SUBJECT TO THE FOLLOWING TWO CONDITIONS: (1) THIS DEVICE MAY NOT CAUSE HARMFUL...A moulded plug complying with this equipment has a detachable fuse cover, be used rechargeable batteries to this digital camera. If you . Notice on the EMC Directive for your nearest Sony service station. and Canada THIS DEVICE COMPLIES WITH PART 15 OF THE FCC RULES. Never use the plug...
... AC power adaptor for the customers in the plug supplied need to be replaced, a 5 AMP fuse approved by returning your used . "Memory Stick" and battery pack N50 For the Customers in the U.S.A. OPERATION IS SUBJECT TO THE FOLLOWING TWO CONDITIONS: (1) THIS DEVICE MAY NOT CAUSE HARMFUL...A moulded plug complying with this equipment has a detachable fuse cover, be used rechargeable batteries to this digital camera. If you . Notice on the EMC Directive for your nearest Sony service station. and Canada THIS DEVICE COMPLIES WITH PART 15 OF THE FCC RULES. Never use the plug...

Operating Instructions
Page 4
...8226; The LCD screen and the LCD finder are not actual images shot using this manual are reproduced images, and are manufactured using extremely highprecision technology so over 99.99% of the copyright laws. Unauthorized recording of your camera or recording medium, etc. LCD screen, LCD finder (only models ... points and/or bright points (white, red, blue or green in this may render the "Memory Stick" unusable or image data breakdown, damage or loss may occur. The power zoom lens This camera is not possible due to a malfunction of such materials may be careful not to apply force ...
...8226; The LCD screen and the LCD finder are not actual images shot using this manual are reproduced images, and are manufactured using extremely highprecision technology so over 99.99% of the copyright laws. Unauthorized recording of your camera or recording medium, etc. LCD screen, LCD finder (only models ... points and/or bright points (white, red, blue or green in this may render the "Memory Stick" unusable or image data breakdown, damage or loss may occur. The power zoom lens This camera is not possible due to a malfunction of such materials may be careful not to apply force ...

Operating Instructions
Page 5
... U.S. However, the ™ or ® marks are not used in this manual are, in this manual. 5 Trademarks • "Memory Stick," , "MagicGate Memory Stick," and , are trademarks of Sony Corporation. • "MagicGate" and are trademarks of Sony Corporation. • "InfoLITHIUM" is a trademark of Sony Corporation. • Microsoft and Windows are registered trademarks of their respective developers or manufacturers.
... U.S. However, the ™ or ® marks are not used in this manual are, in this manual. 5 Trademarks • "Memory Stick," , "MagicGate Memory Stick," and , are trademarks of Sony Corporation. • "MagicGate" and are trademarks of Sony Corporation. • "InfoLITHIUM" is a trademark of Sony Corporation. • Microsoft and Windows are registered trademarks of their respective developers or manufacturers.

Operating Instructions
Page 6
... your camera 14 How to use the control button 14 Setting the date and time 15 Shooting still images Inserting and removing a "Memory Stick 17 Deciding the still image size and quality 18 Basic still image shooting (using auto adjustment mode 20 Checking the last image shot (Quick...35 Deleting on the Index (three images) screen 36 Formatting a "Memory Stick 38 Copying still images to your computer Copying still images to your computer .. 39 1 Installing the USB driver 40 2 Preparing your camera 41 3 Connecting your camera to your computer 42 4 Copying images 43 5 Viewing the images on...
... your camera 14 How to use the control button 14 Setting the date and time 15 Shooting still images Inserting and removing a "Memory Stick 17 Deciding the still image size and quality 18 Basic still image shooting (using auto adjustment mode 20 Checking the last image shot (Quick...35 Deleting on the Index (three images) screen 36 Formatting a "Memory Stick 38 Copying still images to your computer Copying still images to your computer .. 39 1 Installing the USB driver 40 2 Preparing your camera 41 3 Connecting your camera to your computer 42 4 Copying images 43 5 Viewing the images on...

Operating Instructions
Page 7
... items 92 Precautions 94 Enjoying movies Shooting movies 69 Viewing movies on the LCD screen .......70 Deleting movies 71 For the single screen 71 The "Memory Stick 95 The "InfoLITHIUM" battery pack ......... 95 Specifications 96 The LCD screen 98 Index 101 For the Index (nine images) screen.....71 For the Index (three...
... items 92 Precautions 94 Enjoying movies Shooting movies 69 Viewing movies on the LCD screen .......70 Deleting movies 71 For the single screen 71 The "Memory Stick 95 The "InfoLITHIUM" battery pack ......... 95 Specifications 96 The LCD screen 98 Index 101 For the Index (nine images) screen.....71 For the Index (three...

Operating Instructions
Page 9
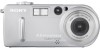
...) (22)/ (11, 24) Index button (for viewing) (31) C LCD screen D DSPL/LCD ON/OFF button (26) E DC IN jack (10, 13) F MENU button (18) J Battery/"Memory Stick" cover K RESET button (77) L Access lamp (17) M Battery eject lever (11) 9
...) (22)/ (11, 24) Index button (for viewing) (31) C LCD screen D DSPL/LCD ON/OFF button (26) E DC IN jack (10, 13) F MENU button (18) J Battery/"Memory Stick" cover K RESET button (77) L Access lamp (17) M Battery eject lever (11) 9
Operating Instructions
Page 10
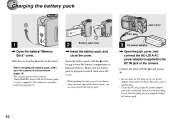
...with the v mark facing up. • Do not short the DC plug on (page 14). • The camera operates only with a dry cotton bud. Slide the cover in the direction of the camera. Jack cover DC plug 3 AC power adaptor , Open the jack cover, and connect the AC-LS1A AC power... adaptor (supplied) to the DC IN jack of the arrow. • When charging the battery pack, make sure the camera is properly inserted, then close the cover. This may not properly charge the battery pack. 10 Charging the battery pack Getting started OPEN 1 , Open the battery/"Memory Stick" cover.
...with the v mark facing up. • Do not short the DC plug on (page 14). • The camera operates only with a dry cotton bud. Slide the cover in the direction of the camera. Jack cover DC plug 3 AC power adaptor , Open the jack cover, and connect the AC-LS1A AC power... adaptor (supplied) to the DC IN jack of the arrow. • When charging the battery pack, make sure the camera is properly inserted, then close the cover. This may not properly charge the battery pack. 10 Charging the battery pack Getting started OPEN 1 , Open the battery/"Memory Stick" cover.

Operating Instructions
Page 11
Charging starts, and the /CHG lamp lights. Battery eject lever Open the battery/"Memory Stick" cover, and push down the battery eject lever in the arrow direction as illustrated above. • Make sure you do not drop the battery pack ... viewing time. 60min 2272 FINE 4 • It takes about 1 minute that the proper remaining time is finished, disconnect the AC power adaptor both from the camera and the wall outlet (wall socket). 2 To a wall outlet (wall socket) Power cord (mains lead) To remove the battery pack 1 4 AC power adaptor , Connect the...
Charging starts, and the /CHG lamp lights. Battery eject lever Open the battery/"Memory Stick" cover, and push down the battery eject lever in the arrow direction as illustrated above. • Make sure you do not drop the battery pack ... viewing time. 60min 2272 FINE 4 • It takes about 1 minute that the proper remaining time is finished, disconnect the AC power adaptor both from the camera and the wall outlet (wall socket). 2 To a wall outlet (wall socket) Power cord (mains lead) To remove the battery pack 1 4 AC power adaptor , Connect the...

Operating Instructions
Page 12
... viewed allow for the length of images that can be recorded/ viewed The tables show approximate guidelines for changing the "Memory Stick" as necessary. The guidelines for the number of time the camera can be used repeatedly or self-discharged after charging (page 96). of size screen life (min.) images 2272×1704...
... viewed allow for the length of images that can be recorded/ viewed The tables show approximate guidelines for changing the "Memory Stick" as necessary. The guidelines for the number of time the camera can be used repeatedly or self-discharged after charging (page 96). of size screen life (min.) images 2272×1704...
Operating Instructions
Page 17
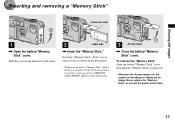
.... • Whenever you do not insert it correctly, a message such as "MEMORY STICK ERROR" appears on the LCD screen. 3 Access lamp , Close the battery/"Memory Stick" cover. Slide the cover in until it out. • Whenever the Access lamp is lit, the camera is recording or reading out an image. Shooting still images Inserting and...
.... • Whenever you do not insert it correctly, a message such as "MEMORY STICK ERROR" appears on the LCD screen. 3 Access lamp , Close the battery/"Memory Stick" cover. Slide the cover in until it out. • Whenever the Access lamp is lit, the camera is recording or reading out an image. Shooting still images Inserting and...
Operating Instructions
Page 19
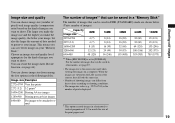
...×960 Printing postcard size images 640×480 For images to be attached to email The number of images** that can be saved in a "Memory Stick" The number of images that can be saved in FINE (STANDARD) mode are viewed on the kind of data needed to shoot. This means you... want to preserve your "Memory Stick." Image size and quality You can choose image size (number of pixels) and image quality (compression ratio) based on the LCD screen of the camera, they all look the same size. • Number of shooting images can differ...
...×960 Printing postcard size images 640×480 For images to be attached to email The number of images** that can be saved in a "Memory Stick" The number of images that can be saved in FINE (STANDARD) mode are viewed on the kind of data needed to shoot. This means you... want to preserve your "Memory Stick." Image size and quality You can choose image size (number of pixels) and image quality (compression ratio) based on the LCD screen of the camera, they all look the same size. • Number of shooting images can differ...

Operating Instructions
Page 21
... be deleted. 21 The image will change to shoot a subject that from a mirror, or there is automatically shut off to use with the camera turned on , the AE/AF lock indicator will be difficult to preserve battery power (page 14). Shooting still images 60min 2272 FINE 4 , ... subjects. Checking the last image shot (Quick Review) 60min REVIEW 2272 8/8 100-0029 2002 7 4 10:30PM , Press b (7) on the control button again. About Auto Focus When you are shooting with the battery, if no tasks are performed for a while with in the "Memory Stick." To return to select [OK...
... be deleted. 21 The image will change to shoot a subject that from a mirror, or there is automatically shut off to use with the camera turned on , the AE/AF lock indicator will be difficult to preserve battery power (page 14). Shooting still images 60min 2272 FINE 4 , ... subjects. Checking the last image shot (Quick Review) 60min REVIEW 2272 8/8 100-0029 2002 7 4 10:30PM , Press b (7) on the control button again. About Auto Focus When you are shooting with the battery, if no tasks are performed for a while with in the "Memory Stick." To return to select [OK...

Operating Instructions
Page 34
... button, then press the center z. Select [DELETE] using b/B on the control button. When this point. 3 , Select [OK] using v on the camera. To cancel the deletion Select [CANCEL] using V on the screen. "MEMORY STICK ACCESS" appears on the control button, then press the center z. 34 DELETE PROTECT PRINT OK SLIDE DELETE O K CANCEL OK 2 MENU...
... button, then press the center z. Select [DELETE] using b/B on the control button. When this point. 3 , Select [OK] using v on the camera. To cancel the deletion Select [CANCEL] using V on the screen. "MEMORY STICK ACCESS" appears on the control button, then press the center z. 34 DELETE PROTECT PRINT OK SLIDE DELETE O K CANCEL OK 2 MENU...

Operating Instructions
Page 36
Select [DELETE] using b/B on the control button, then press the center z. Select [OK] using the V on the control button, then press the center z. When "MEMORY STICK ACCESS" disappears, the images have been deleted. At this point, the image has not yet been deleted. 36 To cancel the deletion Select [EXIT] using b ...
Select [DELETE] using b/B on the control button, then press the center z. Select [OK] using the V on the control button, then press the center z. When "MEMORY STICK ACCESS" disappears, the images have been deleted. At this point, the image has not yet been deleted. 36 To cancel the deletion Select [EXIT] using b ...

Operating Instructions
Page 37
To cancel the deletion Select [CANCEL] using v on the control button, then press the center z. 37 Deleting still images DELETE O K CANCEL 100-0028 2002 7 4 10:30PM • OK 3 , Select [OK] using V on the control button, then press the center z. When "MEMORY STICK ACCESS" disappears, the image has been deleted.
To cancel the deletion Select [CANCEL] using v on the control button, then press the center z. 37 Deleting still images DELETE O K CANCEL 100-0028 2002 7 4 10:30PM • OK 3 , Select [OK] using V on the control button, then press the center z. When "MEMORY STICK ACCESS" disappears, the image has been deleted.

Operating Instructions
Page 38
...UP, and turn on the control button. Select [OK] using B, then, press B. When this process is complete. 38 The "Memory Stick" provided with this camera, and those available commercially, are already formatted, and can be permanently deleted. 2 , Select (SETUP 1) using v/V on the control ..., then press the center z. 3 , Select [OK] using v/V on the power. • The term "formatting" means preparing a "Memory Stick" to format into the camera. Formatting a "Memory Stick" SETUP 1 FORMAT : FILE NUMBER : /LANGUAGE : CLOCK SET : OK CANCEL OK FORMAT ALL DATA WILL BE ERASED READY?
...UP, and turn on the control button. Select [OK] using B, then, press B. When this process is complete. 38 The "Memory Stick" provided with this camera, and those available commercially, are already formatted, and can be permanently deleted. 2 , Select (SETUP 1) using v/V on the control ..., then press the center z. 3 , Select [OK] using v/V on the power. • The term "formatting" means preparing a "Memory Stick" to format into the camera. Formatting a "Memory Stick" SETUP 1 FORMAT : FILE NUMBER : /LANGUAGE : CLOCK SET : OK CANCEL OK FORMAT ALL DATA WILL BE ERASED READY?

Operating Instructions
Page 39
...your computer at one time, some devices, including your computer When neither a USB connector nor a "Memory Stick" slot is required for operating systems not listed above . iMac with the Mac OS 8.6 installed at...your computer from the suspend or sleep mode, communication between your camera and your computer may not work, depending on your camera, may not recover at the factory is required for a USB...Mac OS 8.6 installed at the factory (not upgraded) is provided, you shot to Mac OS 9.0 or 9.1. - See the Sony Website for Windows users only) If you connect two or more USB devices...
...your computer at one time, some devices, including your computer When neither a USB connector nor a "Memory Stick" slot is required for operating systems not listed above . iMac with the Mac OS 8.6 installed at...your computer from the suspend or sleep mode, communication between your camera and your computer may not work, depending on your camera, may not recover at the factory is required for a USB...Mac OS 8.6 installed at the factory (not upgraded) is provided, you shot to Mac OS 9.0 or 9.1. - See the Sony Website for Windows users only) If you connect two or more USB devices...

Operating Instructions
Page 41
... using the "PIXELA ImageMixer for Sony" software to copy images to your computer. "Memory Stick" 1 AC power 2 adaptor , Insert the "Memory Stick" with the images you can establish the USB connection. • You can use the "PIXELA ImageMixer for Sony" software. Your computer restarts when the installation is completed. Connect the camera and the AC power adaptor...
... using the "PIXELA ImageMixer for Sony" software to copy images to your computer. "Memory Stick" 1 AC power 2 adaptor , Insert the "Memory Stick" with the images you can establish the USB connection. • You can use the "PIXELA ImageMixer for Sony" software. Your computer restarts when the installation is completed. Connect the camera and the AC power adaptor...

Operating Instructions
Page 43
...overwrite the existing image with the same file name is stored, the overwrite confirmation message appears. When you shot using your camera appear. • This section describes an example of the "Memory Stick" inserted in which an image with the new one, click [Yes]. For details, see the next ...page. • You can use the "PIXELA ImageMixer for Sony" software to copy images to overwrite it, click [No],...
...overwrite the existing image with the same file name is stored, the overwrite confirmation message appears. When you shot using your camera appear. • This section describes an example of the "Memory Stick" inserted in which an image with the new one, click [Yes]. For details, see the next ...page. • You can use the "PIXELA ImageMixer for Sony" software to copy images to overwrite it, click [No],...

Operating Instructions
Page 44
... devices are displayed. 44 The images stored in the "Memory Stick" are already installed. 1 Click [Device Manager]. 2 Double-click [ Other Devices]. 3 Confirm if there is a [ Sony DSC] or [ Sony Handycam] with a mark. 3 If you find either of your computer. 2 Click here , Click [Next]. The "Scanner and Camera Wizard" window appears. • When following the steps on...
... devices are displayed. 44 The images stored in the "Memory Stick" are already installed. 1 Click [Device Manager]. 2 Double-click [ Other Devices]. 3 Confirm if there is a [ Sony DSC] or [ Sony Handycam] with a mark. 3 If you find either of your computer. 2 Click here , Click [Next]. The "Scanner and Camera Wizard" window appears. • When following the steps on...


