Operating Instructions (primary manual)
Page 8
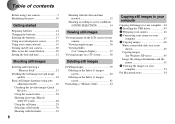
... started Preparing batteries 14 Charging the batteries 14 Inserting the batteries 17 Using an external power source 19 Using your camera abroad 19 Turning on/off your camera 20 How to use the control button 20 Setting the date and time 21 Shooting still images Inserting and removing a "Memory Stick 23 Deciding the still image size and image quality 24 Basic still image shooting (using auto adjustment mode 26 Checking the last shot image (Quick Review 27 Using the zoom feature 28 Shooting close-ups (Macro) (DSC-P71 only 28 Using the self-timer 29 Selecting a flash mode...
... started Preparing batteries 14 Charging the batteries 14 Inserting the batteries 17 Using an external power source 19 Using your camera abroad 19 Turning on/off your camera 20 How to use the control button 20 Setting the date and time 21 Shooting still images Inserting and removing a "Memory Stick 23 Deciding the still image size and image quality 24 Basic still image shooting (using auto adjustment mode 26 Checking the last shot image (Quick Review 27 Using the zoom feature 28 Shooting close-ups (Macro) (DSC-P71 only 28 Using the self-timer 29 Selecting a flash mode...
Operating Instructions (primary manual)
Page 9
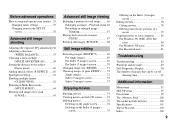
... light-metering 61 Shooting multiple frames (CLIP MOTION 62 Shooting in the SET UP screen 55 Advanced still image shooting Adjusting the exposure (EV adjustment) 56 Adjusting color tones (WHITE BALANCE 57 Choosing a focus method (MULTI AF/CENTER AF 58 Setting the distance to setup and operate your computer ..........80 For Windows 98, 98SE, 2000, Me users 80 For Windows XP users 80 For Macintosh users 81 Troubleshooting Troubleshooting 82 Warnings and messages 89 Self-Diagnostics Display 90 The number of a still image...
... light-metering 61 Shooting multiple frames (CLIP MOTION 62 Shooting in the SET UP screen 55 Advanced still image shooting Adjusting the exposure (EV adjustment) 56 Adjusting color tones (WHITE BALANCE 57 Choosing a focus method (MULTI AF/CENTER AF 58 Setting the distance to setup and operate your computer ..........80 For Windows 98, 98SE, 2000, Me users 80 For Windows XP users 80 For Macintosh users 81 Troubleshooting Troubleshooting 82 Warnings and messages 89 Self-Diagnostics Display 90 The number of a still image...

Operating Instructions (primary manual)
Page 14
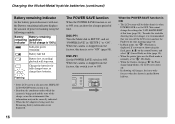
... Charging starts, and the charge lamp lights. To the wall outlet (mains) Power cord (mains lead) Charge lamp 2 , Connect the charger to an easily accessible wall outlet (mains) close by pulling the plug out of batteries made by different manufacturers. If the batteries are noticeably weaker. Acceptable batteries R6 (size AA) Nickel-Metal Hydride batteries (2) - Preparing batteries Use the following information. • Turn POWER SAVE "ON", shut the LCD screen off...
... Charging starts, and the charge lamp lights. To the wall outlet (mains) Power cord (mains lead) Charge lamp 2 , Connect the charger to an easily accessible wall outlet (mains) close by pulling the plug out of batteries made by different manufacturers. If the batteries are noticeably weaker. Acceptable batteries R6 (size AA) Nickel-Metal Hydride batteries (2) - Preparing batteries Use the following information. • Turn POWER SAVE "ON", shut the LCD screen off...
Operating Instructions (primary manual)
Page 16
... Flash mode, the " " (No flash) is set to ON. Change the batteries for a longer period of time. DSC-P71 Turn the Mode dial to SET UP, and set to ON, you want to shoot using the following symbols. When the POWER SAVE function is ON • The LCD screen will stop soon. Flashing • If the LCD screen is off . • In shooting still images, the focus only focuses when the shutter is 100%) Sufficient power remaining Battery half full Battery low, recording/ playback...
... Flash mode, the " " (No flash) is set to ON. Change the batteries for a longer period of time. DSC-P71 Turn the Mode dial to SET UP, and set to ON, you want to shoot using the following symbols. When the POWER SAVE function is ON • The LCD screen will stop soon. Flashing • If the LCD screen is off . • In shooting still images, the focus only focuses when the shutter is 100%) Sufficient power remaining Battery half full Battery low, recording/ playback...
Operating Instructions (primary manual)
Page 20
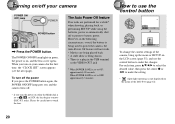
... camera, the Auto Power Off feature will not work. • Movies are performed for the first time, the "CLOCK SET" screen appears (see the next page). Turning on the LCD screen (page 55), and use the control button to make the setting. • (Spot light-metering) is set to OFF: approximately 3 minutes How to use the control button 0EV 0EV EV WB ISO AUTO WHITE BAL ISO To change the current settings of the camera, bring up the menu...
... camera, the Auto Power Off feature will not work. • Movies are performed for the first time, the "CLOCK SET" screen appears (see the next page). Turning on the LCD screen (page 55), and use the control button to make the setting. • (Spot light-metering) is set to OFF: approximately 3 minutes How to use the control button 0EV 0EV EV WB ISO AUTO WHITE BAL ISO To change the current settings of the camera, bring up the menu...
Operating Instructions (primary manual)
Page 26
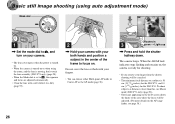
Basic still image shooting (using auto adjustment mode) Mode dial 2048 4 F2.1 50 1 , Set the mode dial to , and turn on your camera. • The lens cover opens when the power is turned on. • When the camera is turned on or when using the zoom, and the lens is moving, don't touch the lens assembly (DSC-P71 only) (page 28). • When the Mode dial is set to , the exposure and focus are adjusted automatically. • Clean the lens with...
Basic still image shooting (using auto adjustment mode) Mode dial 2048 4 F2.1 50 1 , Set the mode dial to , and turn on your camera. • The lens cover opens when the power is turned on. • When the camera is turned on or when using the zoom, and the lens is moving, don't touch the lens assembly (DSC-P71 only) (page 28). • When the Mode dial is set to , the exposure and focus are adjusted automatically. • Clean the lens with...
Operating Instructions (primary manual)
Page 32
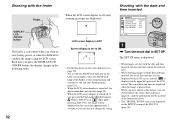
... be removed later. • When shooting images with the date and time inserted CAMERA MOVING IMAGE : DATE/TIME : DIGITAL ZOOM : RED EYE REDUCTION : AF ILLUMINATOR : MPEG MOVIE OFF ON OFF OFF SELECT 1 , Turn the mode dial to SET UP. Each time you press the DISPLAY/LCD ON/OFF button, the display changes in the format you chose. • The "DIGITAL ZOOM" item is difficult to save battery power, or when it is not displayed on the SET UP screen of the DSC-P31...
... be removed later. • When shooting images with the date and time inserted CAMERA MOVING IMAGE : DATE/TIME : DIGITAL ZOOM : RED EYE REDUCTION : AF ILLUMINATOR : MPEG MOVIE OFF ON OFF OFF SELECT 1 , Turn the mode dial to SET UP. Each time you press the DISPLAY/LCD ON/OFF button, the display changes in the format you chose. • The "DIGITAL ZOOM" item is difficult to save battery power, or when it is not displayed on the SET UP screen of the DSC-P31...

Operating Instructions (primary manual)
Page 44
... your camera and your computer may not work, depending on your OS. • After you complete the installation of USB device. • Operations are not guaranteed when using the "NORMAL" mode. Copying still images to your computer Copying still images to your computer Follow the steps below to copy the images you shot to your OS to Mac OS 9.0 or 9.1. - For the following models, update your computer. The factory setting is...
... your camera and your computer may not work, depending on your OS. • After you complete the installation of USB device. • Operations are not guaranteed when using the "NORMAL" mode. Copying still images to your computer Copying still images to your computer Follow the steps below to copy the images you shot to your OS to Mac OS 9.0 or 9.1. - For the following models, update your computer. The factory setting is...

Operating Instructions (primary manual)
Page 53
The image file opens. 53 The "My Documents" folder opens. • This section describes the steps followed for copying images to the "My Documents" folder on the desktop. 5 Viewing the images on your computer Copying still images to view images on your computer 1 , Double-click "My Documents" on page 48. • When using Windows XP, click "Start"t"My Documents" in that order. • You can use the "PIXELA ImageMixer for Sony" software to your computer. For details, see the software's help files. 2 , Double-click the desired image file.
The image file opens. 53 The "My Documents" folder opens. • This section describes the steps followed for copying images to the "My Documents" folder on the desktop. 5 Viewing the images on your computer Copying still images to view images on your computer 1 , Double-click "My Documents" on page 48. • When using Windows XP, click "Start"t"My Documents" in that order. • You can use the "PIXELA ImageMixer for Sony" software to your computer. For details, see the software's help files. 2 , Double-click the desired image file.

Operating Instructions (primary manual)
Page 54
... your computer and view the images on your computer. The image file opens. • You can use the "PIXELA ImageMixer for Sony" software to copy images to the "Trash" icon, then remove the USB cable or "Memory Stick." * If you have turned your camera during a USB connection. OS Steps Mac OS 8.5.1/8.6/9.0 Steps 1 to 5 Mac OS 9.1/9.2/ Mac OS X(v10.0/v10.1) Steps 2 to 5 1 Installing the USB driver (For Mac OS 8.5.1, 8.6, or 9.0 users only) 1 Turn on your computer, and set the supplied...
... your computer and view the images on your computer. The image file opens. • You can use the "PIXELA ImageMixer for Sony" software to copy images to the "Trash" icon, then remove the USB cable or "Memory Stick." * If you have turned your camera during a USB connection. OS Steps Mac OS 8.5.1/8.6/9.0 Steps 1 to 5 Mac OS 9.1/9.2/ Mac OS X(v10.0/v10.1) Steps 2 to 5 1 Installing the USB driver (For Mac OS 8.5.1, 8.6, or 9.0 users only) 1 Turn on your computer, and set the supplied...
Operating Instructions (primary manual)
Page 55
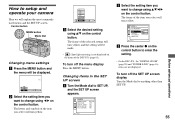
... the setting will be displayed. 0EV 0EV EV WB ISO b Select the setting item you select will turn yellow. SETUP 2 LCD BRIGHTNESS : LCD BACKLIGHT : BEEP : VIDEO OUT : USB CONNECT : POWER SAVE : SHUTTER ON OFF SELECT c Press the center z on the control button to anything other than SET UP. 55 Before advanced operations The letters and symbols of the item you want to SET UP, and the SET UP screen appears. CAMERA MOVING IMAGE : DATE/TIME : DIGITAL ZOOM : RED EYE...
... the setting will be displayed. 0EV 0EV EV WB ISO b Select the setting item you select will turn yellow. SETUP 2 LCD BRIGHTNESS : LCD BACKLIGHT : BEEP : VIDEO OUT : USB CONNECT : POWER SAVE : SHUTTER ON OFF SELECT c Press the center z on the control button to anything other than SET UP. 55 Before advanced operations The letters and symbols of the item you want to SET UP, and the SET UP screen appears. CAMERA MOVING IMAGE : DATE/TIME : DIGITAL ZOOM : RED EYE...
Operating Instructions (primary manual)
Page 65
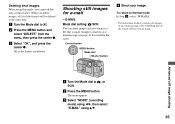
All of the frames are using v/V. 65 E-MAIL Mode dial setting: /SCN You can shoot images and save them in a file that is small enough to attach to , or SCN. c Select "MODE" (recording mode) using b/B, then select "E-MAIL" using . Deleting shot images When using this mode, you delete images, all 16 of the frames will be deleted at the same time. The menu appears. Advanced still image shooting a Turn the Mode dial to an email message (see page 24...
All of the frames are using v/V. 65 E-MAIL Mode dial setting: /SCN You can shoot images and save them in a file that is small enough to attach to , or SCN. c Select "MODE" (recording mode) using b/B, then select "E-MAIL" using . Deleting shot images When using this mode, you delete images, all 16 of the frames will be deleted at the same time. The menu appears. Advanced still image shooting a Turn the Mode dial to an email message (see page 24...

Operating Instructions (primary manual)
Page 82
... images in an quickly. p Install the batteries correctly (page 17). If the screen or the display window shows "C:ss:ss", the selfdiagnostics function is incorrect. p Install a charged batteries (page 14). p Turn on , the camera turns off suddenly. • If you have used the camera for about three minutes while the power is on the power again (page 20). The power cannot be turned on the power again. (This will erase the date/time settings, etc.) RESET button Troubleshooting...
... images in an quickly. p Install the batteries correctly (page 17). If the screen or the display window shows "C:ss:ss", the selfdiagnostics function is incorrect. p Install a charged batteries (page 14). p Turn on , the camera turns off suddenly. • If you have used the camera for about three minutes while the power is on the power again (page 20). The power cannot be turned on the power again. (This will erase the date/time settings, etc.) RESET button Troubleshooting...
Operating Instructions (primary manual)
Page 83
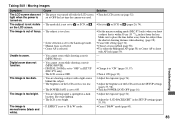
...). Digital zoom does not function. The subject is not visible • The mode dial is set to "B & W" mode. p Adjust the brightness of the LCD screen is too low. • The POWER SAVE is set to zoom. p Turn the POWER SAVE OFF (page 16). p Change it to shoot with AF lock (page 59). - - p Adjust the "LCD BACKLIGHT" in the SET UP settings (pages 55, 98). Taking Still / Moving images Symptom Cause The LCD screen does not • The power was used...
...). Digital zoom does not function. The subject is not visible • The mode dial is set to "B & W" mode. p Adjust the brightness of the LCD screen is too low. • The POWER SAVE is set to zoom. p Turn the POWER SAVE OFF (page 16). p Change it to shoot with AF lock (page 59). - - p Adjust the "LCD BACKLIGHT" in the SET UP settings (pages 55, 98). Taking Still / Moving images Symptom Cause The LCD screen does not • The power was used...
Operating Instructions (primary manual)
Page 86
... the camera (page 20). USB driver. The image cannot be - p In Windows 2000, log on a personal computer. - p Set it again securely. p If you installed the "USB Driver" from your computer correctly using the "PIXELA ImageMixer for Sony" software, click on your OS. - p Install the USB driver (page 45). p Follow the copy procedure that "USB MODE" is not correctly connected to "PTP" in the SET UP settings. • The USB connectors on HELP. played back...
... the camera (page 20). USB driver. The image cannot be - p In Windows 2000, log on a personal computer. - p Set it again securely. p If you installed the "USB Driver" from your computer correctly using the "PIXELA ImageMixer for Sony" software, click on your OS. - p Install the USB driver (page 45). p Follow the copy procedure that "USB MODE" is not correctly connected to "PTP" in the SET UP settings. • The USB connectors on HELP. played back...

Operating Instructions (primary manual)
Page 89
... "Memory Stick" format failed. You cannot record images. Charge the battery (page 14). Use the flash, mount the camera on the LCD screen. Depending on the "Memory Stick." • An error occurred while playing back the image. • The image is set to be played back on your camera (page 100). • The "Memory Stick" is damaged, or the terminal section of the "Memory Stick" is full. NO FILE FILE ERROR FILE PROTECT FOLDER ERROR OVERSIZED IMAGE INVALID OPERATION •...
... "Memory Stick" format failed. You cannot record images. Charge the battery (page 14). Use the flash, mount the camera on the LCD screen. Depending on the "Memory Stick." • An error occurred while playing back the image. • The image is set to be played back on your camera (page 100). • The "Memory Stick" is damaged, or the terminal section of the "Memory Stick" is full. NO FILE FILE ERROR FILE PROTECT FOLDER ERROR OVERSIZED IMAGE INVALID OPERATION •...
Operating Instructions (primary manual)
Page 97
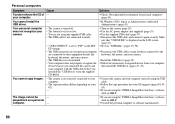
... information recorded on the subject under dark lighting (page 31). Helps when it is changed . - RED EYE REDUCTION ON / xOFF Reduces the red-eye phenomenon when using a flash (page 31). Displays the menu items, warnings and messages in the image. SET UP items Set the Mode dial to focus on a "Memory Stick", including even erasure protected images (page 43). - When shooting movies/Clip Motion, the date and time cannot be inserted in Japanese. Resets the file numbering and starts...
... information recorded on the subject under dark lighting (page 31). Helps when it is changed . - RED EYE REDUCTION ON / xOFF Reduces the red-eye phenomenon when using a flash (page 31). Displays the menu items, warnings and messages in the image. SET UP items Set the Mode dial to focus on a "Memory Stick", including even erasure protected images (page 43). - When shooting movies/Clip Motion, the date and time cannot be inserted in Japanese. Resets the file numbering and starts...
Operating Instructions (primary manual)
Page 99
... if this may cause a malfunction of the camera. Charging the battery Connect the camera to shoot with a dry cloth. This rechargeable button battery is not charged, you can still use any type of solvent such as thinner, alcohol or benzine as you do not record the date and time. Do not use the camera as long as this rechargeable button battery is continually charged as long as a ski slope into...
... if this may cause a malfunction of the camera. Charging the battery Connect the camera to shoot with a dry cloth. This rechargeable button battery is not charged, you can still use any type of solvent such as thinner, alcohol or benzine as you do not record the date and time. Do not use the camera as long as this rechargeable button battery is continually charged as long as a ski slope into...
Marketing Specifications
Page 1
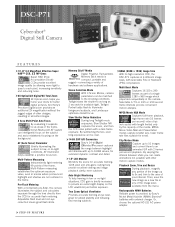
... Movie Video Mail and Presentation modes capture smaller size, lower frame rate files suitable for available light, Twilight Portrait adds flash to the area of your shots for accurate flash metering. Pre-Flash Metering With a momentary pre-flash, the camera illuminates the subject and calculates exposure through the lens directly from the menu. Transportable. By varying the interval between shots you frame your interest. DSC-P71 Cyber-shot® Digital Still Camera F E AT U R E S ➤1/1.8" 3.2 MegaPixel...
... Movie Video Mail and Presentation modes capture smaller size, lower frame rate files suitable for available light, Twilight Portrait adds flash to the area of your shots for accurate flash metering. Pre-Flash Metering With a momentary pre-flash, the camera illuminates the subject and calculates exposure through the lens directly from the menu. Transportable. By varying the interval between shots you frame your interest. DSC-P71 Cyber-shot® Digital Still Camera F E AT U R E S ➤1/1.8" 3.2 MegaPixel...
Marketing Specifications
Page 2
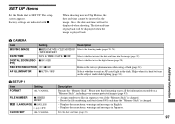
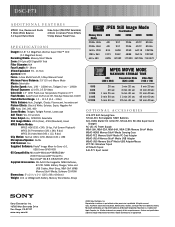
... change without written permission is a trademark of their respective owners. DSC-P71 ADDITIONAL FEATURES MPEG1 Cue, Review and Divide 5 Mode White Balance 3:2 Aspect Ratio Mode Video Output (PAL/NTSC Selectable) 4 Mode In-Camera Picture Effects 5 Step Manual Preset Focus S P E C I F I C AT I O N S Imager: 1/1.8" 3.2 MegaPixel effective Super HAD™ CCD (3.3 MegaPixel Gross) Recording Media: Memory Stick® Media Zoom: 3X Optical/2X Digital/6X Total Filter Diameter: N/A Focal Length: 8 - 24mm 35mm Equivalent: 39 - 117mm Aperture: f2.8 Focus...
... change without written permission is a trademark of their respective owners. DSC-P71 ADDITIONAL FEATURES MPEG1 Cue, Review and Divide 5 Mode White Balance 3:2 Aspect Ratio Mode Video Output (PAL/NTSC Selectable) 4 Mode In-Camera Picture Effects 5 Step Manual Preset Focus S P E C I F I C AT I O N S Imager: 1/1.8" 3.2 MegaPixel effective Super HAD™ CCD (3.3 MegaPixel Gross) Recording Media: Memory Stick® Media Zoom: 3X Optical/2X Digital/6X Total Filter Diameter: N/A Focal Length: 8 - 24mm 35mm Equivalent: 39 - 117mm Aperture: f2.8 Focus...


