Operating Instructions
Page 4
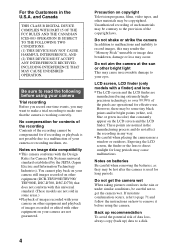
...any way. • Be careful when placing the camera near a window or outdoors. and Canada THIS CLASS B DIGITAL DEVICE COMPLIES WITH PART 15 OF THE FCC RULES... sure that the camera is used for long periods may cause irrecoverable damage to your camera still images recorded on image data compatibility • This camera conforms with a finder) and lens • The ... conditions, be compensated for effective use. Notes on other equipment (DCR-TRV890E/TRV900/ TRV900E, DSC-D700, DSC-D770) that constantly appear on batteries Be careful when removing the batteries, as they may be...
...any way. • Be careful when placing the camera near a window or outdoors. and Canada THIS CLASS B DIGITAL DEVICE COMPLIES WITH PART 15 OF THE FCC RULES... sure that the camera is used for long periods may cause irrecoverable damage to your camera still images recorded on image data compatibility • This camera conforms with a finder) and lens • The ... conditions, be compensated for effective use. Notes on other equipment (DCR-TRV890E/TRV900/ TRV900E, DSC-D700, DSC-D770) that constantly appear on batteries Be careful when removing the batteries, as they may be...
Operating Instructions
Page 8
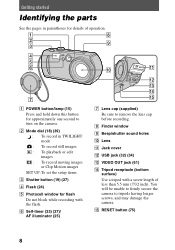
...) Press and hold down this button for approximately one second to remove the lens cap before recording. F Self-timer (23) (27)/ AF illuminator (25) G Lens cap (supplied) Be sure to turn on the camera. H Finder window I Beep/shutter sound holes J Lens K Jack cover L USB jack (32) (34) M VIDEO OUT jack (61) N Tripod receptacle (bottom...
...) Press and hold down this button for approximately one second to remove the lens cap before recording. F Self-timer (23) (27)/ AF illuminator (25) G Lens cap (supplied) Be sure to turn on the camera. H Finder window I Beep/shutter sound holes J Lens K Jack cover L USB jack (32) (34) M VIDEO OUT jack (61) N Tripod receptacle (bottom...
Operating Instructions
Page 9
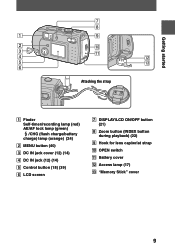
Getting started Attaching the strap A Finder Self-timer/recording lamp (red) AE/AF lock lamp (green) /CHG (flash charge/battery charge) lamp (orange) (24) B MENU button (40) C DC IN jack cover (12) (14) D DC IN jack (12) (14) E Control button (18) (39) F LCD screen G DISPLAY/LCD ON/OFF button (21) H Zoom button (INDEX button during playback) (22) I Hook for lens cap/wrist strap J OPEN switch K Battery cover L Access lamp (17) M "Memory Stick" cover 9
Getting started Attaching the strap A Finder Self-timer/recording lamp (red) AE/AF lock lamp (green) /CHG (flash charge/battery charge) lamp (orange) (24) B MENU button (40) C DC IN jack cover (12) (14) D DC IN jack (12) (14) E Control button (18) (39) F LCD screen G DISPLAY/LCD ON/OFF button (21) H Zoom button (INDEX button during playback) (22) I Hook for lens cap/wrist strap J OPEN switch K Battery cover L Access lamp (17) M "Memory Stick" cover 9

Operating Instructions
Page 20
... flashing slowly, the subject may change after the automatic adjustment is charging the flash.) Holding the camera correctly Hold the camera so that your fingers do not block the flash and do not touch the lens portion when recording images. 20 Notes • When recording a bright subject, the LCD screen ..., then focus again. However, the recording cannot be difficult to 52. 3 Press the shutter button fully down at once in step 2, the camera starts recording after AE/AF lock, but this time, the camera is complete. When "RECORDING" disappears, you can record the next image.
... flashing slowly, the subject may change after the automatic adjustment is charging the flash.) Holding the camera correctly Hold the camera so that your fingers do not block the flash and do not touch the lens portion when recording images. 20 Notes • When recording a bright subject, the LCD screen ..., then focus again. However, the recording cannot be difficult to 52. 3 Press the shutter button fully down at once in step 2, the camera starts recording after AE/AF lock, but this time, the camera is complete. When "RECORDING" disappears, you can record the next image.
Operating Instructions
Page 21
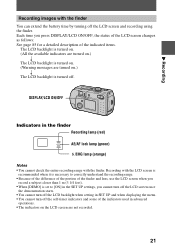
... screen is recommended when it is necessary to correctly understand the recording range. • Because of the difference of the portion of the finder and lens, use the LCD screen when you record a subject closer than 1 m (3 1/4 feet). • When [DEMO] is set to [ON] in the SET UP settings, you press...
... screen is recommended when it is necessary to correctly understand the recording range. • Because of the difference of the portion of the finder and lens, use the LCD screen when you record a subject closer than 1 m (3 1/4 feet). • When [DEMO] is set to [ON] in the SET UP settings, you press...

Operating Instructions
Page 53
... , the exposure adjustment may differ from the actual recording range. 1 Set the mode dial to , or . 2 Press MENU. You can select values ranging from the lens surface with the zoom set all the way to -2.0 EV in the finder may not be effective. If you record using the finder, the range...
... , the exposure adjustment may differ from the actual recording range. 1 Set the mode dial to , or . 2 Press MENU. You can select values ranging from the lens surface with the zoom set all the way to -2.0 EV in the finder may not be effective. If you record using the finder, the range...

Operating Instructions
Page 71
... dropped or damaged. • Do not bend the power cord (mains lead) forcibly, or place a heavy object on operating temperature Your camera is taken from AM receivers and video equipment. Otherwise, the salty air may corrode the metal fittings or dust may enter the inside of ...dirty - Do not use . Should this happens, a short may occur and the unit may condense inside the lens, you are not using your camera at the new location over a period of your camera carefully. AM reception and video operation are : - Note that are disturbed. • The unit becomes warm ...
... dropped or damaged. • Do not bend the power cord (mains lead) forcibly, or place a heavy object on operating temperature Your camera is taken from AM receivers and video equipment. Otherwise, the salty air may corrode the metal fittings or dust may enter the inside of ...dirty - Do not use . Should this happens, a short may occur and the unit may condense inside the lens, you are not using your camera at the new location over a period of your camera carefully. AM reception and video operation are : - Note that are disturbed. • The unit becomes warm ...

Operating Instructions
Page 76
..., text images, Clip Motion and uncompressed images. • Light is noisy. The picture is not striking the subject evenly. Cause and/or Solution • Your camera is about 3 to 25 cm (1 3/16 to the W side. • The focus preset is not a malfunction. 76 t Adjust the exposure (page 53). • ...the zoom button to set to . t Adjust so that the lighting strikes the subject evenly. • The mode dial is set correctly. t Move your camera away from the lens. t Set the flash to auto (no indicator) or (page 24). • The mode dial is set to . • The mode dial is...
..., text images, Clip Motion and uncompressed images. • Light is noisy. The picture is not striking the subject evenly. Cause and/or Solution • Your camera is about 3 to 25 cm (1 3/16 to the W side. • The focus preset is not a malfunction. 76 t Adjust the exposure (page 53). • ...the zoom button to set to . t Adjust so that the lighting strikes the subject evenly. • The mode dial is set correctly. t Move your camera away from the lens. t Set the flash to auto (no indicator) or (page 24). • The mode dial is set to . • The mode dial is...
Operating Instructions
Page 84
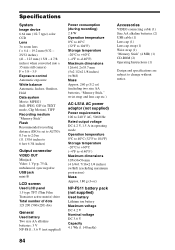
Specifications System Image device 6.64 mm (1/2.7 type) color CCD Lens 3× zoom lens f = 6.4 - 19.2 mm (9/32 - 25/32 inches) (41 - 123 mm (1 5/8 - 4 7/8 inches) when converted into a 35 mm still camera) F = 3.8 - 3.9 Exposure control Automatic exposure White balance Automatic, Indoor, Outdoor, Hold Data system Movie: MPEG1...mm (5×2 1/2×2 1/8 inches) (w/h/d) Mass Approx. 260 g (9.2 oz) (including two size AA batteries, "Memory Stick," wrist strap and lens cap etc.) AC-LS1A AC power adaptor (not supplied) Power requirements 100 to 240 V AC, 50/60 Hz Rated output voltage DC 4.2 V, 1.5...
Specifications System Image device 6.64 mm (1/2.7 type) color CCD Lens 3× zoom lens f = 6.4 - 19.2 mm (9/32 - 25/32 inches) (41 - 123 mm (1 5/8 - 4 7/8 inches) when converted into a 35 mm still camera) F = 3.8 - 3.9 Exposure control Automatic exposure White balance Automatic, Indoor, Outdoor, Hold Data system Movie: MPEG1...mm (5×2 1/2×2 1/8 inches) (w/h/d) Mass Approx. 260 g (9.2 oz) (including two size AA batteries, "Memory Stick," wrist strap and lens cap etc.) AC-LS1A AC power adaptor (not supplied) Power requirements 100 to 240 V AC, 50/60 Hz Rated output voltage DC 4.2 V, 1.5...


