Read This First guide
Page 1
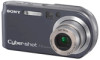
.... 2 Turn the camera on . • Do not touch the lens portion as this may take longer under certain circumstances. DSC-P200 Refer to "User's...sony.net/ 1 Charge the battery pack Be sure to turn off your camera and the AC Adaptor (supplied) in step 3-1, set the clock 1 Select . 2 Press POWER. Connect the plug to drop the battery pack. Digital Still Camera... • USB, A/V cable for multiuse terminal (1) • NP-FR1 battery pack (1) • Wrist strap (1) • CD-ROM (Cyber-shot application software) (1) • Operating instructions for a period of the wall...
.... 2 Turn the camera on . • Do not touch the lens portion as this may take longer under certain circumstances. DSC-P200 Refer to "User's...sony.net/ 1 Charge the battery pack Be sure to turn off your camera and the AC Adaptor (supplied) in step 3-1, set the clock 1 Select . 2 Press POWER. Connect the plug to drop the battery pack. Digital Still Camera... • USB, A/V cable for multiuse terminal (1) • NP-FR1 battery pack (1) • Wrist strap (1) • CD-ROM (Cyber-shot application software) (1) • Operating instructions for a period of the wall...
Operating Instructions
Page 9
...55 Viewing image files stored on a computer with your camera 61 Using the supplied software 62 Using your Macintosh computer 64 Printing still images How to print still images 66 Printing images directly using a PictBridge compliant ...printer 67 Printing at a shop 70 Connecting your camera to your TV Viewing images on a TV screen 72 Troubleshooting Troubleshooting 74 Warning indicators and messages 85 Others On the "Memory Stick 88 On the "InfoLITHIUM" battery pack 90 Using the Cyber-shot...
...55 Viewing image files stored on a computer with your camera 61 Using the supplied software 62 Using your Macintosh computer 64 Printing still images How to print still images 66 Printing images directly using a PictBridge compliant ...printer 67 Printing at a shop 70 Connecting your camera to your TV Viewing images on a TV screen 72 Troubleshooting Troubleshooting 74 Warning indicators and messages 85 Others On the "Memory Stick 88 On the "InfoLITHIUM" battery pack 90 Using the Cyber-shot...
Operating Instructions
Page 91
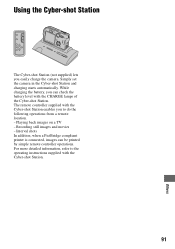
... to do the following operations from a remote location. - Simply set the camera in the Cyber-shot Station and charging starts automatically. While charging the battery, you can be printed by simple remote controller operations. Recording still images and movies - Using the Cyber-shot Station The Cyber-shot Station (not supplied) lets you to the operating instructions supplied with the...
... to do the following operations from a remote location. - Simply set the camera in the Cyber-shot Station and charging starts automatically. While charging the battery, you can be printed by simple remote controller operations. Recording still images and movies - Using the Cyber-shot Station The Cyber-shot Station (not supplied) lets you to the operating instructions supplied with the...

Operating Instructions
Page 95
...48 Cyber-shot Station 91 D Date 45 Date&Time 45 Date/Time 45 Daylight 31 DC IN jack t step 1 in "Read This First" Delete t step 6 in "Read This First" Digital ...64 Software 62 Viewing image stored on a computer with your camera 61 Windows 53 Connecting Computer 56 Printer 68 TV 72 Contrast 35 Copying still images to your computer 55 Create REC. IInndedx ex A AC...Read This First" Auto Focus 10 Auto power-off function t step 2 in "Read This First" Auto Review 46 B Battery pack Charging t step 1 in "Read This First" Install/Remove t step 1 in "Read This First" Remaining indicator ...
...48 Cyber-shot Station 91 D Date 45 Date&Time 45 Date/Time 45 Daylight 31 DC IN jack t step 1 in "Read This First" Delete t step 6 in "Read This First" Digital ...64 Software 62 Viewing image stored on a computer with your camera 61 Windows 53 Connecting Computer 56 Printer 68 TV 72 Contrast 35 Copying still images to your computer 55 Create REC. IInndedx ex A AC...Read This First" Auto Focus 10 Auto power-off function t step 2 in "Read This First" Auto Review 46 B Battery pack Charging t step 1 in "Read This First" Install/Remove t step 1 in "Read This First" Remaining indicator ...

