Instruction Manual
Page 7
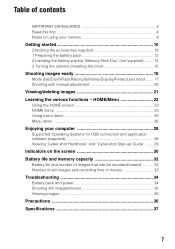
... supplied 10 1 Preparing the battery pack 12 2 Inserting the battery pack/a "Memory Stick Duo" (not supplied) ........ 13 3 Turning the camera on the screen 30 Battery life and memory capacity 32 Battery life and number of images that can be recorded/viewed .......... 32 Number of still...-up Guide" ....... 29 Indicators on /setting the clock 15 Shooting images easily 16 Mode dial/Zoom/Flash/Macro/Self-timer/Display/Finder/Lens hood ...... 17 Shooting with manual adjustment 20 Viewing/deleting images 21 Learning the various functions - Table of movies 33 Troubleshooting 34 Battery ...
... supplied 10 1 Preparing the battery pack 12 2 Inserting the battery pack/a "Memory Stick Duo" (not supplied) ........ 13 3 Turning the camera on the screen 30 Battery life and memory capacity 32 Battery life and number of images that can be recorded/viewed .......... 32 Number of still...-up Guide" ....... 29 Indicators on /setting the clock 15 Shooting images easily 16 Mode dial/Zoom/Flash/Macro/Self-timer/Display/Finder/Lens hood ...... 17 Shooting with manual adjustment 20 Viewing/deleting images 21 Learning the various functions - Table of movies 33 Troubleshooting 34 Battery ...

Instruction Manual
Page 8
... able to record or play back properly. • Using the camera in any way. • When the battery level becomes low, the lens might stop moving. Water entering the inside of the copyright laws. 8 Always protect your camera on other equipment and playback of the pixels are not guaranteed.... light emission. [ Notes on the LCD screen, the LCD finder and the lens • The LCD screen and the LCD finder are manufactured using the camera (page 36). • Do not shake or strike the camera. Read "Precautions" (page 36) before using extremely high-precision technology so over...
... able to record or play back properly. • Using the camera in any way. • When the battery level becomes low, the lens might stop moving. Water entering the inside of the copyright laws. 8 Always protect your camera on other equipment and playback of the pixels are not guaranteed.... light emission. [ Notes on the LCD screen, the LCD finder and the lens • The LCD screen and the LCD finder are manufactured using the camera (page 36). • Do not shake or strike the camera. Read "Precautions" (page 36) before using extremely high-precision technology so over...
Instruction Manual
Page 10
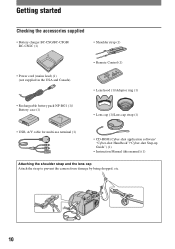
...) (1) (not supplied in the USA and Canada) • Remote Control (1) • Lens hood (1)/Adaptor ring (1) • Rechargeable battery pack NP-BG1 (1)/ Battery case (1) • Lens cap (1)/Lens cap strap (1) • USB, A/V cable for multi-use terminal (1) • CD-ROM... (Cyber-shot application software/ "Cyber-shot Handbook"/"Cyber-shot Step-up Guide") (1) • Instruction Manual (this manual) (1) Attaching the shoulder strap and the lens cap Attach the strap to prevent the camera...
...) (1) (not supplied in the USA and Canada) • Remote Control (1) • Lens hood (1)/Adaptor ring (1) • Rechargeable battery pack NP-BG1 (1)/ Battery case (1) • Lens cap (1)/Lens cap strap (1) • USB, A/V cable for multi-use terminal (1) • CD-ROM... (Cyber-shot application software/ "Cyber-shot Handbook"/"Cyber-shot Step-up Guide") (1) • Instruction Manual (this manual) (1) Attaching the shoulder strap and the lens cap Attach the strap to prevent the camera...
Instruction Manual
Page 17
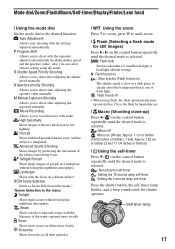
... the settings adjusted automatically. Movie Recording Allows you to shoot after adjusting the shutter speed manually. Mode dial/Zoom/Flash/Macro/Self-timer/Display/Finder/Lens hood [ Using the mode dial Set the mode dial to shoot after adjusting the exposure manually. M Manual Exposure Shooting Allows you can select various setting...
... the settings adjusted automatically. Movie Recording Allows you to shoot after adjusting the shutter speed manually. Mode dial/Zoom/Flash/Macro/Self-timer/Display/Finder/Lens hood [ Using the mode dial Set the mode dial to shoot after adjusting the exposure manually. M Manual Exposure Shooting Allows you can select various setting...
Instruction Manual
Page 19
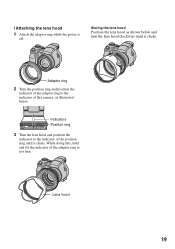
While doing this camera, as shown below . Indicators Position ring 3 Turn the lens hood and position the indicator to the indicator of the position ring until it clicks. Storing the lens hood Position the lens hood as illustrated below and turn . Lens hood 19 [ Attaching the lens hood 1 Attach the adaptor ring while the power is off. Adaptor ring 2 Turn the position ring and position the indicator of the adaptor ring to the indicator of this , hold and fix the indicator of the adaptor ring to not turn the lens hood clockwise until it clicks.
While doing this camera, as shown below . Indicators Position ring 3 Turn the lens hood and position the indicator to the indicator of the position ring until it clicks. Storing the lens hood Position the lens hood as illustrated below and turn . Lens hood 19 [ Attaching the lens hood 1 Attach the adaptor ring while the power is off. Adaptor ring 2 Turn the position ring and position the indicator of the adaptor ring to the indicator of this , hold and fix the indicator of the adaptor ring to not turn the lens hood clockwise until it clicks.

Instruction Manual
Page 24
Folder Copy Function Guide COMPONENT Grid Line Digital Zoom Auto Orientation Expanded Focus Folder Internal Memory Tool Format Main Settings Main Settings 1 Beep Initialize Main Settings 2 USB Connect Video Out Shooting Settings Shooting Settings 1 AF Illuminator AF Mode Conversion Lens Shooting Settings 2 Flash Sync. Auto Review Clock Settings Language Setting Format Music Create...
Folder Copy Function Guide COMPONENT Grid Line Digital Zoom Auto Orientation Expanded Focus Folder Internal Memory Tool Format Main Settings Main Settings 1 Beep Initialize Main Settings 2 USB Connect Video Out Shooting Settings Shooting Settings 1 AF Illuminator AF Mode Conversion Lens Shooting Settings 2 Flash Sync. Auto Review Clock Settings Language Setting Format Music Create...
Instruction Manual
Page 31
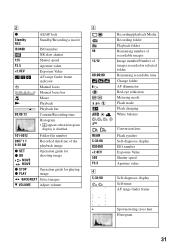
... of images recorded in selected folder Remaining recordable time Change folder AF illuminator Red-eye reduction Metering mode Flash mode Flash charging White balance Conversion lens Flash synchro Self-diagnosis display ISO number Exposure Value Shutter speed Aperture value Self-diagnosis display Self-timer AF range finder frame + Spot metering cross...
... of images recorded in selected folder Remaining recordable time Change folder AF illuminator Red-eye reduction Metering mode Flash mode Flash charging White balance Conversion lens Flash synchro Self-diagnosis display ISO number Exposure Value Shutter speed Aperture value Self-diagnosis display Self-timer AF range finder frame + Spot metering cross...

Instruction Manual
Page 35
...the charged battery pack (page 12). • The battery pack is attached. Replace it . Insert a "Memory Stick PRO Duo". • The lens cap is dead. Delete unnecessary images (page 21). - Do one . Vertical streaks appear when you are using a model other streaks appear on your... play back images. • Press (Playback) button (page 21). • The folder/file name has been changed on your camera is not guaranteed. • The camera is in an extremely hot or cold location. • The displayed battery remaining differs from the current one. Cannot charge the battery ...
...the charged battery pack (page 12). • The battery pack is attached. Replace it . Insert a "Memory Stick PRO Duo". • The lens cap is dead. Delete unnecessary images (page 21). - Do one . Vertical streaks appear when you are using a model other streaks appear on your... play back images. • Press (Playback) button (page 21). • The folder/file name has been changed on your camera is not guaranteed. • The camera is in an extremely hot or cold location. • The displayed battery remaining differs from the current one. Cannot charge the battery ...
Instruction Manual
Page 36
...and this may cause a malfunction. • Under direct sunlight or near a heater The camera body may condense inside the lens, you do not record the date and time. Precautions [ Do not use/store the camera in the following as they may damage the finish or the casing. • Chemical ...cloth slightly moistened with water, then wipe the surface with a soft cloth to evaporate. Cleaning the lens Wipe the lens with a dry cloth. This rechargeable battery is not charged, you can still use the camera as long as you do not use the following places • In an extremely hot, cold...
...and this may cause a malfunction. • Under direct sunlight or near a heater The camera body may condense inside the lens, you do not record the date and time. Precautions [ Do not use/store the camera in the following as they may damage the finish or the casing. • Chemical ...cloth slightly moistened with water, then wipe the surface with a soft cloth to evaporate. Cleaning the lens Wipe the lens with a dry cloth. This rechargeable battery is not charged, you can still use the camera as long as you do not use the following places • In an extremely hot, cold...
Instruction Manual
Page 37
...color filter Total pixel number of camera: Approx. 8 286 000 pixels Effective pixel number of camera: Approx. 8 083 000 pixels Lens: Carl Zeiss Vario-Tessar 15× zoom lens f = 5.2 - 78 mm (31 - 465 mm when converted to a 35 mm still camera) F2.7 - 4.5 Exposure control... (4 3/8 × 3 3/8 × 3 3/8 inches) (W/H/D, excluding protrusions) (for both DSC-H9 and DSC-H7) Mass: DSC-H9: Approx. 546 g (1 lb 3.3 oz) (including NP-BG1 battery pack, shoulder strap, adaptor ring, lens hood and lens cap, etc.) DSC-H7: Approx. 514 g (1 lb 2.1 oz) (including NP-BG1 battery pack, shoulder strap, adaptor...
...color filter Total pixel number of camera: Approx. 8 286 000 pixels Effective pixel number of camera: Approx. 8 083 000 pixels Lens: Carl Zeiss Vario-Tessar 15× zoom lens f = 5.2 - 78 mm (31 - 465 mm when converted to a 35 mm still camera) F2.7 - 4.5 Exposure control... (4 3/8 × 3 3/8 × 3 3/8 inches) (W/H/D, excluding protrusions) (for both DSC-H9 and DSC-H7) Mass: DSC-H9: Approx. 546 g (1 lb 3.3 oz) (including NP-BG1 battery pack, shoulder strap, adaptor ring, lens hood and lens cap, etc.) DSC-H7: Approx. 514 g (1 lb 2.1 oz) (including NP-BG1 battery pack, shoulder strap, adaptor...


