Instruction Manual
Page 2
...operating and maintenance (servicing) instructions in the literature accompanying the appliance. 2 IMPORTANT SAFEGUARDS For your Sony dealer regarding this product. DSC-H10 Serial No WARNING To reduce fire or shock hazard, do not expose the unit to them...and Liquid Entry Never push objects of any kind on the bottom. Use [ Power Sources This set should still fail to fit, contact your dealer or local power company. Refer to these safety instructions completely before operating the... operating instructions. [ Polarization This set may be operated only from battery power, or other ).
...operating and maintenance (servicing) instructions in the literature accompanying the appliance. 2 IMPORTANT SAFEGUARDS For your Sony dealer regarding this product. DSC-H10 Serial No WARNING To reduce fire or shock hazard, do not expose the unit to them...and Liquid Entry Never push objects of any kind on the bottom. Use [ Power Sources This set should still fail to fit, contact your dealer or local power company. Refer to these safety instructions completely before operating the... operating instructions. [ Polarization This set may be operated only from battery power, or other ).

Instruction Manual
Page 4
Read this first CAUTION Replace the battery with Part 15 of Conformity Trade Name: SONY Model No.: DSC-H10 Responsible Party: Sony Electronics Inc. Do not expose the batteries to be correctly orientated in this product, you . Telephone No.: 858-942-2230 This device... fire or injury may cause undesired operation. [ CAUTION You are recyclable. For more information regarding recycling of rechargeable batteries, call : Sony Customer Information Center 1-800-222-SONY (7669) The number below is subject to the following two conditions: (1) This device may not cause harmful interference,...
Read this first CAUTION Replace the battery with Part 15 of Conformity Trade Name: SONY Model No.: DSC-H10 Responsible Party: Sony Electronics Inc. Do not expose the batteries to be correctly orientated in this product, you . Telephone No.: 858-942-2230 This device... fire or injury may cause undesired operation. [ CAUTION You are recyclable. For more information regarding recycling of rechargeable batteries, call : Sony Customer Information Center 1-800-222-SONY (7669) The number below is subject to the following two conditions: (1) This device may not cause harmful interference,...
Instruction Manual
Page 5
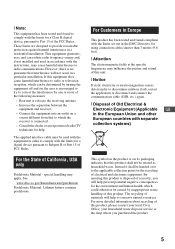
...Disposal of Old Electrical & Electronic Equipment (Applicable GB in the European Union and other European countries with the limits for a digital device pursuant to correct the interference by one or more detailed information about recycling of this product. special handling may apply, See... www.dtsc.ca.gov/hazardouswaste/perchlorate Perchlorate Material: Lithium battery contains perchlorate. Reorient or relocate the receiving antenna. - By ensuring this equipment does cause harmful interference to radio or ...
...Disposal of Old Electrical & Electronic Equipment (Applicable GB in the European Union and other European countries with the limits for a digital device pursuant to correct the interference by one or more detailed information about recycling of this product. special handling may apply, See... www.dtsc.ca.gov/hazardouswaste/perchlorate Perchlorate Material: Lithium battery contains perchlorate. Reorient or relocate the receiving antenna. - By ensuring this equipment does cause harmful interference to radio or ...
Instruction Manual
Page 6
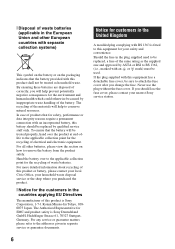
...Directives The manufacturer of this product is Sony Corporation, 1-7-1 Konan Minato-ku Tokyo, 1080075 Japan. The Authorized Representative for your safety and convenience. For all other European countries with separate collection systems) This symbol on the battery or on how to BS 1362, ...same rating as household waste. For more detailed information about recycling of this product or battery, please contact your local Civic Office, your nearest Sony service station. 6 Hand the battery over the product at end-oflife to the addresses given in separate service or guarantee ...
...Directives The manufacturer of this product is Sony Corporation, 1-7-1 Konan Minato-ku Tokyo, 1080075 Japan. The Authorized Representative for your safety and convenience. For all other European countries with separate collection systems) This symbol on the battery or on how to BS 1362, ...same rating as household waste. For more detailed information about recycling of this product or battery, please contact your local Civic Office, your nearest Sony service station. 6 Hand the battery over the product at end-oflife to the addresses given in separate service or guarantee ...
Instruction Manual
Page 7
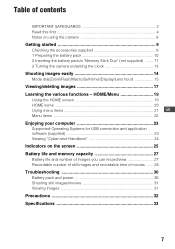
... can record/view 27 Recordable number of still images and recordable time of contents IMPORTANT SAFEGUARDS 2 Read this first 4 Notes on using the camera 8 Getting started 9 Checking the accessories supplied 9 1 Preparing the battery pack 10 2 Inserting the battery pack/a "Memory Stick Duo" (not supplied) ........ 11 3 Turning the camera on/setting the clock 13 Shooting images...
... can record/view 27 Recordable number of still images and recordable time of contents IMPORTANT SAFEGUARDS 2 Read this first 4 Notes on using the camera 8 Getting started 9 Checking the accessories supplied 9 1 Preparing the battery pack 10 2 Inserting the battery pack/a "Memory Stick Duo" (not supplied) ........ 11 3 Turning the camera on/setting the clock 13 Shooting images...
Instruction Manual
Page 8
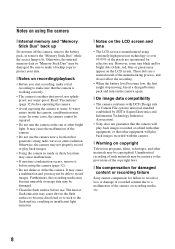
...) universal standard established by JEITA (Japan Electronics and Information Technology Industries Association). • Sony does not guarantee that the camera will play back images. • Using the camera in insufficient light emission. [ Notes on the flash surface to become unusable or image data... cause malfunctions. • If moisture condensation occurs, remove it before operating the camera. • Avoid exposing the camera to water. Insert a charged battery pack and turn off the camera, remove the battery pack, or remove the "Memory Stick Duo" while the access lamp is lit...
...) universal standard established by JEITA (Japan Electronics and Information Technology Industries Association). • Sony does not guarantee that the camera will play back images. • Using the camera in insufficient light emission. [ Notes on the flash surface to become unusable or image data... cause malfunctions. • If moisture condensation occurs, remove it before operating the camera. • Avoid exposing the camera to water. Insert a charged battery pack and turn off the camera, remove the battery pack, or remove the "Memory Stick Duo" while the access lamp is lit...
Instruction Manual
Page 9
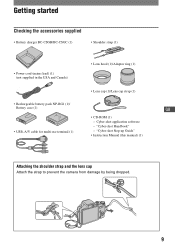
... in the USA and Canada) • Lens hood (1)/Adaptor ring (1) • Lens cap (1)/Lens cap strap (1) • Rechargeable battery pack NP-BG1 (1)/ Battery case (1) GB • USB, A/V cable for multi-use terminal (1) • CD-ROM (1) - "Cyber-shot Handbook" - Cyber...-shot application software - "Cyber-shot Step-up Guide" • Instruction Manual (this manual) (1) Attaching the shoulder strap and the lens cap Attach the strap to prevent the camera...
... in the USA and Canada) • Lens hood (1)/Adaptor ring (1) • Lens cap (1)/Lens cap strap (1) • Rechargeable battery pack NP-BG1 (1)/ Battery case (1) GB • USB, A/V cable for multi-use terminal (1) • CD-ROM (1) - "Cyber-shot Handbook" - Cyber...-shot application software - "Cyber-shot Step-up Guide" • Instruction Manual (this manual) (1) Attaching the shoulder strap and the lens cap Attach the strap to prevent the camera...
Instruction Manual
Page 10
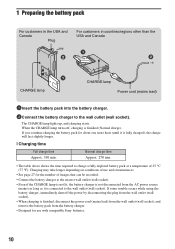
...socket). • When charging is finished, disconnect the power cord (mains lead) from the wall outlet (wall socket), and remove the battery pack from the battery charger. • Designed for use and circumstances. • See page 27 for about one more hour (until it is connected to... longer depending on conditions of use with compatible Sony batteries. 10 If you continue charging the battery pack for the number of images that can be recorded. • Connect the battery charger to the wall outlet (wall socket). 1 Preparing the battery pack For customers in the USA and Canada Plug...
...socket). • When charging is finished, disconnect the power cord (mains lead) from the wall outlet (wall socket), and remove the battery pack from the battery charger. • Designed for use and circumstances. • See page 27 for about one more hour (until it is connected to... longer depending on conditions of use with compatible Sony batteries. 10 If you continue charging the battery pack for the number of images that can be recorded. • Connect the battery charger to the wall outlet (wall socket). 1 Preparing the battery pack For customers in the USA and Canada Plug...
Instruction Manual
Page 11
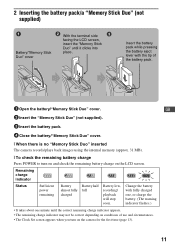
... depending on conditions of the battery pack. 1 Open the battery/"Memory Stick Duo" cover. GB 2 Insert the "Memory Stick Duo" (not supplied). 3 Insert the battery pack. 4 Close the battery/"Memory Stick Duo" cover. [ When there is no "Memory Stick Duo" inserted The camera records/plays back images using... appears when you turn on and check the remaining battery charge on the camera for the first time (page 13). 11 Duo" cover Insert the battery pack while pressing the battery eject lever with fully charged one, or charge the battery. (The warning indicator flashes.) • It takes...
... depending on conditions of the battery pack. 1 Open the battery/"Memory Stick Duo" cover. GB 2 Insert the "Memory Stick Duo" (not supplied). 3 Insert the battery pack. 4 Close the battery/"Memory Stick Duo" cover. [ When there is no "Memory Stick Duo" inserted The camera records/plays back images using... appears when you turn on and check the remaining battery charge on the camera for the first time (page 13). 11 Duo" cover Insert the battery pack while pressing the battery eject lever with fully charged one, or charge the battery. (The warning indicator flashes.) • It takes...

Instruction Manual
Page 12
Slide the battery eject lever. Be sure not to data in once. [ To remove the battery pack/"Memory Stick Duo" Open the battery/"Memory Stick Duo" cover. This may cause damage to drop the battery pack. • Never remove the battery pack/"Memory Stick Duo" when the access lamp is not lit, then push the "Memory Stick Duo" in the "Memory Stick Duo"/internal memory. 12 "Memory Stick Duo" Battery pack Make sure that the access lamp is lit.
Slide the battery eject lever. Be sure not to data in once. [ To remove the battery pack/"Memory Stick Duo" Open the battery/"Memory Stick Duo" cover. This may cause damage to drop the battery pack. • Never remove the battery pack/"Memory Stick Duo" when the access lamp is not lit, then push the "Memory Stick Duo" in the "Memory Stick Duo"/internal memory. 12 "Memory Stick Duo" Battery pack Make sure that the access lamp is lit.

Instruction Manual
Page 13
... then press z. 3 Select [OK], then press z. • The camera does not have a feature for about three minutes, the camera turns off automatically to prevent wearing down the battery pack (Auto power-off function). 13 3 Turning the camera on/setting the clock POWER button HOME button z button ɟ Control button...) (pages 19, 20). [ Notes on when the power is turned on • Once the battery is inserted in the camera, it may take time before operation becomes possible. • If the camera is running on images. By using "Picture Motion Browser" included on the CD-ROM (supplied), you...
... then press z. 3 Select [OK], then press z. • The camera does not have a feature for about three minutes, the camera turns off automatically to prevent wearing down the battery pack (Auto power-off function). 13 3 Turning the camera on/setting the clock POWER button HOME button z button ɟ Control button...) (pages 19, 20). [ Notes on when the power is turned on • Once the battery is inserted in the camera, it may take time before operation becomes possible. • If the camera is running on images. By using "Picture Motion Browser" included on the CD-ROM (supplied), you...

Instruction Manual
Page 25
Battery remaining Low battery warning Image size Mode dial/Menu (Scene Selection) Mode dial White balance Burst mode/Bracket mode Metering mode Face Detection SteadyShot GB Vibration warning Zoom scaling Color mode PictBridge connecting Protect Volume Print order (DPOF) mark Zoom scaling PictBridge connecting Contrast Sharpness 25 Indicators on the screen Each time you press v (DISP) on the A control button, the display changes (page 16). [ When shooting still images M ISO400 [ When shooting movies [ When playing back VOL.
Battery remaining Low battery warning Image size Mode dial/Menu (Scene Selection) Mode dial White balance Burst mode/Bracket mode Metering mode Face Detection SteadyShot GB Vibration warning Zoom scaling Color mode PictBridge connecting Protect Volume Print order (DPOF) mark Zoom scaling PictBridge connecting Contrast Sharpness 25 Indicators on the screen Each time you press v (DISP) on the A control button, the display changes (page 16). [ When shooting still images M ISO400 [ When shooting movies [ When playing back VOL.

Instruction Manual
Page 27
...; Shooting in the following tables assume a fully charged battery pack (supplied) is used at about three second intervals [ Notes on the battery pack • Battery capacity decreases over time and through repeated use . [ When shooting still images Battery life (min.) Approx. 155 No. The power turns...7400 • Viewing single images in the table depending on and off many times. - The camera has been turned on the CIPA standard. (CIPA: Camera & Imaging Products Association) • The battery life and the number of images do not change, regardless of 25 °C (77 °...
...; Shooting in the following tables assume a fully charged battery pack (supplied) is used at about three second intervals [ Notes on the battery pack • Battery capacity decreases over time and through repeated use . [ When shooting still images Battery life (min.) Approx. 155 No. The power turns...7400 • Viewing single images in the table depending on and off many times. - The camera has been turned on the CIPA standard. (CIPA: Camera & Imaging Products Association) • The battery life and the number of images do not change, regardless of 25 °C (77 °...
Instruction Manual
Page 30
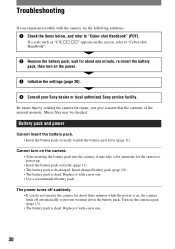
... on the camera again (page 13). • The battery pack is dead. Cannot turn on the power. 3 Initialize the settings (page 20). 4 Consult your Sony dealer or local authorized Sony service facility. Replace it may be checked. Battery pack and power Cannot insert the battery pack. • Insert the battery pack correctly to push the battery eject lever...
... on the camera again (page 13). • The battery pack is dead. Cannot turn on the power. 3 Initialize the settings (page 20). 4 Consult your Sony dealer or local authorized Sony service facility. Replace it may be checked. Battery pack and power Cannot insert the battery pack. • Insert the battery pack correctly to push the battery eject lever...
Instruction Manual
Page 31
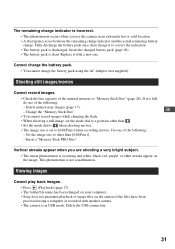
... purple, or other streaks appear on the camera if the files have been processed using the AC Adapter (not supplied). Cannot charge the battery pack. • You cannot charge the battery pack using a computer or recorded with a new one. Shooting still images/movies Cannot record images. • ...USB connection. 31 Vertical streaks appear when you use the camera in USB mode. Viewing images Cannot play back images. • Press (Playback) (page 17). • The folder/file name has been changed on your computer. • Sony does not guarantee playback of the following : - The ...
... purple, or other streaks appear on the camera if the files have been processed using the AC Adapter (not supplied). Cannot charge the battery pack. • You cannot charge the battery pack using a computer or recorded with a new one. Shooting still images/movies Cannot record images. • ...USB connection. 31 Vertical streaks appear when you use the camera in USB mode. Viewing images Cannot play back images. • Press (Playback) (page 17). • The folder/file name has been changed on your computer. • Sony does not guarantee playback of the following : - The ...
Instruction Manual
Page 32
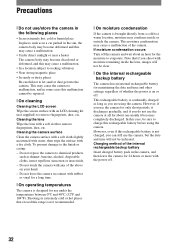
... wait about one month it discharges gradually, and if you can still use the camera at all for maintaining the date and time and other settings regardless of the internal rechargeable backup battery Insert charged battery pack in the camera, and then leave the camera for use under the temperatures between 0°C and 40°C (32...
... wait about one month it discharges gradually, and if you can still use the camera at all for maintaining the date and time and other settings regardless of the internal rechargeable backup battery Insert charged battery pack in the camera, and then leave the camera for use under the temperatures between 0°C and 40°C (32...

Instruction Manual
Page 33
...camera: Approx. 8 083 000 pixels Lens: Carl Zeiss Vario-Tessar 10× zoom lens f = 6.3 - 63 mm (38 - 380 mm (35 mm film equivalent)) F3.5 (W) - 4.4 (T) Exposure control: Automatic exposure, Scene Selection (9 modes) White balance: Automatic, Daylight, Cloudy, Fluorescent 1,2,3, Incandescent, Flash File format (DCF compliant): Still...215; 2 3/4 × 1 15/16 inches) (W/H/D, excluding protrusions) Mass: Approx. 381 g (13.4 oz) (including NPBG1 battery pack, strap, adaptor ring, lens hood and lens cap, etc.) Microphone: Monaural Speaker: Monaural Exif Print: Compatible PRINT Image Matching III...
...camera: Approx. 8 083 000 pixels Lens: Carl Zeiss Vario-Tessar 10× zoom lens f = 6.3 - 63 mm (38 - 380 mm (35 mm film equivalent)) F3.5 (W) - 4.4 (T) Exposure control: Automatic exposure, Scene Selection (9 modes) White balance: Automatic, Daylight, Cloudy, Fluorescent 1,2,3, Incandescent, Flash File format (DCF compliant): Still...215; 2 3/4 × 1 15/16 inches) (W/H/D, excluding protrusions) Mass: Approx. 381 g (13.4 oz) (including NPBG1 battery pack, strap, adaptor ring, lens hood and lens cap, etc.) Microphone: Monaural Speaker: Monaural Exif Print: Compatible PRINT Image Matching III...


