
Operating Instructions
Page 2
...Note: This equipment has been tested and found to comply with the limits for help. This equipment generates, uses, and can be of sufficient magnitude to constitute a risk of the FCC Rules. Increase the separation between the.... - Consult the dealer or an experienced radio/TV technician for a Class B digital device, pursuant to Part 15 of electric shock to : Sony Customer Information Center 1 Sony Drive, Mail Drop #T1-11, Park Ridge, NJ 07656 2 CAUTION You are... be determined by one or more of Conformity Trade Name: SONY Model No.: DSC-F505V Responsible Party:Sony Electronics Inc.
...Note: This equipment has been tested and found to comply with the limits for help. This equipment generates, uses, and can be of sufficient magnitude to constitute a risk of the FCC Rules. Increase the separation between the.... - Consult the dealer or an experienced radio/TV technician for a Class B digital device, pursuant to Part 15 of electric shock to : Sony Customer Information Center 1 Sony Drive, Mail Drop #T1-11, Park Ridge, NJ 07656 2 CAUTION You are... be determined by one or more of Conformity Trade Name: SONY Model No.: DSC-F505V Responsible Party:Sony Electronics Inc.

Operating Instructions
Page 3
... fields at the specific frequencies may influence the picture and sound of this camera. For the Customers in Germany Directive:EMC Directive 89/336/EEC.92/ 31/EEC This equipment... complies with the limits for your nearest Sony Service Center or Factory Service Center. "Memory Stick" N50 For the Customers in CANADA This Class B digital apparatus complies with Part 15 of FCC Rules... the fuse in the plug supplied need to be sure to comply with the EMC regulations when used under the following two conditions: (1) This device may not cause harmful interference, and (2) this ...
... fields at the specific frequencies may influence the picture and sound of this camera. For the Customers in Germany Directive:EMC Directive 89/336/EEC.92/ 31/EEC This equipment... complies with the limits for your nearest Sony Service Center or Factory Service Center. "Memory Stick" N50 For the Customers in CANADA This Class B digital apparatus complies with Part 15 of FCC Rules... the fuse in the plug supplied need to be sure to comply with the EMC regulations when used under the following two conditions: (1) This device may not cause harmful interference, and (2) this ...

Operating Instructions
Page 4
...Germany, and Sony Corporation, and offers the same quality as other equipment on your camera on other ...DSC-D700, DSC-D770) that the camera is capable of data loss, always copy (back up) data to a disk. The lens for effective use. • Be careful when placing the camera...camera is equipped with this universal standard. (These models are not sold in any way. Battery Pack For the Customers in the rain or under similar conditions, be contrary to the provision of the copyright laws. Unauthorized recording of such materials may cause malfunctions. and Canada THIS CLASS B DIGITAL...
...Germany, and Sony Corporation, and offers the same quality as other equipment on your camera on other ...DSC-D700, DSC-D770) that the camera is capable of data loss, always copy (back up) data to a disk. The lens for effective use. • Be careful when placing the camera...camera is equipped with this universal standard. (These models are not sold in any way. Battery Pack For the Customers in the rain or under similar conditions, be contrary to the provision of the copyright laws. Unauthorized recording of such materials may cause malfunctions. and Canada THIS CLASS B DIGITAL...

Operating Instructions
Page 5
...38 Recording text documents (TEXT) ..... 39 Recording uncompressed images (TIFF 39 Recording images in macro 40 Focusing manually 40 Using the PROGRAM AE function .... 41 Using the spot light-metering mode .... 42 Adjusting the exposure (EXPOSURE 43 Adjusting the white balance (WHITE BALANCE 43 Recording ... (COPY 52 Selecting still images to print (PRINT MARK 54 Additional information Precautions 55 On "Memory Sticks 56 Using your camera abroad 57 Troubleshooting 58 Warning and notice messages 62 Self-diagnosis display 63 Specifications 64 LCD screen indicators 65 Index 67 5
...38 Recording text documents (TEXT) ..... 39 Recording uncompressed images (TIFF 39 Recording images in macro 40 Focusing manually 40 Using the PROGRAM AE function .... 41 Using the spot light-metering mode .... 42 Adjusting the exposure (EXPOSURE 43 Adjusting the white balance (WHITE BALANCE 43 Recording ... (COPY 52 Selecting still images to print (PRINT MARK 54 Additional information Precautions 55 On "Memory Sticks 56 Using your camera abroad 57 Troubleshooting 58 Warning and notice messages 62 Self-diagnosis display 63 Specifications 64 LCD screen indicators 65 Index 67 5

Operating Instructions
Page 7
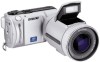
Getting started 7 1 2 3 4 5 6 A Zoom lever B POWER switch POWER lamp C LCD screen D LCD BACK LIGHT switch Usually set to save the battery if you use your camera in bright place. E PROGRAM AE ADJ button VOLUME +/- Set to OFF to ON. button F PROGRAM AE button (41) G Battery eject lever (11) 89 0 qa qs qd qf qg H Access lamp (15) I Battery/"Memory Stick" cover J (flash) button Flash lamp K OPEN switch L Slot cover for AC power adaptor/charger (12) M (External flash) jack N DISPLAY button O Control button 7
Getting started 7 1 2 3 4 5 6 A Zoom lever B POWER switch POWER lamp C LCD screen D LCD BACK LIGHT switch Usually set to save the battery if you use your camera in bright place. E PROGRAM AE ADJ button VOLUME +/- Set to OFF to ON. button F PROGRAM AE button (41) G Battery eject lever (11) 89 0 qa qs qd qf qg H Access lamp (15) I Battery/"Memory Stick" cover J (flash) button Flash lamp K OPEN switch L Slot cover for AC power adaptor/charger (12) M (External flash) jack N DISPLAY button O Control button 7

Operating Instructions
Page 8
D Hook for the wrist/shoulder strap C Tripod receptacle (bottom surface) Use a tripod with a screw length of less than 9/32 inch (6.5 mm). 3 1 2 4 A Speaker B Hook for the lens cap/shoulder strap Be sure to tripods having longer screws, and may damage the camera. Attaching the lens cap (supplied) and the wrist strap (supplied). You will be unable to firmly secure the camera to remove the lens cap before turning on your camera. Lens cap Lens cap strap Wrist strap 8
D Hook for the wrist/shoulder strap C Tripod receptacle (bottom surface) Use a tripod with a screw length of less than 9/32 inch (6.5 mm). 3 1 2 4 A Speaker B Hook for the lens cap/shoulder strap Be sure to tripods having longer screws, and may damage the camera. Attaching the lens cap (supplied) and the wrist strap (supplied). You will be unable to firmly secure the camera to remove the lens cap before turning on your camera. Lens cap Lens cap strap Wrist strap 8

Operating Instructions
Page 9
... lights up when charging begins. "InfoLITHIUM" is a lithium ion battery pack which allows you to use any other battery pack. Slide the battery pack in the direction of Sony Corporation. 9 This unit is completed. You cannot use the battery longer than usual, leave the battery pack inserted for about one hour after normal... battery pack in the direction opposite the v mark. * What is a trademark of the v mark. Getting started Preparing the power supply Charging the battery pack Your camera operates only with compatible video equipment. "InfoLITHIUM" is "InfoLITHIUM"?
... lights up when charging begins. "InfoLITHIUM" is a lithium ion battery pack which allows you to use any other battery pack. Slide the battery pack in the direction of Sony Corporation. 9 This unit is completed. You cannot use the battery longer than usual, leave the battery pack inserted for about one hour after normal... battery pack in the direction opposite the v mark. * What is a trademark of the v mark. Getting started Preparing the power supply Charging the battery pack Your camera operates only with compatible video equipment. "InfoLITHIUM" is "InfoLITHIUM"?

Operating Instructions
Page 10
... correct battery remaining time appears. • Do not expose the battery pack to charge a completely discharged battery pack using the ACVF10 AC power adaptor/charger. The above figures are a guide when you use your camera at a temperature of the "Memory Stick" is indicated but the power runs out soon, fully charge the battery...
... correct battery remaining time appears. • Do not expose the battery pack to charge a completely discharged battery pack using the ACVF10 AC power adaptor/charger. The above figures are a guide when you use your camera at a temperature of the "Memory Stick" is indicated but the power runs out soon, fully charge the battery...

Operating Instructions
Page 11
... sliding the OPEN switch in the direction of use the camera again, slide the POWER switch to turn on the camera shows the remaining time for about three minutes during recording, the camera turns off function If you do not operate the camera for which you can still record or play ...the v mark facing toward the battery compartment as illustrated. 3 Close the battery/"Memory Stick" cover. Battery remaining indicator The LCD screen on the camera again. 11 This indication may not be entirely accurate depending on the conditions of the arrow. 2 Install the battery pack. Slide the battery ...
... sliding the OPEN switch in the direction of use the camera again, slide the POWER switch to turn on the camera shows the remaining time for about three minutes during recording, the camera turns off function If you do not operate the camera for which you can still record or play ...the v mark facing toward the battery compartment as illustrated. 3 Close the battery/"Memory Stick" cover. Battery remaining indicator The LCD screen on the camera again. 11 This indication may not be entirely accurate depending on the conditions of the arrow. 2 Install the battery pack. Slide the battery ...

Operating Instructions
Page 12
Using a car battery Use Sony DC adaptor/charger (not supplied). 12 Using the AC power adaptor DK-115 DC connecting cable (supplied) AC-VF10 AC power adaptor/ charger (supplied) Slot cover for AC power adaptor/charger and ...
Using a car battery Use Sony DC adaptor/charger (not supplied). 12 Using the AC power adaptor DK-115 DC connecting cable (supplied) AC-VF10 AC power adaptor/ charger (supplied) Slot cover for AC power adaptor/charger and ...

Operating Instructions
Page 13
Control button 1 Slide the POWER switch in the direction of the arrow to turn on the control button, then press the center z. 13 The POWER lamp lights up. 2 Press v on the power. The menu bar appears on the LCD screen. 3 Select [SETUP] with B on your camera, set the date and time. Getting started Setting the date and time When you turn on the control button. If these are not set, the CLOCK SET screen appears whenever you first use your camera for recording.
Control button 1 Slide the POWER switch in the direction of the arrow to turn on the control button, then press the center z. 13 The POWER lamp lights up. 2 Press v on the power. The menu bar appears on the LCD screen. 3 Select [SETUP] with B on your camera, set the date and time. Getting started Setting the date and time When you turn on the control button. If these are not set, the CLOCK SET screen appears whenever you first use your camera for recording.

Operating Instructions
Page 17
Digital zoom function This camera has a digital zoom function. You can check the last recorded image by clearing the menu bar from the screen (page 32) and pressing b on the control button. Using digital zoom • The maximum zoom magnification is not necessary, set [DIGITAL ZOOM] to the subject W side: About 9 7/8 inches ... selecting [OK] with b/B on the control button and then press the center z. The T side of the bar shows the digital zooming zone. Using the zoom feature Zoom lever W side: for wide-angle (subject appears farther away) T side: for moving images. 17 When...
Digital zoom function This camera has a digital zoom function. You can check the last recorded image by clearing the menu bar from the screen (page 32) and pressing b on the control button. Using digital zoom • The maximum zoom magnification is not necessary, set [DIGITAL ZOOM] to the subject W side: About 9 7/8 inches ... selecting [OK] with b/B on the control button and then press the center z. The T side of the bar shows the digital zooming zone. Using the zoom feature Zoom lever W side: for wide-angle (subject appears farther away) T side: for moving images. 17 When...

Operating Instructions
Page 18
See page 65 for a detailed description of the indicated items. DISPLAY Notes • You cannot turn on/off the self-timer indicators and some of the indicators used in advanced operations. • The indicators on the LCD screen. Changing the lens orientation You can adjust the angle by turning the lens part upward up to 90 degrees and downward up to turn off the indicators on the LCD screen are not recorded. 18 MODE selector 90° Lens part 50° LCD screen indicators during recording Press DISPLAY to 50 degrees.
See page 65 for a detailed description of the indicated items. DISPLAY Notes • You cannot turn on/off the self-timer indicators and some of the indicators used in advanced operations. • The indicators on the LCD screen. Changing the lens orientation You can adjust the angle by turning the lens part upward up to 90 degrees and downward up to turn off the indicators on the LCD screen are not recorded. 18 MODE selector 90° Lens part 50° LCD screen indicators during recording Press DISPLAY to 50 degrees.

Operating Instructions
Page 19
... of the surrounding brightness. Forced flash: The flash strobes regardless of the flash (FLASH LEVEL) in the menu settings (page 35). 19 Using the self-timer When you use the self-timer function, the subject is recorded about 10 seconds after you change the flash mode while the flash is popped up...
... of the surrounding brightness. Forced flash: The flash strobes regardless of the flash (FLASH LEVEL) in the menu settings (page 35). 19 Using the self-timer When you use the self-timer function, the subject is recorded about 10 seconds after you change the flash mode while the flash is popped up...

Operating Instructions
Page 20
... slow speed in the PROGRAM AE shutter priority mode. • The flash effect is closed when it should be used, the (no-flash) indicator appears in the LCD screen. • Auto red-eye reduction may block the light... from the flash or cause the lens shadow to appear. • You cannot use an external flash and the built-in flash at the same time. • If the flash is not obtained... easily when you use forced flash in flash is 31/32 feet to 8 1/3 feet (0.3 m to 2.5 m). • Attaching a ...
... slow speed in the PROGRAM AE shutter priority mode. • The flash effect is closed when it should be used, the (no-flash) indicator appears in the LCD screen. • Auto red-eye reduction may block the light... from the flash or cause the lens shadow to appear. • You cannot use an external flash and the built-in flash at the same time. • If the flash is not obtained... easily when you use forced flash in flash is 31/32 feet to 8 1/3 feet (0.3 m to 2.5 m). • Attaching a ...

Operating Instructions
Page 21
"REC" appears on the "Memory Stick." See page 65 for up to 60 seconds. Zooming or using the self-timer, etc. See pages 17 to MOVIE. 2 Press the shutter button fully down. B Recording POWER switch DISPLAY 1 Set the MODE selector to 19. ...
"REC" appears on the "Memory Stick." See page 65 for up to 60 seconds. Zooming or using the self-timer, etc. See pages 17 to MOVIE. 2 Press the shutter button fully down. B Recording POWER switch DISPLAY 1 Set the MODE selector to 19. ...

Operating Instructions
Page 25
...type of USB equipment that is used for the following formats. QuickTime 3.2 or newer must be installed (to Mac OS 9.0 should be provided as standard), or when using a personal computer You can view data recorded with your camera on a personal computer. Recommended ...Macintosh environment Macintosh computer with the Mac OS 8.6 standard installation The USB connector must be used simultaneously, some equipment may not operate....
...type of USB equipment that is used for the following formats. QuickTime 3.2 or newer must be installed (to Mac OS 9.0 should be provided as standard), or when using a personal computer You can view data recorded with your camera on a personal computer. Recommended ...Macintosh environment Macintosh computer with the Mac OS 8.6 standard installation The USB connector must be used simultaneously, some equipment may not operate....

Operating Instructions
Page 26
... the camera is set to load. 2 Insert the supplied CD-ROM in the CD-ROM drive of your personal computer and allow Windows 98 to communication standby mode. "PC MODE" appears on your personal computer using the supplied USB cable. The Add Hardware Wizard starts twice because two... different USB drivers are installed. Be sure to allow the installation to load. 2 Insert the supplied CD-ROM in until the connector clicks into place 4 Insert a "Memory Stick" into your camera. The USB...
... the camera is set to load. 2 Insert the supplied CD-ROM in the CD-ROM drive of your personal computer and allow Windows 98 to communication standby mode. "PC MODE" appears on your personal computer using the supplied USB cable. The Add Hardware Wizard starts twice because two... different USB drivers are installed. Be sure to allow the installation to load. 2 Insert the supplied CD-ROM in until the connector clicks into place 4 Insert a "Memory Stick" into your camera. The USB...

Operating Instructions
Page 28
...are trademarks of Apple Computer, Inc. • All other product names mentioned herein may be the trademarks or registered trademarks of your camera. Notes on your personal computer before viewing it is recommended. Desired file type Double-click in this order Still image "Dcim" folder ... TIFF image (uncompressed) ∗ Copying a file to the camera or when you load an image modified using your personal computer "Memory Stick" • "Memory Stick" operations on your camera cannot be played back on using the supplied retouch software from the "Memory Stick", the image and...
...are trademarks of Apple Computer, Inc. • All other product names mentioned herein may be the trademarks or registered trademarks of your camera. Notes on your personal computer before viewing it is recommended. Desired file type Double-click in this order Still image "Dcim" folder ... TIFF image (uncompressed) ∗ Copying a file to the camera or when you load an image modified using your personal computer "Memory Stick" • "Memory Stick" operations on your camera cannot be played back on using the supplied retouch software from the "Memory Stick", the image and...

Operating Instructions
Page 30
... Set the selector as follows before starting to operate your camera. PLAY STILL MOVIE PLAY: To play back or edit images STILL: To record still images and voice memos MOVIE: To record moving images How to use your camera to record or to select the indicators, images and menus... appearing on the LCD screen of your camera. How to use the MODE selector The MODE selector selects whether you can use the control button The control button is used for "Advanced operations" are frequently used to play back and edit images. Advanced operations Before performing ...
... Set the selector as follows before starting to operate your camera. PLAY STILL MOVIE PLAY: To play back or edit images STILL: To record still images and voice memos MOVIE: To record moving images How to use your camera to record or to select the indicators, images and menus... appearing on the LCD screen of your camera. How to use the MODE selector The MODE selector selects whether you can use the control button The control button is used for "Advanced operations" are frequently used to play back and edit images. Advanced operations Before performing ...

