
Operating Instructions
Page 5
...Preparations Checking the contents of the package 9 Setting the ink ribbon 9 Inserting the print paper 10 Connecting to the AC power source 12 Operations in an initial state ...........13 Direct ... Print (Index Print/Print All/DPOF Print 26 Making a Calendar 27 Making an ID Photo 28 Changing the settings 29 Setting the Date Print 29 Setting the print finish (Borders/... 30 Setting the On-screen Display ....... 30 Changing the Color Setting 31 Hiding or showing the Printer information display 31 Resetting to the Default Setting ..... 32 Printing from a USB memory .......32 Printing...
...Preparations Checking the contents of the package 9 Setting the ink ribbon 9 Inserting the print paper 10 Connecting to the AC power source 12 Operations in an initial state ...........13 Direct ... Print (Index Print/Print All/DPOF Print 26 Making a Calendar 27 Making an ID Photo 28 Changing the settings 29 Setting the Date Print 29 Setting the print finish (Borders/... 30 Setting the On-screen Display ....... 30 Changing the Color Setting 31 Hiding or showing the Printer information display 31 Resetting to the Default Setting ..... 32 Printing from a USB memory .......32 Printing...
Operating Instructions
Page 6
... from a PC Printing from a PC 37 Installing the software 37 System requirements 37 Installing the printer driver 38 Installing the PMB (Picture Motion Browser 41 Printing photos from the PMB (Picture Motion Browser 42 Registering a browsing folder ........ 45 Printing from a commercially available software application 46 ... 63 SD Memory Card 64 xD-Picture Card 64 Notes on using a memory card .......65 Specifications 65 Printing range 67 Glossary 68 Index 69 Error messages If an error display appears 47 Troubleshooting If trouble occurs 50 If paper jams 60 Cleaning 61 6 GB
... from a PC Printing from a PC 37 Installing the software 37 System requirements 37 Installing the printer driver 38 Installing the PMB (Picture Motion Browser 41 Printing photos from the PMB (Picture Motion Browser 42 Registering a browsing folder ........ 45 Printing from a commercially available software application 46 ... 63 SD Memory Card 64 xD-Picture Card 64 Notes on using a memory card .......65 Specifications 65 Printing range 67 Glossary 68 Index 69 Error messages If an error display appears 47 Troubleshooting If trouble occurs 50 If paper jams 60 Cleaning 61 6 GB

Operating Instructions
Page 7
...Printer front panel A 1 (on/standby) button/STANDBY indicator B CANCEL/ (Index View) button C MENU button D LCD screen 2.4 type DPP-FP67 3.5 type DPP-FP77 E ENTER button F Direction (g/G/f/F) buttons G AUTO TOUCH-UP button (.page 22) H PRINT button/indicator I Paper tray compartment (.page 10) J Paper... tray compartment door K "Memory Stick PRO" media (Standard/Duo) slot (.pages17, 63) L xD-Picture Card slot (.pages17, 64) M SD Memory Card slot (.pages17, 64) N Ink ...
...Printer front panel A 1 (on/standby) button/STANDBY indicator B CANCEL/ (Index View) button C MENU button D LCD screen 2.4 type DPP-FP67 3.5 type DPP-FP77 E ENTER button F Direction (g/G/f/F) buttons G AUTO TOUCH-UP button (.page 22) H PRINT button/indicator I Paper tray compartment (.page 10) J Paper... tray compartment door K "Memory Stick PRO" media (Standard/Duo) slot (.pages17, 63) L xD-Picture Card slot (.pages17, 64) M SD Memory Card slot (.pages17, 64) N Ink ...

Operating Instructions
Page 8
... into this connector. * In some regions, the DPPA-BT1 Bluetooth USB adaptor is not sold. Notes • When you carry the printer, make sure to remove memory cards, USB memory, the paper tray, AC adaptor, and other external USB device, connect it via a USB cable to its original position.... Printer left side panel E USB connector (.page 39) When using the DPP-FP77, set the LCD panel to this connector. Otherwise malfunctions may occur....
... into this connector. * In some regions, the DPPA-BT1 Bluetooth USB adaptor is not sold. Notes • When you carry the printer, make sure to remove memory cards, USB memory, the paper tray, AC adaptor, and other external USB device, connect it via a USB cable to its original position.... Printer left side panel E USB connector (.page 39) When using the DPP-FP77, set the LCD panel to this connector. Otherwise malfunctions may occur....

Operating Instructions
Page 9
...up the eject lever, and remove the used ink ribbon. Continued 9 GB About Sony Print Packs (sold separately) Please use a Sony optional color print pack designed for the printer. For details, refer to the supplied "About the Print Packs." Setting the ink...that the following accessories are supplied with your printer. • Paper tray (1) • AC adaptor (1) • USB cable (1) • AC power cord*1 (1) • Cleaning cartridge (1)/Cleaning sheet (1) • CD-ROM (Windows Printer Driver Software Ver.1.0 and PMB (Picture Motion Browser) Ver.4.2) • Operating Instructions...
...up the eject lever, and remove the used ink ribbon. Continued 9 GB About Sony Print Packs (sold separately) Please use a Sony optional color print pack designed for the printer. For details, refer to the supplied "About the Print Packs." Setting the ink...that the following accessories are supplied with your printer. • Paper tray (1) • AC adaptor (1) • USB cable (1) • AC power cord*1 (1) • Cleaning cartridge (1)/Cleaning sheet (1) • CD-ROM (Windows Printer Driver Software Ver.1.0 and PMB (Picture Motion Browser) Ver.4.2) • Operating Instructions...

Operating Instructions
Page 10
... wind the ink ribbon in a cool and dark place and use the rewound ink ribbon for which we cannot guarantee or compensate. 2 Set the print paper into place, remove it and then re-insert it within a short period from the ink ribbon. • Do not remove the ink ribbon while printing... the ink ribbon in a location subject to remove the slack. Depending on the ink ribbon may affect the printed results, for printing. Use of the paper tray cover (shown with arrows) and open the paper tray cover. If the ink ribbon does not click into the...
... wind the ink ribbon in a cool and dark place and use the rewound ink ribbon for which we cannot guarantee or compensate. 2 Set the print paper into place, remove it and then re-insert it within a short period from the ink ribbon. • Do not remove the ink ribbon while printing... the ink ribbon in a location subject to remove the slack. Depending on the ink ribbon may affect the printed results, for printing. Use of the paper tray cover (shown with arrows) and open the paper tray cover. If the ink ribbon does not click into the...

Operating Instructions
Page 11
... different types of print paper together into the printer. • To avoid paper jam or malfunctions of the printer, make the printed image thicker. - Preparations 3 Close the paper tray cover. 4 Open the slide cover. 5 Insert the paper tray into the paper tray. - Do not use print paper ejected without printing. Remove...result in imperfect printing. • Do not bend the print paper, or cut the print paper from the printer and close the slide door of the printed image may occur. • Avoid placing the print paper in its printing surface (the side with the protective sheet ...
... different types of print paper together into the printer. • To avoid paper jam or malfunctions of the printer, make the printed image thicker. - Preparations 3 Close the paper tray cover. 4 Open the slide cover. 5 Insert the paper tray into the paper tray. - Do not use print paper ejected without printing. Remove...result in imperfect printing. • Do not bend the print paper, or cut the print paper from the printer and close the slide door of the printed image may occur. • Avoid placing the print paper in its printing surface (the side with the protective sheet ...

Operating Instructions
Page 12
... power source 1 Insert the plug of the AC adaptor into the DC IN 24 V jack on a wobbly table. • Leave enough room around the printer. The print paper emerges from the DC IN 24 V jack of the AC adaptor and the other plug to 240 V AC, 50/60 Hz. If trouble occurs... the AC power cord from the back a few times during printing. Keep 10 cm (13/32 inch) or more space at the rear of the printer. • Connect the AC adaptor to an easily accessible wall outlet close by disconnecting the plug from the wall outlet. • Do not short the...
... power source 1 Insert the plug of the AC adaptor into the DC IN 24 V jack on a wobbly table. • Leave enough room around the printer. The print paper emerges from the DC IN 24 V jack of the AC adaptor and the other plug to 240 V AC, 50/60 Hz. If trouble occurs... the AC power cord from the back a few times during printing. Keep 10 cm (13/32 inch) or more space at the rear of the printer. • Connect the AC adaptor to an easily accessible wall outlet close by disconnecting the plug from the wall outlet. • Do not short the...

Operating Instructions
Page 18
.... If you select "0," printing is printing; When you turn on the printer with multiple media inserted or connected, the printer detects the media in the order of "Memory Stick" media, SD Memory Card, xD-Picture Card, and then a USB memory connected to change, and change the ...print quantity with an input select switch. Do not touch nor pull the emerged paper during the printing process. • If print paper is not equipped with f/F. The image being printed remains in green, the printer is printed. 4 Press PRINT. Press g/G/f/F to print the previewed image. Even...
.... If you select "0," printing is printing; When you turn on the printer with multiple media inserted or connected, the printer detects the media in the order of "Memory Stick" media, SD Memory Card, xD-Picture Card, and then a USB memory connected to change, and change the ...print quantity with an input select switch. Do not touch nor pull the emerged paper during the printing process. • If print paper is not equipped with f/F. The image being printed remains in green, the printer is printed. 4 Press PRINT. Press g/G/f/F to print the previewed image. Even...

Operating Instructions
Page 42
... in each date of the calendar. See "Registering a browsing folder" on the Windows desktop. • Click "Start" - "Pictures" from your PC using P size print paper. 1 Start the PMB window using either of the following methods: • Double-click (PMB) on page 45. The Print dialog..." with Windows 2000) "Sony Picture Utility" - If you want to print. How to print and click (print). Tip In Windows XP/Windows 2000, please read "Pictures" as thumbnails on the desktop. • In Windows Vista/XP: Click "Start" - Printing photos from the PMB (Picture Motion Browser) You can use...
... in each date of the calendar. See "Registering a browsing folder" on the Windows desktop. • Click "Start" - "Pictures" from your PC using P size print paper. 1 Start the PMB window using either of the following methods: • Double-click (PMB) on page 45. The Print dialog..." with Windows 2000) "Sony Picture Utility" - If you want to print. How to print and click (print). Tip In Windows XP/Windows 2000, please read "Pictures" as thumbnails on the desktop. • In Windows Vista/XP: Click "Start" - Printing photos from the PMB (Picture Motion Browser) You can use...
Operating Instructions
Page 43
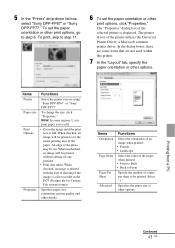
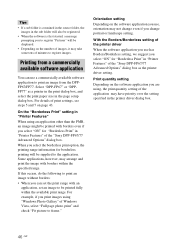
... photo may be printed over the entire printing area of shooting if the image is a file recorded in the DCF (Design rule for Camera File system) format. Note: In some items that are not used within this printer. 7 In the "Layout" tab, specify the paper orientation... Advanced Specifies the paper size or other details. An edge of the selected printer is printed with the date of the paper. Specifies paper size, orientation, picture quality and other options. 5 In the "Printer" drop-down list box, select "Sony DPP-FP67" or "Sony DPP-FP77." To set the paper orientation or other...
... photo may be printed over the entire printing area of shooting if the image is a file recorded in the DCF (Design rule for Camera File system) format. Note: In some items that are not used within this printer. 7 In the "Layout" tab, specify the paper orientation... Advanced Specifies the paper size or other details. An edge of the selected printer is printed with the date of the paper. Specifies paper size, orientation, picture quality and other options. 5 In the "Printer" drop-down list box, select "Sony DPP-FP67" or "Sony DPP-FP77." To set the paper orientation or other...
Operating Instructions
Page 44
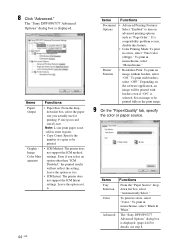
... . • ICM Intent: The printer does not support the ICM Intent settings. Even if you actually use for printing: P size (post card size)/L size Note: L size print paper is selected. Leave the option as it is displayed. The "Sony DPP-FP67/77 Advanced Options" dialog box... is . 44 GB Items Document Options Printer Features Functions • Advanced Printing Features: Select "Enabled" to be ...
... . • ICM Intent: The printer does not support the ICM Intent settings. Even if you actually use for printing: P size (post card size)/L size Note: L size print paper is selected. Leave the option as it is displayed. The "Sony DPP-FP67/77 Advanced Options" dialog box... is . 44 GB Items Document Options Printer Features Functions • Advanced Printing Features: Select "Enabled" to be ...

Operating Instructions
Page 45
...-picture file or RAW data files. To select multiple still images not in a sequence, click the images individually while pressing the Ctrl key. • You can also print from an image preview. • To cancel the printing operation, do the following. 1Double-click on the printer ..."Register Folders to register and then click "Register." Registration of and then click "Cancel" from a PC Continued 45 GB Doing so may cause a paper jam. The confirmation dialog box used for registration is displayed. 2 Select the folder you select as follows: 1 Click "File"-"Register Viewed Folder," or ...
...-picture file or RAW data files. To select multiple still images not in a sequence, click the images individually while pressing the Ctrl key. • You can also print from an image preview. • To cancel the printing operation, do the following. 1Double-click on the printer ..."Register Folders to register and then click "Register." Registration of and then click "Cancel" from a PC Continued 45 GB Doing so may cause a paper jam. The confirmation dialog box used for registration is displayed. 2 Select the folder you select as follows: 1 Click "File"-"Register Viewed Folder," or ...
Operating Instructions
Page 46
... select "Full page photo print" and check "Fit picture to frame." Select "DPP-FP67" or "DPPFP77" as the printer driver setting. For details of the "Sony DPP-FP67/77 Advanced Options" dialog box as a printer in the print dialog box, and select the print paper size in the printer driver dialog box. ...46 GB If this occurs, do the following to print an image from the DPPFP67/FP77.
... select "Full page photo print" and check "Fit picture to frame." Select "DPP-FP67" or "DPPFP77" as the printer driver setting. For details of the "Sony DPP-FP67/77 Advanced Options" dialog box as a printer in the print dialog box, and select the print paper size in the printer driver dialog box. ...46 GB If this occurs, do the following to print an image from the DPPFP67/FP77.

Operating Instructions
Page 48
.... Error display Meaning/Solutions c An error may have occurred with another device. If you cannot remove the ink ribbon, consult with your Sony dealer or Sony service facilities. C: Cleaning sheet (.page 61) c Paper jams. See "If paper jams" (.page 60) and remove jammed paper from the printer. P: P size print paper - C: Cleaning sheet (.page 61) c The wrong print...
.... Error display Meaning/Solutions c An error may have occurred with another device. If you cannot remove the ink ribbon, consult with your Sony dealer or Sony service facilities. C: Cleaning sheet (.page 61) c Paper jams. See "If paper jams" (.page 60) and remove jammed paper from the printer. P: P size print paper - C: Cleaning sheet (.page 61) c The wrong print...

Operating Instructions
Page 49
Error display Meaning/Solutions c No paper tray is inserted in the printer. Set the print paper or cleaning sheet into the paper tray, insert the paper tray into the printer, and then press PRINT. (.page 10) Error messages 49 GB
Error display Meaning/Solutions c No paper tray is inserted in the printer. Set the print paper or cleaning sheet into the paper tray, insert the paper tray into the printer, and then press PRINT. (.page 10) Error messages 49 GB

Operating Instructions
Page 52
...GB Check Cause/Solutions • Is the print paper properly set of print paper and ink ribbon. • Load the print paper in the correct direction in the paper tray? If you use incompatible print paper, the printer may develop trouble. (.page 9, 10) Check ...printer. • Are you using print paper that was not designed for the printer? c Use print paper designed for the printer. Printing Symptom Paper does not feed. c If print paper is ejected without being printed. If you use incompatible print paper, the printer may cause malfunctions of print paper...
...GB Check Cause/Solutions • Is the print paper properly set of print paper and ink ribbon. • Load the print paper in the correct direction in the paper tray? If you use incompatible print paper, the printer may develop trouble. (.page 9, 10) Check ...printer. • Are you using print paper that was not designed for the printer? c Use print paper designed for the printer. Printing Symptom Paper does not feed. c If print paper is ejected without being printed. If you use incompatible print paper, the printer may cause malfunctions of print paper...

Operating Instructions
Page 55
... white lines or dots on the printed pictures. - Troubleshooting Continued 55 GB The whole area of a print. c You can adjust the image. (."Adjusting an image" on page 23) c You cannot use an editing/recording device other than the printer to the end. borders on both sides...the image is saved with the AUTO TOUCH-UP button? Settings Symptom The Borders/ Borderless setting does not take effect. The picture is • Is the paper tray inserted printed at an angle. properly? Check • Are you select "Borders an image cannot (Pattern 1)"? Even if...
... white lines or dots on the printed pictures. - Troubleshooting Continued 55 GB The whole area of a print. c You can adjust the image. (."Adjusting an image" on page 23) c You cannot use an editing/recording device other than the printer to the end. borders on both sides...the image is saved with the AUTO TOUCH-UP button? Settings Symptom The Borders/ Borderless setting does not take effect. The picture is • Is the paper tray inserted printed at an angle. properly? Check • Are you select "Borders an image cannot (Pattern 1)"? Even if...

Operating Instructions
Page 60
If paper jams 1 Turn off the power of the printer and then turn it . Note If you cannot remove the jammed paper, contact your Sony dealer. 60 GB Please wait for the print paper to be ejected automatically. 1 (on again. Check to ensure if there is jammed paper. If there is, remove it on /standby) Print paper 2 Remove the ejected print paper from the printer. 3 Remove the paper tray and ink ribbon from the printer and check to see if there is no jammed print paper inside.
If paper jams 1 Turn off the power of the printer and then turn it . Note If you cannot remove the jammed paper, contact your Sony dealer. 60 GB Please wait for the print paper to be ejected automatically. 1 (on again. Check to ensure if there is jammed paper. If there is, remove it on /standby) Print paper 2 Remove the ejected print paper from the printer. 3 Remove the paper tray and ink ribbon from the printer and check to see if there is no jammed print paper inside.

Operating Instructions
Page 61
... to a PC or a PictBridge camera. 3 Remove the paper tray from the printer. Surface without imprints Troubleshooting 61 GB The cleaning cartridge and cleaning sheet will not improve the printed picture quality. • Do not place the cleaning sheet on the pictures, the thermal transfer head may cause a paper jam or other troubles. • If a cleaning...
... to a PC or a PictBridge camera. 3 Remove the paper tray from the printer. Surface without imprints Troubleshooting 61 GB The cleaning cartridge and cleaning sheet will not improve the printed picture quality. • Do not place the cleaning sheet on the pictures, the thermal transfer head may cause a paper jam or other troubles. • If a cleaning...


