
Note: attaching the Clamp Filter
Page 1
...cores, be sure to attach the supplied clamp filter for noise prevention as possible (within 10 cm (4 inches)) that is not equipped with a screwdriver or a similar tool. 2 Wind the cable into the clamp filter one end of the USB cable. DPP-EX50 English How to attach the clamp... filter (On connecting a PictBridge-compliant digital camera, page 82, Operating Instructions) If the USB cable supplied with your PictBridge-compliant digital camera is connected to the printer's USB connector. © 2004 Sony Corporation Printed in Korea ...
...cores, be sure to attach the supplied clamp filter for noise prevention as possible (within 10 cm (4 inches)) that is not equipped with a screwdriver or a similar tool. 2 Wind the cable into the clamp filter one end of the USB cable. DPP-EX50 English How to attach the clamp... filter (On connecting a PictBridge-compliant digital camera, page 82, Operating Instructions) If the USB cable supplied with your PictBridge-compliant digital camera is connected to the printer's USB connector. © 2004 Sony Corporation Printed in Korea ...
Operating Instructions
Page 2
...unit, operate the disconnect device to switch the power supply off and on, the user is subject to correct the interference by one or more of Conformity Trade Name: SONY Model No.: DPP-EX50 Responsible Party: Sony Electronics Inc. Address: 16450 W. Record the serial... number in a particular installation. Model No. DPP-EX50 Serial No. Increase the separation between the equipment and receiver. -...
...unit, operate the disconnect device to switch the power supply off and on, the user is subject to correct the interference by one or more of Conformity Trade Name: SONY Model No.: DPP-EX50 Responsible Party: Sony Electronics Inc. Address: 16450 W. Record the serial... number in a particular installation. Model No. DPP-EX50 Serial No. Increase the separation between the equipment and receiver. -...
Operating Instructions
Page 4
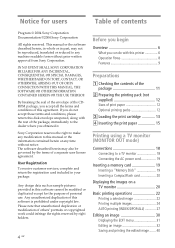
...software cannot be modified or duplicated except for users Table of contents Program © 2004 Sony Corporation Documentation ©2004 Sony Corporation All rights reserved. IN NO EVENT SHALL SONY CORPORATION BE LIABLE FOR ANY INCIDENTAL, CONSEQUENTIAL OR SPECIAL DAMAGES, WHETHER BASED ON TORT, ... of this printer 6 Operation flows 8 Features 9 Preparations 1 Checking the contents of the package 11 2 Preparing the printing pack (not supplied 12 Sizes of print paper 12 Optional printing packs 12 3 Loading the print cartridge 13 4 Inserting the print paper 15 Printing using ...
...software cannot be modified or duplicated except for users Table of contents Program © 2004 Sony Corporation Documentation ©2004 Sony Corporation All rights reserved. IN NO EVENT SHALL SONY CORPORATION BE LIABLE FOR ANY INCIDENTAL, CONSEQUENTIAL OR SPECIAL DAMAGES, WHETHER BASED ON TORT, ... of this printer 6 Operation flows 8 Features 9 Preparations 1 Checking the contents of the package 11 2 Preparing the printing pack (not supplied 12 Sizes of print paper 12 Optional printing packs 12 3 Loading the print cartridge 13 4 Inserting the print paper 15 Printing using ...
Operating Instructions
Page 8
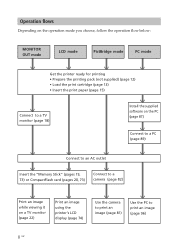
... the operation flow below: MONITOR OUT mode LCD mode PictBridge mode PC mode Get the printer ready for printing • Prepare the printing pack (not supplied) (page 12) • Load the print cartridge (page 13) • Insert the print paper (page 15) Connect to a TV monitor (page 18) Install the... supplied software on the PC (page 87) Connect to a PC (page 89) Connect to an AC outlet Insert the "Memory Stick" (pages 19, 73) or CompactFlash ...
... the operation flow below: MONITOR OUT mode LCD mode PictBridge mode PC mode Get the printer ready for printing • Prepare the printing pack (not supplied) (page 12) • Load the print cartridge (page 13) • Insert the print paper (page 15) Connect to a TV monitor (page 18) Install the... supplied software on the PC (page 87) Connect to a PC (page 89) Connect to an AC outlet Insert the "Memory Stick" (pages 19, 73) or CompactFlash ...
Operating Instructions
Page 9
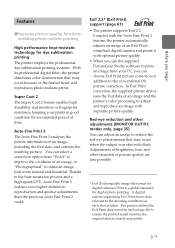
... the printer automatically adjusts an image of an Exif Printcompliant digital camera and prints it with optimal picture quality. • When you use the supplied PictureGear Studio software to print an image from "Vivid" to improve the vividness of an image, or "Photographical" to reduce the red-eye ...The printer utilises the Exif Print data stored in each shot is a global standard for digital photo printing. In Exif Print correction, the supplied printer driver uses the Exif data of an image and the printer's color processing to ensure the printed result matches the original shot as ...
... the printer automatically adjusts an image of an Exif Printcompliant digital camera and prints it with optimal picture quality. • When you use the supplied PictureGear Studio software to print an image from "Vivid" to improve the vividness of an image, or "Photographical" to reduce the red-eye ...The printer utilises the Exif Print data stored in each shot is a global standard for digital photo printing. In Exif Print correction, the supplied printer driver uses the Exif data of an image and the printer's color processing to ensure the printed result matches the original shot as ...
Operating Instructions
Page 10
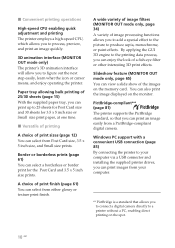
Paper tray allowing bulk printing of 25/30 sheets (page 15) With the supplied paper tray, you can enjoy the look of a fish-eye filter or other interesting 3D print effects. Border or borderless prints (page 61) You can ... spot. 10 GB x Versatile of printing A choice of print finish (page 61) You can print images from your computer via a USB connector and installing the supplied printer driver, you can select from Post Card size, 3.5 x 5 inch size, and Small size prints. x Convenient printing operations High-speed CPU enabling quick adjustment and...
Paper tray allowing bulk printing of 25/30 sheets (page 15) With the supplied paper tray, you can enjoy the look of a fish-eye filter or other interesting 3D print effects. Border or borderless prints (page 61) You can ... spot. 10 GB x Versatile of printing A choice of print finish (page 61) You can print images from your computer via a USB connector and installing the supplied printer driver, you can select from Post Card size, 3.5 x 5 inch size, and Small size prints. x Convenient printing operations High-speed CPU enabling quick adjustment and...
Operating Instructions
Page 11
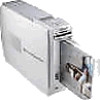
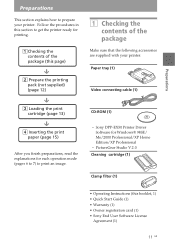
PictureGear Studio V.2.0 Cleaning cartridge (1) Clamp filter (1) • Operating Instructions (this page) x 2 Prepare the printing pack (not supplied) (page 12) x 3 Loading the print cartridge (page 13) x 4 Inserting the print paper (page 15) After you finish...• Owner registration card (1) • Sony End User Software License Agreement (1) 11 GB Sony DPP-EX50 Printer Driver Software for each operation mode (pages 6 to 7) to print an image. 1 Checking the contents of the package Make sure that the following accessories are supplied with your printer. Paper tray (1) Video ...
PictureGear Studio V.2.0 Cleaning cartridge (1) Clamp filter (1) • Operating Instructions (this page) x 2 Prepare the printing pack (not supplied) (page 12) x 3 Loading the print cartridge (page 13) x 4 Inserting the print paper (page 15) After you finish...• Owner registration card (1) • Sony End User Software License Agreement (1) 11 GB Sony DPP-EX50 Printer Driver Software for each operation mode (pages 6 to 7) to print an image. 1 Checking the contents of the package Make sure that the following accessories are supplied with your printer. Paper tray (1) Video ...
Operating Instructions
Page 12
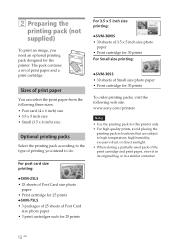
2 Preparing the printing pack (not supplied) To print an image, you intend to high temperature, high humidity, excessive dust, or direct sunlight. • When storing a partially-used pack of print paper ... placing the printing pack in a similar container. 12 GB Sizes of print paper You can select the print paper from the following web site: www.sony.com/printers Notes • Use the printing pack for the printer.
2 Preparing the printing pack (not supplied) To print an image, you intend to high temperature, high humidity, excessive dust, or direct sunlight. • When storing a partially-used pack of print paper ... placing the printing pack in a similar container. 12 GB Sizes of print paper You can select the print paper from the following web site: www.sony.com/printers Notes • Use the printing pack for the printer.

Operating Instructions
Page 16
... place at the most inside arrow marker. Then insert the print paper and the protection sheet together with its printing surface (the side with the supplied cleaning cartridge. (page 124) 5 Close the paper tray cover. 16 GB Note You can set up and the arrow pointing to 25 sheets for Post...
... place at the most inside arrow marker. Then insert the print paper and the protection sheet together with its printing surface (the side with the supplied cleaning cartridge. (page 124) 5 Close the paper tray cover. 16 GB Note You can set up and the arrow pointing to 25 sheets for Post...
Operating Instructions
Page 18
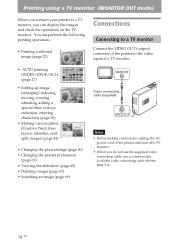
... the printer preferences (page 63) • Viewing the slideshow (page 65) • Deleting images (page 67) • Searching an image (page 69) Video connecting cable (supplied) Notes • Before making connections, unplug the AC power cord of the printer to a TV monitor, you do not use the...
... the printer preferences (page 63) • Viewing the slideshow (page 65) • Deleting images (page 67) • Searching an image (page 69) Video connecting cable (supplied) Notes • Before making connections, unplug the AC power cord of the printer to a TV monitor, you do not use the...
Operating Instructions
Page 81
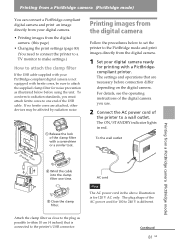
... and print images directly from the digital camera. 1 Set your PictBridge-compliant digital camera is not equipped with ferrite cores, be sure to attach the supplied clamp filter for noise prevention as possible (within 10 cm (4 inches)) that are attached, other devices may be affected by radiation noise. (4Winicthhiens)10 cm... settings (page 83) (You need to connect the printer to a TV monitor to make settings.) How to attach the clamp filter If the USB cable supplied with your digital camera ready for printing with a screwdriver or a similar tool.
... and print images directly from the digital camera. 1 Set your PictBridge-compliant digital camera is not equipped with ferrite cores, be sure to attach the supplied clamp filter for noise prevention as possible (within 10 cm (4 inches)) that are attached, other devices may be affected by radiation noise. (4Winicthhiens)10 cm... settings (page 83) (You need to connect the printer to a TV monitor to make settings.) How to attach the clamp filter If the USB cable supplied with your digital camera ready for printing with a screwdriver or a similar tool.
Operating Instructions
Page 82
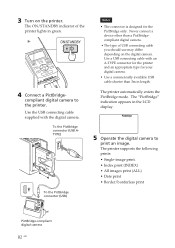
... print an image. The ON/STANDBY indicator of USB connecting cable you should use may differ depending on the printer. Use the USB connecting cable supplied with an A-TYPE connector for the printer and an appropriate type for the PictBridge only. The "PictBridge" indication appears in length. Never connect a device other...
... print an image. The ON/STANDBY indicator of USB connecting cable you should use may differ depending on the printer. Use the USB connecting cable supplied with an A-TYPE connector for the printer and an appropriate type for the PictBridge only. The "PictBridge" indication appears in length. Never connect a device other...

Operating Instructions
Page 85
... or Sony Music Communications Corporation. Furthermore, "™" and "®" are not mentioned in each case in this manual. This section explains how to install the supplied software on your PC and how to your PC. On trademarks and copyrights of PictureGear Studio &#...8226; On copyrights of design materials The copyrights of their respective companies. Installing the software System requirements To use the supplied PictureGear Studio software to the operating instructions of Windows 2000 are owned by the copyrights laws. • Duplication of copyrighted ...
... or Sony Music Communications Corporation. Furthermore, "™" and "®" are not mentioned in each case in this manual. This section explains how to install the supplied software on your PC and how to your PC. On trademarks and copyrights of PictureGear Studio &#...8226; On copyrights of design materials The copyrights of their respective companies. Installing the software System requirements To use the supplied PictureGear Studio software to the operating instructions of Windows 2000 are owned by the copyrights laws. • Duplication of copyrighted ...
Operating Instructions
Page 86
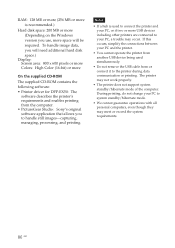
... or more Colors: High Color (16-bit) or more On the supplied CD-ROM The supplied CD-ROM contains the following software: • Printer driver for DPP-EX50: The software describes the printer's requirements and enables printing from the computer. • PictureGear Studio: Sony's original software application that allows you use, more space will be...
... or more Colors: High Color (16-bit) or more On the supplied CD-ROM The supplied CD-ROM contains the following software: • Printer driver for DPP-EX50: The software describes the printer's requirements and enables printing from the computer. • PictureGear Studio: Sony's original software application that allows you use, more space will be...

Operating Instructions
Page 87
... "Administrator" or "Power user". • When installing or uninstalling the software with Windows® XP Professional/Home Edition, log on the operating system. 3 Insert the supplied CD-ROM into the CD-ROM drive of the CD-ROM. 4 Click "Installing Printer Driver." Installing the printer driver 1 Make sure that the printer is... mode) Continued 87 GB The setup starts automatically and the installation window is disconnected from the computer. Notes • Be sure to your computer. The "Sony DPP-EX50 - InstallShield Wizard" dialog box appears.
... "Administrator" or "Power user". • When installing or uninstalling the software with Windows® XP Professional/Home Edition, log on the operating system. 3 Insert the supplied CD-ROM into the CD-ROM drive of the CD-ROM. 4 Click "Installing Printer Driver." Installing the printer driver 1 Make sure that the printer is... mode) Continued 87 GB The setup starts automatically and the installation window is disconnected from the computer. Notes • Be sure to your computer. The "Sony DPP-EX50 - InstallShield Wizard" dialog box appears.
Operating Instructions
Page 90
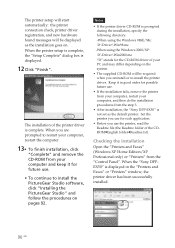
... installation Open the "Printers and Faxes" (Windows XP Home Edition/XP Professional only) or "Printers" from the step 3. • After installation, the "Sony DPP-EX50" is complete. When the printer setup is complete, the "Setup Complete" dialog box is displayed in good order for future use. • To continue to..., click "Complete" and remove the CD-ROM from your computer, restart your PC and may differ depending on the system. • The supplied CD-ROM will be required when you uninstall or re-install the printer driver. Set the printer you use for the CD-ROM driver of...
... installation Open the "Printers and Faxes" (Windows XP Home Edition/XP Professional only) or "Printers" from the step 3. • After installation, the "Sony DPP-EX50" is complete. When the printer setup is complete, the "Setup Complete" dialog box is displayed in good order for future use. • To continue to..., click "Complete" and remove the CD-ROM from your computer, restart your PC and may differ depending on the system. • The supplied CD-ROM will be required when you uninstall or re-install the printer driver. Set the printer you use for the CD-ROM driver of...
Operating Instructions
Page 91
... a PC (PC mode) The "Sony DPP-EX50 - The setup starts automatically and the installation window is not automatically displayed, double-click the "Setup.exe" of the license agreement" and click "Next". Note In case the installation window is displayed. Printing from your printer and the computer. 2 Insert the supplied CD-ROM into the CD...
... a PC (PC mode) The "Sony DPP-EX50 - The setup starts automatically and the installation window is not automatically displayed, double-click the "Setup.exe" of the license agreement" and click "Next". Note In case the installation window is displayed. Printing from your printer and the computer. 2 Insert the supplied CD-ROM into the CD...
Operating Instructions
Page 92
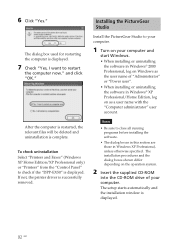
If not, the printer driver is displayed. 7 Check "Yes, I want to check if the "DPP-EX50" is complete. The installation procedures and the dialog boxes shown differ depending on the operation system. 2 Insert the supplied CD-ROM into the CD-ROM drive of your computer and start Windows. • When installing or uninstalling the...
If not, the printer driver is displayed. 7 Check "Yes, I want to check if the "DPP-EX50" is complete. The installation procedures and the dialog boxes shown differ depending on the operation system. 2 Insert the supplied CD-ROM into the CD-ROM drive of your computer and start Windows. • When installing or uninstalling the...
Operating Instructions
Page 94
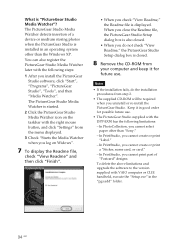
...; When you check "View Readme," the Readme file is "PictureGear Studio Media Watcher"? In PrintStudio, you cannot select paper other than "Sony." - You can also register the PictureGear Studio Media Watcher later with the right mouse button, and click "Settings" from the menu displayed..."Programs", "PictureGear Studio", "Tools", and then "Media Watcher". To delete the above limitations and upgrade the software to the version supplied with the DPP-EX50 has the following steps: 1 After you cannot print part of a device or medium storing photos when the PictureGear Studio is closed. ...
...; When you check "View Readme," the Readme file is "PictureGear Studio Media Watcher"? In PrintStudio, you cannot select paper other than "Sony." - You can also register the PictureGear Studio Media Watcher later with the right mouse button, and click "Settings" from the menu displayed..."Programs", "PictureGear Studio", "Tools", and then "Media Watcher". To delete the above limitations and upgrade the software to the version supplied with the DPP-EX50 has the following steps: 1 After you cannot print part of a device or medium storing photos when the PictureGear Studio is closed. ...

Operating Instructions
Page 95
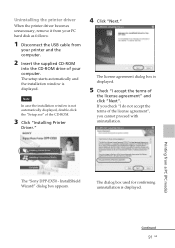
... displayed, double-click the "Setup.exe" of your PC hard disk as follows: 1 Remove the USB cable between the printer and the PC. 2 Insert the supplied CD-ROM into the CD-ROM drive of the CD-ROM. 3 Click "Installing PictureGear Studio." 4 Click "Next."
... displayed, double-click the "Setup.exe" of your PC hard disk as follows: 1 Remove the USB cable between the printer and the PC. 2 Insert the supplied CD-ROM into the CD-ROM drive of the CD-ROM. 3 Click "Installing PictureGear Studio." 4 Click "Next."