

Camera Operations Guide
Page 1
Camera Operations Guide [US] 3-090-178-11(1) Camera Operations Guide Read this first Digital Video Camera Recorder DCR-HC65/HC85 © 2004 Sony Corporation
Camera Operations Guide [US] 3-090-178-11(1) Camera Operations Guide Read this first Digital Video Camera Recorder DCR-HC65/HC85 © 2004 Sony Corporation
Camera Operations Guide
Page 3
...8226; This product contains mercury. Declaration of Conformity Trade Name: SONY Model No.: DCR-HC65 Responsible Party: Sony Electronics Inc. Address: 16450 W. DCR-HC Serial No. Model No. Notes on the DV format...DCR-HC85 Responsible Party: Sony Electronics Inc. If this product may call upon your Sony dealer regarding this equipment. Reorient or relocate the receiving antenna. - For customers in your camcorder (p. 127). Connect the equipment to an outlet on the "Memory Stick Duo." ,continued 3 Consult a Sony dealer or an experienced radio/TV technician for a digital...
...8226; This product contains mercury. Declaration of Conformity Trade Name: SONY Model No.: DCR-HC65 Responsible Party: Sony Electronics Inc. Address: 16450 W. DCR-HC Serial No. Model No. Notes on the DV format...DCR-HC85 Responsible Party: Sony Electronics Inc. If this product may call upon your Sony dealer regarding this equipment. Reorient or relocate the receiving antenna. - For customers in your camcorder (p. 127). Connect the equipment to an outlet on the "Memory Stick Duo." ,continued 3 Consult a Sony dealer or an experienced radio/TV technician for a digital...

Camera Operations Guide
Page 4
... or the lens to direct sunlight for long periods of the LCD screen and the viewfinder used on this manual are captured using a digital still camera, and thus may appear different from what you see. • The illustrations used in illustrating the operating procedures. However,... such materials may cause malfunctions. Viewfinder LCD panel Battery pack Flash (DCR-HC85) 4 Notes on the back side of the LCD panel to the copyright laws. Doing so might cause your camcorder if necessary (p. 22). To view your camcorder correctly. • To ensure a good grip, fasten the grip ...
... or the lens to direct sunlight for long periods of the LCD screen and the viewfinder used on this manual are captured using a digital still camera, and thus may appear different from what you see. • The illustrations used in illustrating the operating procedures. However,... such materials may cause malfunctions. Viewfinder LCD panel Battery pack Flash (DCR-HC85) 4 Notes on the back side of the LCD panel to the copyright laws. Doing so might cause your camcorder if necessary (p. 22). To view your camcorder correctly. • To ensure a good grip, fasten the grip ...
Camera Operations Guide
Page 5
... first 2 Quick Start Guide Recording movies 8 Recording still images 10 Recording/Playing back with ease - Easy Handycam 34 Recording a movie 34 ,continued 5 Memory photo recording 29 Selecting image quality or size 31 Using the flash (DCR-HC85 31 Using the self-timer 33 Recording a still image on a "Memory Stick Duo" while recording movies... movies fit for "Memory Stick Duo" only. Table of Contents : Features available for tape only. : Features available for breaking into still images - Progressive recording mode (DCR-HC85 28 Recording still images -
... first 2 Quick Start Guide Recording movies 8 Recording still images 10 Recording/Playing back with ease - Easy Handycam 34 Recording a movie 34 ,continued 5 Memory photo recording 29 Selecting image quality or size 31 Using the flash (DCR-HC85 31 Using the self-timer 33 Recording a still image on a "Memory Stick Duo" while recording movies... movies fit for "Memory Stick Duo" only. Table of Contents : Features available for tape only. : Features available for breaking into still images - Progressive recording mode (DCR-HC85 28 Recording still images -
Camera Operations Guide
Page 13
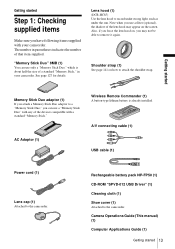
Lens hood (1) (DCR-HC85) Use the lens hood to the camcorder. Also, if you force the lens hood on, you use a filter (optional), the shadow of the lens hood may not be able to attach the ...-type lithium battery is about half the size of a standard "Memory Stick," in parentheses indicates the number of that item supplied. The number in your camcorder. Note when you may appear on how to remove it again. A/V connecting cable (1) AC Adaptor (1) USB cable (1) Power cord (1) Lens cap (1) Attached to record under...
Lens hood (1) (DCR-HC85) Use the lens hood to the camcorder. Also, if you force the lens hood on, you use a filter (optional), the shadow of the lens hood may not be able to attach the ...-type lithium battery is about half the size of a standard "Memory Stick," in parentheses indicates the number of that item supplied. The number in your camcorder. Note when you may appear on how to remove it again. A/V connecting cable (1) AC Adaptor (1) USB cable (1) Power cord (1) Lens cap (1) Attached to record under...
Camera Operations Guide
Page 16
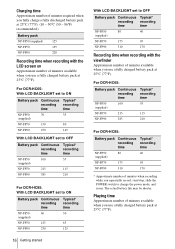
The actual battery life may be shorter. For DCR-HC65: Battery pack Continuous Typical* recording recording time time NP-FP50 100 55 (supplied) NP-FP70 215 115 NP-FP90 385 210 For DCR-HC85: Battery pack Continuous Typical* recording recording time time NP-FP50 80 40 (supplied) NP-FP70 175 95 NP-FP90 310 170...
The actual battery life may be shorter. For DCR-HC65: Battery pack Continuous Typical* recording recording time time NP-FP50 100 55 (supplied) NP-FP70 215 115 NP-FP90 385 210 For DCR-HC85: Battery pack Continuous Typical* recording recording time time NP-FP50 80 40 (supplied) NP-FP70 175 95 NP-FP90 310 170...

Camera Operations Guide
Page 28
... for breaking into still images - Recording movies fit for about 10 seconds. If the item is not displayed on the screen, touch / . Progressive recording mode (DCR-HC85) This feature is useful for analyzing high-speed action such as a movie, it is recorded only every 1/30 of about 10 seconds (The count down...
... for breaking into still images - Recording movies fit for about 10 seconds. If the item is not displayed on the screen, touch / . Progressive recording mode (DCR-HC85) This feature is useful for analyzing high-speed action such as a movie, it is recorded only every 1/30 of about 10 seconds (The count down...
Camera Operations Guide
Page 30
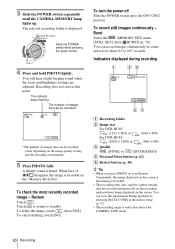
... the screen. A shutter sound is displayed. Review Touch . To cancel deleting, touch [NO]. 60min 101 1600 FINE P-MENU A Recording folder B Image size For DCR-HC65: (1152 × 864) or For DCR-HC85: 1600 (1600 × 1200) or C Quality (640 × 480) (640 × 480) ([FINE]) or ([STANDARD]) D Personal Menu button (p. 62) E Review button (p. 30...
... the screen. A shutter sound is displayed. Review Touch . To cancel deleting, touch [NO]. 60min 101 1600 FINE P-MENU A Recording folder B Image size For DCR-HC65: (1152 × 864) or For DCR-HC85: 1600 (1600 × 1200) or C Quality (640 × 480) (640 × 480) ([FINE]) or ([STANDARD]) D Personal Menu button (p. 62) E Review button (p. 30...

Camera Operations Guide
Page 31
...DCR-HC85) The recommended distance to the subject when using the built-in flash is 420 kB, that can record on a "Memory Stick Duo" varies depending on your camcorder. When the image quality is [FINE] (number of images) For DCR-HC65...215; 864 15 30 61 120 245 445 640 × 480 50 96 190 390 780 1400 900 2850 For DCR-HC85: The image size of 1600 × 1200 is 960 kB, that of 640 × 480 is 150 kB...1600 × 1200 640 × 480 480 2850 When the image quality is [STANDARD] (number of images) For DCR-HC65: The image size of 1152 × 864 is 200 kB, that of 640 × 480 is 60 kB....
...DCR-HC85) The recommended distance to the subject when using the built-in flash is 420 kB, that can record on a "Memory Stick Duo" varies depending on your camcorder. When the image quality is [FINE] (number of images) For DCR-HC65...215; 864 15 30 61 120 245 445 640 × 480 50 96 190 390 780 1400 900 2850 For DCR-HC85: The image size of 1600 × 1200 is 960 kB, that of 640 × 480 is 150 kB...1600 × 1200 640 × 480 480 2850 When the image quality is [STANDARD] (number of images) For DCR-HC65: The image size of 1152 × 864 is 200 kB, that of 640 × 480 is 60 kB....
Camera Operations Guide
Page 32
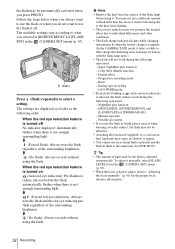
Digital effect - Progressive recording mode - Burst - Flexible spot meter • If you selected in [REDEYE REDUC] of flash if the dust discolors or sticks to the ... the CAMERA-TAPE mode, it takes a while to fully charge the flash lamp since it charges its shadow to "Adjusting the focus manually" (p. 41) for DCR-HC85). When the red eye reduction feature is turned on (Auto red-eye reduction): Pre-flashes to reduce red-eye before using it manually, select [FLASH...
Digital effect - Progressive recording mode - Burst - Flexible spot meter • If you selected in [REDEYE REDUC] of flash if the dust discolors or sticks to the ... the CAMERA-TAPE mode, it takes a while to fully charge the flash lamp since it charges its shadow to "Adjusting the focus manually" (p. 41) for DCR-HC85). When the red eye reduction feature is turned on (Auto red-eye reduction): Pre-flashes to reduce red-eye before using it manually, select [FLASH...
Camera Operations Guide
Page 34
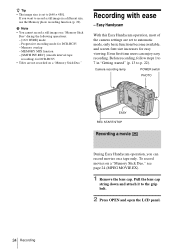
...EASY REC START/STOP Recording a movie During Easy Handycam operation, you want to record a still image in "Getting started" (p. 13 to p. 22). If you can enjoy easy recording. MEMORY MIX function - [SMTH INT.REC] (smooth interval tape recording) for DCR-HC85 • Titles are set to [640 ×... this Easy Handycam operation, most of the camera settings are not recorded on a "Memory Stick Duo," see page 24 (MPEG MOVIE EX). 1 Remove the lens cap. To record movies on a "Memory Stick Duo." Progressive recording mode for DCR-HC85 - Recording with ease - Before recording, follow steps 1...
...EASY REC START/STOP Recording a movie During Easy Handycam operation, you want to record a still image in "Getting started" (p. 13 to p. 22). If you can enjoy easy recording. MEMORY MIX function - [SMTH INT.REC] (smooth interval tape recording) for DCR-HC85 • Titles are set to [640 ×... this Easy Handycam operation, most of the camera settings are not recorded on a "Memory Stick Duo," see page 24 (MPEG MOVIE EX). 1 Remove the lens cap. To record movies on a "Memory Stick Duo." Progressive recording mode for DCR-HC85 - Recording with ease - Before recording, follow steps 1...

Camera Operations Guide
Page 41
... to the recording conditions. When the CAMERA-MEMORY lamp is dark and hard to [ON] (p. 66). b Note • You cannot use the expanded focus For DCR-HC85: It will be displayed at twice its background. - z Tip The focal distance information (for when it is on the subject when you rotate the focus...
... to the recording conditions. When the CAMERA-MEMORY lamp is dark and hard to [ON] (p. 66). b Note • You cannot use the expanded focus For DCR-HC85: It will be displayed at twice its background. - z Tip The focal distance information (for when it is on the subject when you rotate the focus...
Camera Operations Guide
Page 43
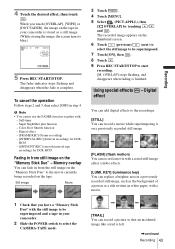
... indicator stops flashing and disappears when the fade is finished. Digital effect - [FRAME REC] (Frame recording) - [INTERVAL REC] (Interval recording) for DCR-HC85 Fading in step 4. The recorded image appears on white paper...on the thumbnail screen. 6 Touch (previous)/ (next) to select the still image to be superimposed and a tape in your camcorder. 2 Slide the POWER switch to start recording. [M. Super NightShot plus function - Still image Movie 3 Touch . 4 Touch...], the image on the "Memory Stick Duo" - HC65 - [SMTH INT.REC] (smooth interval tape recording) for...
... indicator stops flashing and disappears when the fade is finished. Digital effect - [FRAME REC] (Frame recording) - [INTERVAL REC] (Interval recording) for DCR-HC85 Fading in step 4. The recorded image appears on white paper...on the thumbnail screen. 6 Touch (previous)/ (next) to select the still image to be superimposed and a tape in your camcorder. 2 Slide the POWER switch to start recording. [M. Super NightShot plus function - Still image Movie 3 Touch . 4 Touch...], the image on the "Memory Stick Duo" - HC65 - [SMTH INT.REC] (smooth interval tape recording) for...

Camera Operations Guide
Page 66
...SPOT FOCUS See page 40 for more than the default setting. SHARPNESS For DCR-HC85: You can see if the focus is anything other than 5 minutes. Select when recording without using fixed exposure, or bring your camcorder in bright conditions. z Tip • For better color balance adjustment when... returns to [AUTO] or [ONE PUSH] under white or cool white fluorescent lamps. Select to deactivate expanded focus. EXP.FOCUS For DCR-HC85: When you are recording pictures on a "Memory Stick Duo" while focusing manually, you can adjust the sharpness of the picture to adjust...
...SPOT FOCUS See page 40 for more than the default setting. SHARPNESS For DCR-HC85: You can see if the focus is anything other than 5 minutes. Select when recording without using fixed exposure, or bring your camcorder in bright conditions. z Tip • For better color balance adjustment when... returns to [AUTO] or [ONE PUSH] under white or cool white fluorescent lamps. Select to deactivate expanded focus. EXP.FOCUS For DCR-HC85: When you are recording pictures on a "Memory Stick Duo" while focusing manually, you can adjust the sharpness of the picture to adjust...

Camera Operations Guide
Page 67
... MODE For DCR-HC65: GON ON AUTO AUTO Select to make the flash level lower than the standard setting. b Note • If the flash is not capable of preventing the red-eye phenomenon, you disconnect the power source from your camcorder for more... than the standard setting. HIGH ( ) GNORMAL ( ) LOW ( ) Select to trigger the flash (optional) regardless of the brightness of the surroundings. Select to trigger the flash (optional) regardless of the brightness of the surroundings. FLASH LEVEL You can select only [ON] or [AUTO]. REDEYE REDUC For DCR-HC85...
... MODE For DCR-HC65: GON ON AUTO AUTO Select to make the flash level lower than the standard setting. b Note • If the flash is not capable of preventing the red-eye phenomenon, you disconnect the power source from your camcorder for more... than the standard setting. HIGH ( ) GNORMAL ( ) LOW ( ) Select to trigger the flash (optional) regardless of the brightness of the surroundings. Select to trigger the flash (optional) regardless of the brightness of the surroundings. FLASH LEVEL You can select only [ON] or [AUTO]. REDEYE REDUC For DCR-HC85...

Camera Operations Guide
Page 69
... full mode. **Played in an analog connection. Select to record a picture to compensate for details. GON OFF ( ) Standard setting (enable the SteadyShot function). REC For DCR-HC85: See page 28 for camera-shake. When you play back on a 4:3 TV). PROGRES. STEADYSHOT You can select this function to be wide. Natural pictures are...
... full mode. **Played in an analog connection. Select to record a picture to compensate for details. GON OFF ( ) Standard setting (enable the SteadyShot function). REC For DCR-HC85: See page 28 for camera-shake. When you play back on a 4:3 TV). PROGRES. STEADYSHOT You can select this function to be wide. Natural pictures are...

Camera Operations Guide
Page 70
...and space available on the MEMORY SET menu. Select to 13 (640 × 480 image size) images continuously at approximately 0.5-second intervals. For DCR-HC65: Select to record from 4 (1600 × 1200 image size) to 32 images (640 × 480 image size) continuously at approximately 0.5-...the "Memory Stick Duo" you are using. 1 Select [NORMAL], [HIGH SPEED] (DCR-HC85) or [EXP. The number of your camcorder. BRKTG () Select when not recording continuously. In the [NORMAL] or [HIGH SPEED] (DCR-HC85) setting, the maximum number of images will be recorded in the self-timer mode ...
...and space available on the MEMORY SET menu. Select to 13 (640 × 480 image size) images continuously at approximately 0.5-second intervals. For DCR-HC65: Select to record from 4 (1600 × 1200 image size) to 32 images (640 × 480 image size) continuously at approximately 0.5-...the "Memory Stick Duo" you are using. 1 Select [NORMAL], [HIGH SPEED] (DCR-HC85) or [EXP. The number of your camcorder. BRKTG () Select when not recording continuously. In the [NORMAL] or [HIGH SPEED] (DCR-HC85) setting, the maximum number of images will be recorded in the self-timer mode ...

Camera Operations Guide
Page 71
For DCR-HC85: • The images may flicker or discolor when you have space for playing on the LCD screen, connect your camcorder to about 1/4). Select to record still images with the standard image quality (compressed to your TV or a computer. MOVIE SET IMAGE SIZE G320 × ... for playing on a small screen. This setting can be selected only in [EXP. BRKTG] will not function when you select [HIGH SPEED]. IMAGE SIZE For DCR-HC65: G1152 × 864 ( ) 640 × 480 ( Select to record many still images or for playing on the "Memory Stick Duo." • When...
For DCR-HC85: • The images may flicker or discolor when you have space for playing on the LCD screen, connect your camcorder to about 1/4). Select to record still images with the standard image quality (compressed to your TV or a computer. MOVIE SET IMAGE SIZE G320 × ... for playing on a small screen. This setting can be selected only in [EXP. BRKTG] will not function when you select [HIGH SPEED]. IMAGE SIZE For DCR-HC65: G1152 × 864 ( ) 640 × 480 ( Select to record many still images or for playing on the "Memory Stick Duo." • When...

Camera Operations Guide
Page 76
...little. Then those frames are played in the standard recording mode. To pause, touch [PAUSE]. SMTH INT.REC For DCR-HC85: This function is recorded, and your camcorder enters the standby mode. 4 Move the subject and repeat step 3. To cancel the slide show , you use frame... using the supplied AC Adaptor during the operation. [a] [a] [a] [b] [b] a: Shooting time b: Interval 1 Touch . 76 Using the Menu Connect your camcorder using the Remote Commander to the wall outlet using the frame recording. 1 Select [ON], then touch . 2 Touch . 3 Press REC START/STOP. Operate your...
...little. Then those frames are played in the standard recording mode. To pause, touch [PAUSE]. SMTH INT.REC For DCR-HC85: This function is recorded, and your camcorder enters the standby mode. 4 Move the subject and repeat step 3. To cancel the slide show , you use frame... using the supplied AC Adaptor during the operation. [a] [a] [a] [b] [b] a: Shooting time b: Interval 1 Touch . 76 Using the Menu Connect your camcorder using the Remote Commander to the wall outlet using the frame recording. 1 Select [ON], then touch . 2 Touch . 3 Press REC START/STOP. Operate your...
Camera Operations Guide
Page 106
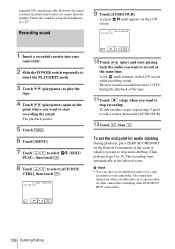
...you want to start playing back the audio you want to stop recording. Recording sound 9 Touch [AUDIO DUB]. A green X mark appears on other camcorders (including other scenes, repeat steps 3 and 4 to play the 4 Touch (play ) and start recording the sound. The new sound is not...10Touch (play /pause) again at the same time. b Note • You can only record additional audio over a tape recorded on other DCR-HC65/ HC85 camcorders). A red mark remains on the Remote Commander at the scene at the selected scene. To set the end point for audio dubbing During playback...
...you want to start playing back the audio you want to stop recording. Recording sound 9 Touch [AUDIO DUB]. A green X mark appears on other camcorders (including other scenes, repeat steps 3 and 4 to play the 4 Touch (play ) and start recording the sound. The new sound is not...10Touch (play /pause) again at the same time. b Note • You can only record additional audio over a tape recorded on other DCR-HC65/ HC85 camcorders). A red mark remains on the Remote Commander at the scene at the selected scene. To set the end point for audio dubbing During playback...
