
Operating Instructions
Page 2
...visit http://www.rbrc.org/ Caution: Do not handle damaged or leaking Lithium-Ion batteries. Use of controls or adjustments or performance of rechargeable batteries, call : Sony Customer Information Center 1-800-222-SONY (7669) The number below is for years to use of important operating and ...superior picture and sound quality. You can capture life's precious moments with Part 15 of Conformity Trade Name: SONY Model No.: DCR-DVD101 Responsible Party:Sony Electronics Inc. Your Handycam is loaded with this product, you can help preserve our environment by returning your ...
...visit http://www.rbrc.org/ Caution: Do not handle damaged or leaking Lithium-Ion batteries. Use of controls or adjustments or performance of rechargeable batteries, call : Sony Customer Information Center 1-800-222-SONY (7669) The number below is for years to use of important operating and ...superior picture and sound quality. You can capture life's precious moments with Part 15 of Conformity Trade Name: SONY Model No.: DCR-DVD101 Responsible Party:Sony Electronics Inc. Your Handycam is loaded with this product, you can help preserve our environment by returning your ...
Operating Instructions
Page 3
...accept any changes or modifications not expressly approved in a particular installation. CAUTION You are designed to Subpart B of Part 15 of the battery used with the equipment in order to comply with the limits for help. Consult the dealer or an experienced radio/ TV technician for... pursuant to provide reasonable protection against harmful interference in accordance with your authority to Part 15 of Conformity Trade Name: SONY Model No.: DCR-DVD201 Responsible Party:Sony Electronics Inc. Reorient or relocate the receiving antenna. - Address: 16450 W.
...accept any changes or modifications not expressly approved in a particular installation. CAUTION You are designed to Subpart B of Part 15 of the battery used with the equipment in order to comply with the limits for help. Consult the dealer or an experienced radio/ TV technician for... pursuant to provide reasonable protection against harmful interference in accordance with your authority to Part 15 of Conformity Trade Name: SONY Model No.: DCR-DVD201 Responsible Party:Sony Electronics Inc. Reorient or relocate the receiving antenna. - Address: 16450 W.
Operating Instructions
Page 10
... mode ........ 34 Shooting still images 35 Selecting the still image quality and size 38 Shooting images continuously (BURST, DCR-DVD201 only) .. 41 Adjusting the exposure 43 Adjusting the exposure for movies only) ....... 53 Using special effects ...Wide mode 48 Adjusting the white balance manually 50 Shooting techniques to prepare and use your DVD Handycam 8 Getting Started Using this manual 12 Checking the supplied accessories ..... 14 Step 1 Preparing the power source ... 15 Installing/removing the battery pack 15 Charging the installed battery pack 16 Showing the remaining battery...
... mode ........ 34 Shooting still images 35 Selecting the still image quality and size 38 Shooting images continuously (BURST, DCR-DVD201 only) .. 41 Adjusting the exposure 43 Adjusting the exposure for movies only) ....... 53 Using special effects ...Wide mode 48 Adjusting the white balance manually 50 Shooting techniques to prepare and use your DVD Handycam 8 Getting Started Using this manual 12 Checking the supplied accessories ..... 14 Step 1 Preparing the power source ... 15 Installing/removing the battery pack 15 Charging the installed battery pack 16 Showing the remaining battery...
Operating Instructions
Page 11
... of trouble and corrective action 118 Self-diagnosis display 125 Warning indicators 126 Warning messages 127 Additional information About the disc 129 About the "InfoLITHIUM" battery pack 130 Using your camcorder - Photomovie 79 Erasing unnecessary scenes from the Playlist 80 Changing the order within the Playlist 82 Dividing a movie within the...
... of trouble and corrective action 118 Self-diagnosis display 125 Warning indicators 126 Warning messages 127 Additional information About the disc 129 About the "InfoLITHIUM" battery pack 130 Using your camcorder - Photomovie 79 Erasing unnecessary scenes from the Playlist 80 Changing the order within the Playlist 82 Dividing a movie within the...
Operating Instructions
Page 14
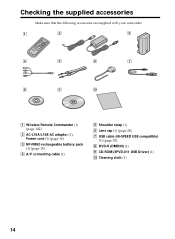
Cleaning cloth (1) 14 Checking the supplied accessories Make sure that the following accessories are supplied with your camcorder. 1 2 3 4 5 6 7 8 9 0 1 Wireless Remote Commander (1) (page 142) 2 AC-L15A/L15B AC adaptor (1), Power cord (1) (page 16) 3 NP-FM50 rechargeable battery pack (1) (page 15) 4 A/V connecting cable (1) 5 Shoulder strap (1) 6 Lens cap (1) (page 28) 7 USB cable (Hi-SPEED USB compatible) (1) (page 92) 8 DVD-R (DMR30) (1) 9 CD-ROM (SPVD-011 USB Driver) (1) q;
Cleaning cloth (1) 14 Checking the supplied accessories Make sure that the following accessories are supplied with your camcorder. 1 2 3 4 5 6 7 8 9 0 1 Wireless Remote Commander (1) (page 142) 2 AC-L15A/L15B AC adaptor (1), Power cord (1) (page 16) 3 NP-FM50 rechargeable battery pack (1) (page 15) 4 A/V connecting cable (1) 5 Shoulder strap (1) 6 Lens cap (1) (page 28) 7 USB cable (Hi-SPEED USB compatible) (1) (page 92) 8 DVD-R (DMR30) (1) 9 CD-ROM (SPVD-011 USB Driver) (1) q;

Operating Instructions
Page 15
To remove the battery pack 1 Slide the battery pack in the direction of the arrow until it in and up in the direction of arrow while pressing the battery release button. 2 Slide the battery pack down. 1 2 BATT release button 15 Getting Started Step 1 Preparing the power source Installing/removing the battery pack To install the battery pack, slide it clicks.
To remove the battery pack 1 Slide the battery pack in the direction of the arrow until it in and up in the direction of arrow while pressing the battery release button. 2 Slide the battery pack down. 1 2 BATT release button 15 Getting Started Step 1 Preparing the power source Installing/removing the battery pack To install the battery pack, slide it clicks.
Operating Instructions
Page 16
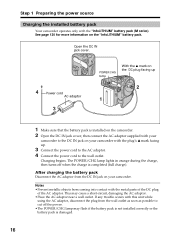
... objects from the DC IN jack on your camcorder. If any trouble occurs with the plug's v mark facing up 2 1 1 Make sure that the battery pack is installed on the camcorder. 2 Open the DC IN jack cover, then connect the AC adaptor supplied with your camcorder to the DC IN...-circuit, damaging the AC adaptor. • Place the AC adaptor near a wall outlet. See page 130 for more information on the "InfoLITHIUM" battery pack. Step 1 Preparing the power source Charging the installed battery pack Your camcorder operates only with the metal parts of the DC plug of the AC adaptor.
... objects from the DC IN jack on your camcorder. If any trouble occurs with the plug's v mark facing up 2 1 1 Make sure that the battery pack is installed on the camcorder. 2 Open the DC IN jack cover, then connect the AC adaptor supplied with your camcorder to the DC IN...-circuit, damaging the AC adaptor. • Place the AC adaptor near a wall outlet. See page 130 for more information on the "InfoLITHIUM" battery pack. Step 1 Preparing the power source Charging the installed battery pack Your camcorder operates only with the metal parts of the DC plug of the AC adaptor.
Operating Instructions
Page 17
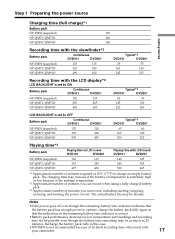
... time when used with the LCD display*2 LCD BACKLIGHT is set to ON Battery pack Continuous DVD101 DVD201 NP-FM50 (supplied) 120 105 NP-QM71/QM71D 290 265 NP-QM91/QM91D 445 400 Typical*3 DVD101 DVD201 60 50 145 130 220 200 LCD BACKLIGHT is set to charge an... 20 minutes. Step 1 Preparing the power source Charging time (full charge)*1 Battery pack NP-FM50 (supplied) 150 NP-QM71/QM71D 260 NP-QM91/QM91D 360 Getting Started Recording time with the viewfinder*2 Battery pack Continuous DVD101 DVD201 NP-FM50 (supplied) 135 115 NP-QM71/QM71D 325 285 NP-QM91...
... time when used with the LCD display*2 LCD BACKLIGHT is set to ON Battery pack Continuous DVD101 DVD201 NP-FM50 (supplied) 120 105 NP-QM71/QM71D 290 265 NP-QM91/QM91D 445 400 Typical*3 DVD101 DVD201 60 50 145 130 220 200 LCD BACKLIGHT is set to charge an... 20 minutes. Step 1 Preparing the power source Charging time (full charge)*1 Battery pack NP-FM50 (supplied) 150 NP-QM71/QM71D 260 NP-QM91/QM91D 360 Getting Started Recording time with the viewfinder*2 Battery pack Continuous DVD101 DVD201 NP-FM50 (supplied) 135 115 NP-QM71/QM71D 325 285 NP-QM91...
Operating Instructions
Page 18
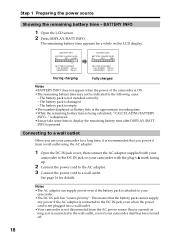
... your camcorder. •The DC IN jack has "source priority". Connecting to a wall outlet When you power it is being calculated, "CALCULATING BATTERY INFO..." BATTERY INFO 1 Open the LCD screen. 2 Press DISPLAY/BATT INFO. See page 16 for a long time, it is recommended that the... Connect the power cord to the DC IN jack on the LCD display. Step 1 Preparing the power source Showing the remaining battery time - The battery pack is pressed. The remaining battery time appears for a while on your camcorder itself has been turned off. 18 is displayed. •It may not be ...
... your camcorder. •The DC IN jack has "source priority". Connecting to a wall outlet When you power it is being calculated, "CALCULATING BATTERY INFO..." BATTERY INFO 1 Open the LCD screen. 2 Press DISPLAY/BATT INFO. See page 16 for a long time, it is recommended that the... Connect the power cord to the DC IN jack on the LCD display. Step 1 Preparing the power source Showing the remaining battery time - The battery pack is pressed. The remaining battery time appears for a while on your camcorder itself has been turned off. 18 is displayed. •It may not be ...

Operating Instructions
Page 21
...Press SETUP. When you are recording. •The backlight of the backlight. Select (LCD/VF SET) then [LCD B.L.] in the SETUP display when using the battery pack (page 113). •The [LCD BRIGHT], [LCD B.L.] and [LCD COLOR] settings do not affect the brightness of the image when you use the... camcorder outdoors, set to OFF so that the battery pack lasts longer. •When you close the LCD screen facing out. The SETUP display disappears from the LCD display. Getting Started Step 3 Adjusting...
...Press SETUP. When you are recording. •The backlight of the backlight. Select (LCD/VF SET) then [LCD B.L.] in the SETUP display when using the battery pack (page 113). •The [LCD BRIGHT], [LCD B.L.] and [LCD COLOR] settings do not affect the brightness of the image when you use the... camcorder outdoors, set to OFF so that the battery pack lasts longer. •When you close the LCD screen facing out. The SETUP display disappears from the LCD display. Getting Started Step 3 Adjusting...
Operating Instructions
Page 22
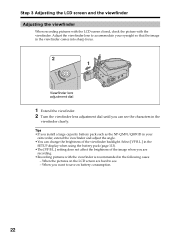
... the viewfinder is recommended in the following cases: - Adjust the viewfinder lens to accommodate your camcorder, extend the viewfinder and adjust the angle. •You can see . - When you install a large capacity battery pack such as the NP-QM91/QM91D in your eyesight so that the... image in the viewfinder comes into sharp focus. 2 1 Viewfinder lens adjustment dial 1 Extend the viewfinder. 2 Turn the viewfinder lens adjustment dial until you can change the brightness of...
... the viewfinder is recommended in the following cases: - Adjust the viewfinder lens to accommodate your camcorder, extend the viewfinder and adjust the angle. •You can see . - When you install a large capacity battery pack such as the NP-QM91/QM91D in your eyesight so that the... image in the viewfinder comes into sharp focus. 2 1 Viewfinder lens adjustment dial 1 Extend the viewfinder. 2 Turn the viewfinder lens adjustment dial until you can change the brightness of...
Operating Instructions
Page 23
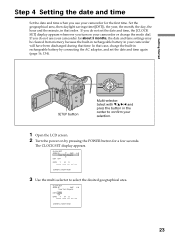
... and time when you use your camcorder for about 3 months, the date and time settings may be cleared from memory because the built-in rechargeable battery in your selection. 1 Open the LCD screen. 2 Turn the power on by connecting the AC adaptor, and set the date and time, the [CLOCK SET... OFF DATE Y M D : [ ENTER ] : NEXT ITEM 3 Use the multi-selector to confirm your camcorder will have been discharged during that case, charge the built-in rechargeable battery by pressing the POWER button for the first time.
... and time when you use your camcorder for about 3 months, the date and time settings may be cleared from memory because the built-in rechargeable battery in your selection. 1 Open the LCD screen. 2 Turn the power on by connecting the AC adaptor, and set the date and time, the [CLOCK SET... OFF DATE Y M D : [ ENTER ] : NEXT ITEM 3 Use the multi-selector to confirm your camcorder will have been discharged during that case, charge the built-in rechargeable battery by pressing the POWER button for the first time.
Operating Instructions
Page 27
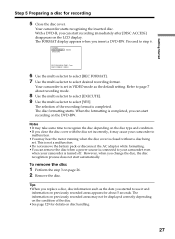
... select [EXECUTE]. 9 Use the multi-selector to use it may cause your camcorder is turned off. This is not a malfunction. •Do not remove the battery pack or disconnect the AC adaptor while formatting. •You can start recording on the DVD-RW. Getting Started Step 5 Preparing a disc for details on...
... select [EXECUTE]. 9 Use the multi-selector to use it may cause your camcorder is turned off. This is not a malfunction. •Do not remove the battery pack or disconnect the AC adaptor while formatting. •You can start recording on the DVD-RW. Getting Started Step 5 Preparing a disc for details on...
Operating Instructions
Page 28
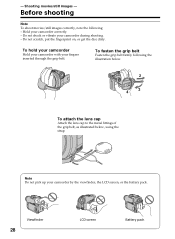
Viewfinder 28 LCD screen Battery pack Shooting movies/still images - To hold your camcorder Hold your camcorder with your camcorder during shooting. - Do not scratch, put the fingerprint on, or ... pick up your camcorder correctly. - Before shooting Note To shoot movies/still images correctly, note the following the illustration below. 1 2 4 3 To attach the lens cap Attach the lens cap to the metal fittings of the grip belt, as illustrated below, using the strap. Hold your camcorder by the viewfinder, the LCD screen...
Viewfinder 28 LCD screen Battery pack Shooting movies/still images - To hold your camcorder Hold your camcorder with your camcorder during shooting. - Do not scratch, put the fingerprint on, or ... pick up your camcorder correctly. - Before shooting Note To shoot movies/still images correctly, note the following the illustration below. 1 2 4 3 To attach the lens cap Attach the lens cap to the metal fittings of the grip belt, as illustrated below, using the strap. Hold your camcorder by the viewfinder, the LCD screen...
Operating Instructions
Page 29
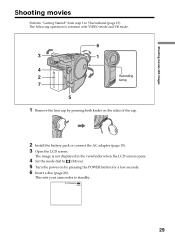
... LCD screen opens. 4 Set the mode dial to (Movie). 5 Turn the power on by pressing both knobs on the sides of the cap. 2 Install the battery pack or connect the AC adaptor (page 15). 3 Open the LCD screen. This sets your camcorder to 5 beforehand (page 15). The image is common with... VIDEO mode and VR mode. 6 3 1 4 2 Recording lamp 7 5 1 Remove the lens cap by pressing the POWER button for a few seconds. 6 Insert a disc (page 26). STBY0:00:00 -R VIDEO 29
... LCD screen opens. 4 Set the mode dial to (Movie). 5 Turn the power on by pressing both knobs on the sides of the cap. 2 Install the battery pack or connect the AC adaptor (page 15). 3 Open the LCD screen. This sets your camcorder to 5 beforehand (page 15). The image is common with... VIDEO mode and VR mode. 6 3 1 4 2 Recording lamp 7 5 1 Remove the lens cap by pressing the POWER button for a few seconds. 6 Insert a disc (page 26). STBY0:00:00 -R VIDEO 29
Operating Instructions
Page 30
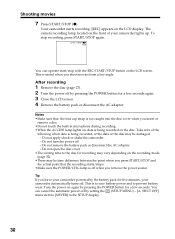
... the recording mode (page 32). •There may be time difference between the point when you press START/STOP and the actual point that the lens cap strap is being recorded, or the data or the disc may be damaged. - Notes •Make sure that the recording starts/stops. ... START/STOP again. Take note of your camcorder powered by pressing the POWER button for a few seconds again. 3 Close the LCD screen. 4 Remove the battery pack or disconnect the AC adaptor. Do not apply shock or shake the camcorder. - Your camcorder starts recording. [REC] appears on the disc.
... the recording mode (page 32). •There may be time difference between the point when you press START/STOP and the actual point that the lens cap strap is being recorded, or the data or the disc may be damaged. - Notes •Make sure that the recording starts/stops. ... START/STOP again. Take note of your camcorder powered by pressing the POWER button for a few seconds again. 3 Close the LCD screen. 4 Remove the battery pack or disconnect the AC adaptor. Do not apply shock or shake the camcorder. - Your camcorder starts recording. [REC] appears on the disc.
Operating Instructions
Page 31
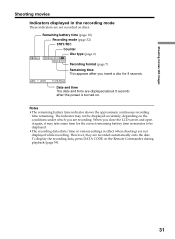
...data (date/time or various settings in the recording mode These indicators are displayed about 5 seconds after the power is turned on. Remaining battery time (page 18) Recording mode (page 32) STBY/REC Counter Disc type (page 6) 40min REC 0:00:01 -R [30min] VIDEO ...Recording format (page 7) Remaining time This appears after you are recorded automatically onto the disc. Notes •The remaining battery time indicator shows the approximate continuous recording time remaining. To display the recording data, press DATA CODE on discs. However, they are recording...
...data (date/time or various settings in the recording mode These indicators are displayed about 5 seconds after the power is turned on. Remaining battery time (page 18) Recording mode (page 32) STBY/REC Counter Disc type (page 6) 40min REC 0:00:01 -R [30min] VIDEO ...Recording format (page 7) Remaining time This appears after you are recorded automatically onto the disc. Notes •The remaining battery time indicator shows the approximate continuous recording time remaining. To display the recording data, press DATA CODE on discs. However, they are recording...
Operating Instructions
Page 35
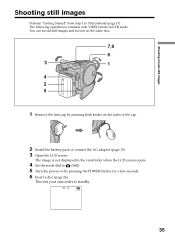
... when the LCD screen opens. 4 Set the mode dial to (Still). 5 Turn the power on by pressing both knobs on the same disc. 7 8 6 3 1 4 2 5 1 Remove the lens cap by pressing the POWER button for a few seconds. 6 Insert a disc (page 26). FINE 0 -R VIDEO 35 You can record still images and movies on the...
... when the LCD screen opens. 4 Set the mode dial to (Still). 5 Turn the power on by pressing both knobs on the same disc. 7 8 6 3 1 4 2 5 1 Remove the lens cap by pressing the POWER button for a few seconds. 6 Insert a disc (page 26). FINE 0 -R VIDEO 35 You can record still images and movies on the...
Operating Instructions
Page 37
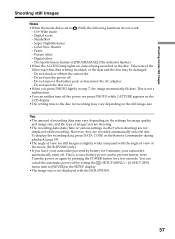
... a malfunction. •You can cancel the automatic power-off . - Turn the power on again by battery for still images is slightly wider compared with the DCR-DVD101. 37 Do not remove the battery pack or disconnect the AC adaptor. - However, they are not displayed while recording. Tips •The amount... in the SETUP display. •The image size is not displayed with the angle of view of the following functions do not work. - 16:9 Wide mode - Fader - Digital zoom - To display the recording data, press DATA CODE on the settings for recording may be damaged. - You can...
... a malfunction. •You can cancel the automatic power-off . - Turn the power on again by battery for still images is slightly wider compared with the DCR-DVD101. 37 Do not remove the battery pack or disconnect the AC adaptor. - However, they are not displayed while recording. Tips •The amount... in the SETUP display. •The image size is not displayed with the angle of view of the following functions do not work. - 16:9 Wide mode - Fader - Digital zoom - To display the recording data, press DATA CODE on the settings for recording may be damaged. - You can...
Operating Instructions
Page 50
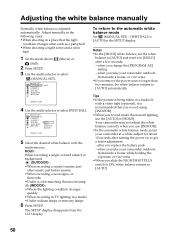
..., white balance returns to [AUTO] automatically. HOLD : When recording a single-colored subject or background (OUTDOOR) : •When recording a sunset/sunrise, just after you replace the battery pack. - Notes •In the [HOLD] white balance, set the white balance to [AUTO] and reset it is adjusted automatically. Adjust manually in the following...
..., white balance returns to [AUTO] automatically. HOLD : When recording a single-colored subject or background (OUTDOOR) : •When recording a sunset/sunrise, just after you replace the battery pack. - Notes •In the [HOLD] white balance, set the white balance to [AUTO] and reset it is adjusted automatically. Adjust manually in the following...
