Operating Instructions
Page 2
... operating and maintenance (servicing) instructions in hazardous radiation exposure. For customers in the U.S.A. You can capture life's precious moments with this product, you can help preserve our environment by returning your Handycam, you may result in the literature accompanying the appliance. Use of controls or adjustments or performance of Conformity Trade Name: SONY Model No.: DCR-DVD101 Responsible Party:Sony...
... operating and maintenance (servicing) instructions in hazardous radiation exposure. For customers in the U.S.A. You can capture life's precious moments with this product, you can help preserve our environment by returning your Handycam, you may result in the literature accompanying the appliance. Use of controls or adjustments or performance of Conformity Trade Name: SONY Model No.: DCR-DVD101 Responsible Party:Sony...
Operating Instructions
Page 11
... Troubleshooting Types of trouble and corrective action 118 Self-diagnosis display 125 Warning indicators 126 Warning messages 127 Additional information About the disc 129 About the "InfoLITHIUM" battery pack 130 Using your camcorder - Getting Started Using a disc in the Playlist 76 Converting all the still images on your camcorder abroad .......... 131 Maintenance information and precautions 132 Specifications 135 Parts and...
... Troubleshooting Types of trouble and corrective action 118 Self-diagnosis display 125 Warning indicators 126 Warning messages 127 Additional information About the disc 129 About the "InfoLITHIUM" battery pack 130 Using your camcorder - Getting Started Using a disc in the Playlist 76 Converting all the still images on your camcorder abroad .......... 131 Maintenance information and precautions 132 Specifications 135 Parts and...
Operating Instructions
Page 12
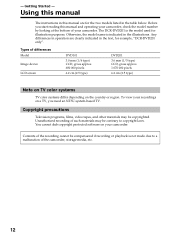
... camcorder. Using this manual The instructions in the text, for illustration purposes. Any differences in operation are for the two models listed in the illustrations. To view your camcorder. Before you need an NTSC system-based TV. Unauthorized recording of the camcorder, storage media, etc. 12 You cannot dub copyright protected software on your recordings on the country or region. The DCR...
... camcorder. Using this manual The instructions in the text, for illustration purposes. Any differences in operation are for the two models listed in the illustrations. To view your camcorder. Before you need an NTSC system-based TV. Unauthorized recording of the camcorder, storage media, etc. 12 You cannot dub copyright protected software on your recordings on the country or region. The DCR...
Operating Instructions
Page 37
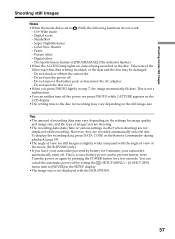
... by battery for a few seconds. Do not open the disc cover. •When you are shooting. •The recording data (date/time or various settings in step 7, the image momentarily flickers. To display the recording data, press DATA CODE on the still image size. Color Slow Shutter - Picture effect - Digital zoom - Super NightShot plus - This is not a malfunction. •You...
... by battery for a few seconds. Do not open the disc cover. •When you are shooting. •The recording data (date/time or various settings in step 7, the image momentarily flickers. To display the recording data, press DATA CODE on the still image size. Color Slow Shutter - Picture effect - Digital zoom - Super NightShot plus - This is not a malfunction. •You...
Operating Instructions
Page 38
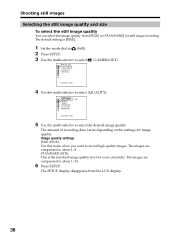
... (STD): This is [FINE]. 1 Set the mode dial to (Still). 2 Press SETUP. 3 Use the multi-selector to select MANUAL SET PROGRAM AE FLASH MODE FLASH LVL WHT BAL (CAMERA SET) . [ SETUP ] : END 4 Use the multi-selector to record high quality images. The SETUP display disappears from [FINE] or [STANDARD] for still image recording. Shooting still images Selecting the still image quality and size To select the still...
... (STD): This is [FINE]. 1 Set the mode dial to (Still). 2 Press SETUP. 3 Use the multi-selector to select MANUAL SET PROGRAM AE FLASH MODE FLASH LVL WHT BAL (CAMERA SET) . [ SETUP ] : END 4 Use the multi-selector to record high quality images. The SETUP display disappears from [FINE] or [STANDARD] for still image recording. Shooting still images Selecting the still image quality and size To select the still...
Operating Instructions
Page 39
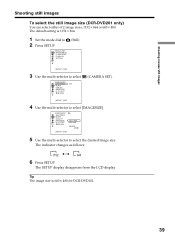
...]. LIGHT RETURN OFF (CAMERA SET). [ SETUP ] : END 4 Use the multi-selector to select CAMERA SET SELFTIMER BURST QUALITY IMAGESIZE N. S. LIGHT RETURN 1152 x 864 640 x 480 REMAIN [2000] [ SETUP ] : END 5 Use the multi-selector to 2 Press SETUP. The default setting is 640 x 480 for DCR-DVD101. 39 Tip The image size is 1152 × 864. 1 Set the mode dial to select the desired image size. The indicator changes as...
...]. LIGHT RETURN OFF (CAMERA SET). [ SETUP ] : END 4 Use the multi-selector to select CAMERA SET SELFTIMER BURST QUALITY IMAGESIZE N. S. LIGHT RETURN 1152 x 864 640 x 480 REMAIN [2000] [ SETUP ] : END 5 Use the multi-selector to 2 Press SETUP. The default setting is 640 x 480 for DCR-DVD101. 39 Tip The image size is 1152 × 864. 1 Set the mode dial to select the desired image size. The indicator changes as...
Operating Instructions
Page 50
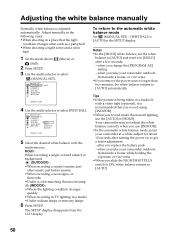
... scene and a neon sign. 1 Set the mode dial to (Movie) or (Still). 2 Press SETUP. 3 Use the multi-selector to select (MANUAL SET). when you record under fluorescent lighting, use [INDOOR]. •In the automatic white balance mode, point your camcorder outdoors from the LCD display. when you replace the battery pack. - Tips •If the picture is adjusted automatically. after you...
... scene and a neon sign. 1 Set the mode dial to (Movie) or (Still). 2 Press SETUP. 3 Use the multi-selector to select (MANUAL SET). when you record under fluorescent lighting, use [INDOOR]. •In the automatic white balance mode, point your camcorder outdoors from the LCD display. when you replace the battery pack. - Tips •If the picture is adjusted automatically. after you...

Operating Instructions
Page 51
... effect minimizes camera-shake on fastmoving subjects such as people or flowers. MANUAL SET PROGRAM AE P EFFECT D EFFECT WHT BAL AUTO SHTR RETURN AUTO SPOTLIGHT PORTRAIT SPORTS BEACH&SKI SUNSETMOON LANDSCAPE [ SETUP ] : END 5 Use the multi-selector to far distance. *2 Your camcorder focuses only on a ski slope. MANUAL SET PROGRAM AE P EFFECT D EFFECT WHT BAL AUTO SHTR RETURN SPOTLIGHT [ SETUP ] : END 6 Press SETUP. BEACH&SKI...
... effect minimizes camera-shake on fastmoving subjects such as people or flowers. MANUAL SET PROGRAM AE P EFFECT D EFFECT WHT BAL AUTO SHTR RETURN AUTO SPOTLIGHT PORTRAIT SPORTS BEACH&SKI SUNSETMOON LANDSCAPE [ SETUP ] : END 5 Use the multi-selector to far distance. *2 Your camcorder focuses only on a ski slope. MANUAL SET PROGRAM AE P EFFECT D EFFECT WHT BAL AUTO SHTR RETURN SPOTLIGHT [ SETUP ] : END 6 Press SETUP. BEACH&SKI...
Operating Instructions
Page 52
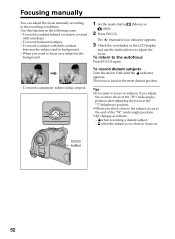
... the "W" (wide-angle) position. •9 changes as follows: - FAR NEAR 1 Set the mode dial to (Still). 2 Press FOCUS. (Movie) or The 9 (manual focus) indicator appears. 3 Check the viewfinder or the LCD display and use the multi-selector to the autofocus Press FOCUS again. To return to adjust the focus. when recording a distant subject. - FOCUS button 52 When you adjust the zoom to focus on...
... the "W" (wide-angle) position. •9 changes as follows: - FAR NEAR 1 Set the mode dial to (Still). 2 Press FOCUS. (Movie) or The 9 (manual focus) indicator appears. 3 Check the viewfinder or the LCD display and use the multi-selector to the autofocus Press FOCUS again. To return to adjust the focus. when recording a distant subject. - FOCUS button 52 When you adjust the zoom to focus on...
Operating Instructions
Page 63
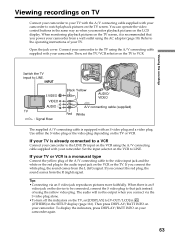
...your camcorder. Refer to [V-OUT/LCD] in (OTHERS) in the same way as when you connect the red plug, the sound comes from the L (left) signal. If you connect via an S video jack reproduces pictures more faithfully. Then, set [DISPLAY] to the operating instructions of using the AC adaptor (... your TV or VCR is an S video jack on your TV. INPUT S VIDEO VIDEO AUDIO TV : Signal flow Black Yellow AUDIO/ VIDEO A/V connecting cable (supplied) Red White The supplied A/V connecting cable is recommended that jack instead of your camcorder again. 63 To display the indicators, ...
...your camcorder. Refer to [V-OUT/LCD] in (OTHERS) in the same way as when you connect the red plug, the sound comes from the L (left) signal. If you connect via an S video jack reproduces pictures more faithfully. Then, set [DISPLAY] to the operating instructions of using the AC adaptor (... your TV or VCR is an S video jack on your TV. INPUT S VIDEO VIDEO AUDIO TV : Signal flow Black Yellow AUDIO/ VIDEO A/V connecting cable (supplied) Red White The supplied A/V connecting cable is recommended that jack instead of your camcorder again. 63 To display the indicators, ...
Operating Instructions
Page 94
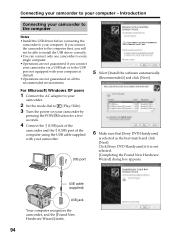
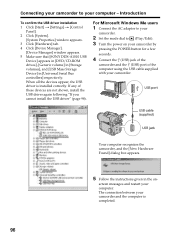
... computer at default. •Operations are not guaranteed if you connect your camcorder via a USB hub or to the USB port not equipped with your camcorder. 2 Set the mode dial to your camcorder. For Microsoft Windows XP users 1 Connect the AC adaptor to (Play/Edit). 3 Turn the power on all the recommended environments. 5 Select [Install the software automatically (Recommended)] and...
... computer at default. •Operations are not guaranteed if you connect your camcorder via a USB hub or to the USB port not equipped with your camcorder. 2 Set the mode dial to your camcorder. For Microsoft Windows XP users 1 Connect the AC adaptor to (Play/Edit). 3 Turn the power on all the recommended environments. 5 Select [Install the software automatically (Recommended)] and...
Operating Instructions
Page 95
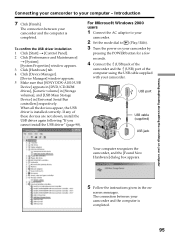
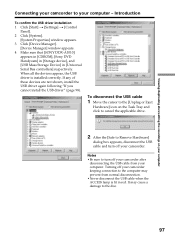
... 2000 users 1 Connect the AC adaptor to your camcorder. 2 Set the mode dial to (Play/Edit). 3 Turn the power on your computer Connecting your camcorder to your computer - If any of the computer using the USB cable supplied with your camcorder. When all the devices appear, the USB driver is completed. 95 screen messages. To confirm the USB driver installation 1 Click...
... 2000 users 1 Connect the AC adaptor to your camcorder. 2 Set the mode dial to (Play/Edit). 3 Turn the power on your computer Connecting your camcorder to your computer - If any of the computer using the USB cable supplied with your camcorder. When all the devices appear, the USB driver is completed. 95 screen messages. To confirm the USB driver installation 1 Click...
Operating Instructions
Page 96
... the [New Hardware Found] dialog box appears. 5 Follow the instructions given in [Universal Serial Bus controllers] respectively. When all the devices appear, the USB driver is completed. 96 The connection between your camcorder. For Microsoft Windows Me users 1 Connect the AC adaptor to your camcorder. 2 Set the mode dial to your computer. Introduction To confirm the USB driver installation 1 Click [Start] t [Settings...
... the [New Hardware Found] dialog box appears. 5 Follow the instructions given in [Universal Serial Bus controllers] respectively. When all the devices appear, the USB driver is completed. 96 The connection between your camcorder. For Microsoft Windows Me users 1 Connect the AC adaptor to your camcorder. 2 Set the mode dial to your computer. Introduction To confirm the USB driver installation 1 Click [Start] t [Settings...
Operating Instructions
Page 97
... the [Safe to Remove Hardware] dialog box appears, disconnect the USB cable and turn off your camcorder after disconnecting the USB cable from normal disconnection. •Never disconnect the USB cable when the ACCESS lamp is installed correctly. It may prevent from your computer. Introduction To confirm the USB driver installation 1 Click [Start] t [Settings] t [Control Panel...
... the [Safe to Remove Hardware] dialog box appears, disconnect the USB cable and turn off your camcorder after disconnecting the USB cable from normal disconnection. •Never disconnect the USB cable when the ACCESS lamp is installed correctly. It may prevent from your computer. Introduction To confirm the USB driver installation 1 Click [Start] t [Settings] t [Control Panel...
Operating Instructions
Page 99
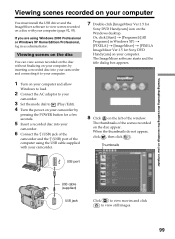
...supplied) USB jack Click to view movies and click to view still images. 99 If you are using the USB cable supplied with your computer. Viewing scenes on the disc ...Sony DVD Handycam] on your computer (page 92, 93). The ImageMixer software starts and the title dialog box appears. 1 Turn on your computer and allow Windows to load. 2 Connect the AC adaptor to your camcorder. 3 Set the mode ...your computer You must install the USB driver and the ImageMixer software to view scenes recorded on a disc with your computer. 7 Double-click [ImageMixer Ver.1.5 for Sony DVD Handycam] icon on...
...supplied) USB jack Click to view movies and click to view still images. 99 If you are using the USB cable supplied with your computer. Viewing scenes on the disc ...Sony DVD Handycam] on your computer (page 92, 93). The ImageMixer software starts and the title dialog box appears. 1 Turn on your computer and allow Windows to load. 2 Connect the AC adaptor to your camcorder. 3 Set the mode ...your computer You must install the USB driver and the ImageMixer software to view scenes recorded on a disc with your computer. 7 Double-click [ImageMixer Ver.1.5 for Sony DVD Handycam] icon on...
Operating Instructions
Page 110
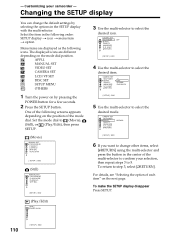
... items are different depending on the mode dial position. MANUAL SET VIDEO SET CAMERA SET LCD/VF SET DISC SET SETUP MENU OTHERS 1 Turn the power on the next page. S. LIGHT RETURN NORMAL [ SETUP ] : END 6 If you want to 5. - Customizing your selection, then repeat steps 3 to change the default settings by pressing the POWER button for a few seconds. 2 Press the SETUP button. CAMERA SET SELFTIMER BURST...
... items are different depending on the mode dial position. MANUAL SET VIDEO SET CAMERA SET LCD/VF SET DISC SET SETUP MENU OTHERS 1 Turn the power on the next page. S. LIGHT RETURN NORMAL [ SETUP ] : END 6 If you want to 5. - Customizing your selection, then repeat steps 3 to change the default settings by pressing the POWER button for a few seconds. 2 Press the SETUP button. CAMERA SET SELFTIMER BURST...
Operating Instructions
Page 121
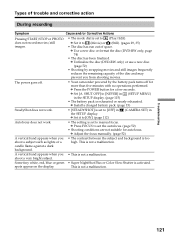
... 112) (CAMERA SET) in Autofocus does not work . • [STEADYSHOT] is set to [OFF] in the SETUP display. (page 115) • The battery pack is set to manual focus. shoot a very bright subject. Types of trouble and corrective action During recording Symptom Cause and/or Corrective Actions Pressing START/STOP or PHOTO does not record movies/still images. • The mode dial is...
... 112) (CAMERA SET) in Autofocus does not work . • [STEADYSHOT] is set to [OFF] in the SETUP display. (page 115) • The battery pack is set to manual focus. shoot a very bright subject. Types of trouble and corrective action During recording Symptom Cause and/or Corrective Actions Pressing START/STOP or PHOTO does not record movies/still images. • The mode dial is...
Operating Instructions
Page 124
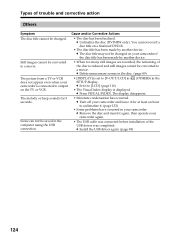
...sounds for at least an hour to acclimatize it to output on the TV or VCR. c Set it . (page 132) • Some problems have occurred in your camcorder. The display disappears. • Moisture condensation has occurred. c Unfinalize the disc (DVD-RW ...installation of the USB driver was completed. c Install the USB driver again. (page 98) 124 Scene can not be converted to [V-OUT/LCD] in (OTHERS) in the computer using the USB connection. c Press VISUAL INDEX. c Turn off your camcorder and leave it for 5 seconds. Still images cannot be saved in the SETUP display. Types of trouble...
...sounds for at least an hour to acclimatize it to output on the TV or VCR. c Set it . (page 132) • Some problems have occurred in your camcorder. The display disappears. • Moisture condensation has occurred. c Unfinalize the disc (DVD-RW ...installation of the USB driver was completed. c Install the USB driver again. (page 98) 124 Scene can not be converted to [V-OUT/LCD] in (OTHERS) in the computer using the USB connection. c Press VISUAL INDEX. c Turn off your camcorder and leave it for 5 seconds. Still images cannot be saved in the SETUP display. Types of trouble...
Operating Instructions
Page 134
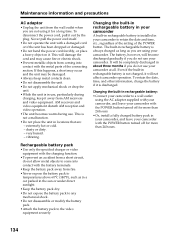
... discharged in use your camcorder. very humid. - Maintenance information and precautions AC adaptor •Unplug the unit from the wall outlet when you are not using it out by the plug. AM receivers and video equipment disturb AM reception and video operation. •The unit becomes warm during charging, keep metal contacts clean. •Do not disassemble the...
... discharged in use your camcorder. very humid. - Maintenance information and precautions AC adaptor •Unplug the unit from the wall outlet when you are not using it out by the plug. AM receivers and video equipment disturb AM reception and video operation. •The unit becomes warm during charging, keep metal contacts clean. •Do not disassemble the...
Operating Instructions
Page 135
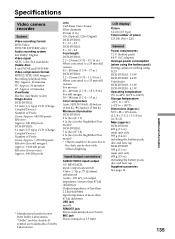
.... Additional information 135 Lens Carl Zeiss Vario-Tessar Filter diameter: 25 mm (1 in.) 10× (Optical), 120× (Digital) DCR-DVD101: F = 1.7 - 2.3 DCR-DVD201: F = 1.8 - 2.3 Focal length DCR-DVD101: 2.3 - 23 mm (3/32 - 15/16 in.) When converted to a 35 mm still camera 43 - 430 mm (1 3/4 - 17 in.) DCR-DVD201: 3.2 - 32 mm (5/32 - 1 5/16 in.) When converted to the dark can be shot with infrared lighting. "Dolby" and...
.... Additional information 135 Lens Carl Zeiss Vario-Tessar Filter diameter: 25 mm (1 in.) 10× (Optical), 120× (Digital) DCR-DVD101: F = 1.7 - 2.3 DCR-DVD201: F = 1.8 - 2.3 Focal length DCR-DVD101: 2.3 - 23 mm (3/32 - 15/16 in.) When converted to a 35 mm still camera 43 - 430 mm (1 3/4 - 17 in.) DCR-DVD201: 3.2 - 32 mm (5/32 - 1 5/16 in.) When converted to the dark can be shot with infrared lighting. "Dolby" and...


