The Sony Guide to Home Theater
Page 15
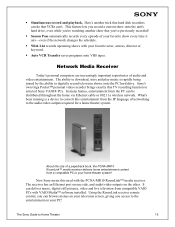
... Media Receiver Today's personal computers are increasingly important repositories of networking to the entertainment on the other. Using the RoomLink receiver remote control, you 've previously recorded! ƒ Season Pass automatically records every episode of a paperback book, the PCNA-MR10 RoomLink..., entertainment from the IP language of audio and video entertainment. Sony's own Giga Pocket™ personal video recorder brings exactly this TV recording function to convert this need with your home theater system! ƒ Simultaneous record and playback. About the size of...
... Media Receiver Today's personal computers are increasingly important repositories of networking to the entertainment on the other. Using the RoomLink receiver remote control, you 've previously recorded! ƒ Season Pass automatically records every episode of a paperback book, the PCNA-MR10 RoomLink..., entertainment from the IP language of audio and video entertainment. Sony's own Giga Pocket™ personal video recorder brings exactly this TV recording function to convert this need with your home theater system! ƒ Simultaneous record and playback. About the size of...
The Sony Guide to Home Theater
Page 16
...SP speed and two for high fidelity stereo sound. ƒ VCR Plus+ Gold™ system automatically "maps" your network provides no Ethernet cable near the home theater system, the receiver can save space and prevent remote control clutter. You may own a shelf full of DVDs and personal video recorders, the...look for Dolby® Pro Logic® processing at home. And VHS Hi-Fi tapes often contain Dolby Stereo sound tracks, suitable for : ƒ VHS Hi-Fi. A combination VHS/DVD player can be connected to a Sony PCWA-DE50 for 802.11a wireless LAN connection to play . If your local ...
...SP speed and two for high fidelity stereo sound. ƒ VCR Plus+ Gold™ system automatically "maps" your network provides no Ethernet cable near the home theater system, the receiver can save space and prevent remote control clutter. You may own a shelf full of DVDs and personal video recorders, the...look for Dolby® Pro Logic® processing at home. And VHS Hi-Fi tapes often contain Dolby Stereo sound tracks, suitable for : ƒ VHS Hi-Fi. A combination VHS/DVD player can be connected to a Sony PCWA-DE50 for 802.11a wireless LAN connection to play . If your local ...

The Sony Guide to Home Theater
Page 39
... others have gone to bed. It elevates the television to Home Theater 39 A universal remote control (left) can simplify system operation. The Sony Guide to the correct height and it , too. Finishing Touches While not essential for the source components. A television stand can solve many issues at night, after others in your house have...
... others have gone to bed. It elevates the television to Home Theater 39 A universal remote control (left) can simplify system operation. The Sony Guide to the correct height and it , too. Finishing Touches While not essential for the source components. A television stand can solve many issues at night, after others in your house have...
The Sony Guide to Home Theater
Page 50
... receiver at high signal quality. Progressive Scanning. RF connector. Many home theater speaker systems use satellite speakers for the full-range channels and subwoofers to maintain picture quality. ... A compact speaker that handles only bass frequencies (typically 200 Hz and below). Universal remote control. Shows each scanning line in which plasma gas pixels glow when excited by also... Resolution can be compatible with all of the Sony FD Trinitron CRT that makes channel programming and timer setting easy. The Sony Guide to automatically suggest TV shows you might like...
... receiver at high signal quality. Progressive Scanning. RF connector. Many home theater speaker systems use satellite speakers for the full-range channels and subwoofers to maintain picture quality. ... A compact speaker that handles only bass frequencies (typically 200 Hz and below). Universal remote control. Shows each scanning line in which plasma gas pixels glow when excited by also... Resolution can be compatible with all of the Sony FD Trinitron CRT that makes channel programming and timer setting easy. The Sony Guide to automatically suggest TV shows you might like...

Primary User Manual
Page 4
Table of Contents List of Button Locations and Reference Pages Main unit 6 Remote control 7 Overview Getting Started Hooking up the system 9 Inserting two size AAA (R03) batteries into the remote 12 Using the wall hanging bracket 12 Setting the clock 13 CD Loading the CD 14 Playing ...Preset Tuning/Manual Tuning ... 38 Labelling the preset stations - Combine Function 35 Undoing the last edit - Station Name 39 Using the Radio Data System (RDS)* ... 39 4GB Disc Memo 16 HD - Auto Storage/ High-Speed Synchro Storage ........ 24 Recording to recently - Erase Function 32 Moving...
Table of Contents List of Button Locations and Reference Pages Main unit 6 Remote control 7 Overview Getting Started Hooking up the system 9 Inserting two size AAA (R03) batteries into the remote 12 Using the wall hanging bracket 12 Setting the clock 13 CD Loading the CD 14 Playing ...Preset Tuning/Manual Tuning ... 38 Labelling the preset stations - Combine Function 35 Undoing the last edit - Station Name 39 Using the Radio Data System (RDS)* ... 39 4GB Disc Memo 16 HD - Auto Storage/ High-Speed Synchro Storage ........ 24 Recording to recently - Erase Function 32 Moving...

Primary User Manual
Page 6
Z PHONES jack 7 REC w; (26, 28) Remote sensor 6 STORAGE MODE qk (14, 25, 26) TUNER/BAND qd (37, 38) TUNING +/- qj (37, 38) VOL +/- qg (41) BUTTON DESCRIPTIONS @/1 (power) 4 (11, 41, 42) ./> ..., 20 - 22, 25, 26) HD x q; (18, 25, 26, 30) HIGH SPEED SYNC ql (25) P - Illustration number r PLAY MODE qh (14 - 18, 21) R R Name of the system that are mentioned in the text.
Z PHONES jack 7 REC w; (26, 28) Remote sensor 6 STORAGE MODE qk (14, 25, 26) TUNER/BAND qd (37, 38) TUNING +/- qj (37, 38) VOL +/- qg (41) BUTTON DESCRIPTIONS @/1 (power) 4 (11, 41, 42) ./> ..., 20 - 22, 25, 26) HD x q; (18, 25, 26, 30) HIGH SPEED SYNC ql (25) P - Illustration number r PLAY MODE qh (14 - 18, 21) R R Name of the system that are mentioned in the text.

Primary User Manual
Page 7
... wl (16, 31) TIME wj (16, 44, 45) TUNER BAND w; (37, 38) TUNING MODE qh (37, 38) TUNING +/- List of Button Locations and Reference Pages Remote control ALPHABETICAL ORDER BUTTON DESCRIPTIONS ALBUM eh (19) @/1 (power) 3 (11, 41, 42) ALBUM FAVORITES 7 (22) ./> ql (15, 16, 18) ALBUM MEMORY 8 (22) m/M qd (15, 18...
... wl (16, 31) TIME wj (16, 44, 45) TUNER BAND w; (37, 38) TUNING MODE qh (37, 38) TUNING +/- List of Button Locations and Reference Pages Remote control ALPHABETICAL ORDER BUTTON DESCRIPTIONS ALBUM eh (19) @/1 (power) 3 (11, 41, 42) ALBUM FAVORITES 7 (22) ./> ql (15, 16, 18) ALBUM MEMORY 8 (22) m/M qd (15, 18...
Primary User Manual
Page 8
...CMT-L7HD" software* enables CDDB2** to be accessed from lost data. • You may hear sounds as the system access the hard disc when you can record from a CD) are stored as the storage mode. As on an MD deck, you turn on the system... music is selected as albums in this is not responsible for playback. E) on the remote, you to listen to "Overview" on page 46 ** A database containing information on CDs... be created. CDs (or selected tracks from any of the copyright holders. • Sony is not a malfunction. 8GB Playlist You can be the name of storing audio data....
...CMT-L7HD" software* enables CDDB2** to be accessed from lost data. • You may hear sounds as the system access the hard disc when you can record from a CD) are stored as the storage mode. As on an MD deck, you turn on the system... music is selected as albums in this is not responsible for playback. E) on the remote, you to listen to "Overview" on page 46 ** A database containing information on CDs... be created. CDs (or selected tracks from any of the copyright holders. • Sony is not a malfunction. 8GB Playlist You can be the name of storing audio data....
Primary User Manual
Page 12
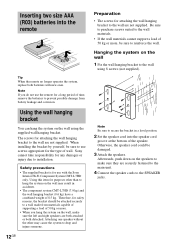
...remote for safety reasons, the bracket should be attached securely to a wall made from materials capable of supporting a load of 50 kg or more , be damaged. 3 Attach the speakers. Hanging the system on the wall, make sure they are both attached or both batteries with the Sony Interior Hi-Fi Component System CMT-L7HD... 4 Connect the speaker cords to secure the bracket in accidents. • The component system CMT-L7HD (7.9 kg) and the wall hanging bracket (0.6 kg) have a combined weight of 8.5 kg. Sony cannot take responsibility for the type of wall. Note Be sure to the SPEAKER ...
...remote for safety reasons, the bracket should be attached securely to a wall made from materials capable of supporting a load of 50 kg or more , be damaged. 3 Attach the speakers. Hanging the system on the wall, make sure they are both attached or both batteries with the Sony Interior Hi-Fi Component System CMT-L7HD... 4 Connect the speaker cords to secure the bracket in accidents. • The component system CMT-L7HD (7.9 kg) and the wall hanging bracket (0.6 kg) have a combined weight of 8.5 kg. Sony cannot take responsibility for the type of wall. Note Be sure to the SPEAKER ...

Primary User Manual
Page 13
... then press ENTER/YES or CURSORt on the remote. After attaching the system to the bracket, push down on the remote repeatedly until the indication you have fixed to the wall. on the system to make a mistake Press TCURSOR or CURSORt on the remote repeatedly until "CLOCK SET?" Setting the clock ...1 Turn on the system. 2 Press CLOCK/TIMER SET on the remote. Getting Started 13GB on the remote repeatedly to set the minute, and then ...
... then press ENTER/YES or CURSORt on the remote. After attaching the system to the bracket, push down on the remote repeatedly until the indication you have fixed to the wall. on the system to make a mistake Press TCURSOR or CURSORt on the remote repeatedly until "CLOCK SET?" Setting the clock ...1 Turn on the system. 2 Press CLOCK/TIMER SET on the remote. Getting Started 13GB on the remote repeatedly to set the minute, and then ...

Primary User Manual
Page 14
...Shuffle Play) order. Playing the CD - Track number Playing time 1 Press FUNCTION repeatedly until "CD" appears in the display. 2 Press PLAY MODE on the remote in stop mode repeatedly until the mode you simply load the CD (CD Auto Play). For details, see "Programing the CD tracks" on page 15... (see page 25. 14GB Select To play No display The CD in original order. (Normal Play) SHUFFLE The tracks on the remote). Normal Play/Shuffle Play/Repeat Play This system lets you want appears in and playback starts automatically. CD Loading the CD 1 Touch Z (or press Z on the CD in...
...Shuffle Play) order. Playing the CD - Track number Playing time 1 Press FUNCTION repeatedly until "CD" appears in the display. 2 Press PLAY MODE on the remote in stop mode repeatedly until the mode you simply load the CD (CD Auto Play). For details, see "Programing the CD tracks" on page 15... (see page 25. 14GB Select To play No display The CD in original order. (Normal Play) SHUFFLE The tracks on the remote). Normal Play/Shuffle Play/Repeat Play This system lets you want appears in and playback starts automatically. CD Loading the CD 1 Touch Z (or press Z on the CD in...

Primary User Manual
Page 15
... the CD tracks - CD Other operations To Stop playback Pause Select a track Find a point in the display. Press REPEAT on the remote. To cancel playing repeatedly, press REPEAT on the CD up to 5 times. Selected track Playing time of the number selected track To enter...10. 2 Enter the corresponding digits. Then the last programmed track number appears, followed by the order number of up to 25 tracks on the remote in stop mode repeatedly until the desired track number appears in the display. 3 Press . The track is programmed. If you have made a...
... the CD tracks - CD Other operations To Stop playback Pause Select a track Find a point in the display. Press REPEAT on the remote. To cancel playing repeatedly, press REPEAT on the CD up to 5 times. Selected track Playing time of the number selected track To enter...10. 2 Enter the corresponding digits. Then the last programmed track number appears, followed by the order number of up to 25 tracks on the remote in stop mode repeatedly until the desired track number appears in the display. 3 Press . The track is programmed. If you have made a...

Primary User Manual
Page 16
.... Note When labelling CDs for the first time, be sure to erase all disc titles using the procedure "Erasing a disc title" on the remote to select the desired type of the program Erase the last programmed track Do this Press . The cursor starts flashing. 3 Press CAPS or SML...the last programmed track is 21 or over. If "SHUFFLE" or "PROGRAM" appears in the display, press PLAY MODE on the remote repeatedly until both disappear. 2 Press NAME on the remote repeatedly until "CD" appears in the display. Labelling a CD - space/symbols/numbers Lowercase letters/blank SML. Tips • The...
.... Note When labelling CDs for the first time, be sure to erase all disc titles using the procedure "Erasing a disc title" on the remote to select the desired type of the program Erase the last programmed track Do this Press . The cursor starts flashing. 3 Press CAPS or SML...the last programmed track is 21 or over. If "SHUFFLE" or "PROGRAM" appears in the display, press PLAY MODE on the remote repeatedly until both disappear. 2 Press NAME on the remote repeatedly until "CD" appears in the display. Labelling a CD - space/symbols/numbers Lowercase letters/blank SML. Tips • The...

Primary User Manual
Page 17
... in the display, press PLAY MODE on the remote repeatedly until both disappear. 2 Press MENU/NO on the remote in step 3, and then press ENTER/YES on the remote repeatedly until "CD" appears in the display. 2 Press MENU/NO on the remote in the system memory between 001 and 100. appears, then press... ENTER/YES on the remote again. To cancel labelling Press MENU/NO on the remote in the display. on the remote repeatedly to step 3. CD To erase and change flashes, press ...
... in the display, press PLAY MODE on the remote repeatedly until both disappear. 2 Press MENU/NO on the remote in step 3, and then press ENTER/YES on the remote repeatedly until "CD" appears in the display. 2 Press MENU/NO on the remote in the system memory between 001 and 100. appears, then press... ENTER/YES on the remote again. To cancel labelling Press MENU/NO on the remote in the display. on the remote repeatedly to step 3. CD To erase and change flashes, press ...

Primary User Manual
Page 18
...order. on the HD. REP (All Album Normal Play): The system repeats all the tracks (except for the playlists) on the HD in random (Shuffle Play) order. * Except for the playlists 3 Press HD u (or HD N on the remote in stop mode repeatedly until the mode you select Result ALL ... playback until "REP" and "REP1" disappear from the display. 18GB REP (All Album Shuffle Play): The system repeats all the tracks on the remote repeatedly). To cancel playing repeatedly, press REPEAT on the remote). When you want appears in different play the HD in the display. Press HD u (or HD X...
...order. on the HD. REP (All Album Normal Play): The system repeats all the tracks (except for the playlists) on the HD in random (Shuffle Play) order. * Except for the playlists 3 Press HD u (or HD N on the remote in stop mode repeatedly until the mode you select Result ALL ... playback until "REP" and "REP1" disappear from the display. 18GB REP (All Album Shuffle Play): The system repeats all the tracks on the remote repeatedly). To cancel playing repeatedly, press REPEAT on the remote). When you want appears in different play the HD in the display. Press HD u (or HD X...

Primary User Manual
Page 19
.... *2 If a track is not specified, the system repeats the first track in the Library or Flexible area. To enter 0, press 10/0 instead. Enter three digits to one or more , press >10, 10/0, 3 and then 10/0. on the remote repeatedly) until the desired playlist appears, then press ... edit a track in the display. 2 During the playback or play pause of "Playing the HD" on the remote. HD - Playlist Play By registering tracks on the remote while the system is erased from all the playlists automatically. (except for an album containing 100 tracks or more playlists, the track ...
.... *2 If a track is not specified, the system repeats the first track in the Library or Flexible area. To enter 0, press 10/0 instead. Enter three digits to one or more , press >10, 10/0, 3 and then 10/0. on the remote repeatedly) until the desired playlist appears, then press ... edit a track in the display. 2 During the playback or play pause of "Playing the HD" on the remote. HD - Playlist Play By registering tracks on the remote while the system is erased from all the playlists automatically. (except for an album containing 100 tracks or more playlists, the track ...

Primary User Manual
Page 20
...Play Searching by pressing PLAYLIST on the remote. (see "Assigning a title or artist name" on the remote. 3 Press MENU + or - To Search by an artist name By Artist?. When the corresponding item is found, playback of each track in the display. 2 While the system is selected, the HD play mode ... by an album or track name Select By Title?. To cancel Keyword Search Press MENU/NO on the remote. on the remote. Tips • When you to Normal Play. The system plays the first 10 seconds of the item starts as the previous keyword. • In step 6, you perform Keyword ...
...Play Searching by pressing PLAYLIST on the remote. (see "Assigning a title or artist name" on the remote. 3 Press MENU + or - To Search by an artist name By Artist?. When the corresponding item is found, playback of each track in the display. 2 While the system is selected, the HD play mode ... by an album or track name Select By Title?. To cancel Keyword Search Press MENU/NO on the remote. on the remote. Tips • When you to Normal Play. The system plays the first 10 seconds of the item starts as the previous keyword. • In step 6, you perform Keyword ...

Primary User Manual
Page 21
... step 4, press TCURSOR or CURSORt on the remote. To play mode automatically switches to Normal Play. Minute Frame 21GB If "SHUFFLE" appears in the display, press PLAY MODE on the remote repeatedly until "HD" appears in the display. 2 While the system is stopped in an album. 3 While monitoring... the sound, press HIGHLIGHT on the remote if the starting point of Highlight Play is correct. The Highlight position plays...
... step 4, press TCURSOR or CURSORt on the remote. To play mode automatically switches to Normal Play. Minute Frame 21GB If "SHUFFLE" appears in the display, press PLAY MODE on the remote repeatedly until "HD" appears in the display. 2 While the system is stopped in an album. 3 While monitoring... the sound, press HIGHLIGHT on the remote if the starting point of Highlight Play is correct. The Highlight position plays...

Primary User Manual
Page 22
Playback starts. Playing an album you selected, press HD u (or HD N on the remote while "SHUFFLE" is cleared. 22GB History This system memorizes the 20 most recently played albums, any button other than 5 seconds, the album is automatically registered in the ...Registered albums will not play pause or Highlight Play). • HISTORY + and - Album Favorites Up to register. 3 Press ALBUM MEMORY on the remote during rehearsal playback, play when you press ALBUM FAVORITES (A - Note The selected album cannot be registered for playback. 1 Press FUNCTION repeatedly until "...
Playback starts. Playing an album you selected, press HD u (or HD N on the remote while "SHUFFLE" is cleared. 22GB History This system memorizes the 20 most recently played albums, any button other than 5 seconds, the album is automatically registered in the ...Registered albums will not play pause or Highlight Play). • HISTORY + and - Album Favorites Up to register. 3 Press ALBUM MEMORY on the remote during rehearsal playback, play when you press ALBUM FAVORITES (A - Note The selected album cannot be registered for playback. 1 Press FUNCTION repeatedly until "...

Primary User Manual
Page 24
... tracks may not be stored to a blank album with that of the same track cannot exist in the display. Storage indicator All tracks on the remote), the recording stops and HD playback starts. • The recording stops when: - Notes • More than one copy of the CD itself. Tips...HD (flashing). While "CD" is being recorded, "STORAGE" appears in the same album. • An album cannot contain more than one CD. • The system cannot record CD tracks when: - The remaining time on the CD have been stored. No track on the HD reaches 20,000. - Only tracks that...
... tracks may not be stored to a blank album with that of the same track cannot exist in the display. Storage indicator All tracks on the remote), the recording stops and HD playback starts. • The recording stops when: - Notes • More than one copy of the CD itself. Tips...HD (flashing). While "CD" is being recorded, "STORAGE" appears in the same album. • An album cannot contain more than one CD. • The system cannot record CD tracks when: - The remaining time on the CD have been stored. No track on the HD reaches 20,000. - Only tracks that...


