
Operating Instructions
Page 5
... that conforms to Lead-out regarded as a single session. music CD format - There are for example, "CMT-HPX10W only". • This manual mainly explains operations using the remote, but the same operations can also be no more than 8 characters. CD-Extra: This format records audio ... • A disc with each segment from Lead-in the text, for model CMT-HPX10W, CMT-HPX9 and CMTHPX7. List of playable discs Format of data using the buttons on this system. MP3 format that this system cannot play back the following formats: - continued 5GB Any difference in operation is...
... that conforms to Lead-out regarded as a single session. music CD format - There are for example, "CMT-HPX10W only". • This manual mainly explains operations using the remote, but the same operations can also be no more than 8 characters. CD-Extra: This format records audio ... • A disc with each segment from Lead-in the text, for model CMT-HPX10W, CMT-HPX9 and CMTHPX7. List of playable discs Format of data using the buttons on this system. MP3 format that this system cannot play back the following formats: - continued 5GB Any difference in operation is...
Operating Instructions
Page 8
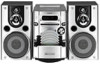
...local power line voltage. Inserting two R6 (size AA) batteries into the remote Note If you do not use the remote for a long period of time, remove the batteries to avoid possible damage from the system and other components. 3 For models with a voltage selector, set VOLTAGE SELECTOR to CD.... 2 Make sure that "PLEASE WAIT" then "LOCK" is displayed. 4 Unplug the power cord. * Saudi Arabian Model: 120 - 127 V 8GB Tip When the remote no longer operates the system, replace both ...
...local power line voltage. Inserting two R6 (size AA) batteries into the remote Note If you do not use the remote for a long period of time, remove the batteries to avoid possible damage from the system and other components. 3 For models with a voltage selector, set VOLTAGE SELECTOR to CD.... 2 Make sure that "PLEASE WAIT" then "LOCK" is displayed. 4 Unplug the power cord. * Saudi Arabian Model: 120 - 127 V 8GB Tip When the remote no longer operates the system, replace both ...
Operating Instructions
Page 9
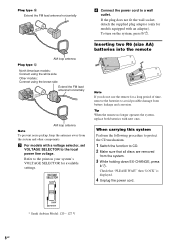
Note The clock is not displayed in Power Saving Mode (page 22). 9GB To adjust the clock 1 Press CLOCK/TIMER SET. 2 Press ./> until "CLOCK SET" appears, then press ENTER. 3 Do the same procedures as step 3 to set the minute. 6 Press ENTER. The clock starts working. Getting Started Setting the clock Use buttons on the remote for the operation. 1 Press ?/1 to turn on the system. 2 Press CLOCK/TIMER SET. 3 Press ./> repeatedly to set the hour. 4 Press ENTER. 5 Press ./> repeatedly to 6 above.
Note The clock is not displayed in Power Saving Mode (page 22). 9GB To adjust the clock 1 Press CLOCK/TIMER SET. 2 Press ./> until "CLOCK SET" appears, then press ENTER. 3 Do the same procedures as step 3 to set the minute. 6 Press ENTER. The clock starts working. Getting Started Setting the clock Use buttons on the remote for the operation. 1 Press ?/1 to turn on the system. 2 Press CLOCK/TIMER SET. 3 Press ./> repeatedly to set the hour. 4 Press ENTER. 5 Press ./> repeatedly to 6 above.
Operating Instructions
Page 10
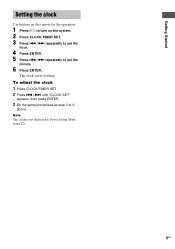
CD/MP3 - When you eject a disc, handle the disc by its edge. To remove discs 1 Press Z. 2 Hold down the lever on it as the remote or cords) in front of the respective slot to elevate the disc, then lift it out with your other hand. Notes • Do not place ...anything (such as this may cause the system to remove these discs, see page 27. • Do not use a disc with tape, seals or paste on the left side of the respective slot...
CD/MP3 - When you eject a disc, handle the disc by its edge. To remove discs 1 Press Z. 2 Hold down the lever on it as the remote or cords) in front of the respective slot to elevate the disc, then lift it out with your other hand. Notes • Do not place ...anything (such as this may cause the system to remove these discs, see page 27. • Do not use a disc with tape, seals or paste on the left side of the respective slot...

Operating Instructions
Page 11
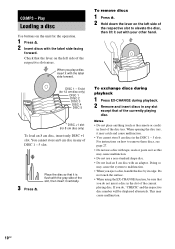
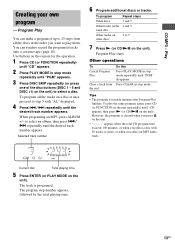
Normal Play/Shuffle Play You can play Press x. CD/MP3 - Play 3 Press N on the remote (or CD/NX on the unit. Pause Press X. Select a track Press ./> repeatedly. Select an album Press ALBUM +/- Select a disc in original order. Exchange discs Press ...). All MP3 audio tracks in the album on the disc you have selected in stop mode repeatedly until the mode you want appears in the system continuously. The tracks on the disc you have selected in random order. The tracks on the unit are not available when "ALL DISCS SHUF" is...
Normal Play/Shuffle Play You can play Press x. CD/MP3 - Play 3 Press N on the remote (or CD/NX on the unit. Pause Press X. Select a track Press ./> repeatedly. Select an album Press ALBUM +/- Select a disc in original order. Exchange discs Press ...). All MP3 audio tracks in the album on the disc you have selected in stop mode repeatedly until the mode you want appears in the system continuously. The tracks on the disc you have selected in random order. The tracks on the unit are not available when "ALL DISCS SHUF" is...
Operating Instructions
Page 13
... a disc with "AL" displayed. 4 Press ./> repeatedly until "PGM" appears. 3 Press DISC SKIP repeatedly (or press one of the disc buttons (DISC 1 - 5 and DISC +1) on the remote for the operation. 1 Press CD (or FUNCTION repeatedly) until "PGM" disappears. Use buttons on the unit) to select a disc. To program all the discs in...
... a disc with "AL" displayed. 4 Press ./> repeatedly until "PGM" appears. 3 Press DISC SKIP repeatedly (or press one of the disc buttons (DISC 1 - 5 and DISC +1) on the remote for the operation. 1 Press CD (or FUNCTION repeatedly) until "PGM" disappears. Use buttons on the unit) to select a disc. To program all the discs in...
Operating Instructions
Page 19
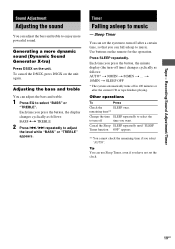
...Press SLEEP repeatedly. Other operations To Press Check the SLEEP once. t 10MIN t SLEEP OFF * The system automatically turns off in 100 minutes or after a certain time, so that you have not set the system to enjoy more dynamic sound (Dynamic Sound Generator X-tra) Press DSGX on the unit. To cancel the... DSGX, press DSGX on the remote for the operation. Sleep Timer You can adjust the bass and treble to ...
...Press SLEEP repeatedly. Other operations To Press Check the SLEEP once. t 10MIN t SLEEP OFF * The system automatically turns off in 100 minutes or after a certain time, so that you have not set the system to enjoy more dynamic sound (Dynamic Sound Generator X-tra) Press DSGX on the unit. To cancel the... DSGX, press DSGX on the remote for the operation. Sleep Timer You can adjust the bass and treble to ...

Operating Instructions
Page 20
Use buttons on the remote for Play Timer. • You cannot activate Play Timer and Rec Timer... the time the system turns on until the play starts (about 15 seconds before the preset time, Play Timer will not be activated. • You cannot use the optional component connected to the MD/VIDEO jacks or the transmitter (CMTHPX10W only) as follows: t TUNER...want to set the clock (see "Setting the clock" on about 15 seconds before the preset time). • If the system is on page 9). Other operations To Check the setting Change the setting Cancel the timer Do this 1 Press CLOCK/TIMER ...
Use buttons on the remote for Play Timer. • You cannot activate Play Timer and Rec Timer... the time the system turns on until the play starts (about 15 seconds before the preset time, Play Timer will not be activated. • You cannot use the optional component connected to the MD/VIDEO jacks or the transmitter (CMTHPX10W only) as follows: t TUNER...want to set the clock (see "Setting the clock" on about 15 seconds before the preset time). • If the system is on page 9). Other operations To Check the setting Change the setting Cancel the timer Do this 1 Press CLOCK/TIMER ...
Operating Instructions
Page 21
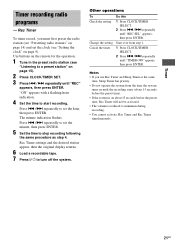
Use buttons on the remote for the operation. 1 Tune in the preset radio station (see "Setting the clock" on page 9). ...repeatedly until "REC" appears, then press ENTER. "ON" appears with a flashing hour indication. 4 Set the time to turn off the system. Notes • If you must first preset the radio station (see "Presetting radio stations" on page 14) and set the clock (...Rec Timer and Sleep Timer at the same time, Sleep Timer has priority. • Do not operate the system from step 1. 1 Press CLOCK/TIMER SELECT. 2 Press ./> repeatedly until "TIMER OFF" appears, then press ENTER. Start over...
Use buttons on the remote for the operation. 1 Tune in the preset radio station (see "Setting the clock" on page 9). ...repeatedly until "REC" appears, then press ENTER. "ON" appears with a flashing hour indication. 4 Set the time to turn off the system. Notes • If you must first preset the radio station (see "Presetting radio stations" on page 14) and set the clock (...Rec Timer and Sleep Timer at the same time, Sleep Timer has priority. • Do not operate the system from step 1. 1 Press CLOCK/TIMER SELECT. 2 Press ./> repeatedly until "TIMER OFF" appears, then press ENTER. Start over...

Operating Instructions
Page 26
... Sony service facility. After ?/1 indicator stops flashing, reconnect the power cord and turn VOLUME on the unit clockwise). • Make sure the headphones are not connected. • Check the speaker connections (page 7). The remote does not function. • Remove the obstacle. • Move the remote closer to the system. • Point the remote at the system...
... Sony service facility. After ?/1 indicator stops flashing, reconnect the power cord and turn VOLUME on the unit clockwise). • Make sure the headphones are not connected. • Check the speaker connections (page 7). The remote does not function. • Remove the obstacle. • Move the remote closer to the system. • Point the remote at the system...

Operating Instructions
Page 33
projecting parts and controls Mass CMT-HPX10W: CMT-HPX9: CMT-HPX7: Approx. 7.8 kg Approx. 8.1 kg Approx. 7.8 kg Supplied accessories Remote Commander (1) R6 (size AA) batteries (2) AM loop antenna (1) FM lead antenna (1) Transmitter (CMT-HPX10W only) (1) AC adapter (CMT-HPX10W only) (1) Connecting cord phono plug-stereo mini plug (1 m) (CMT-HPX10W only) (1) Design and specifications are subject to change without notice. 33GB Additional Information...
projecting parts and controls Mass CMT-HPX10W: CMT-HPX9: CMT-HPX7: Approx. 7.8 kg Approx. 8.1 kg Approx. 7.8 kg Supplied accessories Remote Commander (1) R6 (size AA) batteries (2) AM loop antenna (1) FM lead antenna (1) Transmitter (CMT-HPX10W only) (1) AC adapter (CMT-HPX10W only) (1) Connecting cord phono plug-stereo mini plug (1 m) (CMT-HPX10W only) (1) Design and specifications are subject to change without notice. 33GB Additional Information...

Operating Instructions
Page 34
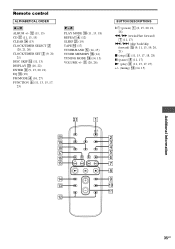
Z PHONES jack qk PLAY MODE qj (11, 13, 18) Remote sensor 2 REPEAT qh (12) TUNER/BAND 0 (14, 15) TUNING +/- 8 (14, 15) TUNING MODE qj (14, 15) VOLUME 7 (20, 26) BUTTON DESCRIPTIONS ?/1 (power) 1 (8, 15, 20, 21, ...) P - Illustration number r FM MODE qh (16, 27) R R Name of the system that are mentioned in the text. List of button locations and reference pages How to use this page Use this page to find the location of buttons and other parts of button/part Reference page Main unit (CMT-HPX10W/CMT-HPX9) ALPHABETICAL ORDER A -
Z PHONES jack qk PLAY MODE qj (11, 13, 18) Remote sensor 2 REPEAT qh (12) TUNER/BAND 0 (14, 15) TUNING +/- 8 (14, 15) TUNING MODE qj (14, 15) VOLUME 7 (20, 26) BUTTON DESCRIPTIONS ?/1 (power) 1 (8, 15, 20, 21, ...) P - Illustration number r FM MODE qh (16, 27) R R Name of the system that are mentioned in the text. List of button locations and reference pages How to use this page Use this page to find the location of buttons and other parts of button/part Reference page Main unit (CMT-HPX10W/CMT-HPX9) ALPHABETICAL ORDER A -
Operating Instructions
Page 35
..., 21) DISC SKIP 0 (11, 13) DISPLAY w; (16, 22) ENTER 9 (9, 13, 20, 21) EQ qd (19) FM MODE 4 (16, 27) FUNCTION 6 (11, 13, 15, 17, 23) P - Remote control ALPHABETICAL ORDER A -
..., 21) DISC SKIP 0 (11, 13) DISPLAY w; (16, 22) ENTER 9 (9, 13, 20, 21) EQ qd (19) FM MODE 4 (16, 27) FUNCTION 6 (11, 13, 15, 17, 23) P - Remote control ALPHABETICAL ORDER A -

Marketing Specifications
Page 2
...Sony or their respective owners. *CD-R/RW playback may not be compatible with 20 FM + 10 AM Station Presets Audio • Bass and Treble Control • CD-R & CD-RW Playback* Inputs and Outputs • Analog Audio Input x 1 (RCA Type) (Video/MD) • Mini-pin Headphone Jack Convenience • Play Exchange- CMT-HPX10W Micro System... • Power Requirements • Instruction Manual • Remote Commander® Remote Control RM-SC3 • Batteries x 2 • FM Lead Antenna UPC Codes • 0272426429420 ©2004 Sony Electronics Inc. CD Player • CD Digital to change...
...Sony or their respective owners. *CD-R/RW playback may not be compatible with 20 FM + 10 AM Station Presets Audio • Bass and Treble Control • CD-R & CD-RW Playback* Inputs and Outputs • Analog Audio Input x 1 (RCA Type) (Video/MD) • Mini-pin Headphone Jack Convenience • Play Exchange- CMT-HPX10W Micro System... • Power Requirements • Instruction Manual • Remote Commander® Remote Control RM-SC3 • Batteries x 2 • FM Lead Antenna UPC Codes • 0272426429420 ©2004 Sony Electronics Inc. CD Player • CD Digital to change...


