Operating Instructions
Page 3
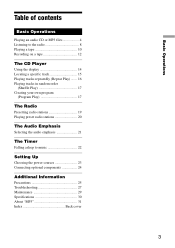
...the radio 8 Playing a tape 10 Recording on a tape 12 The CD Player Using the display 14 Locating a specific track 15 Playing tracks repeatedly (Repeat Play) ....... 16 Playing tracks in random order (Shuffle Play 17 Creating your own program (Program Play 17 The Radio Presetting radio stations 19 Playing preset radio stations 20 The Audio Emphasis Selecting the audio emphasis 21 The Timer Falling asleep to music 22 Setting Up Choosing the power sources 23 Connecting optional components 24 Additional Information Precautions 25 Troubleshooting 27 Maintenance 29 Specifications 30...
...the radio 8 Playing a tape 10 Recording on a tape 12 The CD Player Using the display 14 Locating a specific track 15 Playing tracks repeatedly (Repeat Play) ....... 16 Playing tracks in random order (Shuffle Play 17 Creating your own program (Program Play 17 The Radio Presetting radio stations 19 Playing preset radio stations 20 The Audio Emphasis Selecting the audio emphasis 21 The Timer Falling asleep to music 22 Setting Up Choosing the power sources 23 Connecting optional components 24 Additional Information Precautions 25 Troubleshooting 27 Maintenance 29 Specifications 30...
Operating Instructions
Page 4
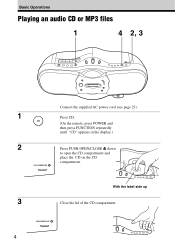
Press CD. (On the remote, press POWER and then press FUNCTION repeatedly until "CD" appears in the display.) Press PUSH OPEN/CLOSE Z down to open the CD compartment and place the CD on the CD compartment. With the label side up Close the lid of the CD compartment. Basic Operations Playing an audio CD or MP3 files 1 4 2, 3 1 2 3 4 Connect the supplied AC power cord (see page 23).
Press CD. (On the remote, press POWER and then press FUNCTION repeatedly until "CD" appears in the display.) Press PUSH OPEN/CLOSE Z down to open the CD compartment and place the CD on the CD compartment. With the label side up Close the lid of the CD compartment. Basic Operations Playing an audio CD or MP3 files 1 4 2, 3 1 2 3 4 Connect the supplied AC power cord (see page 23).
Operating Instructions
Page 5
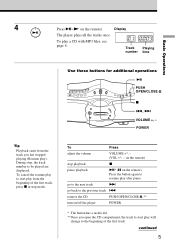
Track Playing number time Basic Operations Use these buttons for additional operations u PUSH OPEN/CLOSE Z x ., > VOLUME +, - To cancel the resume play to start play will change to the beginning of the first track, press x in stop mode. go to the next track > go back to start play after pause. 4 Press u (N on the remote) stop , the track number to be played are displayed. POWER Tip Playback starts from the beginning of the first track. continued 5 To Press...
Track Playing number time Basic Operations Use these buttons for additional operations u PUSH OPEN/CLOSE Z x ., > VOLUME +, - To cancel the resume play to start play will change to the beginning of the first track, press x in stop mode. go to the next track > go back to start play after pause. 4 Press u (N on the remote) stop , the track number to be played are displayed. POWER Tip Playback starts from the beginning of the first track. continued 5 To Press...

Operating Instructions
Page 7
... the folders and files is a recording standard used for Compact Disc Digital Audio. Other characters are displayed as follows: CD-R CD-RW Folder MP3 file 1 1 2 2 3 3 4 5 4 6 7 8 5 9 6 0 About CD-Rs/CD-RWs and MP3 files This player can play CD-Rs/CD-RWs recorded in the CDDA format* and MP3 files recorded in the CD-ROM format, but playback capability may vary depending on this player. Z, a - z, 0 - 9, and _ can be displayed with up to Version 1.1 of...
... the folders and files is a recording standard used for Compact Disc Digital Audio. Other characters are displayed as follows: CD-R CD-RW Folder MP3 file 1 1 2 2 3 3 4 5 4 6 7 8 5 9 6 0 About CD-Rs/CD-RWs and MP3 files This player can play CD-Rs/CD-RWs recorded in the CDDA format* and MP3 files recorded in the CD-ROM format, but playback capability may vary depending on this player. Z, a - z, 0 - 9, and _ can be displayed with up to Version 1.1 of...

Operating Instructions
Page 8
until the band you can't tune in a station, press TUNE + or - broadcast The player automatically scans the ST radio frequencies and stops when it finds a clear station. Listening to the radio 1 2 Connect the supplied AC power cord (see page 23). 1 Press RADIO BAND•AUTO Display PRESET (BAND on the remote) until the frequency digits begin to change in the display. 2 Hold down TUNE + or - repeatedly to change the frequency step by step. 8 If you want appears in Indicates an FM stereo the display.
until the band you can't tune in a station, press TUNE + or - broadcast The player automatically scans the ST radio frequencies and stops when it finds a clear station. Listening to the radio 1 2 Connect the supplied AC power cord (see page 23). 1 Press RADIO BAND•AUTO Display PRESET (BAND on the remote) until the frequency digits begin to change in the display. 2 Hold down TUNE + or - repeatedly to change the frequency step by step. 8 If you want appears in Indicates an FM stereo the display.
Operating Instructions
Page 9
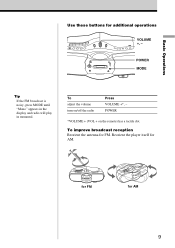
for FM for additional operations VOLUME +, - Basic Operations Use these buttons for AM 9 POWER MODE Tip If the FM broadcast is noisy, press MODE until "Mono" appears in the display and radio will play in monaural. To adjust the volume turn on the remote) has a tactile dot. To improve broadcast reception Reorient the antenna for AM. POWER *VOLUME + (VOL + on /off the radio Press VOLUME +*, - Reorient the player itself for FM.
for FM for additional operations VOLUME +, - Basic Operations Use these buttons for AM 9 POWER MODE Tip If the FM broadcast is noisy, press MODE until "Mono" appears in the display and radio will play in monaural. To adjust the volume turn on the remote) has a tactile dot. To improve broadcast reception Reorient the antenna for AM. POWER *VOLUME + (VOL + on /off the radio Press VOLUME +*, - Reorient the player itself for FM.

Operating Instructions
Page 10
Display 10 Playing a tape 1 32 Connect the supplied AC power cord (see page 23). 1 Press TAPE. 2 Press xZ to open the tape With the side you want compartment and insert a recorded to play facing upward tape. The player starts playing. * N has a tactile dot. Use TYPE I (normal) tape only. Close the compartment. 3 Press N*.
Display 10 Playing a tape 1 32 Connect the supplied AC power cord (see page 23). 1 Press TAPE. 2 Press xZ to open the tape With the side you want compartment and insert a recorded to play facing upward tape. The player starts playing. * N has a tactile dot. Use TYPE I (normal) tape only. Close the compartment. 3 Press N*.
Operating Instructions
Page 12
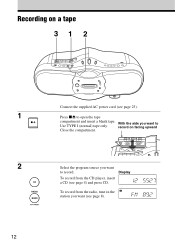
Display To record from the radio, tune in the ST station you want to record. To record from the CD player, insert a CD (see page 4) and press CD. record on a tape 31 2 1 2 12 Connect the supplied AC power cord (see page 8). Press xZ to Use TYPE I (normal) tape only. Select the program source you want to open the tape compartment and insert a blank tape. With the side you want (see page 23). Recording on facing upward Close the compartment.
Display To record from the radio, tune in the ST station you want to record. To record from the CD player, insert a CD (see page 4) and press CD. record on a tape 31 2 1 2 12 Connect the supplied AC power cord (see page 8). Press xZ to Use TYPE I (normal) tape only. Select the program source you want to open the tape compartment and insert a blank tape. With the side you want (see page 23). Recording on facing upward Close the compartment.

Operating Instructions
Page 16
... to repeat. 3 Press u. REPEAT FOLDER +, - 1 Press CD. To repeat Do this 1 Program tracks (see page 17). 2 Press REPEAT until "REP PGM" appears. 3 Press u. 1 Program folders (see page 17). 2 Press REPEAT until "REP PGM FLDR" appears. 3 Press u. Playing tracks repeatedly (Repeat Play) You can play tracks repeatedly in the display. 2 Proceed as follows. all files (up to select the track that you select "REP ALL", the player plays all tracks on the CD a selected...
... to repeat. 3 Press u. REPEAT FOLDER +, - 1 Press CD. To repeat Do this 1 Program tracks (see page 17). 2 Press REPEAT until "REP PGM" appears. 3 Press u. 1 Program folders (see page 17). 2 Press REPEAT until "REP PGM FLDR" appears. 3 Press u. Playing tracks repeatedly (Repeat Play) You can play tracks repeatedly in the display. 2 Proceed as follows. all files (up to select the track that you select "REP ALL", the player plays all tracks on the CD a selected...

Operating Instructions
Page 18
... saved until "PGM" disappears from the display. Tips • You can play Press DSPL/ENT/MEM. Every time you want . *Folders for the tracks or files* you press the button, the track or folder number appears in the order you open the CD compartment. • You can record your own program. Then press MODE until you want to start recording. • The resume function doesn't work...
... saved until "PGM" disappears from the display. Tips • You can play Press DSPL/ENT/MEM. Every time you want . *Folders for the tracks or files* you press the button, the track or folder number appears in the order you open the CD compartment. • You can record your own program. Then press MODE until you want to start recording. • The resume function doesn't work...
Operating Instructions
Page 19
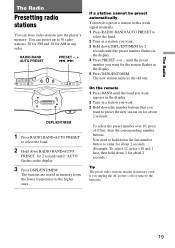
... be preset automatically You need to hold down the number buttons that you unplug the AC power cord or remove the batteries. 19 The Radio The Radio Presetting radio stations You can preset up to select the band. 2 Tune in a station you want. 3 Hold down RADIO BAND•AUTO PRESET for about 2 seconds. You can store radio stations into the player's memory. You need to preset a station with a weak signal manually. 1 Press RADIO BAND•AUTO PRESET to 30 radio stations...
... be preset automatically You need to hold down the number buttons that you unplug the AC power cord or remove the batteries. 19 The Radio The Radio Presetting radio stations You can preset up to select the band. 2 Tune in a station you want. 3 Hold down RADIO BAND•AUTO PRESET for about 2 seconds. You can store radio stations into the player's memory. You need to preset a station with a weak signal manually. 1 Press RADIO BAND•AUTO PRESET to 30 radio stations...
Operating Instructions
Page 20
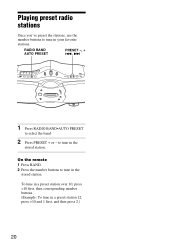
RADIO BAND AUTO PRESET PRESET -, + ., > 1 Press RADIO BAND•AUTO PRESET to tune in the stored station. On the remote 1 Press BAND. 2 Press the number buttons to select the band. 2 Press PRESET + or - to tune in your favorite stations. To tune in a preset station over 10, press >10 first, then corresponding number buttons. (Example: To tune in a preset station 12, press >10 and 1 first, and then press 2.) 20 Playing preset radio stations Once you've preset the stations, use the number buttons to tune in the stored station.
RADIO BAND AUTO PRESET PRESET -, + ., > 1 Press RADIO BAND•AUTO PRESET to tune in the stored station. On the remote 1 Press BAND. 2 Press the number buttons to select the band. 2 Press PRESET + or - to tune in your favorite stations. To tune in a preset station over 10, press >10 first, then corresponding number buttons. (Example: To tune in a preset station 12, press >10 and 1 first, and then press 2.) 20 Playing preset radio stations Once you've preset the stations, use the number buttons to tune in the stored station.
Operating Instructions
Page 23
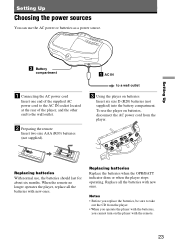
.... Replacing batteries With normal use the AC power or batteries as a power source. When the remote no longer operates the player, replace all the batteries with new ones. Notes • Before you cannot turn on the player with the remote. 23 To use the player on batteries Insert six size D (R20) batteries (not supplied) into the battery compartment. to the wall outlet. 2 Preparing the remote Insert two size AAA (R03) batteries (not supplied). Setting...
.... Replacing batteries With normal use the AC power or batteries as a power source. When the remote no longer operates the player, replace all the batteries with new ones. Notes • Before you cannot turn on the player with the remote. 23 To use the player on batteries Insert six size D (R20) batteries (not supplied) into the battery compartment. to the wall outlet. 2 Preparing the remote Insert two size AAA (R03) batteries (not supplied). Setting...
Operating Instructions
Page 24
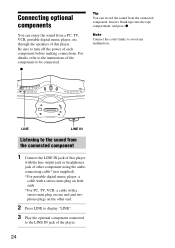
... sound from the connected component. Note Connect the cords firmly to turn off the power of this player. Insert a blank tape into the tape compartment, and press z. through the speakers of this player with the line output jack or headphones jack of the player. 24 For details, refer to the instructions of the component to the LINE IN jack of other component using the audio connecting cable* (not supplied). * For portable digital music player: a cable with a stereo-mini plug...
... sound from the connected component. Note Connect the cords firmly to turn off the power of this player. Insert a blank tape into the tape compartment, and press z. through the speakers of this player with the line output jack or headphones jack of the player. 24 For details, refer to the instructions of the component to the LINE IN jack of other component using the audio connecting cable* (not supplied). * For portable digital music player: a cable with a stereo-mini plug...
Operating Instructions
Page 25
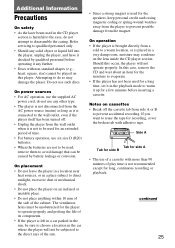
... use the supplied AC power cord; On power sources • For AC operation, use of a cassette with adhesive tape. Attempting to do not attempt to disassemble the casing. Do not use six size D (R20) batteries. • When the batteries are not to be used, remove them to avoid damage that can be subjected to the direct rays of play time is not recommended except for the speakers, keep personal...
... use the supplied AC power cord; On power sources • For AC operation, use of a cassette with adhesive tape. Attempting to do not attempt to disassemble the casing. Do not use six size D (R20) batteries. • When the batteries are not to be used, remove them to avoid damage that can be subjected to the direct rays of play time is not recommended except for the speakers, keep personal...
Operating Instructions
Page 27
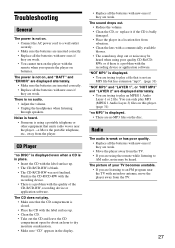
... displayed. • There are no audio. • Adjust the volume. • Unplug the headphones when listening through speakers. There is not on the disc. Noise is heard. • Someone is using the remote while listening to AM radio, noise may be heard. The picture of the CD-R/CD-RW, recording device or application software. Troubleshooting General The power is not on. • Connect the AC power cord...
... displayed. • There are no audio. • Adjust the volume. • Unplug the headphones when listening through speakers. There is not on the disc. Noise is heard. • Someone is using the remote while listening to AM radio, noise may be heard. The picture of the CD-R/CD-RW, recording device or application software. Troubleshooting General The power is not on. • Connect the AC power cord...
Operating Instructions
Page 28
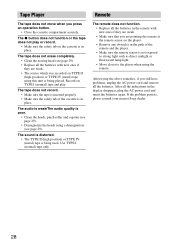
... of the remote and the player. • Make sure the remote sensor is not exposed to strong light such as direct sunlight or fluorescent lamp light. • Move closer to the player when using a demagnetizer (see page 29). • Replace all the batteries. Use TYPE I (normal) tape and play. The z button does not function or the tape does not play or record. • Make sure the safety tab on TYPE I (normal) tape only.
... of the remote and the player. • Make sure the remote sensor is not exposed to strong light such as direct sunlight or fluorescent lamp light. • Move closer to the player when using a demagnetizer (see page 29). • Replace all the batteries. Use TYPE I (normal) tape and play. The z button does not function or the tape does not play or record. • Make sure the safety tab on TYPE I (normal) tape only.
Operating Instructions
Page 30
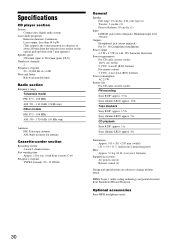
.... Specifications CD player section System Compact disc digital audio system Laser diode properties Emission duration: Continuous Laser output: Less than 44.6 µW (This output is the value measured at 6 Ω, 10% harmonic distortion) Power requirements For CD radio cassette-corder: 120 V AC, 60 Hz 9 V DC, 6 size D (R20) batteries For remote control: 3 V DC, 2 size AAA (R03) batteries Power consumption AC 25 W Battery life For CD radio cassette-corder: FM recording Sony R20P: approx. 3.5 h Sony alkaline LR20: approx. 10 h Tape playback Sony R20P: approx. 1.5 h Sony...
.... Specifications CD player section System Compact disc digital audio system Laser diode properties Emission duration: Continuous Laser output: Less than 44.6 µW (This output is the value measured at 6 Ω, 10% harmonic distortion) Power requirements For CD radio cassette-corder: 120 V AC, 60 Hz 9 V DC, 6 size D (R20) batteries For remote control: 3 V DC, 2 size AAA (R03) batteries Power consumption AC 25 W Battery life For CD radio cassette-corder: FM recording Sony R20P: approx. 3.5 h Sony alkaline LR20: approx. 10 h Tape playback Sony R20P: approx. 1.5 h Sony...
Operating Instructions
Page 31
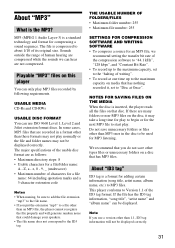
..., set to "Disc at one time up to the ID3 tag. Playable "MP3" files on that could damage your speakers. • The file name does not correspond to the maximum capacity on media that you use ISO 9660 Level 1, Level 2 and Joliet extension format discs. About "ID3 tag" ID3 tag is compressed to be displayed. USABLE MEDIA CD-Rs...
..., set to "Disc at one time up to the ID3 tag. Playable "MP3" files on that could damage your speakers. • The file name does not correspond to the maximum capacity on media that you use ISO 9660 Level 1, Level 2 and Joliet extension format discs. About "ID3 tag" ID3 tag is compressed to be displayed. USABLE MEDIA CD-Rs...
Operating Instructions
Page 32
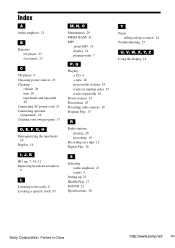
... to the radio 8 Locating a specific track 15 M, N, O Maintenance 29 MEGA BASS 21 MP3 about MP3 31 display 14 playing order 7 P, Q Playing a CD 4 a tape 10 preset radio stations 19 tracks in random order 17 tracks repeatedly 16 Power sources 23 Precautions 25 Presetting radio stations 19 Program Play 17 R Radio stations playing 20 presetting 19 Recording on a tape 12 Repeat Play 16 S Selecting audio emphasis 21 tracks 5 Setting up 23 Shuffle Play 17 SOUND 21 Specifications 30 T Timer falling asleep to music 22 Troubleshooting 27 U, V, W, X, Y, Z Using the display 14 S3o2ny Corporation...
... to the radio 8 Locating a specific track 15 M, N, O Maintenance 29 MEGA BASS 21 MP3 about MP3 31 display 14 playing order 7 P, Q Playing a CD 4 a tape 10 preset radio stations 19 tracks in random order 17 tracks repeatedly 16 Power sources 23 Precautions 25 Presetting radio stations 19 Program Play 17 R Radio stations playing 20 presetting 19 Recording on a tape 12 Repeat Play 16 S Selecting audio emphasis 21 tracks 5 Setting up 23 Shuffle Play 17 SOUND 21 Specifications 30 T Timer falling asleep to music 22 Troubleshooting 27 U, V, W, X, Y, Z Using the display 14 S3o2ny Corporation...


