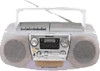
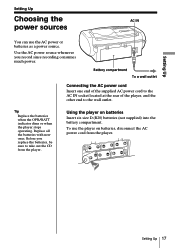
Limited Warranty (US Only)
Page 1
... within the Warranty period must pay for all accessories are for all parts costs. 3. 4-557-172-02 General Stereo/Hifi Components/Tape Decks ® CD Players/Mini Disc Players/Audio Systems Hifi Audio LIMITED WARRANTY Sony Electronics Inc. ("Sony") warrants this Product is determined to be presented to obtain warranty service. LABOR: For a period of one (1) year. After the Warranty Period, you must take...
Operating Instructions (primary manual)
Page 1
3-865-316-12 (1) CD Radio Cassette-Corder Operating Instructions CFD-V17 CFD-V27 CFD-V177 ©1998 by Sony Corporation
Operating Instructions (primary manual)
Page 2
... wide blade of plug to Part 15 of the following measures: -Reorient or relocate the receiving antenna. -Increase the separation between the equipment and receiver. -Connect the equipment into an outlet on the player, the OPR/BATT indicator lights up. Record these numbers in cabinet. You are designed to the presence of important operating and maintenance (servicing) instructions in accordance...
Operating Instructions (primary manual)
Page 3
Basic Operations Table of contents Basic Operations 4 Playing a CD 6 Listening to the radio 8 Playing a tape 10 Recording on a tape The CD Player 12 Using the display 13 Locating a specific point in a track 14 Playing tracks repeatedly (Repeat Play) 15 Playing tracks in random order (Shuffle Play) 16 Creating your own program (Program Play) Setting Up 17 Choosing the power sources 18 Adjusting the sound emphasis (TONE/MEGA BASS) Additional Information 19 Precautions 21 Troubleshooting 23 Maintenance 24 Specifications 25 Index Introduction 3
Operating Instructions (primary manual)
Page 4
Basic Operations Playing a CD 3 4 1,2 Connect the supplied AC power cord (see page 17). 1 Press 6 PUSH OPEN/CLOSE down to CD. 4 Basic Operations With the label side up 2 Close the CD compartment. 3 Set FUNCTION to open the CD compartment and place a CD on the CD compartment.
Operating Instructions (primary manual)
Page 5
Press again to the previous track remove the CD turn off the player Do this Turn VOLUME. Press 6 PUSH OPEN/ CLOSE. Press =. Display The player plays all the tracks once. Basic Operations 4 Press ^ . Press p. Basic Operations 5 Track number Playing time Use these buttons for additional operations VOLUME ^ 6 PUSH OPEN/CLOSE p =, + FUNCTION To adjust the volume stop playback pause playback go to the next track go back to resume play after pause. Press +. Press ^. Set FUNCTION to TAPE• CD/RADIO OFF.
Operating Instructions (primary manual)
Page 6
If the received FM stereo is too weak, the reception becomes monaural. 6 Basic Operations Listening to the radio 1 2 Connect the supplied AC power cord (see page 17). 1 Set FUNCTION to FM or AM. 2 Turn TUNING to tune in a radio station.
Operating Instructions (primary manual)
Page 7
Set FUNCTION to TAPE• CD/RADIO OFF. For FM For AM Basic Operations 7 Basic Operations Use these buttons for AM. Reorient the player itself for additional operations VOLUME FUNCTION To adjust the volume turn off the radio Do this Turn VOLUME. To improve broadcast reception Reorient the antenna for FM.
Operating Instructions (primary manual)
Page 8
Playing a tape 31 2 Connect the supplied AC power cord (see page 17). 1 Press p6 to TAPE •CD/ RADIO OFF. 3 Press (. 8 Basic Operations Use TYPE I (normal) tape only. With the side you want to play facing upward 2 Set FUNCTION to open the tape compartment and insert a recorded tape. Close the compartment.
Operating Instructions (primary manual)
Page 9
Press the button again to resume play after pause. Basic Operations 9 Basic Operations Use these buttons for additional operations 0, ) p6 P VOLUME To adjust the volume stop playback fast-forward or rewind the tape pause playback eject the cassette Do this Turn VOLUME. Press p6. Press ) or 0. Press p6. Press P.
Operating Instructions (primary manual)
Page 10
Display To record from the CD player, set FUNCTION to CD and insert a CD (see page 6). 10 Basic Operations Use TYPE I (normal) tape only. To record from the radio, tune in the station you want (see page 4). Recording on facing upward 2 Select the program source you want to record. With the side you want to record on a tape 312 Connect the supplied AC power cord (see page 17). 1 Press p6 to open the tape compartment and insert a blank tape.
Operating Instructions (primary manual)
Page 11
Basic Operations 11 To stop recording pause recording Press p6 P Press the button again to start recording. (( is depressed automatically). Basic Operations 3 Press r to resume recording. Use these buttons for additional operations p6 P Tips • Adjusting the volume or the audio emphasis (see page 18) will not affect the recording level. • For the best results, use the AC power as a power source for recording. • To erase a recording, proceed as follows: 1 Insert a tape you want to erase its recording. 2 Set FUNCTION to TAPE•CD/RADIO OFF. 3 Press r.
Operating Instructions (primary manual)
Page 14
Playing tracks repeatedly (Repeat Play) You can play tracks repeatedly in random order programmed tracks Do this 1 Press PLAY MODE until "REP 1" appears. 2 Select the track by pressing the = or + and press ^. 1 Press PLAY MODE until "REP ALL" appears. 2 Press ^. 1 Press PLAY MODE until "SHUF REP" appears. 2 Press ^. 1 Press PLAY MODE until "REP" disappears from the display. To cancel Repeat Play Press PLAY MODE until "PGM REP" appears. 2 Program tracks (see page 16). FUNCTION PLAY MODE =,+ ^ 14 The CD Player 1 Set FUNCTION to CD. 2 Proceed...
Operating Instructions (primary manual)
Page 16
... cancel Program Play Press PLAY MODE until "PGM" appears in the order you open the CD compartment or switch FUNCTION. • You can record your own program (Program Play) You can play . To change the current program Press p once if the CD is stopped and twice if the CD is saved until you want to 20 tracks on a CD. The current program will be erased. Playing order Programed track 4 Press ^ to start recording. 1 Set FUNCTION to CD. 2 Press PLAY MODE...
Operating Instructions (primary manual)
Page 17
... the supplied AC power cord to the AC IN socket located at the rear of the player, and the other end to take out the CD from the player. Before you record since recording consumes much power. To use the AC power or batteries as a power source. Setting Up 17 Tip Replace the batteries when the OPR/BATT indicator dims or when the player stops operating. Replace all the batteries...
Operating Instructions (primary manual)
Page 19
... period of time. • For battery operation, use the supplied AC power cord; is located at the bottom. In this occur, the player will not be caused by qualified personnel before operating it up for a long time, set it in the playback mode to warm it any questions or problems concerning your player, please consult your nearest Sony dealer. Should this case, remove the CD and wait...
Operating Instructions (primary manual)
Page 21
... an FM program near the player. The sound drops out. The audio is set to the function you want to operate. • Adjust the volume. • Unplug the headphones when listening through speakers. • Someone is using a portable telephone or other equipment that emits radio waves near the TV with an indoor antenna, move the player away from the TV. • Make sure that the CD compartment is...
Operating Instructions (primary manual)
Page 22
..., plug the power cord and insert the batteries again. The REC r button does not function/The tape does not play . • Make sure the tape is inserted properly. • Make sure the safety tab of the cassette is set to CD, AM or FM. • Clean the erasing heads (see page 23). • The TYPE II (high position) or TYPE IV (metal) tape is being used. If the problem...
Operating Instructions (primary manual)
Page 24
...-in AC operation. batteries) Supplied accessory AC power cord (1) Design and specifications are subject to 500 r/min (rpm) (CLV) Number of about 200 mm from 150 - 10,000 Hz; Other Specifications CD player section System Compact disc digital audio system Laser diode properties Material: GaAlAs Wave length: 780 nm Emission duration: Continuous Laser output: Less than 10 % total harmonic distortion in ferrite bar antenna Cassette-corder section Recording system 4-track 2 channel stereo Fast winding time Approx...
Operating Instructions (primary manual)
Page 25
... B Batteries for player 17 C CD player 12 Choosing power sources 17 Cleaning cabinet 23 tape heads and tape path 23 Creating your own program 16 D, E, F, G, H Demagnetizing the tape heads 23 Display 12 I, J, K Improving broadcast reception 7 L Listening to the radio 6 Locating a specific point in a track 13 M, N, O MEGA BASS 18 P, Q Playing a CD 4 a tape 8 tracks repeatedly 14 Power sources 17 Program Play 16 R Recording on a tape 10 Repeat Play 14 S Selecting tracks 5 Setting up 17 Shuffle Play 15 Sound emphasis 18 T TONE 18 Troubleshooting 21 U, V, W, X, Y, Z Using...