
Warranty Card
Page 1
... or workmanship as fuses or batteries). PARTS: In addition, Sony will repair or replace the Product, at your convenience, Sony Electronics Inc. 4-557-147-22 Tape Cassette Player/Recorder/CD Player/Mini Disc ® DAT/Radio/Head Phone/Speaker/MIC/Personals Portable Audio LIMITED WARRANTY Sony Electronics Inc. ("Sony") warrants this Product is determined to be presented to obtain...
... or workmanship as fuses or batteries). PARTS: In addition, Sony will repair or replace the Product, at your convenience, Sony Electronics Inc. 4-557-147-22 Tape Cassette Player/Recorder/CD Player/Mini Disc ® DAT/Radio/Head Phone/Speaker/MIC/Personals Portable Audio LIMITED WARRANTY Sony Electronics Inc. ("Sony") warrants this Product is determined to be presented to obtain...
Operating Instructions
Page 2
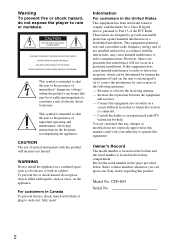
... and the serial number is located on a circuit different from that may cause harmful interference to radio or television reception, which the receiver is intended to alert the user to the presence of electric shock to which...player to wide slot, fully insert. Consult the dealer or an experienced radio/TV technician for a Class B digital device, pursuant to operate this product will not occur in this manual could void your Sony dealer regarding this equipment does cause harmful interference to radio communications. Reorient or relocate the receiving antenna. - CFD-E95...
... and the serial number is located on a circuit different from that may cause harmful interference to radio or television reception, which the receiver is intended to alert the user to the presence of electric shock to which...player to wide slot, fully insert. Consult the dealer or an experienced radio/TV technician for a Class B digital device, pursuant to operate this product will not occur in this manual could void your Sony dealer regarding this equipment does cause harmful interference to radio communications. Reorient or relocate the receiving antenna. - CFD-E95...

Operating Instructions
Page 3
... from the demonstration mode, set the clock or press DISPLAY for 2 seconds. 3 Table of contents Basic Operations Basic Operations Playing a CD 4 Listening to the radio 6 Playing a tape 8 Recording on a tape 10 The CD Player Using the display 12 Locating a specific point in a track 12 Playing tracks repeatedly (Repeat Play 13 Playing tracks in random...
... from the demonstration mode, set the clock or press DISPLAY for 2 seconds. 3 Table of contents Basic Operations Basic Operations Playing a CD 4 Listening to the radio 6 Playing a tape 8 Recording on a tape 10 The CD Player Using the display 12 Locating a specific point in a track 12 Playing tracks repeatedly (Repeat Play 13 Playing tracks in random...
Operating Instructions
Page 4
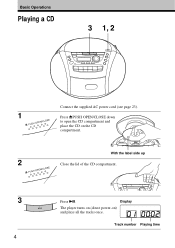
Basic Operations Playing a CD 3 1, 2 1 2 3 4 Connect the supplied AC power cord (see page 23). Display The player turns on (direct power-on the CD compartment. Track number Playing time Press u. Press ZPUSH OPEN/CLOSE down to open the CD compartment and place the CD on ) and plays all the tracks once. With the label side up Close the lid of the CD compartment.
Basic Operations Playing a CD 3 1, 2 1 2 3 4 Connect the supplied AC power cord (see page 23). Display The player turns on (direct power-on the CD compartment. Track number Playing time Press u. Press ZPUSH OPEN/CLOSE down to open the CD compartment and place the CD on ) and plays all the tracks once. With the label side up Close the lid of the CD compartment.
Operating Instructions
Page 5
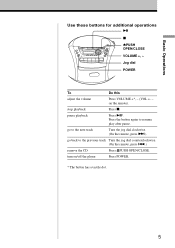
on /off the player Press POWER. * The button has a tactile dot. 5 stop playback Press x. Jog dial POWER To Do this adjust the volume Press VOLUME +*, - (VOL +, - pause playback Press u*. go to the next track Turn the jog dial clockwise. (On the remote, press >.) go back to resume play after pause. Basic Operations Use these buttons for additional operations u x ZPUSH OPEN/CLOSE VOLUME +, - turn on the remote). Press the button again to the previous track Turn the jog dial counterclockwise. (On the remote, press ..) remove the CD Press ZPUSH OPEN/CLOSE.
on /off the player Press POWER. * The button has a tactile dot. 5 stop playback Press x. Jog dial POWER To Do this adjust the volume Press VOLUME +*, - (VOL +, - pause playback Press u*. go to the next track Turn the jog dial clockwise. (On the remote, press >.) go back to resume play after pause. Basic Operations Use these buttons for additional operations u x ZPUSH OPEN/CLOSE VOLUME +, - turn on the remote). Press the button again to the previous track Turn the jog dial counterclockwise. (On the remote, press ..) remove the CD Press ZPUSH OPEN/CLOSE.
Operating Instructions
Page 6
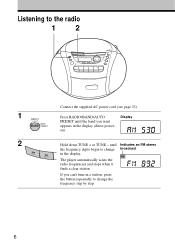
on). 2 Hold down TUNE + or TUNE - until the band you can't tune in a station, press the button repeatedly to change the frequency step by step. 6 Listening to the radio 1 2 Connect the supplied AC power cord (see page 23). 1 Press RADIO•BAND•AUTO Display PRESET until Indicates an FM stereo the frequency digits begin to change broadcast in the display (direct power- The player automatically scans the radio frequencies and stops when it finds a clear station. If you want appears in the display.
on). 2 Hold down TUNE + or TUNE - until the band you can't tune in a station, press the button repeatedly to change the frequency step by step. 6 Listening to the radio 1 2 Connect the supplied AC power cord (see page 23). 1 Press RADIO•BAND•AUTO Display PRESET until Indicates an FM stereo the frequency digits begin to change broadcast in the display (direct power- The player automatically scans the radio frequencies and stops when it finds a clear station. If you want appears in the display.
Operating Instructions
Page 7
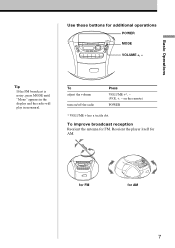
Reorient the player itself for FM. Tip If the FM broadcast is noisy, press MODE until "Mono" appears in the display and the radio will play in monaural. To improve broadcast reception Reorient the antenna for AM. for FM for additional operations POWER MODE VOLUME +, - Basic Operations Use these buttons for AM 7 on /off the radio Press VOLUME +*, - (VOL +, - To adjust the volume turn on the remote) POWER * VOLUME + has a tactile dot.
Reorient the player itself for FM. Tip If the FM broadcast is noisy, press MODE until "Mono" appears in the display and the radio will play in monaural. To improve broadcast reception Reorient the antenna for AM. for FM for additional operations POWER MODE VOLUME +, - Basic Operations Use these buttons for AM 7 on /off the radio Press VOLUME +*, - (VOL +, - To adjust the volume turn on the remote) POWER * VOLUME + has a tactile dot.
Operating Instructions
Page 8
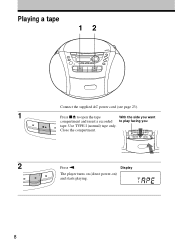
Use TYPE I (normal) tape only. Display The player turns on (direct power-on) and starts playing. 8 Close the compartment. 2 Press n. Playing a tape 12 Connect the supplied AC power cord (see page 23). 1 Press xZ to open the tape With the side you want compartment and insert a recorded to play facing you tape.
Use TYPE I (normal) tape only. Display The player turns on (direct power-on) and starts playing. 8 Close the compartment. 2 Press n. Playing a tape 12 Connect the supplied AC power cord (see page 23). 1 Press xZ to open the tape With the side you want compartment and insert a recorded to play facing you tape.

Operating Instructions
Page 9
on /off the player Press VOLUME +*, - (VOL +, - Basic Operations Use these buttons for additional operations POWER VOLUME +, - xZ POWER * VOLUME + and n have a tactile dot. 9 m, M xZ X To adjust the volume stop playback fast-forward or rewind the tape pause playback eject the cassette turn on the remote) xZ m or M X Press the button again to resume play after pause.
on /off the player Press VOLUME +*, - (VOL +, - Basic Operations Use these buttons for additional operations POWER VOLUME +, - xZ POWER * VOLUME + and n have a tactile dot. 9 m, M xZ X To adjust the volume stop playback fast-forward or rewind the tape pause playback eject the cassette turn on the remote) xZ m or M X Press the button again to resume play after pause.

Operating Instructions
Page 10
record on the CD section. To record from the radio, tune in the station you Use TYPE I (normal) tape only. Display To record from the CD player, insert a CD (see page 4) and press x on facing you want (see page 23). Select the program source you want to compartment and insert a blank tape. Recording on a tape 13 1 2 10 Connect the supplied AC power cord (see page 6). Press xZ to open the tape With the side you want to record.
record on the CD section. To record from the radio, tune in the station you Use TYPE I (normal) tape only. Display To record from the CD player, insert a CD (see page 4) and press x on facing you want (see page 23). Select the program source you want to compartment and insert a blank tape. Recording on a tape 13 1 2 10 Connect the supplied AC power cord (see page 6). Press xZ to open the tape With the side you want to record.

Operating Instructions
Page 11
... 18) will not affect the recording level. • If the AM program makes a whistling sound after you want to erase. 2 Press FUNCTION on /off the player X Press the button again to start recording (n is depressed automatically).
... 18) will not affect the recording level. • If the AM program makes a whistling sound after you want to erase. 2 Press FUNCTION on /off the player X Press the button again to start recording (n is depressed automatically).

Operating Instructions
Page 12
... Total playing time Total track number Checking the remaining time Press DISPLAY while playing a CD. m M Checking the total track number and playing time Press DISPLAY in a track You can check information about the CD using the display. The display changes as follows: tthe current track number and playing... remaining time on the current track* r the number of tracks left and remaining time on the CD * For a track whose number is more than 20, the remaining time appears as "- -:- -". The CD Player Using the display You can quickly find the point. (On the remote, use > or .). ...
... Total playing time Total track number Checking the remaining time Press DISPLAY while playing a CD. m M Checking the total track number and playing time Press DISPLAY in a track You can check information about the CD using the display. The display changes as follows: tthe current track number and playing... remaining time on the current track* r the number of tracks left and remaining time on the CD * For a track whose number is more than 20, the remaining time appears as "- -:- -". The CD Player Using the display You can quickly find the point. (On the remote, use > or .). ...
Operating Instructions
Page 13
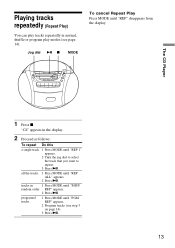
The CD Player 1 Press x. programed tracks 1 Press MODE until "REP 1" appears. 2 Turn the jog dial to select the track that you want to repeat. 3 Press u. "Cd" appears in the display. 2 Proceed as follows: To repeat Do this a single track 1 Press MODE until "PGM REP" appears. 2 Program tracks (see page 14). tracks ...
The CD Player 1 Press x. programed tracks 1 Press MODE until "REP 1" appears. 2 Turn the jog dial to select the track that you want to repeat. 3 Press u. "Cd" appears in the display. 2 Proceed as follows: To repeat Do this a single track 1 Press MODE until "PGM REP" appears. 2 Program tracks (see page 14). tracks ...

Operating Instructions
Page 15
...program again, since the program is playing. To change the current program Press x once if the CD is stopped and twice if the CD is saved until "PGM" disappears from the display. After you open the CD compartment. • You can play Press ENTER. Every time you press the button, the track ...number appears in the programed order. Then create a new program following the programing procedure. The CD Player To cancel Program Play Press MODE until you 've created the program, insert a blank tape and press z to start recording. 15
...program again, since the program is playing. To change the current program Press x once if the CD is stopped and twice if the CD is saved until "PGM" disappears from the display. After you open the CD compartment. • You can play Press ENTER. Every time you press the button, the track ...number appears in the programed order. Then create a new program following the programing procedure. The CD Player To cancel Program Play Press MODE until you 've created the program, insert a blank tape and press z to start recording. 15
Operating Instructions
Page 16
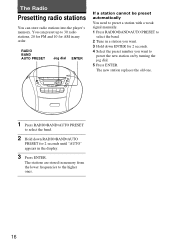
... station you want to 30 radio stations, 20 for FM and 10 for 2 seconds until "AUTO" appears in any order. The Radio Presetting radio stations You can preset up to preset the new station on by turning the jog dial. 5 Press ENTER. You can store radio stations into the player's memory. The new station... replaces the old one. 1 Press RADIO•BAND•AUTO PRESET to the higher ones. 16 The stations are stored in memory from the lower...
... station you want to 30 radio stations, 20 for FM and 10 for 2 seconds until "AUTO" appears in any order. The Radio Presetting radio stations You can preset up to preset the new station on by turning the jog dial. 5 Press ENTER. You can store radio stations into the player's memory. The new station... replaces the old one. 1 Press RADIO•BAND•AUTO PRESET to the higher ones. 16 The stations are stored in memory from the lower...
Operating Instructions
Page 17
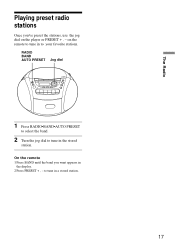
On the remote 1 Press BAND until the band you 've preset the stations, use the jog dial on the remote to tune in to tune in a stored station. 17 to tune in the stored station. RADIO BAND AUTO PRESET Jog dial The Radio 1 Press RADIO•BAND•AUTO PRESET to select the band. 2 Turn the jog dial to your favorite stations. Playing preset radio stations Once you want appears in the display. 2 Press PRESET + , - on the player or PRESET + , -
On the remote 1 Press BAND until the band you 've preset the stations, use the jog dial on the remote to tune in to tune in a stored station. 17 to tune in the stored station. RADIO BAND AUTO PRESET Jog dial The Radio 1 Press RADIO•BAND•AUTO PRESET to select the band. 2 Turn the jog dial to your favorite stations. Playing preset radio stations Once you want appears in the display. 2 Press PRESET + , - on the player or PRESET + , -
Operating Instructions
Page 20
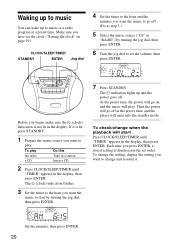
.... Set the minutes, then press ENTER. 20 Each time you want the music to music or a radio program at the preset time, and the player will go off . (Do as step 3.) 5 Select the music source ("Cd" or "RAdIO") by turning the jog dial, then press ENTER. 7 Press STANDBY. To play . To check/change and...
.... Set the minutes, then press ENTER. 20 Each time you want the music to music or a radio program at the preset time, and the player will go off . (Do as step 3.) 5 Select the music source ("Cd" or "RAdIO") by turning the jog dial, then press ENTER. 7 Press STANDBY. To play . To check/change and...

Operating Instructions
Page 21
In case of the radio, however, if you listen to the station which is different from the display. • The preset settings remain until you reset them. 1 Play the music source you want to listen to music You can use the player before a timer playback starts Just turn on the player, and then you..." t "120" t "OFF" t "10" t "20" t "30." Notes • When you press STANDBY in step 7 on page 20, you will hear that n or z button of the tape player is longer than the set time, the player will start at the preset time. continued 21 The Timer To use it. If you turn off the...
In case of the radio, however, if you listen to the station which is different from the display. • The preset settings remain until you reset them. 1 Play the music source you want to listen to music You can use the player before a timer playback starts Just turn on the player, and then you..." t "120" t "OFF" t "10" t "20" t "30." Notes • When you press STANDBY in step 7 on page 20, you will hear that n or z button of the tape player is longer than the set time, the player will start at the preset time. continued 21 The Timer To use it. If you turn off the...
Operating Instructions
Page 22
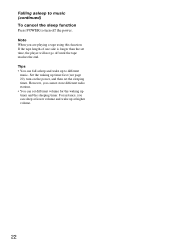
Set the waking up timer and the sleeping timer. For instance, you cannot store different radio stations. • You can set different volume for the waking up timer first (see page 20), turn off until the tape reaches the end. Tips &#.... 22 However, you can fall asleep and wake up at lower volume and wake up to turn on the power, and then set time, the player will not go off the power. Falling asleep to music (continued) To cancel the sleep function Press POWER to different music. Note When you are...
Set the waking up timer and the sleeping timer. For instance, you cannot store different radio stations. • You can set different volume for the waking up timer first (see page 20), turn off until the tape reaches the end. Tips &#.... 22 However, you can fall asleep and wake up at lower volume and wake up to turn on the power, and then set time, the player will not go off the power. Falling asleep to music (continued) To cancel the sleep function Press POWER to different music. Note When you are...

Operating Instructions
Page 23
Setting Up Choosing the power sources You can use the AC power or batteries as illustrated. Note Before you replace the batteries, be sure to a wall outlet AC IN 1 Inserting the back-up batteries Insert three size AA (R6) batteries (not supplied) into the battery compartment. Setting Up 14 Battery compartment 2 to take out the CD from the player. Replacing batteries Take out the batteries as a power source. These batteries work to save the memory data. continued 23
Setting Up Choosing the power sources You can use the AC power or batteries as illustrated. Note Before you replace the batteries, be sure to a wall outlet AC IN 1 Inserting the back-up batteries Insert three size AA (R6) batteries (not supplied) into the battery compartment. Setting Up 14 Battery compartment 2 to take out the CD from the player. Replacing batteries Take out the batteries as a power source. These batteries work to save the memory data. continued 23


