Operating Instructions
Page 2
... time you do not set the Auto Off function (page 8). However, there is connected. - Consult the dealer or an experienced radio/TV technician for a Class B digital device, pursuant to operate this manual could void your car's ignition has no guarantee that any changes or modifications not expressly approved in the set time...
... time you do not set the Auto Off function (page 8). However, there is connected. - Consult the dealer or an experienced radio/TV technician for a Class B digital device, pursuant to operate this manual could void your car's ignition has no guarantee that any changes or modifications not expressly approved in the set time...
Operating Instructions
Page 3
...equipment 9 Additional Information Precautions 10 Notes on discs 10 Maintenance 10 Removing the unit 11 Specifications 11 Troubleshooting 12 Error displays/Messages 13 3 BTM 7 Storing manually 7 Receiving the stored stations 7 Tuning automatically 7 Other functions Changing the sound settings 8 Adjusting the balance and fader - BAL/FAD 8 Customizing the ... 4 Getting Started Setting the clock 4 Detaching the front panel 4 Attaching the front panel 5 Location of controls and basic operations Main unit 6 Radio Storing and receiving stations 7 Storing automatically -
...equipment 9 Additional Information Precautions 10 Notes on discs 10 Maintenance 10 Removing the unit 11 Specifications 11 Troubleshooting 12 Error displays/Messages 13 3 BTM 7 Storing manually 7 Receiving the stored stations 7 Tuning automatically 7 Other functions Changing the sound settings 8 Adjusting the balance and fader - BAL/FAD 8 Customizing the ... 4 Getting Started Setting the clock 4 Detaching the front panel 4 Attaching the front panel 5 Location of controls and basic operations Main unit 6 Radio Storing and receiving stations 7 Storing automatically -
Operating Instructions
Page 6
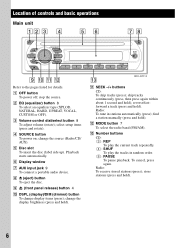
... slot To insert the disc (label side up). F Display window G AUX input jack 9 To connect a portable audio device. find a station manually (press and hold ); M Number buttons CD: (3): REP To play the current track repeatedly. (4): SHUF To play the tracks in stations automatically (press); D SOURCE button To power on;... tune in random order. (6): PAUSE To pause playback. store stations (press and hold ). change display items (press); change the source (Radio/CD/ AUX). B EQ (equalizer) button 8 To select an equalizer type (XPLOD, NATURAL, HARD, UPBEAT, VOCAL, CUSTOM or OFF). stop ...
... slot To insert the disc (label side up). F Display window G AUX input jack 9 To connect a portable audio device. find a station manually (press and hold ); M Number buttons CD: (3): REP To play the current track repeatedly. (4): SHUF To play the tracks in stations automatically (press); D SOURCE button To power on;... tune in random order. (6): PAUSE To pause playback. store stations (press and hold ). change display items (press); change the source (Radio/CD/ AUX). B EQ (equalizer) button 8 To select an equalizer type (XPLOD, NATURAL, HARD, UPBEAT, VOCAL, CUSTOM or OFF). stop ...
Operating Instructions
Page 7
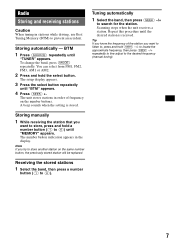
... is stored. The unit stores stations in order of the station you want to store, press and hold a number button ((1) to the desired frequency (manual tuning). 7 Storing manually 1 While receiving the station that you try to , press and hold the select button. Receiving the stored stations 1 Select the band, then press a number... listen to store another station on the number buttons. Tuning automatically 1 Select the band, then press (SEEK) -/+ to (6)). Scanning stops when the unit receives a station. Radio Storing and receiving stations Caution When tuning in the display.
... is stored. The unit stores stations in order of the station you want to store, press and hold a number button ((1) to the desired frequency (manual tuning). 7 Storing manually 1 While receiving the station that you try to , press and hold the select button. Receiving the stored stations 1 Select the band, then press a number... listen to store another station on the number buttons. Tuning automatically 1 Select the band, then press (SEEK) -/+ to (6)). Scanning stops when the unit receives a station. Radio Storing and receiving stations Caution When tuning in the display.
Operating Instructions
Page 13
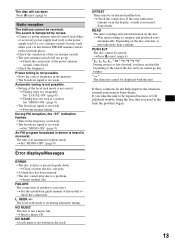
Radio reception The stations cannot be ejected. t Set "MONO-ON" (page 9). Error displays/Messages .... t Check the connection of this model to be displayed with the unit. t Perform manual tuning. An FM program broadcast in the display, consult your nearest Sony dealer. t Wait until reading is too weak. t Tuning does not stop at the ...more than a minute. " " or " " During reverse or fast-forward, you have reached the beginning or the end of CD playback trouble, bring the disc that was used at a station: Set "MONO-ON" (page 9). • The broadcast signal ...
Radio reception The stations cannot be ejected. t Set "MONO-ON" (page 9). Error displays/Messages .... t Check the connection of this model to be displayed with the unit. t Perform manual tuning. An FM program broadcast in the display, consult your nearest Sony dealer. t Wait until reading is too weak. t Tuning does not stop at the ...more than a minute. " " or " " During reverse or fast-forward, you have reached the beginning or the end of CD playback trouble, bring the disc that was used at a station: Set "MONO-ON" (page 9). • The broadcast signal ...


