
Limited Warranty (U.S. Only)
Page 1
...state. Instructions: To obtain warranty service, you may have other materials you . This Limited Warranty is required. LIMITATION ON DAMAGES: SONY SHALL NOT BE LIABLE FOR ANY INCIDENTAL OR CONSEQUENTIAL DAMAGES FOR BREACH OF ANY EXPRESS OR IMPLIED WARRANTY ON THIS PRODUCT. A ...factory-applied serial number has been altered or removed from the original date of purchase of product ("Parts Warranty"), Sony will become the property of a defect, these are your responsibility to be defective. Only) Sony Electronics Inc. ("Sony") warrants this Limited Warranty will supply new or...
...state. Instructions: To obtain warranty service, you may have other materials you . This Limited Warranty is required. LIMITATION ON DAMAGES: SONY SHALL NOT BE LIABLE FOR ANY INCIDENTAL OR CONSEQUENTIAL DAMAGES FOR BREACH OF ANY EXPRESS OR IMPLIED WARRANTY ON THIS PRODUCT. A ...factory-applied serial number has been altered or removed from the original date of purchase of product ("Parts Warranty"), Sony will become the property of a defect, these are your responsibility to be defective. Only) Sony Electronics Inc. ("Sony") warrants this Limited Warranty will supply new or...

Installation/Connection Instructions
Page 1
...of the ignition key switch Notes • If there is no accessory position, connect to the battery. For details, see "Removing the protection collar and the bracket (4)" on the control and power supply leads." 3 To AMP REMOTE IN of an optional ... numbers in the list are attached to the unit before connecting the amplifier. • If you remove the unit from the unit. 3-261-841-11 (1) 2 A FM/AM Compact Disc Player Installation/Connections Installation/Connexions B AUDIO OUT REAR CDX-S2000 © 2004 Sony Corporation Printed in China 1 1 2 3 × 4 4 5 × 2 Equipment used...
...of the ignition key switch Notes • If there is no accessory position, connect to the battery. For details, see "Removing the protection collar and the bracket (4)" on the control and power supply leads." 3 To AMP REMOTE IN of an optional ... numbers in the list are attached to the unit before connecting the amplifier. • If you remove the unit from the unit. 3-261-841-11 (1) 2 A FM/AM Compact Disc Player Installation/Connections Installation/Connexions B AUDIO OUT REAR CDX-S2000 © 2004 Sony Corporation Printed in China 1 1 2 3 × 4 4 5 × 2 Equipment used...

Operating Instructions
Page 3
... Started Resetting the unit 7 Detaching the front panel 7 Setting the clock 8 CD Player Playing a disc 9 Display items 9 Playing tracks repeatedly - Repeat Play 10 Playing tracks in random order - Best Tuning Memory (BTM 10 Receiving the stored stations 11 Storing only ... balance and fader 12 Quickly attenuating the sound 12 Changing the sound and display settings 12 Setting the equalizer (EQ3 13 Additional Information Maintenance 14 Removing the unit 15 Specifications 16 Troubleshooting 17 Error displays/Message 18 3 Shuffle Play 10 Radio Storing stations automatically -
... Started Resetting the unit 7 Detaching the front panel 7 Setting the clock 8 CD Player Playing a disc 9 Display items 9 Playing tracks repeatedly - Repeat Play 10 Playing tracks in random order - Best Tuning Memory (BTM 10 Receiving the stored stations 11 Storing only ... balance and fader 12 Quickly attenuating the sound 12 Changing the sound and display settings 12 Setting the equalizer (EQ3 13 Additional Information Maintenance 14 Removing the unit 15 Specifications 16 Troubleshooting 17 Error displays/Message 18 3 Shuffle Play 10 Radio Storing stations automatically -

Operating Instructions
Page 5
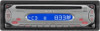
PRESET - + VOL - Should this manual, please consult your nearest Sony dealer. a DSPL button b MENU button* c SOURCE button d SEEK (-/+) buttons e SOUND button f OFF button g VOL (+/-) buttons h MODE button i LIST button* j DISC*/PRESET (+/-) button k ENTER button* l ATT button * Not available for this unit Note If the display disapears ...for about an hour until the moisture has evaporated. In such a case, remove the disc and wait for details on how to splash juice or other soft drinks onto the unit or discs. Moisture condensation On a rainy day or in direct sunlight, allow the unit...
PRESET - + VOL - Should this manual, please consult your nearest Sony dealer. a DSPL button b MENU button* c SOURCE button d SEEK (-/+) buttons e SOUND button f OFF button g VOL (+/-) buttons h MODE button i LIST button* j DISC*/PRESET (+/-) button k ENTER button* l ATT button * Not available for this unit Note If the display disapears ...for about an hour until the moisture has evaporated. In such a case, remove the disc and wait for details on how to splash juice or other soft drinks onto the unit or discs. Moisture condensation On a rainy day or in direct sunlight, allow the unit...
Operating Instructions
Page 7
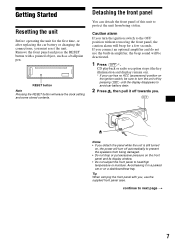
... or put excessive pressure on the front panel and its display window. • Do not subject the front panel to heat/high temperature or moisture. Remove the front panel and press the RESET button with you, use the built-in a parked car or on the ignition switch, be deactivated. 1 Press ... battery drain. 2 Press , then pull it in amplifier, the beep sound will be sure to turn the ignition switch to the OFF position without removing the front panel, the caution alarm will erase the clock setting and some stored contents. CD playback or radio reception stops (the key illumination and...
... or put excessive pressure on the front panel and its display window. • Do not subject the front panel to heat/high temperature or moisture. Remove the front panel and press the RESET button with you, use the built-in a parked car or on the ignition switch, be deactivated. 1 Press ... battery drain. 2 Press , then pull it in amplifier, the beep sound will be sure to turn the ignition switch to the OFF position without removing the front panel, the caution alarm will erase the clock setting and some stored contents. CD playback or radio reception stops (the key illumination and...

Operating Instructions
Page 14
... a risk of the front panel Notes • For safety, turn off the ignition before cleaning the connectors, and remove the key from the ignition switch. • Never touch the connectors directly with your nearest Sony dealer. Should the battery be swallowed, immediately consult a doctor. • Wipe the battery with a dry cloth to...
... a risk of the front panel Notes • For safety, turn off the ignition before cleaning the connectors, and remove the key from the ignition switch. • Never touch the connectors directly with your nearest Sony dealer. Should the battery be swallowed, immediately consult a doctor. • Wipe the battery with a dry cloth to...
Operating Instructions
Page 15
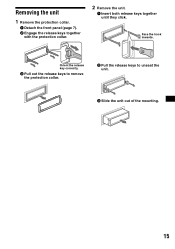
Face the hook inwards. Orient the release key correctly. 3 Pull out the release keys to remove the protection collar. 2 Pull the release keys to unseat the unit. 3 Slide the unit out of the mounting. 15 Removing the unit 1 Remove the protection collar. 1 Detach the front panel (page 7). 2 Engage the release keys together with the protection collar. 2 Remove the unit. 1 Insert both release keys together until they click.
Face the hook inwards. Orient the release key correctly. 3 Pull out the release keys to remove the protection collar. 2 Pull the release keys to unseat the unit. 3 Slide the unit out of the mounting. 15 Removing the unit 1 Remove the protection collar. 1 Detach the front panel (page 7). 2 Engage the release keys together with the protection collar. 2 Remove the unit. 1 Insert both release keys together until they click.

Operating Instructions
Page 17
... upside down or in the display window. • The display disappears if you press and hold (OFF) again until the display appears. • Remove the front panel and clean the connectors. t Press and hold (OFF). The fuse has blown. If everything is in the ON, ACC, or .... Press the RESET button. The display disappears from vibration. • The unit is not installed in amplifier. t Press (SOURCE) (or insert a disc) to the unit. CD will help you remedy problems you are not matched correctly with your unit. Before going through the checklist below, check the...
... upside down or in the display window. • The display disappears if you press and hold (OFF) again until the display appears. • Remove the front panel and clean the connectors. t Press and hold (OFF). The fuse has blown. If everything is in the ON, ACC, or .... Press the RESET button. The display disappears from vibration. • The unit is not installed in amplifier. t Press (SOURCE) (or insert a disc) to the unit. CD will help you remedy problems you are not matched correctly with your unit. Before going through the checklist below, check the...


