
Limited Warranty (U.S. Only)
Page 1
... become the property of product ("Parts Warranty"), Sony will , at its option, repair or replace with a new or refurbished product. This Limited Warranty is likely that has been returned to this product against defects in the United States. For specific instructions on how to obtain warranty service for the time periods and as fuses or batteries). This Limited Warranty covers only...
... become the property of product ("Parts Warranty"), Sony will , at its option, repair or replace with a new or refurbished product. This Limited Warranty is likely that has been returned to this product against defects in the United States. For specific instructions on how to obtain warranty service for the time periods and as fuses or batteries). This Limited Warranty covers only...

Installation/Connection Instructions
Page 1
3-261-841-11 (1) 2 A FM/AM Compact Disc Player Installation/Connections Installation/Connexions B AUDIO OUT REAR CDX-S2000 © 2004 Sony Corporation Printed in China 1 1 2 3 × 4 4 5 × 2 Equipment used in illustrations (not supplied) Appareils utilisés dans les illustrations (non fournis) Front speaker Haut-parleur avant Power amplifier Amplificateur de puissance Rear speaker Haut-parleur arrière Cautions • This unit is designed for negative ground 12 V DC operation only. •...
3-261-841-11 (1) 2 A FM/AM Compact Disc Player Installation/Connections Installation/Connexions B AUDIO OUT REAR CDX-S2000 © 2004 Sony Corporation Printed in China 1 1 2 3 × 4 4 5 × 2 Equipment used in illustrations (not supplied) Appareils utilisés dans les illustrations (non fournis) Front speaker Haut-parleur avant Power amplifier Amplificateur de puissance Rear speaker Haut-parleur arrière Cautions • This unit is designed for negative ground 12 V DC operation only. •...

Operating Instructions
Page 2
You can enjoy its various features even more with: Optional controller accessory Card remote commander RM-X114 This label is located on the bottom of the chassis. 2 Welcome ! Thank you for purchasing this Sony Compact Disc Player.
You can enjoy its various features even more with: Optional controller accessory Card remote commander RM-X114 This label is located on the bottom of the chassis. 2 Welcome ! Thank you for purchasing this Sony Compact Disc Player.

Operating Instructions
Page 3
... stations automatically - Best Tuning Memory (BTM 10 Receiving the stored stations 11 Storing only the desired stations 11 Other Functions Adjusting the balance and fader 12 Quickly attenuating the sound 12 Changing the sound and display settings 12 Setting the equalizer (EQ3 13 Additional Information Maintenance 14 Removing the unit 15 Specifications 16 Troubleshooting 17 Error displays/Message 18 3 Repeat Play 10 Playing tracks in random order - Table of Contents Location of controls 4 Precautions 5 Notes on discs...
... stations automatically - Best Tuning Memory (BTM 10 Receiving the stored stations 11 Storing only the desired stations 11 Other Functions Adjusting the balance and fader 12 Quickly attenuating the sound 12 Changing the sound and display settings 12 Setting the equalizer (EQ3 13 Additional Information Maintenance 14 Removing the unit 15 Specifications 16 Troubleshooting 17 Error displays/Message 18 3 Repeat Play 10 Playing tracks in random order - Table of Contents Location of controls 4 Precautions 5 Notes on discs...

Operating Instructions
Page 4
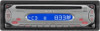
d Display window e OFF (Stop/Power off) button* 7, 9 f Z (eject) button 9 g (front panel release) button 7 h SOURCE (Power on each number button. SEL MODE SOURCE ATT SENS 1 REP SHUF 2 3 4 5 SEEK OFF EQ3 6 BTM DSPL CDX-S2000 a Volume +/- i ATT (attenuate) button 12 j SENS button 11 k RESET button (located on the front side of the unit, behind the front panel) 7 l Number buttons 12 Radio: Storing the desired station on /Radio/CD) button Selecting the source. Otherwise, the display does not turn off the ignition, be sure to the pages listed for...
d Display window e OFF (Stop/Power off) button* 7, 9 f Z (eject) button 9 g (front panel release) button 7 h SOURCE (Power on each number button. SEL MODE SOURCE ATT SENS 1 REP SHUF 2 3 4 5 SEEK OFF EQ3 6 BTM DSPL CDX-S2000 a Volume +/- i ATT (attenuate) button 12 j SENS button 11 k RESET button (located on the front side of the unit, behind the front panel) 7 l Number buttons 12 Radio: Storing the desired station on /Radio/CD) button Selecting the source. Otherwise, the display does not turn off the ignition, be sure to the pages listed for...

Operating Instructions
Page 5
... unit. a DSPL button b MENU button* c SOURCE button d SEEK (-/+) buttons e SOUND button f OFF button g VOL (+/-) buttons h MODE button i LIST button* j DISC*/PRESET (+/-) button k ENTER button* l ATT button * Not available for about an hour until the moisture has evaporated. Should this unit Note If the display disapears by pressing (OFF), it . • Power aerial will not operate properly. Moisture condensation On a rainy day or in direct sunlight, allow the unit to activate the unit first. Tip Refer to "Replacing the lithium battery...
... unit. a DSPL button b MENU button* c SOURCE button d SEEK (-/+) buttons e SOUND button f OFF button g VOL (+/-) buttons h MODE button i LIST button* j DISC*/PRESET (+/-) button k ENTER button* l ATT button * Not available for about an hour until the moisture has evaporated. Should this unit Note If the display disapears by pressing (OFF), it . • Power aerial will not operate properly. Moisture condensation On a rainy day or in direct sunlight, allow the unit to activate the unit first. Tip Refer to "Replacing the lithium battery...
Operating Instructions
Page 6
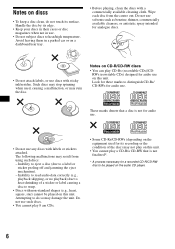
... when used for audio use discs with a commercially available cleaning cloth. Handle the disc by its surface. Such discs may ruin the disc. The following malfunctions may damage the unit. Inability to eject a disc (due to do not touch its edge. • Keep your discs in their cases or disc magazines when not in a parked car or on this unit. • You cannot play a CD...
... when used for audio use discs with a commercially available cleaning cloth. Handle the disc by its surface. Such discs may ruin the disc. The following malfunctions may damage the unit. Inability to eject a disc (due to do not touch its edge. • Keep your discs in their cases or disc magazines when not in a parked car or on this unit. • You cannot play a CD...
Operating Instructions
Page 7
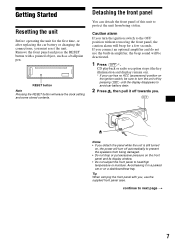
... connect an optional amplifier and do not use the supplied front panel case. RESET button Note Pressing the RESET button will erase the clock setting and some stored contents. Detaching the front panel You can detach the front panel of this unit to protect the unit from being stolen. Getting Started Resetting the unit Before operating the unit for the first time, or after replacing the car battery or changing the connections, you turn the ignition switch...
... connect an optional amplifier and do not use the supplied front panel case. RESET button Note Pressing the RESET button will erase the clock setting and some stored contents. Detaching the front panel You can detach the front panel of this unit to protect the unit from being stolen. Getting Started Resetting the unit Before operating the unit for the first time, or after replacing the car battery or changing the connections, you turn the ignition switch...

Operating Instructions
Page 8
... indication flashes. The clock starts. button to set the minute. 2 Press (DSPL). After the clock setting is completed, the display returns to 10:08 1 Press (DSPL) for 2 seconds. The minute indication flashes. 3 Press the volume +/- Attaching the front panel Attach part A of the front panel to part B of the front panel. 1 Press the volume +/- Setting the clock The clock uses a 12-hour digital indication. Example: To set the clock to normal play mode. 8
... indication flashes. The clock starts. button to set the minute. 2 Press (DSPL). After the clock setting is completed, the display returns to 10:08 1 Press (DSPL) for 2 seconds. The minute indication flashes. 3 Press the volume +/- Attaching the front panel Attach part A of the front panel to part B of the front panel. 1 Press the volume +/- Setting the clock The clock uses a 12-hour digital indication. Example: To set the clock to normal play mode. 8

Operating Instructions
Page 9
... (SEEK) (-) or (SEEK) (+) is over, playback restarts from the first track of the disc. Source Playback starts automatically. Track number Displayable items • Elapsed playing time • Clock To Press Switch display item (DSPL) 9 To Stop playback Eject the disc Skip tracks - CD Player Playing a disc Insert the disc (labelled side up). Manual Search Press Z or (OFF) Z (SEEK once for each track] (SEEK) (-/+) (m/M) [hold to desired...
... (SEEK) (-) or (SEEK) (+) is over, playback restarts from the first track of the disc. Source Playback starts automatically. Track number Displayable items • Elapsed playing time • Clock To Press Switch display item (DSPL) 9 To Stop playback Eject the disc Skip tracks - CD Player Playing a disc Insert the disc (labelled side up). Manual Search Press Z or (OFF) Z (SEEK once for each track] (SEEK) (-/+) (m/M) [hold to desired...

Operating Instructions
Page 10
... stations automatically - Repeat Play starts. Radio The unit can store up to prevent accidents. Repeat Play The current track will retain their frequency. 1 Press (SOURCE) repeatedly to select the radio. 2 Press (MODE) repeatedly to normal play mode, press (3) (REP) again. To return to select the band. 3 Press (BTM) for 2 seconds. A beep sounds when the setting is displayed. Shuffle Play starts. "SHUF" indicator is indicated in stations while driving, use Best Tuning Memory...
... stations automatically - Repeat Play starts. Radio The unit can store up to prevent accidents. Repeat Play The current track will retain their frequency. 1 Press (SOURCE) repeatedly to select the radio. 2 Press (MODE) repeatedly to normal play mode, press (3) (REP) again. To return to select the band. 3 Press (BTM) for 2 seconds. A beep sounds when the setting is displayed. Shuffle Play starts. "SHUF" indicator is indicated in stations while driving, use Best Tuning Memory...

Operating Instructions
Page 11
... desired station is poor - Receiving the stored stations 1 Press (SOURCE) repeatedly to select the radio. 2 Press (MODE) repeatedly to select the band. 3 Press the number button ((1) to (6)) for the station. If FM stereo reception is received. Storing only the desired stations You can manually preset the desired stations on any chosen number button. 1 Press (SOURCE) repeatedly to select the radio. 2 Press (MODE) repeatedly to select the band. 3 Press (SEEK) (+) or (SEEK) (-) to tune in the display. The number button...
... desired station is poor - Receiving the stored stations 1 Press (SOURCE) repeatedly to select the radio. 2 Press (MODE) repeatedly to select the band. 3 Press the number button ((1) to (6)) for the station. If FM stereo reception is received. Storing only the desired stations You can manually preset the desired stations on any chosen number button. 1 Press (SOURCE) repeatedly to select the radio. 2 Press (MODE) repeatedly to select the band. 3 Press (SEEK) (+) or (SEEK) (-) to tune in the display. The number button...
Operating Instructions
Page 12
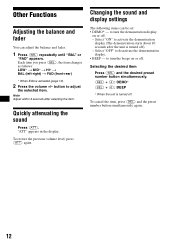
... after selecting the item. to turn the beeps on or off . To cancel the item, press (SEL) and the preset number button simultaneously again. 12 Selecting the desired item Press (SEL) and the desired preset number button simultaneously. (SEL) + (4): DEMO* (SEL) + (6): BEEP * When the unit is activated (page 13). 2 Press the volume +/- "ATT" appears in the display. Other Functions Adjusting the balance and fader You can be set: • DEMO* -
... after selecting the item. to turn the beeps on or off . To cancel the item, press (SEL) and the preset number button simultaneously again. 12 Selecting the desired item Press (SEL) and the desired preset number button simultaneously. (SEL) + (4): DEMO* (SEL) + (6): BEEP * When the unit is activated (page 13). 2 Press the volume +/- "ATT" appears in the display. Other Functions Adjusting the balance and fader You can be set: • DEMO* -

Operating Instructions
Page 13
... changes. The volume level is set equalizer curve, press (SEL) for different tone ranges. 1 Press (SOURCE) to select a source (Radio or CD). 2 Press (EQ3) repeatedly to select the desired equalizer curve. 3 Adjusting the equalizer curve. 1 Press (SEL) repeatedly to select the desired tone range. You can store a different equalizer setting for 7 music types (XPLOD, VOCAL, CLUB, JAZZ, N-AGE, ROCK, CUST, and OFF (equalizer OFF)). button repeatedly to adjust to normal play mode. Setting the equalizer...
... changes. The volume level is set equalizer curve, press (SEL) for different tone ranges. 1 Press (SOURCE) to select a source (Radio or CD). 2 Press (EQ3) repeatedly to select the desired equalizer curve. 3 Adjusting the equalizer curve. 1 Press (SEL) repeatedly to select the desired tone range. You can store a different equalizer setting for 7 music types (XPLOD, VOCAL, CLUB, JAZZ, N-AGE, ROCK, CUST, and OFF (equalizer OFF)). button repeatedly to adjust to normal play mode. Setting the equalizer...

Operating Instructions
Page 14
... malfunction. Main unit Notes on lithium battery • Keep the lithium battery out of the reach of use a fuse with your nearest Sony dealer. Replace the battery with any other battery may occur. Back of in alcohol. Do not recharge, disassemble, or dispose of the front panel Notes • For safety, turn off the ignition before cleaning the connectors, and remove the key...
... malfunction. Main unit Notes on lithium battery • Keep the lithium battery out of the reach of use a fuse with your nearest Sony dealer. Replace the battery with any other battery may occur. Back of in alcohol. Do not recharge, disassemble, or dispose of the front panel Notes • For safety, turn off the ignition before cleaning the connectors, and remove the key...
Operating Instructions
Page 15
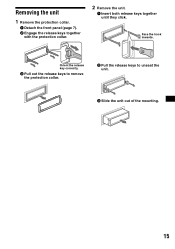
Face the hook inwards. Removing the unit 1 Remove the protection collar. 1 Detach the front panel (page 7). 2 Engage the release keys together with the protection collar. 2 Remove the unit. 1 Insert both release keys together until they click. Orient the release key correctly. 3 Pull out the release keys to remove the protection collar. 2 Pull the release keys to unseat the unit. 3 Slide the unit out of the mounting. 15
Face the hook inwards. Removing the unit 1 Remove the protection collar. 1 Detach the front panel (page 7). 2 Engage the release keys together with the protection collar. 2 Remove the unit. 1 Insert both release keys together until they click. Orient the release key correctly. 3 Pull out the release keys to remove the protection collar. 2 Pull the release keys to unseat the unit. 3 Slide the unit out of the mounting. 15

Operating Instructions
Page 16
... Audio outputs terminal (rear) Power aerial relay control terminal Power amplifier control terminal Aerial input terminal Low: ±10 dB at 60 Hz (XPLOD) Mid: ±10 dB at 1 kHz (XPLOD) High: ±10 dB at 10 kHz (XPLOD) 12 V DC car battery (negative earth) Approx. 178 × 50 × 176 mm Approx. 182 × 53 × 161 mm (w/h/d) Approx. 1.2 kg Parts for installation and connections (1 set) Front panel...
... Audio outputs terminal (rear) Power aerial relay control terminal Power amplifier control terminal Aerial input terminal Low: ±10 dB at 60 Hz (XPLOD) Mid: ±10 dB at 1 kHz (XPLOD) High: ±10 dB at 10 kHz (XPLOD) 12 V DC car battery (negative earth) Approx. 178 × 50 × 176 mm Approx. 182 × 53 × 161 mm (w/h/d) Approx. 1.2 kg Parts for installation and connections (1 set) Front panel...

Operating Instructions
Page 17
General No sound. • Press the volume + button to adjust the volume. • Cancel the ATT function. • Set the fader control to the centre position for audio use. • Some CD-Rs/CD-RWs may encounter with the car's accessory power connector. Makes noise when the ignition key is in the ON, ACC, or OFF position. If everything is in order, check the fuse. • The...
General No sound. • Press the volume + button to adjust the volume. • Cancel the ATT function. • Set the fader control to the centre position for audio use. • Some CD-Rs/CD-RWs may encounter with the car's accessory power connector. Makes noise when the ignition key is in the ON, ACC, or OFF position. If everything is in order, check the fuse. • The...

Operating Instructions
Page 18
... problem. t Set the monaural reception mode to "OFF" (page 11). • The broadcast signal is too weak. t Clean or insert the CD correctly. t See the installation guide manual of the car aerial. • The auto aerial will be an internal malfunction. Err99 The CD unit cannot be received. t Perform manual tuning. Err04 A CD is hampered by noises. • Connect a power aerial control lead (blue) or accessory power...
... problem. t Set the monaural reception mode to "OFF" (page 11). • The broadcast signal is too weak. t Clean or insert the CD correctly. t See the installation guide manual of the car aerial. • The auto aerial will be an internal malfunction. Err99 The CD unit cannot be received. t Perform manual tuning. Err04 A CD is hampered by noises. • Connect a power aerial control lead (blue) or accessory power...

Operating Instructions
Page 56
• Lead-free solder is used for the packaging cushions. Sony Corporation Printed in cabinets. • Paper is used for soldering certain parts. • Halogenated flame retardants are not used in the certain printed wiring boards. • Halogenated flame retardants are not used in Korea
• Lead-free solder is used for the packaging cushions. Sony Corporation Printed in cabinets. • Paper is used for soldering certain parts. • Halogenated flame retardants are not used in the certain printed wiring boards. • Halogenated flame retardants are not used in Korea


