
Operating Instructions
Page 3
... Additional Information Maintenance 14 Removing the unit 15 Specifications 16 Troubleshooting 17 Error displays/Message 18 3 Table of Contents Location of controls 4 Precautions 5 Notes on discs 6 Getting Started Resetting the unit 7 Detaching the front panel 7 Setting the clock 8 CD Player Playing a disc 9 Display items 9 Playing tracks repeatedly - Shuffle Play 10 Radio Storing stations automatically -
... Additional Information Maintenance 14 Removing the unit 15 Specifications 16 Troubleshooting 17 Error displays/Message 18 3 Table of Contents Location of controls 4 Precautions 5 Notes on discs 6 Getting Started Resetting the unit 7 Detaching the front panel 7 Setting the clock 8 CD Player Playing a disc 9 Display items 9 Playing tracks repeatedly - Shuffle Play 10 Radio Storing stations automatically -

Operating Instructions
Page 4
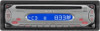
... 8, 9 p EQ3 button 13 q Receptor for details. SEL MODE SOURCE ATT SENS 1 REP SHUF 2 3 4 5 SEEK OFF EQ3 6 BTM DSPL CDX-S2000 a Volume +/- button Radio: Tuning in stations automatically/finding a station manually. button b SEL (select) button Selecting items. c MODE button Changing the operation.... d Display window e OFF (Stop/Power off) button* 7, 9 f Z (eject) button 9 g (front panel release) button 7 h SOURCE (Power on each number button. CD: (3): REP 10 (4): SHUF 10 m Frequency select switch (located on the unit until the...
... 8, 9 p EQ3 button 13 q Receptor for details. SEL MODE SOURCE ATT SENS 1 REP SHUF 2 3 4 5 SEEK OFF EQ3 6 BTM DSPL CDX-S2000 a Volume +/- button Radio: Tuning in stations automatically/finding a station manually. button b SEL (select) button Selecting items. c MODE button Changing the operation.... d Display window e OFF (Stop/Power off) button* 7, 9 f Z (eject) button 9 g (front panel release) button 7 h SOURCE (Power on each number button. CD: (3): REP 10 (4): SHUF 10 m Frequency select switch (located on the unit until the...
Operating Instructions
Page 7
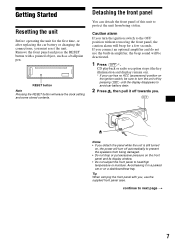
...replacing the car battery or changing the connections, you connect an optional amplifier and do not use the supplied front panel case. Detaching the front panel You can detach the front panel of this unit to protect the unit from being stolen. CD playback or radio reception stops (the key illumination... and display remain on). * If your car has no ACC (accesssory) position on the front panel and its display window. • Do not subject the front panel to prevent the speakers from being damaged. • Do not drop or put excessive pressure on the ignition switch,...
...replacing the car battery or changing the connections, you connect an optional amplifier and do not use the supplied front panel case. Detaching the front panel You can detach the front panel of this unit to protect the unit from being stolen. CD playback or radio reception stops (the key illumination... and display remain on). * If your car has no ACC (accesssory) position on the front panel and its display window. • Do not subject the front panel to prevent the speakers from being damaged. • Do not drop or put excessive pressure on the ignition switch,...

Operating Instructions
Page 8
Attaching the front panel Attach part A of the front panel to part B of the front panel. 1 Press the volume +/- A B Note Do not put anything on the inner surface of the unit as illustrated and push the left side into position until ...
Attaching the front panel Attach part A of the front panel to part B of the front panel. 1 Press the volume +/- A B Note Do not put anything on the inner surface of the unit as illustrated and push the left side into position until ...

Operating Instructions
Page 14
... ignition before cleaning the connectors, and remove the key from the ignition switch. • Never touch the connectors directly with your nearest Sony dealer. Cleaning the connectors The unit may explode if mistreated. Back of in alcohol. Replace the battery with metallic tweezers, otherwise a ...present a risk of the card remote commander becomes shorter. WARNING Battery may not function properly if the connectors between the unit and the front panel are not clean. Otherwise, the connectors may be damaged. Do not apply too much force. Fuse (10 A) x + side up ...
... ignition before cleaning the connectors, and remove the key from the ignition switch. • Never touch the connectors directly with your nearest Sony dealer. Cleaning the connectors The unit may explode if mistreated. Back of in alcohol. Replace the battery with metallic tweezers, otherwise a ...present a risk of the card remote commander becomes shorter. WARNING Battery may not function properly if the connectors between the unit and the front panel are not clean. Otherwise, the connectors may be damaged. Do not apply too much force. Fuse (10 A) x + side up ...
Operating Instructions
Page 15
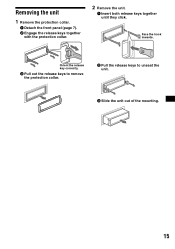
Face the hook inwards. Orient the release key correctly. 3 Pull out the release keys to remove the protection collar. 2 Pull the release keys to unseat the unit. 3 Slide the unit out of the mounting. 15 Removing the unit 1 Remove the protection collar. 1 Detach the front panel (page 7). 2 Engage the release keys together with the protection collar. 2 Remove the unit. 1 Insert both release keys together until they click.
Face the hook inwards. Orient the release key correctly. 3 Pull out the release keys to remove the protection collar. 2 Pull the release keys to unseat the unit. 3 Slide the unit out of the mounting. 15 Removing the unit 1 Remove the protection collar. 1 Detach the front panel (page 7). 2 Engage the release keys together with the protection collar. 2 Remove the unit. 1 Insert both release keys together until they click.

Operating Instructions
Page 16
Specifications CD Player section Signal-to-noise ratio Frequency response Wow and flutter 120 dB 10 - 20,000 Hz Below measurable limit Tuner section FM Tuning range FM tuning interval: 50 kHz/200 kHz switchable 87.5 - 108 MHz (at 50 kHz step) 87.5 - 107.9 MHz (at 200 kHz step) Aerial terminal External ...negative earth) Approx. 178 × 50 × 176 mm Approx. 182 × 53 × 161 mm (w/h/d) Approx. 1.2 kg Parts for installation and connections (1 set) Front panel case (1) Card remote commander RM-X114 Design and specifications are subject to change without notice. 16
Specifications CD Player section Signal-to-noise ratio Frequency response Wow and flutter 120 dB 10 - 20,000 Hz Below measurable limit Tuner section FM Tuning range FM tuning interval: 50 kHz/200 kHz switchable 87.5 - 108 MHz (at 50 kHz step) 87.5 - 107.9 MHz (at 200 kHz step) Aerial terminal External ...negative earth) Approx. 178 × 50 × 176 mm Approx. 182 × 53 × 161 mm (w/h/d) Approx. 1.2 kg Parts for installation and connections (1 set) Front panel case (1) Card remote commander RM-X114 Design and specifications are subject to change without notice. 16

Operating Instructions
Page 17
... in amplifier. The leads are not matched correctly with your unit. t Press (SOURCE) (or insert a disc) to next page t 17 A disc is continuously supplied to the unit. Press the RESET button. The sound skips. continue to turn on the ... adjust the volume. • Cancel the ATT function. • Set the fader control to its recording equipment or the disc condition. The power is automatically ejected. The sound skips from /does not appear in a sturdy part of the memory have... and hold (OFF) again until the display appears. • Remove the front panel and clean the connectors.
... in amplifier. The leads are not matched correctly with your unit. t Press (SOURCE) (or insert a disc) to next page t 17 A disc is continuously supplied to the unit. Press the RESET button. The sound skips. continue to turn on the ... adjust the volume. • Cancel the ATT function. • Set the fader control to its recording equipment or the disc condition. The power is automatically ejected. The sound skips from /does not appear in a sturdy part of the memory have... and hold (OFF) again until the display appears. • Remove the front panel and clean the connectors.


