
XM Satellite Radio Operating manual
Page 1
...search mode. Caution For the following checks, consult your nearest Sony dealer.) Introducing XMTM Satellite Radio There's a world beyond AM and FM. With some stored contents of Digital Voice Systems, Inc....details on the Web at (800)852-9696. CDX-C8050X CDX-C800REC* CDX-M750 CDX-M650 CDX-M610 CDX-M600 MDX-C8500X XR-M550 * You may use an optional CD or MD changer. • Receive up to...there no key is only equipped on the remote control. 3 Press the Disc/Preset button to change by connecting a Sony master unit* compatible with subscription) by the broadcast service, or the ...
...search mode. Caution For the following checks, consult your nearest Sony dealer.) Introducing XMTM Satellite Radio There's a world beyond AM and FM. With some stored contents of Digital Voice Systems, Inc....details on the Web at (800)852-9696. CDX-C8050X CDX-C800REC* CDX-M750 CDX-M650 CDX-M610 CDX-M600 MDX-C8500X XR-M550 * You may use an optional CD or MD changer. • Receive up to...there no key is only equipped on the remote control. 3 Press the Disc/Preset button to change by connecting a Sony master unit* compatible with subscription) by the broadcast service, or the ...

XM Satellite Radio Operating manual
Page 2
...which is not subject to direct sunlight. - Black RCA pin cord (not supplied) BUS cable (not supplied) 4 3 OUT OUT IN CD/MD changer (not supplied) Sony BUS Compatible Car Audio (not supplied) IN The unit is not subject to excessive vibration. - The unit is not near heat sources (such...8226; Be sure to temperatures exceeding 55°C (131°F) (such as heaters). - Connection Connection example XM Antenna* XT-XM1 CD/MD changer* Connection diagram Sony BUS Compatible Car Audio* Cautions • This unit is not subject to use an optional BUS cable, note that a BUS cable with...
...which is not subject to direct sunlight. - Black RCA pin cord (not supplied) BUS cable (not supplied) 4 3 OUT OUT IN CD/MD changer (not supplied) Sony BUS Compatible Car Audio (not supplied) IN The unit is not subject to excessive vibration. - The unit is not near heat sources (such...8226; Be sure to temperatures exceeding 55°C (131°F) (such as heaters). - Connection Connection example XM Antenna* XT-XM1 CD/MD changer* Connection diagram Sony BUS Compatible Car Audio* Cautions • This unit is not subject to use an optional BUS cable, note that a BUS cable with...
Operating Instructions
Page 2
... features using the following controller accessories: Supplied accessory Card remote commander RM-X94 (for the CDX-M650) RM-X93 (for the CDX-M600) RM-X92 (for the CDX-M750) Optional accessory Rotary commander RM-X4S In addition to the CD playback and radio operations, you operate this manual, please consult your authority to operate this... your unit that are cautioned that to Part 15 of the following measures: - Consult the dealer or an experienced radio/ TV technician for purchasing the Sony Compact Disc Player.
... features using the following controller accessories: Supplied accessory Card remote commander RM-X94 (for the CDX-M650) RM-X93 (for the CDX-M600) RM-X92 (for the CDX-M750) Optional accessory Rotary commander RM-X4S In addition to the CD playback and radio operations, you operate this manual, please consult your authority to operate this... your unit that are cautioned that to Part 15 of the following measures: - Consult the dealer or an experienced radio/ TV technician for purchasing the Sony Compact Disc Player.
Operating Instructions
Page 3
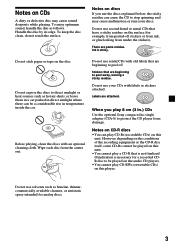
... recorded CDR disc to be a considerable rise in .) CDs Use the optional Sony compact disc single adapter (CSA-8) to peel away, leaving a sticky residue. Before playing, clean the discs with old labels that have a sticky residue on CDs A dirty or defective disc may cause malfunction or ruin your CDs with labels ...peeled-off . Do not use rental CDs with an optional cleaning cloth. Notes on CD-R discs • You can be played on the audio CD player). • You cannot play CD-RWs (rewritable CDs) on the disc. To enjoy optimum sound, handle the disc as hot air-ducts, or leave them...
... recorded CDR disc to be a considerable rise in .) CDs Use the optional Sony compact disc single adapter (CSA-8) to peel away, leaving a sticky residue. Before playing, clean the discs with old labels that have a sticky residue on CDs A dirty or defective disc may cause malfunction or ruin your CDs with labels ...peeled-off . Do not use rental CDs with an optional cleaning cloth. Notes on CD-R discs • You can be played on the audio CD player). • You cannot play CD-RWs (rewritable CDs) on the disc. To enjoy optimum sound, handle the disc as hot air-ducts, or leave them...
Operating Instructions
Page 4
... the station names - Station Memo 18 Locating a station by name - D-bass (CDX-M600 only 27 Selecting the spectrum analyzer 28 Adjusting the sound and frequency of the equalizer preamplifier (CDX-M650 only) 28 TV/Video Watching the TV 29 Watching a video 29 Memorizing TV...Displaying the information stored on /off 8 How to use the menu 8 Setting the clock 9 CD Player CD/MD Unit (optional) Listening to a CD (with the custom file function 13 Locating a disc by name - Simultaneous Play 31 Additional Information Maintenance 32 Dismounting the unit 33 Specifications 35 Troubleshooting...
... the station names - Station Memo 18 Locating a station by name - D-bass (CDX-M600 only 27 Selecting the spectrum analyzer 28 Adjusting the sound and frequency of the equalizer preamplifier (CDX-M650 only) 28 TV/Video Watching the TV 29 Watching a video 29 Memorizing TV...Displaying the information stored on /off 8 How to use the menu 8 Setting the clock 9 CD Player CD/MD Unit (optional) Listening to a CD (with the custom file function 13 Locating a disc by name - Simultaneous Play 31 Additional Information Maintenance 32 Dismounting the unit 33 Specifications 35 Troubleshooting...
Operating Instructions
Page 5
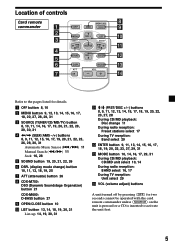
... button 19, 20, 21, 22, 26 6 DSPL (display mode change) button 10, 11, 13, 18, 19, 25 7 ATT (attenuate) button 26 8 CDX-M750: DSO (Dynamic Soundstage Organaizer) button 21 CDX-M600: D-BASS button 27 9 OPEN/CLOSE button 10 0 LIST button 13, 14, 18, 19, 30, 31 List-up 14, 19, 30, 31 qa... M/m (PRST/DISC +/-) buttons 8, 9, 11, 12, 13, 14, 15, 17, 18, 19, 20, 22, 23, 27, 28 During CD/MD playback: Disc change 11 During radio reception...
... button 19, 20, 21, 22, 26 6 DSPL (display mode change) button 10, 11, 13, 18, 19, 25 7 ATT (attenuate) button 26 8 CDX-M750: DSO (Dynamic Soundstage Organaizer) button 21 CDX-M600: D-BASS button 27 9 OPEN/CLOSE button 10 0 LIST button 13, 14, 18, 19, 30, 31 List-up 14, 19, 30, 31 qa... M/m (PRST/DISC +/-) buttons 8, 9, 11, 12, 13, 14, 15, 17, 18, 19, 20, 22, 23, 27, 28 During CD/MD playback: Disc change 11 During radio reception...
Operating Instructions
Page 7
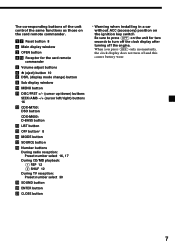
...6 Z (eject) button 10 8 DSPL (display mode change) button 9 Sub display window 0 MENU button qa DISC/PRST +/- (cursor up/down) buttons SEEK/AMS -/+ (cursor left/right) buttons 16 qs CDX-M750: DSO button CDX-M600: D-BASS button qd LIST button qg OFF button* 8 qh MODE button qj SOURCE button qk Number buttons... During radio reception: Preset number select 16, 17 During CD/MD playback: (1) REP 12 (2) SHUF 12 During TV ...
...6 Z (eject) button 10 8 DSPL (display mode change) button 9 Sub display window 0 MENU button qa DISC/PRST +/- (cursor up/down) buttons SEEK/AMS -/+ (cursor left/right) buttons 16 qs CDX-M750: DSO button CDX-M600: D-BASS button qd LIST button qg OFF button* 8 qh MODE button qj SOURCE button qk Number buttons... During radio reception: Preset number select 16, 17 During CD/MD playback: (1) REP 12 (2) SHUF 12 During TV ...
Operating Instructions
Page 8
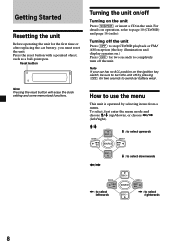
... the ignition key switch, be sure to turn off the unit. Note If your car has no ACC position on operation, refer to page 10 (CD/MD) and page 16 (radio). How to use the menu This unit is operated by pressing (OFF) for two seconds to avoid car battery wear.... Turning off the unit Press (OFF) to stop CD/MD playback or FM/ AM reception (the key illumination and display remains on the unit Press (SOURCE) or insert a CD in the unit. Press the reset button with a pointed object, such as a ball-point pen. Reset...
... the ignition key switch, be sure to turn off the unit. Note If your car has no ACC position on operation, refer to page 10 (CD/MD) and page 16 (radio). How to use the menu This unit is operated by pressing (OFF) for two seconds to avoid car battery wear.... Turning off the unit Press (OFF) to stop CD/MD playback or FM/ AM reception (the key illumination and display remains on the unit Press (SOURCE) or insert a CD in the unit. Press the reset button with a pointed object, such as a ball-point pen. Reset...
Operating Instructions
Page 10
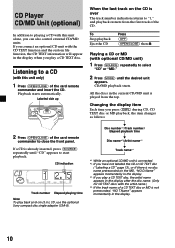
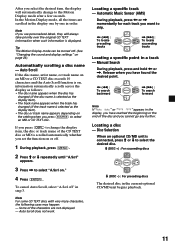
... *4 If the track name of a CD TEXT disc or MD is already inserted, press (SOURCE) repeatedly until the desired unit appears. CD indication Track number Elapsed playing time Note To play a CD TEXT disc. CD Player CD/MD Unit (optional) In addition to playing a CD with this unit only) 1 Press (...play a CD TEXT disc, the artist name appears in the display after the disc name. (Only for CD TEXT discs with the CD TEXT function and the custom file function, the CD TEXT information will appear in the display when you play back an 8 cm (3 in.) CD, use the optional Sony compact disc single adapter...
... *4 If the track name of a CD TEXT disc or MD is already inserted, press (SOURCE) repeatedly until the desired unit appears. CD indication Track number Elapsed playing time Note To play a CD TEXT disc. CD Player CD/MD Unit (optional) In addition to playing a CD with this unit only) 1 Press (...play a CD TEXT disc, the artist name appears in the display after the disc name. (Only for CD TEXT discs with the CD TEXT function and the custom file function, the CD TEXT information will appear in the display when you play back an 8 cm (3 in.) CD, use the optional Sony compact disc single adapter...
Operating Instructions
Page 11
... Release when you press (SOURCE) to the Motion Display mode after a few seconds. Note For some CD TEXT discs with very many characters, the following cases may happen: - Disc Selection When an optional CD/MD unit is selected as the display item). • The track name appears when the track has ...MD is scrolled automatically whether you press (DSPL) to change to select an MD or CD TEXT disc. Auto Scroll If the disc name, artist name, or track name on an MD or a CD TEXT disc exceeds 10 characters and the Auto Scroll function is on, information automatically scrolls across the ...
... Release when you press (SOURCE) to the Motion Display mode after a few seconds. Note For some CD TEXT discs with very many characters, the following cases may happen: - Disc Selection When an optional CD/MD unit is selected as the display item). • The track name appears when the track has ...MD is scrolled automatically whether you press (DSPL) to change to select an MD or CD TEXT disc. Auto Scroll If the disc name, artist name, or track name on an MD or a CD TEXT disc exceeds 10 characters and the Auto Scroll function is on, information automatically scrolls across the ...
Operating Instructions
Page 12
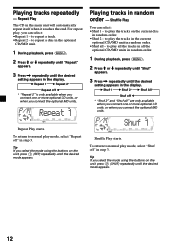
... the desired mode appears. Tip If you connect the optional MD units. Shuffle Play starts. Playing tracks repeatedly - To return to repeat a disc in the optional CD/MD unit. 1 During playback, press (MENU). 2 Press M or m repeatedly until "Repeat" appears. 3 Press , repeatedly until the desired...2* B Shuf All* Shuf off b * "Repeat 2" is only available when you connect one or more optional CD units, or when you select the mode using the buttons on the current disc in the display. To return to play mode, select "Shuf off " in random order. •Shuf all ...
... the desired mode appears. Tip If you connect the optional MD units. Shuffle Play starts. Playing tracks repeatedly - To return to repeat a disc in the optional CD/MD unit. 1 During playback, press (MENU). 2 Press M or m repeatedly until "Repeat" appears. 3 Press , repeatedly until the desired...2* B Shuf All* Shuf off b * "Repeat 2" is only available when you connect one or more optional CD units, or when you select the mode using the buttons on the current disc in the display. To return to play mode, select "Shuf off " in random order. •Shuf all ...
Operating Instructions
Page 13
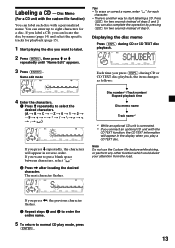
... desired character. The next character flashes. Each time you press (DSPL) during CD or CD TEXT disc playback. Disc Memo (For a CD unit with the custom file function) You can locate the disc by pressing (LIST) for each disc with the CD TEXT function, the CD TEXT information will appear in the display when you press m repeatedly, the characters...
... desired character. The next character flashes. Each time you press (DSPL) during CD or CD TEXT disc playback. Disc Memo (For a CD unit with the custom file function) You can locate the disc by pressing (LIST) for each disc with the CD TEXT function, the CD TEXT information will appear in the display when you press m repeatedly, the characters...
Operating Instructions
Page 14
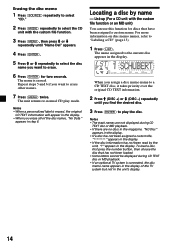
...You can use this function for two seconds. Locating a disc by the unit, "?" appears in step 6. The unit returns to normal CD play the disc. Notes • When a personalized label is erased, the original CD TEXT information will appear in the display. • When ... For more information on disc memo names, refer to the current disc appears in the display. • If the disc information has not been read by name - When you assign a disc memo name to a CD TEXT disc, it takes priority over the original CD TEXT information. 2 Press M (DISC +) or m (DISC -) repeatedly until "Name...
...You can use this function for two seconds. Locating a disc by the unit, "?" appears in step 6. The unit returns to normal CD play the disc. Notes • When a personalized label is erased, the original CD TEXT information will appear in the display. • When ... For more information on disc memo names, refer to the current disc appears in the display. • If the disc information has not been read by name - When you assign a disc memo name to a CD TEXT disc, it takes priority over the original CD TEXT information. 2 Press M (DISC +) or m (DISC -) repeatedly until "Name...
Operating Instructions
Page 15
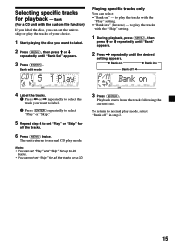
... with the custom file function) If you label the disc, you can set "Play" or "Skip" for up to normal play mode. to normal CD play mode, select "Bank off b 4 Label the tracks. 1 Press < or , repeatedly to select the track you want to label. 2 Press (ENTER) repeatedly to select "Play" ...or "Skip." 5 Repeat step 4 to set the unit to skip or play the tracks of your choice. 1 Start playing the disc you want to...
... with the custom file function) If you label the disc, you can set "Play" or "Skip" for up to normal play mode. to normal CD play mode, select "Bank off b 4 Label the tracks. 1 Press < or , repeatedly to select the track you want to label. 2 Press (ENTER) repeatedly to select "Play" ...or "Skip." 5 Repeat step 4 to set the unit to skip or play the tracks of your choice. 1 Start playing the disc you want to...
Operating Instructions
Page 16
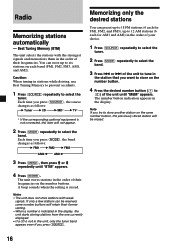
... b AM1b 3 Press (MENU), then press M or m repeatedly until "MEM" appears. If only a few stations can be erased. 16 You can preset up to 18 FM stations (6 each for AM1 and AM2) in the order of their former setting. • When a number is indicated in the display, the unit starts storing... stations from the one currently displayed. • If a CD is not in the order of the unit until "BTM" appears. 4 Press (ENTER). Each time you press (MODE), the band changes as follows: B Tuner...
... b AM1b 3 Press (MENU), then press M or m repeatedly until "MEM" appears. If only a few stations can be erased. 16 You can preset up to 18 FM stations (6 each for AM1 and AM2) in the order of their former setting. • When a number is indicated in the display, the unit starts storing... stations from the one currently displayed. • If a CD is not in the order of the unit until "BTM" appears. 4 Press (ENTER). Each time you press (MODE), the band changes as follows: B Tuner...
Operating Instructions
Page 19
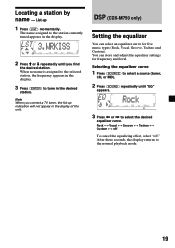
... select an equalizer curve for frequency and level. DSP (CDX-M750 only) Setting the equalizer You can store and adjust the equalizer settings for five music types (Rock, Vocal, Groove, Techno and Custom). Selecting the equalizer curve 1 Press (SOURCE) to select a source (tuner, CD, or MD). 2 Press (SOUND) repeatedly until "EQ" appears...
... select an equalizer curve for frequency and level. DSP (CDX-M750 only) Setting the equalizer You can store and adjust the equalizer settings for five music types (Rock, Vocal, Groove, Techno and Custom). Selecting the equalizer curve 1 Press (SOURCE) to select a source (tuner, CD, or MD). 2 Press (SOUND) repeatedly until "EQ" appears...
Operating Instructions
Page 20
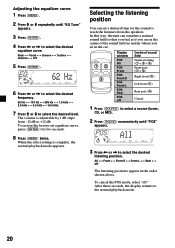
... y Groove y Techno y Custom y off Centre of sound field Normal setting (1 + 2 + 3) Front part (1 + 2) Right front (2) Left front (1) Rear part (3) Cancel 1 Press (SOURCE) to select a source (tuner, CD, or MD). 2 Press (SOUND) momentarily until "EQ Tune" appears. 3 Press (ENTER). 4 Press < or , to the normal playback mode. 20
... y Groove y Techno y Custom y off Centre of sound field Normal setting (1 + 2 + 3) Front part (1 + 2) Right front (2) Left front (1) Rear part (3) Cancel 1 Press (SOURCE) to select a source (tuner, CD, or MD). 2 Press (SOUND) momentarily until "EQ Tune" appears. 3 Press (ENTER). 4 Press < or , to the normal playback mode. 20
Operating Instructions
Page 21
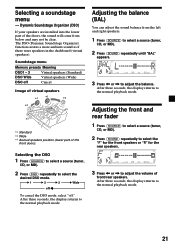
...You can adjust the sound balance from below and may not be clear. Adjusting the front and rear fader 1 Press (SOURCE) to select a source (tuner, CD, or MD). 2 Press (SOUND) repeatedly to select the "F" for the front speakers or "R" for the rear speakers. 3 Press < or , to the... display returns to adjust the volume of the doors, the sound will come from the left and right speakers. 1 Press (SOURCE) to select a source (tuner, CD, or MD). 2 Press (SOUND) repeatedly until "BAL" appears. 3 Press < or , to select the desired DSO mode. Selecting a soundstage menu - B 1 B 2 B 3 B Wide off...
...You can adjust the sound balance from below and may not be clear. Adjusting the front and rear fader 1 Press (SOURCE) to select a source (tuner, CD, or MD). 2 Press (SOUND) repeatedly to select the "F" for the front speakers or "R" for the rear speakers. 3 Press < or , to the... display returns to adjust the volume of the doors, the sound will come from the left and right speakers. 1 Press (SOURCE) to select a source (tuner, CD, or MD). 2 Press (SOUND) repeatedly until "BAL" appears. 3 Press < or , to select the desired DSO mode. Selecting a soundstage menu - B 1 B 2 B 3 B Wide off...

Operating Instructions
Page 22
... select "Front HPF" or "Rear HPF" 3 Press (ENTER). 4 Press < or , to adjust the volume level. After three seconds, the display returns to select a source (tuner, CD, or MD). 2 Press (SOUND) repeatedly until "SUB LPF" appears. 22 By setting the cut-off frequency (see the diagram below), the subwoofer(s) will output only...
... select "Front HPF" or "Rear HPF" 3 Press (ENTER). 4 Press < or , to adjust the volume level. After three seconds, the display returns to select a source (tuner, CD, or MD). 2 Press (SOUND) repeatedly until "SUB LPF" appears. 22 By setting the cut-off frequency (see the diagram below), the subwoofer(s) will output only...
Operating Instructions
Page 24
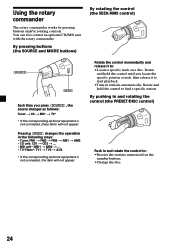
... unit with the rotary commander. By pushing in and rotating the control (the PRESET/DISC control) Push in the following ways: • Tuner: FM1 t FM2 t FM3 t AM1 t AM2 • CD unit: CD1 t CD2 t ... • MD unit*: MD1 t MD2 t ... • TV/Video*: TV1 t TV2 t AUX * If the corresponding optional equipment is not connected...
... unit with the rotary commander. By pushing in and rotating the control (the PRESET/DISC control) Push in the following ways: • Tuner: FM1 t FM2 t FM3 t AM1 t AM2 • CD unit: CD1 t CD2 t ... • MD unit*: MD1 t MD2 t ... • TV/Video*: TV1 t TV2 t AUX * If the corresponding optional equipment is not connected...


