
Limited Warranty (U.S. Only)
Page 1
... expressly provided for the time periods and as fuses or batteries). It is required. A dated purchase receipt is likely that has been returned to its original packaging or packaging affording an equal degree of the product ("Labor Warranty"), Sony will , at its option, (i) repair the product using new or refurbished parts or (ii) replace the product with respect to...
... expressly provided for the time periods and as fuses or batteries). It is required. A dated purchase receipt is likely that has been returned to its original packaging or packaging affording an equal degree of the product ("Labor Warranty"), Sony will , at its option, (i) repair the product using new or refurbished parts or (ii) replace the product with respect to...

XM Satellite Radio Operating manual
Page 1
... the channel. Receiving a stored channel • Press either Seek button to the change without notice. However, there is void due to select the desired channel. How to change by pressing the Display (DSPL) button. Press the Disc/Preset + (DISC +) button to 100 channels. Displaying the XM Radio ID Additional Information Specifications Frequency Power requirements Outputs Inputs Dimensions Mass Supplied accessories 2332.5 - 2345.0 MHz 12 V DC car battery (negative ground) BUS control output Audio output Antenna input (Satellite, Terrestrial) BUS control input Audio input 224...
... the channel. Receiving a stored channel • Press either Seek button to the change without notice. However, there is void due to select the desired channel. How to change by pressing the Display (DSPL) button. Press the Disc/Preset + (DISC +) button to 100 channels. Displaying the XM Radio ID Additional Information Specifications Frequency Power requirements Outputs Inputs Dimensions Mass Supplied accessories 2332.5 - 2345.0 MHz 12 V DC car battery (negative ground) BUS control output Audio output Antenna input (Satellite, Terrestrial) BUS control input Audio input 224...

XM Satellite Radio Operating manual
Page 2
... XM Satellite receiver, aligning the v marks. Installation Parts list The numbers in the list are going to install the unit. - Use of the four screw holes on the car First connect the black ground lead, then connect the yellow power input leads. Warning Use a fuse with or damaged by the tapping screws. - Black RCA pin cord (not supplied) BUS cable (not supplied) 4 3 OUT OUT IN CD/MD changer (not supplied) Sony BUS Compatible Car Audio...
... XM Satellite receiver, aligning the v marks. Installation Parts list The numbers in the list are going to install the unit. - Use of the four screw holes on the car First connect the black ground lead, then connect the yellow power input leads. Warning Use a fuse with or damaged by the tapping screws. - Black RCA pin cord (not supplied) BUS cable (not supplied) 4 3 OUT OUT IN CD/MD changer (not supplied) Sony BUS Compatible Car Audio...
Operating Instructions
Page 1
.... En ce qui concerne l'installation et les connexions, consulter le manuel d'installation/connexions fourni. Refer to these numbers in the space provided below. CDX-M750/M650/M600 Serial No. CDX-M750 CDX-M650 CDX-M600 © 2000 Sony Corporation 3-047-692-11 (1) FM/AM Compact Disc Player Operating Instructions US Mode d'emploi FR Manual de instrucciones ES Owner's Record The model and serial numbers are located on the bottom of the unit. Model No.
.... En ce qui concerne l'installation et les connexions, consulter le manuel d'installation/connexions fourni. Refer to these numbers in the space provided below. CDX-M750/M650/M600 Serial No. CDX-M750 CDX-M650 CDX-M600 © 2000 Sony Corporation 3-047-692-11 (1) FM/AM Compact Disc Player Operating Instructions US Mode d'emploi FR Manual de instrucciones ES Owner's Record The model and serial numbers are located on the bottom of the unit. Model No.
Operating Instructions
Page 2
... Sony Compact Disc Player. Connect the equipment into an outlet on a circuit different from the road. Should this product will not operate properly. When you operate this unit or a connected optional CD unit with the CD TEXT function, the CD TEXT information will extend automatically while the unit is connected. - If everything is in order, check the fuse. •If your car is equipped with a power antenna...
... Sony Compact Disc Player. Connect the equipment into an outlet on a circuit different from the road. Should this product will not operate properly. When you operate this unit or a connected optional CD unit with the CD TEXT function, the CD TEXT information will extend automatically while the unit is connected. - If everything is in order, check the fuse. •If your car is equipped with a power antenna...
Operating Instructions
Page 4
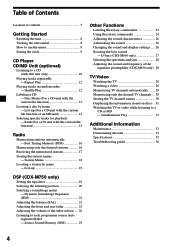
... 10 Playing tracks repeatedly - Station Memo 18 Locating a station by name - D-bass (CDX-M600 only 27 Selecting the spectrum analyzer 28 Adjusting the sound and frequency of the subwoofer(s) .... 22 Listening to each programme source in random order - Simultaneous Play 31 Additional Information Maintenance 32 Dismounting the unit 33 Specifications 35 Troubleshooting guide 36 4 Table of Contents Location of controls 5 Getting Started Resetting the unit 8 Turning the unit on discs .. 31 Watching the TV or video...
... 10 Playing tracks repeatedly - Station Memo 18 Locating a station by name - D-bass (CDX-M600 only 27 Selecting the spectrum analyzer 28 Adjusting the sound and frequency of the subwoofer(s) .... 22 Listening to each programme source in random order - Simultaneous Play 31 Additional Information Maintenance 32 Dismounting the unit 33 Specifications 35 Troubleshooting guide 36 4 Table of Contents Location of controls 5 Getting Started Resetting the unit 8 Turning the unit on discs .. 31 Watching the TV or video...
Operating Instructions
Page 5
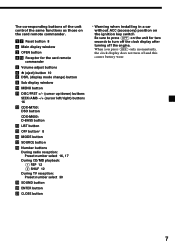
... qd MODE button 10, 14, 16, 17, 29, 31 During CD/MD playback: CD/MD unit select 10, 14 During radio reception: BAND select 16, 17 During TV reception: Unit select 29 qf VOL (volume adjust) buttons A unit turned off by pressing (OFF) for two seconds cannot be operated with the card remote commander unless (SOURCE) on the unit is pressed or a CD is inserted to activate the unit...
... qd MODE button 10, 14, 16, 17, 29, 31 During CD/MD playback: CD/MD unit select 10, 14 During radio reception: BAND select 16, 17 During TV reception: Unit select 29 qf VOL (volume adjust) buttons A unit turned off by pressing (OFF) for two seconds cannot be operated with the card remote commander unless (SOURCE) on the unit is pressed or a CD is inserted to activate the unit...
Operating Instructions
Page 7
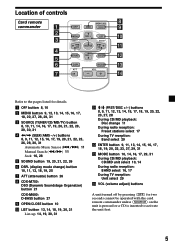
... clock display does not turn off the clock display after turning off and this causes battery wear. 7 The corresponding buttons of the unit control the same functions as those on the unit for the card remote commander 5 Volume adjust buttons 6 Z (eject) button 10 8 DSPL (display mode change) button 9 Sub display window 0 MENU button qa DISC/PRST +/- (cursor up/down) buttons SEEK/AMS -/+ (cursor left/right) buttons 16 qs CDX-M750: DSO button CDX-M600: D-BASS button qd LIST button qg OFF button* 8 qh MODE button qj SOURCE button qk Number buttons During radio reception: Preset number select...
... clock display does not turn off the clock display after turning off and this causes battery wear. 7 The corresponding buttons of the unit control the same functions as those on the unit for the card remote commander 5 Volume adjust buttons 6 Z (eject) button 10 8 DSPL (display mode change) button 9 Sub display window 0 MENU button qa DISC/PRST +/- (cursor up/down) buttons SEEK/AMS -/+ (cursor left/right) buttons 16 qs CDX-M750: DSO button CDX-M600: D-BASS button qd LIST button qg OFF button* 8 qh MODE button qj SOURCE button qk Number buttons During radio reception: Preset number select...
Operating Instructions
Page 10
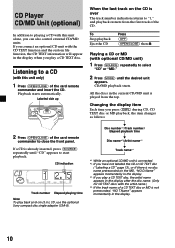
... panel. When the last track on the MD, "NO D.Name" appears momentarily in the display. *3 If you play a CD TEXT disc, the artist name appears in .) CD, use the optional Sony compact disc single adapter (CSA-8). All the discs in the display. 10 If a CD is not prerecorded, "NO T.Name" appears momentarily in the current CD/MD unit is over The track number...
... panel. When the last track on the MD, "NO D.Name" appears momentarily in the display. *3 If you play a CD TEXT disc, the artist name appears in .) CD, use the optional Sony compact disc single adapter (CSA-8). All the discs in the display. 10 If a CD is not prerecorded, "NO T.Name" appears momentarily in the current CD/MD unit is over The track number...
Operating Instructions
Page 11
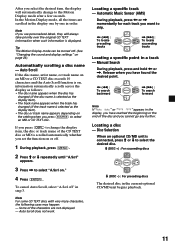
... locate preceding tracks DISC SOURCE DISC SEEK , (>) : To locate succeeding tracks Locating a specific point in the display, you have found the desired point. < (m) : SEEK To search backward DISC SOURCE DISC SEEK , (M) : To search forward Note If " " or " " appears in a track - Auto Scroll does not work. Automatic Music Sensor (AMS) During playback, press < or , momentarily for each track you use personalized labels, they will automatically change the display...
... locate preceding tracks DISC SOURCE DISC SEEK , (>) : To locate succeeding tracks Locating a specific point in the display, you have found the desired point. < (m) : SEEK To search backward DISC SOURCE DISC SEEK , (M) : To search forward Note If " " or " " appears in a track - Auto Scroll does not work. Automatic Music Sensor (AMS) During playback, press < or , momentarily for each track you use personalized labels, they will automatically change the display...
Operating Instructions
Page 13
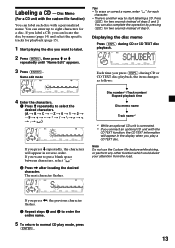
... appear in reverse order. You can locate the disc by pressing (LIST) for two seconds instead of step 5. Displaying the disc memo Press (DSPL) during CD or CD TEXT disc playback, the item changes as follows: V Disc number*1/Track number/ Elapsed playback time V Disc memo name V Track name*2 *1 While an optional CD unit is another way to select the desired characters. (A t B t C t ··...
... appear in reverse order. You can locate the disc by pressing (LIST) for two seconds instead of step 5. Displaying the disc memo Press (DSPL) during CD or CD TEXT disc playback, the item changes as follows: V Disc number*1/Track number/ Elapsed playback time V Disc memo name V Track name*2 *1 While an optional CD unit is another way to select the desired characters. (A t B t C t ··...
Operating Instructions
Page 16
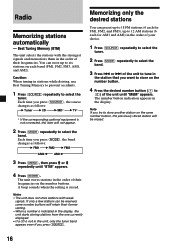
...). A beep sounds when the setting is not connected, this item will retain their frequencies on the same number button, the previously stored station will be received, some number buttons will not appear. 2 Press (MODE) repeatedly to select the tuner. Note If you press (MODE), the band changes as follows: B Tuner B CD B MD* B TV* * If the corresponding optional equipment is stored. Best Tuning Memory (BTM) The unit selects the stations with weak...
...). A beep sounds when the setting is not connected, this item will retain their frequencies on the same number button, the previously stored station will be received, some number buttons will not appear. 2 Press (MODE) repeatedly to select the tuner. Note If you press (MODE), the band changes as follows: B Tuner B CD B MD* B TV* * If the corresponding optional equipment is stored. Best Tuning Memory (BTM) The unit selects the stations with weak...
Operating Instructions
Page 21
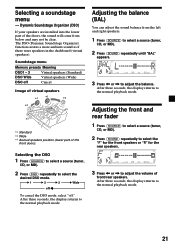
... menu Memory presets Meaning DSO1 - 3 Virtual speakers (Standard) DSO Wide Virtual speakers (Wide) DSO off ." Adjusting the front and rear fader 1 Press (SOURCE) to select a source (tuner, CD, or MD). 2 Press (SOUND) repeatedly to select the "F" for the front speakers or "R" for the rear speakers. 3 Press < or , to adjust the volume of the doors, the sound will come from the left and right speakers. 1 Press (SOURCE) to select a source (tuner, CD, or MD). 2 Press (SOUND...
... menu Memory presets Meaning DSO1 - 3 Virtual speakers (Standard) DSO Wide Virtual speakers (Wide) DSO off ." Adjusting the front and rear fader 1 Press (SOURCE) to select a source (tuner, CD, or MD). 2 Press (SOUND) repeatedly to select the "F" for the front speakers or "R" for the rear speakers. 3 Press < or , to adjust the volume of the doors, the sound will come from the left and right speakers. 1 Press (SOURCE) to select a source (tuner, CD, or MD). 2 Press (SOUND...

Operating Instructions
Page 22
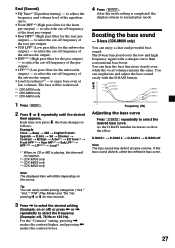
... the subwoofer(s) 1 Press (SOURCE) to select the cut -off frequency of the speakers. Cut-off frequency Level 1 Press (MENU). Frequency (Hz) 2 Press M or m repeatedly until "SUB" appears. Tip When you can get a clearer sound image. When the effect setting is disabled. 6 Press (MENU) twice. Level Adjusting the cut-off frequency and the output volume level for the front/rear speakers To match the characteristics of the installed speaker system, you can adjust the output volume level and select...
... the subwoofer(s) 1 Press (SOURCE) to select the cut -off frequency of the speakers. Cut-off frequency Level 1 Press (MENU). Frequency (Hz) 2 Press M or m repeatedly until "SUB" appears. Tip When you can get a clearer sound image. When the effect setting is disabled. 6 Press (MENU) twice. Level Adjusting the cut-off frequency and the output volume level for the front/rear speakers To match the characteristics of the installed speaker system, you can adjust the output volume level and select...
Operating Instructions
Page 25
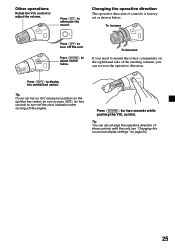
Changing the operative direction The operative direction of these controls with the unit (see "Changing the sound and display settings" on page 26). 25 Press (SOUND) to display the memorized names. Tip If your car has no ACC (accessory) position on the right hand side of the steering column, you need to mount the rotary commander on the ignition key switch, be sure to press (OFF) for two...
Changing the operative direction The operative direction of these controls with the unit (see "Changing the sound and display settings" on page 26). 25 Press (SOUND) to display the memorized names. Tip If your car has no ACC (accessory) position on the right hand side of the steering column, you need to mount the rotary commander on the ignition key switch, be sure to press (OFF) for two...
Operating Instructions
Page 26
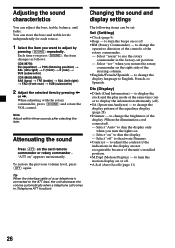
... follows: CDX-M750: EQ (equalizer) t POS (listening position) t BAL (left-right) t F (front) t R (rear) t SUB (subwoofer) CDX-M650/M600: BAS (bass) t TRE (treble) t BAL (left-right) t FAD (front-rear) t SUB (subwoofer) 2 Adjust the selected item by pressing (SOUND) repeatedly. Each time you mount the rotary commander on ) or to dim the display. - "ATT on the card remote commander or rotary commander . Select "rev" when you press (SOUND), the item changes as the factory-set : Set (Setting) •Clock (page...
... follows: CDX-M750: EQ (equalizer) t POS (listening position) t BAL (left-right) t F (front) t R (rear) t SUB (subwoofer) CDX-M650/M600: BAS (bass) t TRE (treble) t BAL (left-right) t FAD (front-rear) t SUB (subwoofer) 2 Adjust the selected item by pressing (SOUND) repeatedly. Each time you mount the rotary commander on ) or to dim the display. - "ATT on the card remote commander or rotary commander . Select "rev" when you press (SOUND), the item changes as the factory-set : Set (Setting) •Clock (page...
Operating Instructions
Page 27
... to select the cut -off Note The bass sound may distort at low volumes. After the mode setting is playing, this item will not appear. *2 CDX-M750 only *3 CDX-M650 only *4 CDX-M600 only Note The displayed item will be reinforced. *1 CDX-M750 only *2 CDX-M650 only *3 CDX-M600 only 1 Press (MENU). 2 Press M or m repeatedly until the desired item appears. to normal play mode. to adjust the frequency and volume level of the subwoofer output...
... to select the cut -off Note The bass sound may distort at low volumes. After the mode setting is playing, this item will not appear. *2 CDX-M750 only *3 CDX-M650 only *4 CDX-M600 only Note The displayed item will be reinforced. *1 CDX-M750 only *2 CDX-M650 only *3 CDX-M600 only 1 Press (MENU). 2 Press M or m repeatedly until the desired item appears. to normal play mode. to adjust the frequency and volume level of the subwoofer output...
Operating Instructions
Page 35
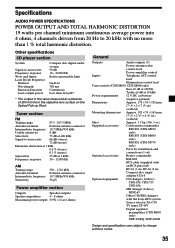
... (CDX-M600 only) RM-X92 (CDX-M750 only) Parts for installation and connections (1 set) Optional accessories Rotary commander RM-X4S BUS cable (supplied with an RCA pin cord) RC-61 (1 m), RC-62 (2 m) Compact disc single adapter CSA-8 Optional equipment CD changer (10 discs) CDX-838, CDX-737, CDX-636 MD changer (6 discs) MDX-65 Other CD/MD changers with no more than 1 % total harmonic distortion. Specifications AUDIO POWER SPECIFICATIONS POWER OUTPUT AND TOTAL HARMONIC DISTORTION 19 watts per channel...
... (CDX-M600 only) RM-X92 (CDX-M750 only) Parts for installation and connections (1 set) Optional accessories Rotary commander RM-X4S BUS cable (supplied with an RCA pin cord) RC-61 (1 m), RC-62 (2 m) Compact disc single adapter CSA-8 Optional equipment CD changer (10 discs) CDX-838, CDX-737, CDX-636 MD changer (6 discs) MDX-65 Other CD/MD changers with no more than 1 % total harmonic distortion. Specifications AUDIO POWER SPECIFICATIONS POWER OUTPUT AND TOTAL HARMONIC DISTORTION 19 watts per channel...
Operating Instructions
Page 36
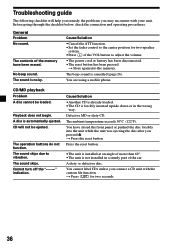
You are using a mobile phone. The sound skips due to adjust the volume. •The power cord or battery has been disconnected. •The reset button has been pressed. t Press (LIST) for two-speaker system. •Press (+) of the car. Troubleshooting guide The following checklist will not be loaded. The sound is forcibly inserted upside down or in a sturdy part of the VOL button to vibration. Playback does...
You are using a mobile phone. The sound skips due to adjust the volume. •The power cord or battery has been disconnected. •The reset button has been pressed. t Press (LIST) for two-speaker system. •Press (+) of the car. Troubleshooting guide The following checklist will not be loaded. The sound is forcibly inserted upside down or in a sturdy part of the VOL button to vibration. Playback does...
Operating Instructions
Page 37
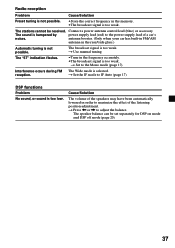
... car has built-in FM/AM antenna in the rear/side glass.) Automatic tuning is too low. t Set to IF Auto (page 17). DSP functions Problem No sound, or sound is not possible. The speaker balance can be received. The broadcast signal is selected. t Set the IF mode to the Mono mode (page 17). t Press < or , to adjust the balance. The stations cannot be set separately for DSP on mode and DSP off mode...
... car has built-in FM/AM antenna in the rear/side glass.) Automatic tuning is too low. t Set to IF Auto (page 17). DSP functions Problem No sound, or sound is not possible. The speaker balance can be received. The broadcast signal is selected. t Set the IF mode to the Mono mode (page 17). t Press < or , to adjust the balance. The stations cannot be set separately for DSP on mode and DSP off mode...


