
Operating Instructions
Page 4
... Information Precautions 20 Notes on this unit 6 Resetting the unit 6 Canceling the Demo mode 6 Preparing the card remote commander 6 Setting the clock 6 Detaching the front panel 7 Attaching the front panel 7 Location of MP3/WMA/AAC files 21 About iPod 21 ...play 16 Operating an iPod directly - Passenger control 17 Other functions Changing the sound settings 17 Adjusting the sound characteristics 17 Customizing the equalizer curve - Table of Contents Getting Started Playable discs on discs 20 Playback order of controls and basic operations Main unit 8 Card remote ...
... Information Precautions 20 Notes on this unit 6 Resetting the unit 6 Canceling the Demo mode 6 Preparing the card remote commander 6 Setting the clock 6 Detaching the front panel 7 Attaching the front panel 7 Location of MP3/WMA/AAC files 21 About iPod 21 ...play 16 Operating an iPod directly - Passenger control 17 Other functions Changing the sound settings 17 Adjusting the sound characteristics 17 Customizing the equalizer curve - Table of Contents Getting Started Playable discs on discs 20 Playback order of controls and basic operations Main unit 8 Card remote ...
Operating Instructions
Page 8
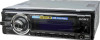
... Receptor for the card remote commander G Display window H OPEN button page 7, 12 I USB connector page 13, 15 To connect to enter sound setting/apply a setting. reverse/fastforward a track (press and hold to enter menu. Press and hold ). Radio: To tune in stations automatically (press); Location of... and basic operations. B (BACK) button To return to adjust the volume/adjust a setting. C SOURCE button*1 To turn off; J SEEK +/- buttons CD/USB: To skip tracks (press); E Control dial/ENTER/SOUND/MENU button Rotate to the previous display. D ZAP button page 11 To enter ZAPPIN&#...
... Receptor for the card remote commander G Display window H OPEN button page 7, 12 I USB connector page 13, 15 To connect to enter sound setting/apply a setting. reverse/fastforward a track (press and hold to enter menu. Press and hold ). Radio: To tune in stations automatically (press); Location of... and basic operations. B (BACK) button To return to adjust the volume/adjust a setting. C SOURCE button*1 To turn off; J SEEK +/- buttons CD/USB: To skip tracks (press); E Control dial/ENTER/SOUND/MENU button Rotate to the previous display. D ZAP button page 11 To enter ZAPPIN&#...

Operating Instructions
Page 9
...6 R Z (eject) button page 12 To eject the disc. Remove the insulation film before use (page 6). w buttons To control CD/radio/USB, the same as (SEEK) -/+ on the unit. wd VOL (volume) +*2/- wg SOUND button To enter sound setting. enter the Quick-BrowZer mode (CD/USB). N Number ...FM/AM)/ select the play mode of iPod. The following buttons on the unit is pressed, or a disc is turned off and the display disappears, it cannot be operated with the card remote commander unless (SOURCE) on the card remote commander have also different buttons/functions from the unit. Setup, sound setting...
...6 R Z (eject) button page 12 To eject the disc. Remove the insulation film before use (page 6). w buttons To control CD/radio/USB, the same as (SEEK) -/+ on the unit. wd VOL (volume) +*2/- wg SOUND button To enter sound setting. enter the Quick-BrowZer mode (CD/USB). N Number ...FM/AM)/ select the play mode of iPod. The following buttons on the unit is pressed, or a disc is turned off and the display disappears, it cannot be operated with the card remote commander unless (SOURCE) on the card remote commander have also different buttons/functions from the unit. Setup, sound setting...
Operating Instructions
Page 11
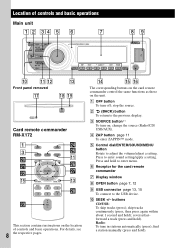
... by ZAPPIN mode again, repeat steps 1 and 2. Radio Storing and receiving stations Caution When tuning in order of the next track. A beep sounds when the setting is received. 1 Press (ZAP) during playback. Playback starts from the beginning. Tuning automatically 1 Select the band, then press (SEEK) +/- ...The unit stores stations in stations while driving, use Best Tuning Memory (BTM) to search for the set time, then a click sounds and the next passage starts. To change the band, press (MODE) repeatedly. Tip If you know the frequency of the station ...
... by ZAPPIN mode again, repeat steps 1 and 2. Radio Storing and receiving stations Caution When tuning in order of the next track. A beep sounds when the setting is received. 1 Press (ZAP) during playback. Playback starts from the beginning. Tuning automatically 1 Select the band, then press (SEEK) +/- ...The unit stores stations in stations while driving, use Best Tuning Memory (BTM) to search for the set time, then a click sounds and the next passage starts. To change the band, press (MODE) repeatedly. Tip If you know the frequency of the station ...

Operating Instructions
Page 15
... Mode t Track Mode t Podcast Mode* t Genre Mode t Playlist Mode t Artist Mode * May not appear depending on iPod setting. 4 Adjust the volume. Support site http://esupport.sony.com http://www.xplodsony.com/ Playing back iPod Before connecting the iPod, turn on automatically, and the display will appear on the...(MODE) to select the play mode. If an iPod is disconnected during a telephone call. In order to stop playback. Press (OFF) to avoid sudden loud sound after a call, do not function. - (1) (REP) - (2) (SHUF) Tip We recommend the RC-100IP USB cable (not supplied) to connect the...
... Mode t Track Mode t Podcast Mode* t Genre Mode t Playlist Mode t Artist Mode * May not appear depending on iPod setting. 4 Adjust the volume. Support site http://esupport.sony.com http://www.xplodsony.com/ Playing back iPod Before connecting the iPod, turn on automatically, and the display will appear on the...(MODE) to select the play mode. If an iPod is disconnected during a telephone call. In order to stop playback. Press (OFF) to avoid sudden loud sound after a call, do not function. - (1) (REP) - (2) (SHUF) Tip We recommend the RC-100IP USB cable (not supplied) to connect the...
Operating Instructions
Page 17
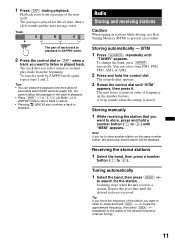
... Then "Mode Audio" will appear and the play /reception mode. Level Adjusts the subwoofer volume: "+10dB" - Other functions Changing the sound settings Adjusting the sound characteristics 1 Press the control dial. 2 Rotate the control dial until the desired menu item appears, then press it . 4 Press (... enhanced the effect. The larger the number, the more ambient sound field. continue to "Resuming Mode." "Mode iPod" appears and you will change to next page t 17 EQ3 Parametric Tune*1 Custom equalizer settings. Notes • The volume can operate an iPod connected to...
... Then "Mode Audio" will appear and the play /reception mode. Level Adjusts the subwoofer volume: "+10dB" - Other functions Changing the sound settings Adjusting the sound characteristics 1 Press the control dial. 2 Rotate the control dial until the desired menu item appears, then press it . 4 Press (... enhanced the effect. The larger the number, the more ambient sound field. continue to "Resuming Mode." "Mode iPod" appears and you will change to next page t 17 EQ3 Parametric Tune*1 Custom equalizer settings. Notes • The volume can operate an iPod connected to...
Operating Instructions
Page 18
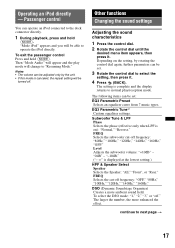
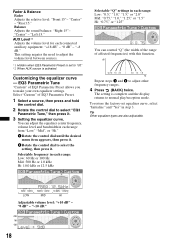
...your own equalizer settings. Fader & Balance Fader Adjusts the relative level: "Front:15"- "0 dB" - EQ3 Parametric Tune "Custom" of affected frequencies) with this function. dB Q=1.0 1.5 2.0 2.0 1.5 1.0 Hz Repeat steps 1 and 2 to select "EQ3 Parametric Tune," then press it . Balance Adjusts the sound balance: "...." 1 Rotate the control dial until the desired menu item appears, then press it. 2 Rotate the control dial to select the setting, then press it . 3 Setting the equalizer curve. Select "Custom" of EQ3 Parametric Preset. 1 Select a source, then press and hold the control dial. 2...
...your own equalizer settings. Fader & Balance Fader Adjusts the relative level: "Front:15"- "0 dB" - EQ3 Parametric Tune "Custom" of affected frequencies) with this function. dB Q=1.0 1.5 2.0 2.0 1.5 1.0 Hz Repeat steps 1 and 2 to select "EQ3 Parametric Tune," then press it . Balance Adjusts the sound balance: "...." 1 Rotate the control dial until the desired menu item appears, then press it. 2 Rotate the control dial to select the setting, then press it . 3 Setting the equalizer curve. Select "Custom" of EQ3 Parametric Preset. 1 Select a source, then press and hold the control dial. 2...
Operating Instructions
Page 19
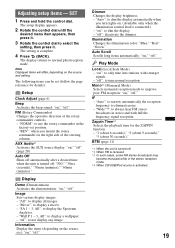
... the ZAPPIN function. - IF - BTM (page 11) *1 When the unit is turned off ": deactivate the dimmer. "NORM": to improve poor FM reception: "on ," "off ." AUX Audio*1 Activates the AUX source display: "on the right side of the rotary commander controls. - The setup... (Demonstration) Activates the demonstration: "on ," "off ." The following items can be set position. - Zappin Time*4 Selects the playback time for details): Setup Clock Adjust (page 6) Beep Activates the beep sound: "on ," "off ." SET 1 Press and hold the control dial. Play Mode Local (Local Seek Mode) - ...
... the ZAPPIN function. - IF - BTM (page 11) *1 When the unit is turned off ": deactivate the dimmer. "NORM": to improve poor FM reception: "on ," "off ." AUX Audio*1 Activates the AUX source display: "on the right side of the rotary commander controls. - The setup... (Demonstration) Activates the demonstration: "on ," "off ." The following items can be set position. - Zappin Time*4 Selects the playback time for details): Setup Clock Adjust (page 6) Beep Activates the beep sound: "on ," "off ." SET 1 Press and hold the control dial. Play Mode Local (Local Seek Mode) - ...
Operating Instructions
Page 20
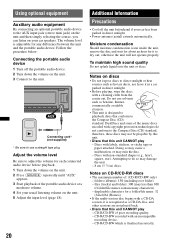
... the portable audio device at a moderate volume. 4 Set your usual listening volume on the unit. 3 Connect to the Compact Disc (CD) standard, therefore, these discs may damage the unit. - 8 cm (3 1/4 in direct sunlight. • Before playing, wipe the discs with a cleaning cloth from the center out. Do ...1 Turn down the volume on the unit. 5 Adjust the input level (page 18). To maintain high sound quality Do not splash liquid onto the unit or discs. Attempting to direct sunlight or heat sources such as benzine, thinner, commercially available cleaners. • This unit...
... the portable audio device at a moderate volume. 4 Set your usual listening volume on the unit. 3 Connect to the Compact Disc (CD) standard, therefore, these discs may damage the unit. - 8 cm (3 1/4 in direct sunlight. • Before playing, wipe the discs with a cleaning cloth from the center out. Do ...1 Turn down the volume on the unit. 5 Adjust the input level (page 18). To maintain high sound quality Do not splash liquid onto the unit or discs. Attempting to direct sunlight or heat sources such as benzine, thinner, commercially available cleaners. • This unit...
Operating Instructions
Page 24
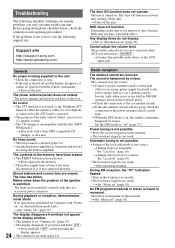
...Sony MP3 compatible CD changer, or this unit. The leads are erased. During playback or reception, demonstration mode starts. Automatic tuning is not possible. • Setting of the ignition is connected and you are dirty (page 22). t Set "Mono off " (page 19). t Set to the AUX input jack. The sound... your car has built-in FM/AM antenna (aerial) in amplifier. The display disappears from/does not appear in the display window. • The dimmer is incompatible with the remote commander. Radio reception The stations cannot be operated with the disc (MP3/ WMA/AAC). t...
...Sony MP3 compatible CD changer, or this unit. The leads are erased. During playback or reception, demonstration mode starts. Automatic tuning is not possible. • Setting of the ignition is connected and you are dirty (page 22). t Set "Mono off " (page 19). t Set to the AUX input jack. The sound... your car has built-in FM/AM antenna (aerial) in amplifier. The display disappears from/does not appear in the display window. • The dimmer is incompatible with the remote commander. Radio reception The stations cannot be operated with the disc (MP3/ WMA/AAC). t...

Operating Instructions
Page 25
... an unsupported device is set to store, then try it . CD playback The disc cannot be loaded. • Another disc is complete and playback starts automatically. t Press (SCRL). USB playback You cannot play back. • Defective or dirty disc. • The CD-Rs/CD-RWs are not for data protection. The sound is not supported...
... an unsupported device is set to store, then try it . CD playback The disc cannot be loaded. • Another disc is complete and playback starts automatically. t Press (SCRL). USB playback You cannot play back. • Defective or dirty disc. • The CD-Rs/CD-RWs are not for data protection. The sound is not supported...
Marketing Specifications
Page 2
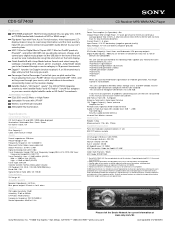
...Sony Bus audio/controll terminal Infrared Port: Wireless remote Dimensions Weight: 1.3Kg Measurements: 178 x 50 x 179mm Supplied Accessories Parts for installation and connections (1 set) RM-X172 wireless remote Optional Accessories CD changer (10 discs): CDX-757MX CD changer (6 discs): CDX... Ohms, 4 channels driven from your car's sound system. ADDITIONAL FEATURES EQ3, DSO and 52 Watts... Preset(s): 18 FM / 12 AM Digital-to-Analog Converter: 24bit Tuner Frequency Range: FM:Tuner Frequency Range...function to file variations. CDX-GT740UI CD Receiver MP3/WMA/AAC Player Features MP3/WMA playback1 ...
...Sony Bus audio/controll terminal Infrared Port: Wireless remote Dimensions Weight: 1.3Kg Measurements: 178 x 50 x 179mm Supplied Accessories Parts for installation and connections (1 set) RM-X172 wireless remote Optional Accessories CD changer (10 discs): CDX-757MX CD changer (6 discs): CDX... Ohms, 4 channels driven from your car's sound system. ADDITIONAL FEATURES EQ3, DSO and 52 Watts... Preset(s): 18 FM / 12 AM Digital-to-Analog Converter: 24bit Tuner Frequency Range: FM:Tuner Frequency Range...function to file variations. CDX-GT740UI CD Receiver MP3/WMA/AAC Player Features MP3/WMA playback1 ...

